I was browsing the wood-turning blocks at Windsor Plywood (and who doesn't enjoy an afternoon of that?) and noticed a cherry block that looked to be about right for making a replacement for the turning I had failed to successfully complete so many years ago. I also had in the back of my mind an intent to make a turning with a bubble motif, and decided to combine those two aspirations.
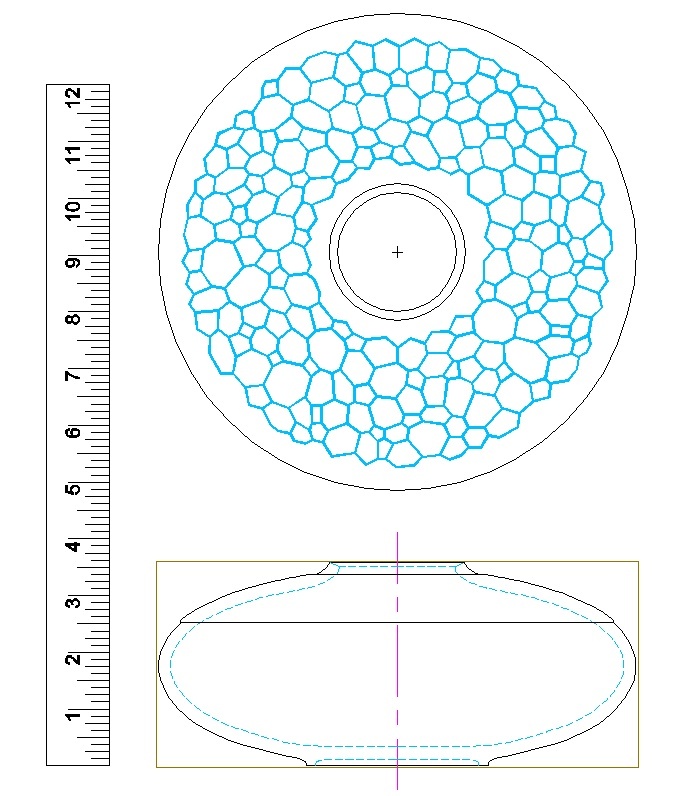
The not-really-a-bowl plan
Some raw material
This is the cherry bowl blank I started with; about 8-1/2" diameter by just under 4" high.
This would just be pure "lumber" if not for the bark on a couple corners which serve to emphasize that this was once a cherry tree.
I'm guessing the tree's trunk may have been 14" to 16" diameter based on the angle of the bark and the grain pattern.
This would just be pure "lumber" if not for the bark on a couple corners which serve to emphasize that this was once a cherry tree.
I'm guessing the tree's trunk may have been 14" to 16" diameter based on the angle of the bark and the grain pattern.
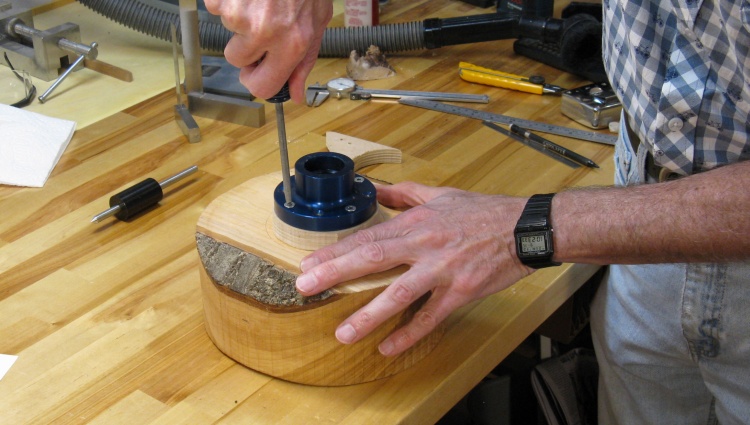
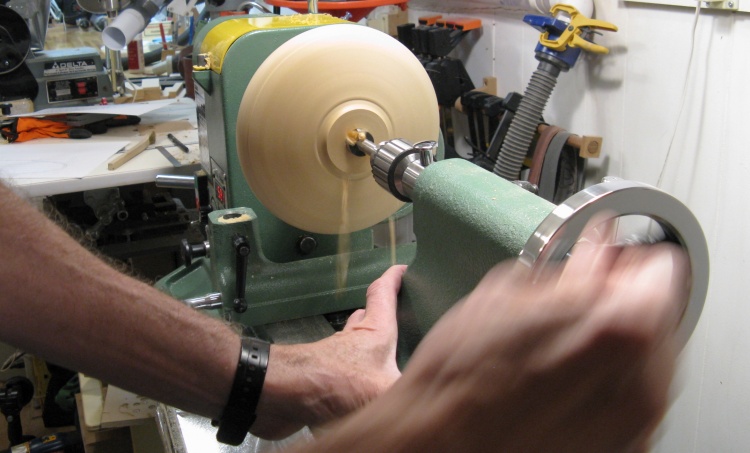
Attaching the faceplate
I needed pretty much the full thickness of the blank for the turning so I glued a disc of plywood to the bottom to accept the screws securing the faceplate. Here I'm just tightening up those screws.
Mounted on the lathe and marked
So then it was on to the lathe. For those unfamiliar with the mechanics, there is a male threaded piece on the lathe which mates to the matching female thread in the faceplate. The faceplate is just spun on and the lathe rotates in the direction that tightens the connection so it holds securely. And for those unfamiliar with the male/female thing, isn't it past your bedtime?
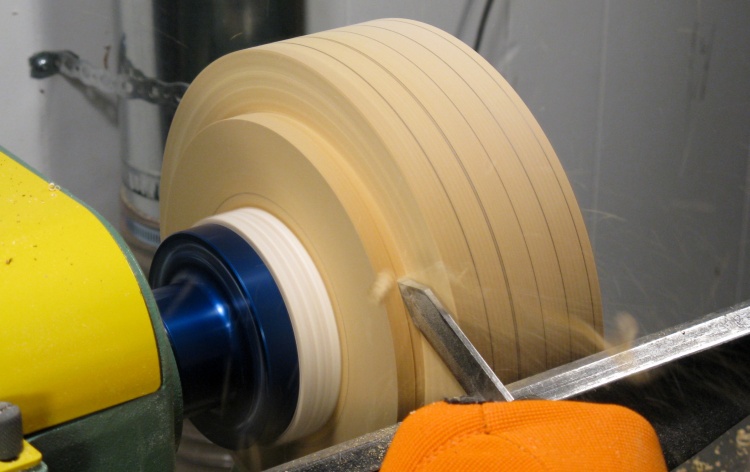
I did a bit of rounding first and then drew pencil lines every half inch to guide my shaping efforts.
I did a bit of rounding first and then drew pencil lines every half inch to guide my shaping efforts.
Reducing diameter at first reference line
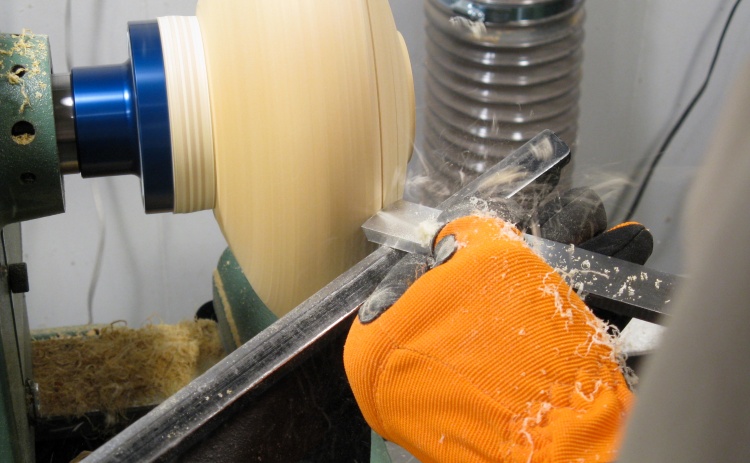
This diamond parting tool was used to reduce the wood diameter at the reference lines. Here I'm starting at the bottom of the bowl and the inside corner of the section I'm cutting will be close to where the finished edge needs to be.
The "diamond" adjective unfortunately just refers to the angled sides of the tool rather than say a long-lasting, ultrasharp jewel-equipped tip. Though that might be pretty cool...
The "diamond" adjective unfortunately just refers to the angled sides of the tool rather than say a long-lasting, ultrasharp jewel-equipped tip. Though that might be pretty cool...
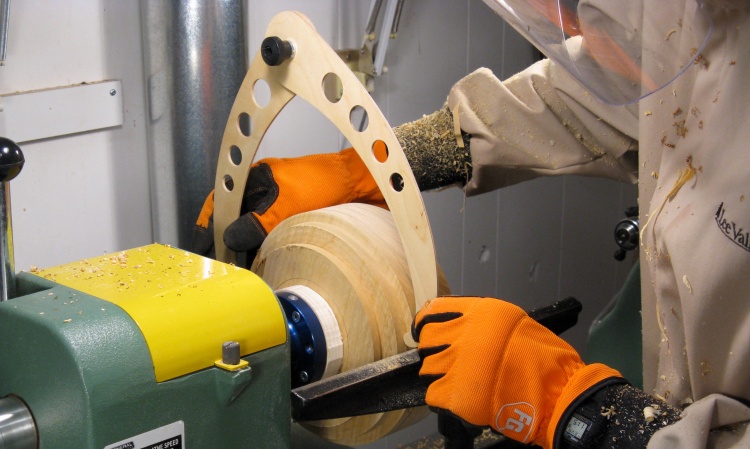
Setting El Grande calipers to the diameter of the cut
To compare the diameter of the section I was cutting with the plan, I used my Big Wooden Calipers. They were set to the diameter of the cut section as shown here...
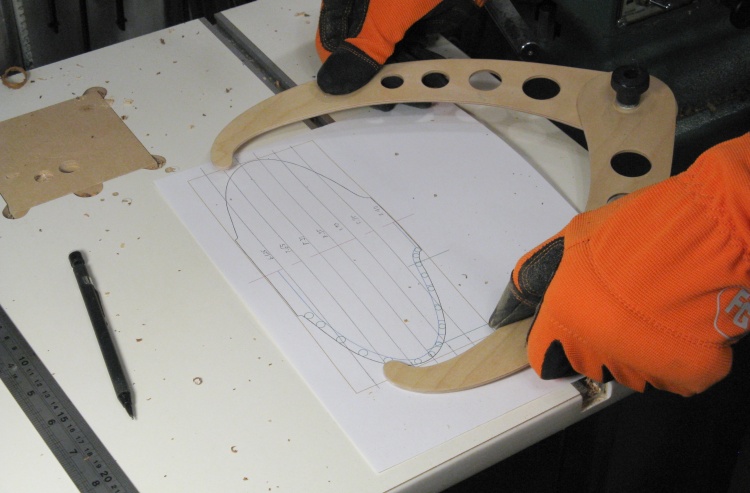
Checking diameter against 1:1 drawing
...and then that was compared to the plan and the wood diameter reduced a bit more if needed.
There's no good way to recover from cutting a diameter too small, so I usually took four to six steps of cutting to "sneak up" on the correct size.
There's no good way to recover from cutting a diameter too small, so I usually took four to six steps of cutting to "sneak up" on the correct size.
Cut to purple line
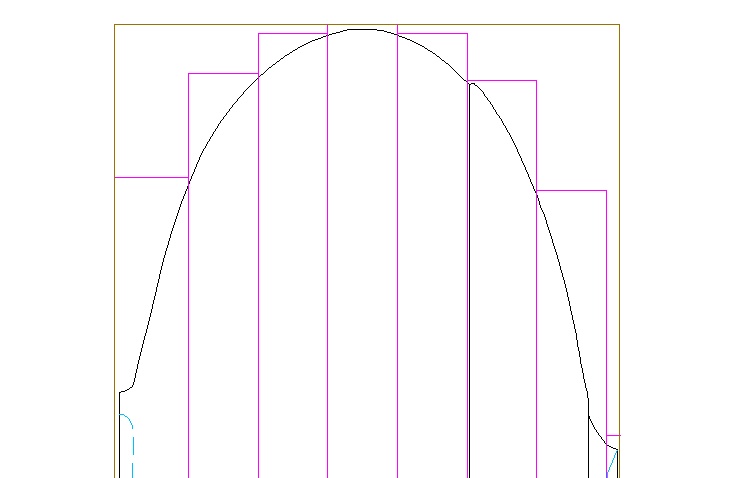
In this sketch the rough-cut blank is shown in the purple lines, where the inside corners of the cuts are close to the desired profile in black.
Then rounding off the profile is a matter of connecting the inside corners with a smooth curve.
Then rounding off the profile is a matter of connecting the inside corners with a smooth curve.
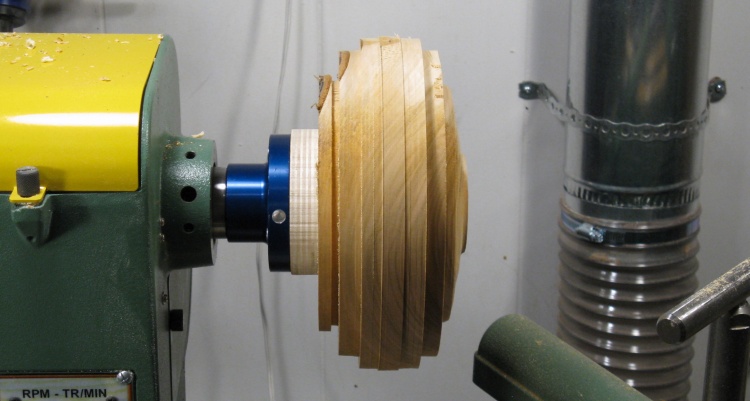
All the reference diameters cut now
This is the physical manifestation of the above sketch with where all the reference diameters have been cut.
Using a scraper to round off the shape
I mostly used this large scraper to remove the corners and round off the profile.
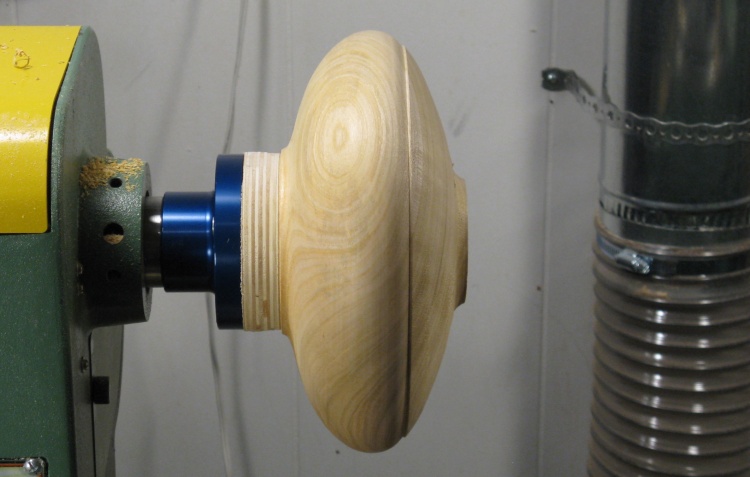
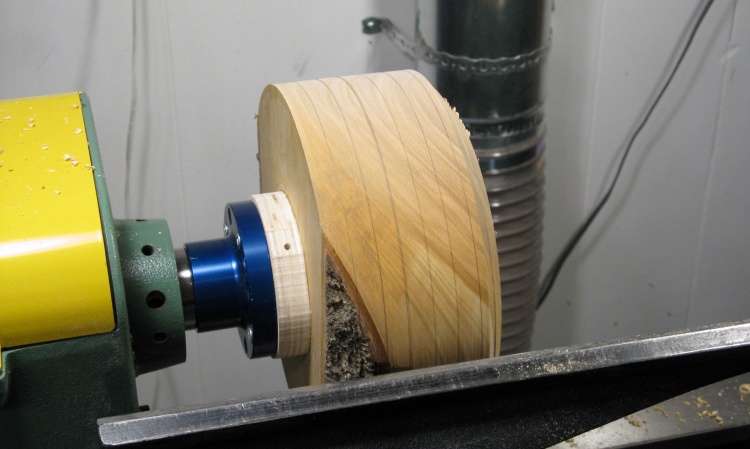
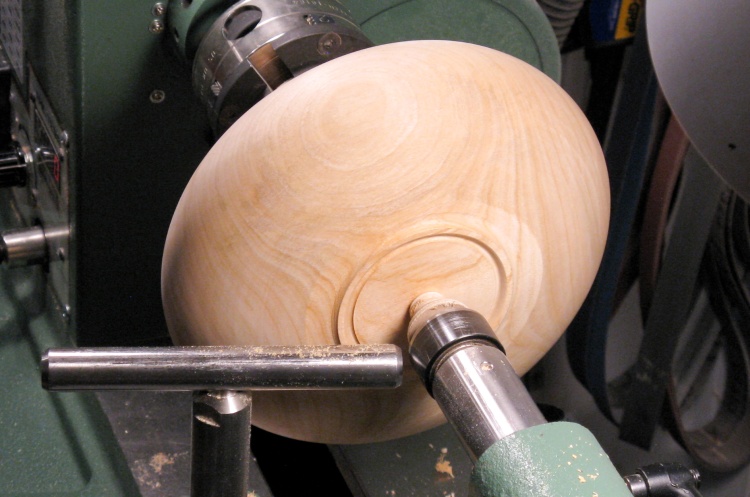
The mostly-completed outside (except for the very bottom)
And here's the final outside shape done.
I left the plywood piece on the bottom to make it easier to hold the bowl securely for carving. When the carving's done I'll need to flip this around on the lathe and complete the bottom.
I left the plywood piece on the bottom to make it easier to hold the bowl securely for carving. When the carving's done I'll need to flip this around on the lathe and complete the bottom.
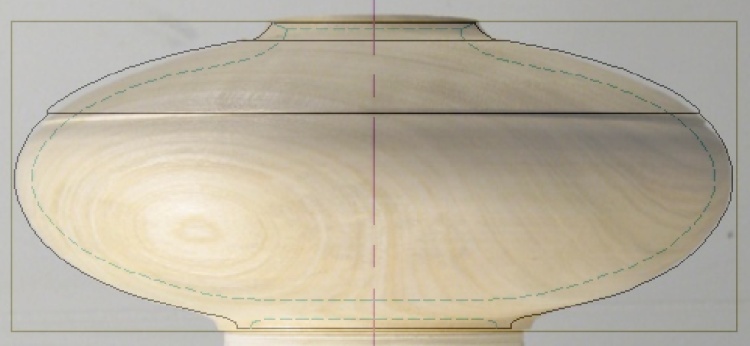
Shape is close-ish to plan
I did an overlay of the completed photo above with the original plan as shown here. It's not exactly the curve I had drawn out, but I figure it still looks fine.
This also shows how the bottom will eventually be shaped.
This also shows how the bottom will eventually be shaped.
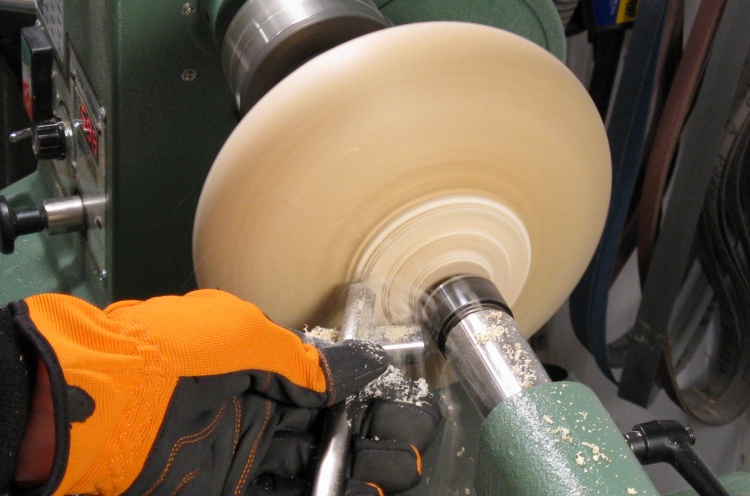
Drilling a large pilot hole
At this point the "bowl" was still full of wood. It was going to have to be emptied out and this shot shows the beginning of that process, starting with drilling a sizeable hole using a 1-1/4" Forstner bit.
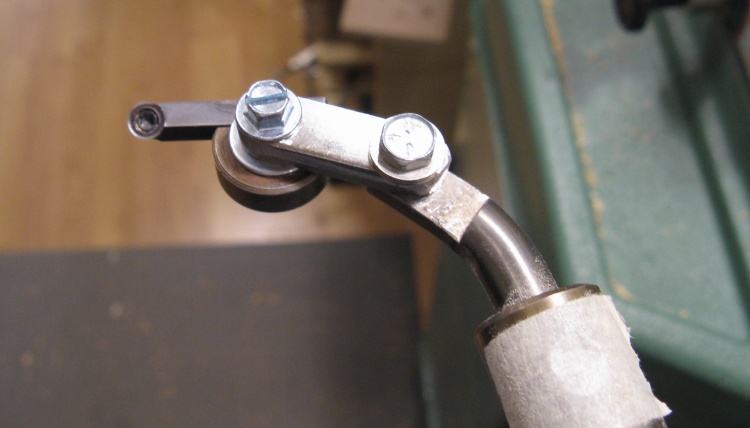
Cutter with home-made extension to reach into the side
The trick with hollowing this piece was reaching into the wide sides. I didn't have any special attachments for my normal hollowing tool for that so I made an inch-long extension to get more sideways reach. That's the metal piece seen between the two screw heads.
The original 2010 vessel had been done with a hand-held tool (which I still had) but I wanted to stick with my new hollowing rig since it lets me gauge the wall thickness better - and critically, isn't susceptable to the loose-tool issue that damaged the first piece. Live 'n learn...
The original 2010 vessel had been done with a hand-held tool (which I still had) but I wanted to stick with my new hollowing rig since it lets me gauge the wall thickness better - and critically, isn't susceptable to the loose-tool issue that damaged the first piece. Live 'n learn...
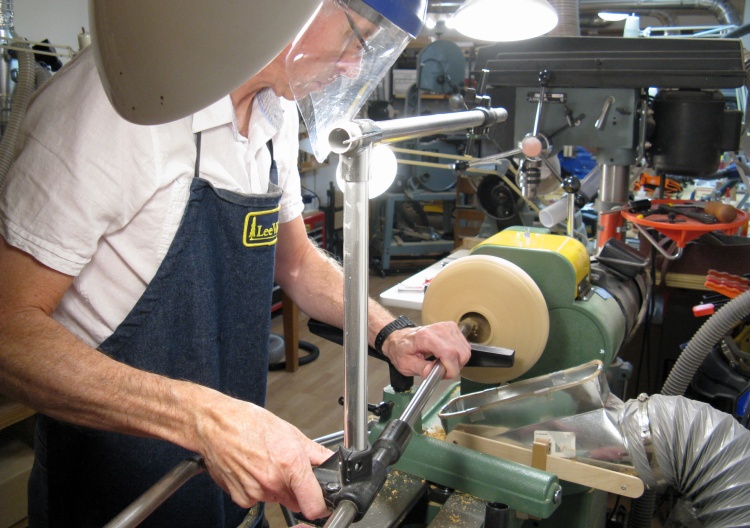
Doing the hollowing (with the mandatory serious expression)
This photo from the back of the hollowing tool shows the inside being worked on.
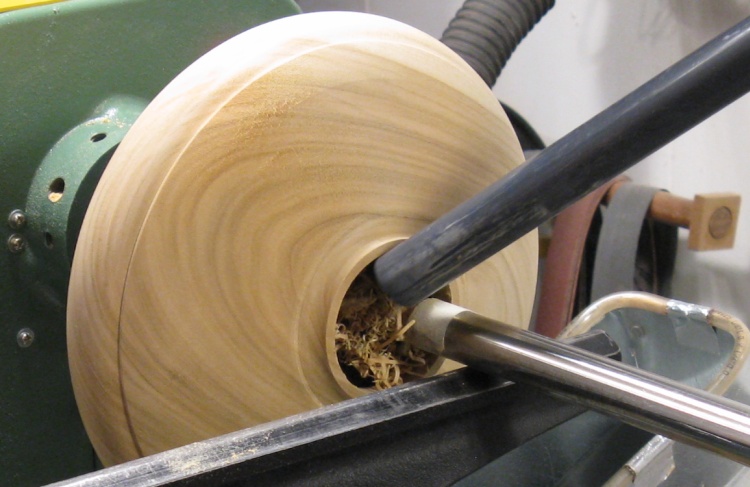
Lots of shavings to be vacuumed out
The cutter produced lots of curly shavings that had to be removed by tweezering with a couple fingers or like here, vacuuming out with this thin extension pipe.
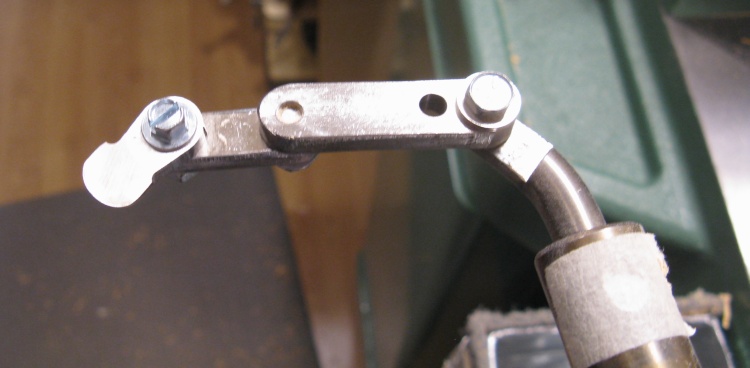
A second extension for reaching even further
Pretty quickly I had worked as far as the originally modified tool would let me and I needed to make a second extension. In this photo the new one is on the top with the original extension on the bottom. I also changed to this mushroom-shaped cutter for a smoother finish.
With this setup there was just enough length to get into the widest part of the interior.
With this setup there was just enough length to get into the widest part of the interior.
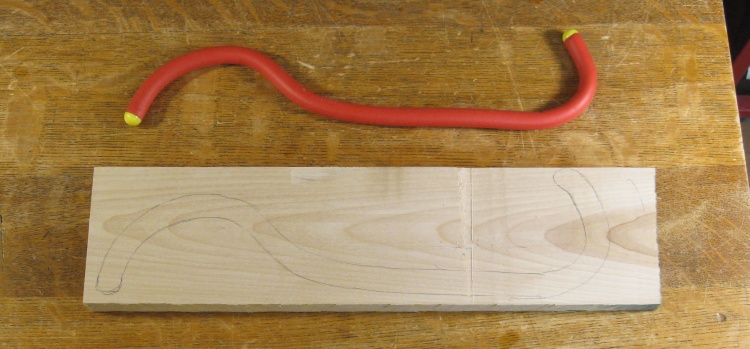
A prototype sanding-jig shape and the wood for a real one
After the hollowing was done, the inside still needed to be sanded. I wasn't going to be able to reach in with a hand so I looked at making a jig to reach all the inside walls. I started with this oddly thick foamy tie and used it as a model by bending it into a shape that should work.
The actual jig would be made of wood (naturally) so I grabbed a scrap of maple and traced out the shape.
The actual jig would be made of wood (naturally) so I grabbed a scrap of maple and traced out the shape.
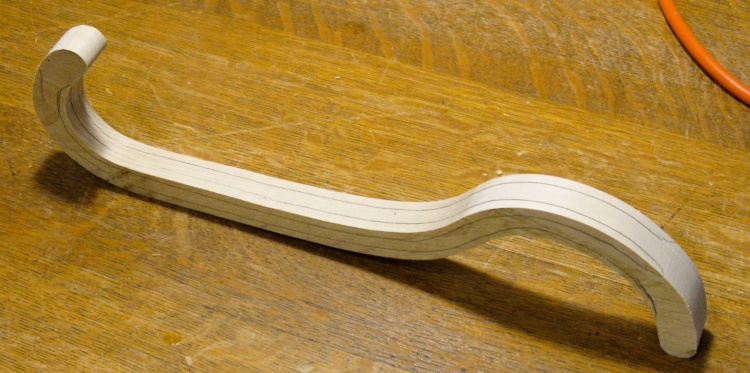
Sanding jig cut out
The jig was cut out and the edges sanded into shape. Here I've also marked the corners as an aid to sanding them into a round profile.
The right end will be used to do the bottom and into the wide sides of the bowl while the tip of the left end will be used for the underside of the "roof" of the bowl
The right end will be used to do the bottom and into the wide sides of the bowl while the tip of the left end will be used for the underside of the "roof" of the bowl
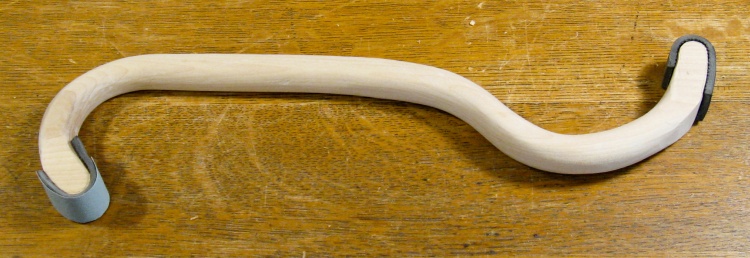
Sanding jig shaped and rubber ends added
So then a bit more sanding to get it round, plus contact-cementing rubber pads to both ends got it to this state, where it's ready to go. The sandpaper is held to the rubber pads using double-sided tape
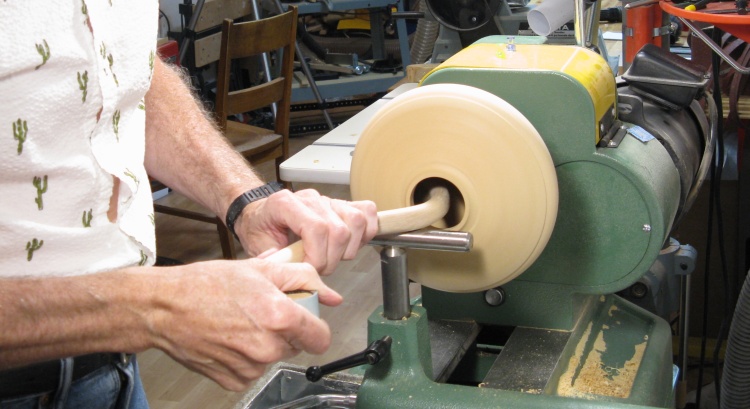
The sanding jig in action
And then the jig got used. I may never use it again but I'll throw it in my jig drawer and it may see some action in later years (assuming I remember I have it).
I also did a bit of sanding of the outside while it was on the lathe, and then it was ready for the next step; bubble carving
I also did a bit of sanding of the outside while it was on the lathe, and then it was ready for the next step; bubble carving
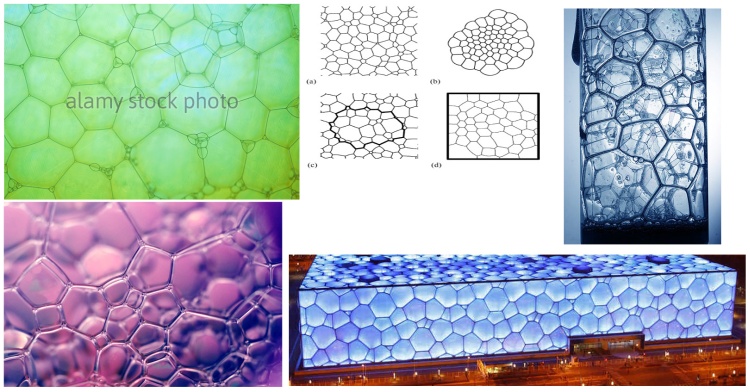
Some representative bubbles
I did some searching for representative bubbles (since I didn't want to draw them all by hand) and found a number of suitable examples, the best of which are shown here.
I used samples from three of these images to trace shapes for the vessel bubbles, suitably scaled and interconnected.
I used samples from three of these images to trace shapes for the vessel bubbles, suitably scaled and interconnected.

Checking out carving techniques on a cherry sample
But first things first; before I jumped into the carving, I thought I'd better figure out how to carve it. I started with a scrap piece of cherry with a part of the bubble pattern traced onto it.
Here I'm using a small round gouge to carve between the bubbles. I also tried a V-gouge and various combinations of sharp or rounded edges and corners, etc.
Here I'm using a small round gouge to carve between the bubbles. I also tried a V-gouge and various combinations of sharp or rounded edges and corners, etc.

Checking if a Dremel would work (no)
I had hoped using a Dremel may have been a good or easy way to do at least part of the carving. It was not.
Ultimately I settled on a suitable technique: small round gouge followed by V-gouge, then rounding bubble edges and rounding bubble corners, followed by sanding. Suitable, but not necessarily simple.
Ultimately I settled on a suitable technique: small round gouge followed by V-gouge, then rounding bubble edges and rounding bubble corners, followed by sanding. Suitable, but not necessarily simple.
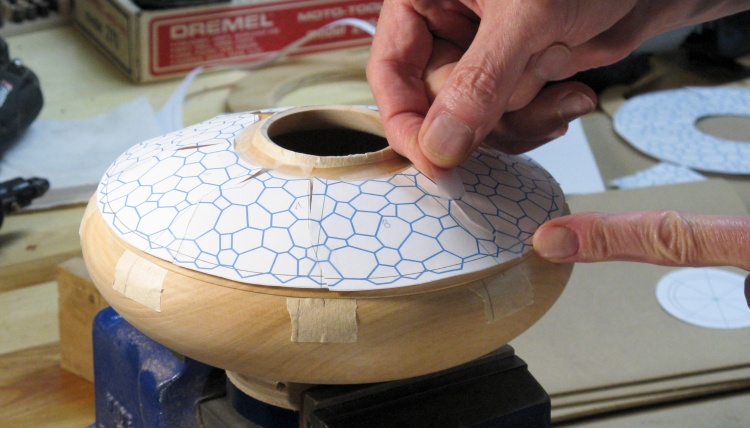
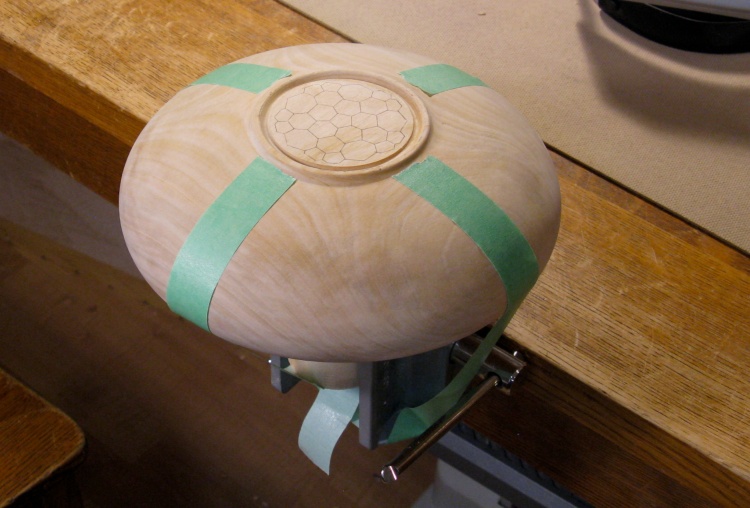
Taping on the bubble pattern
I printed out the bubble pattern so it could be traced onto the bowl top. Of course that was on a flat piece of paper whereas it ultimately needed to be on a surface curved in two dimensions.
Since the curves were relatively gentle, I was able to get away with just cutting the pattern into 8 pieces at strategically-chosen spots and taping them onto the curved surface.
Since the curves were relatively gentle, I was able to get away with just cutting the pattern into 8 pieces at strategically-chosen spots and taping them onto the curved surface.
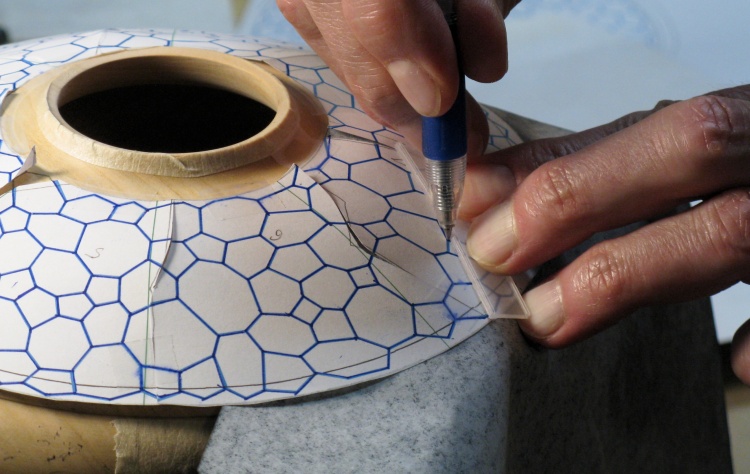
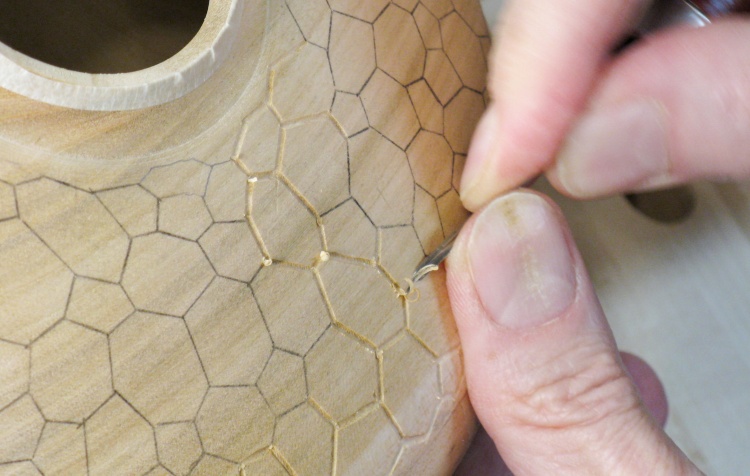
Tracing the pattern onto the wood
With the classic carbon paper between the pattern and the wood, I used a little section of transparent plastic as a flexible ruler to trace over the pattern lines with a ballpoint pen. That gave a nice clear design to carve.
Some lines spanning pieces didn't align correctly so I just ignored the pattern and drew the lines in the correct position for those.
Some lines spanning pieces didn't align correctly so I just ignored the pattern and drew the lines in the correct position for those.
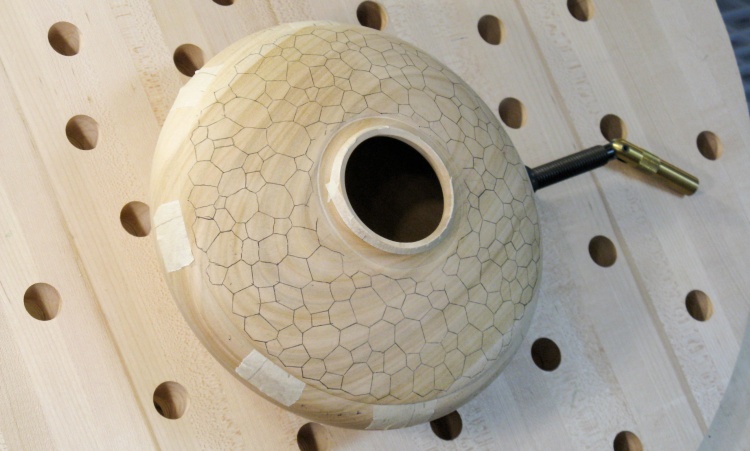
Bowl mounted to carving table and ready to go
I whipped up another little jig (too trivial to even require a picture) to accommodate the round plywood base on the bowl which let me clamp it to my carving table.
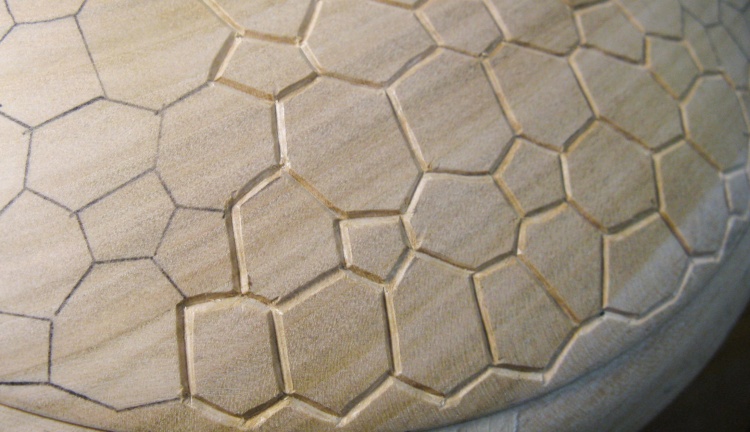
Step 1: Grooving out the lines
Carving Step 1 was to outline the pattern with a small-radius round gouge as shown here.
There were lots of bubbles (190) and even more in-between lines (maybe 650ish) so I just worked on a small section at a time - maybe 1/8 of the bowl diameter.
There were lots of bubbles (190) and even more in-between lines (maybe 650ish) so I just worked on a small section at a time - maybe 1/8 of the bowl diameter.
Step 2: Re-cut with V-groove
Step 2 was to go over the lines with a small V-gouge to make them a bit deeper and more sharply defined.
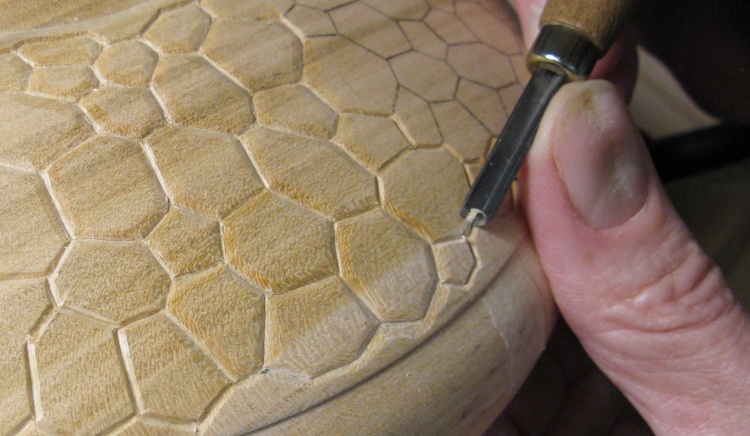
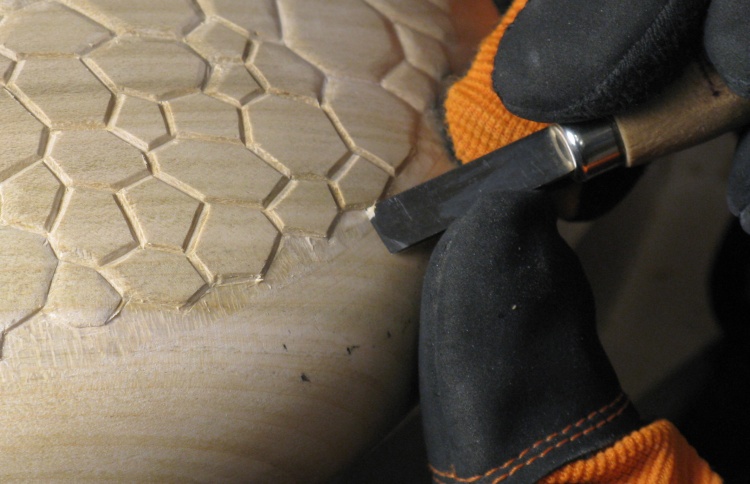
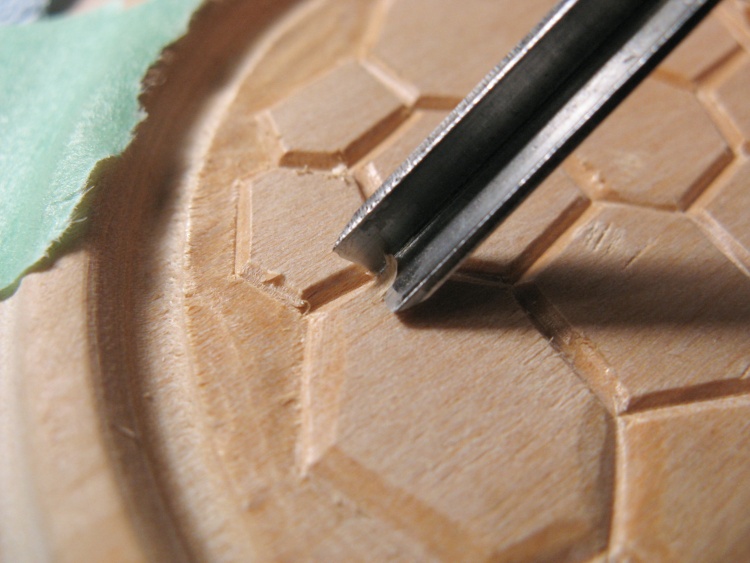
Step 3: Rounding edges of bubbles
Step 3 was the most time-consuming and consisted of rounding the edges of each bubble. I found the V-gouge did the best job of that, just using one side of the blade.
Step 3-1/2: Rounding corners of bubbles
As part of Step 3, the corners of the bubbles were rounded as well, since that looked more realistic than the sharp angular corners that the carving initially left. Like the rounding, this was also done using the V-gouge.
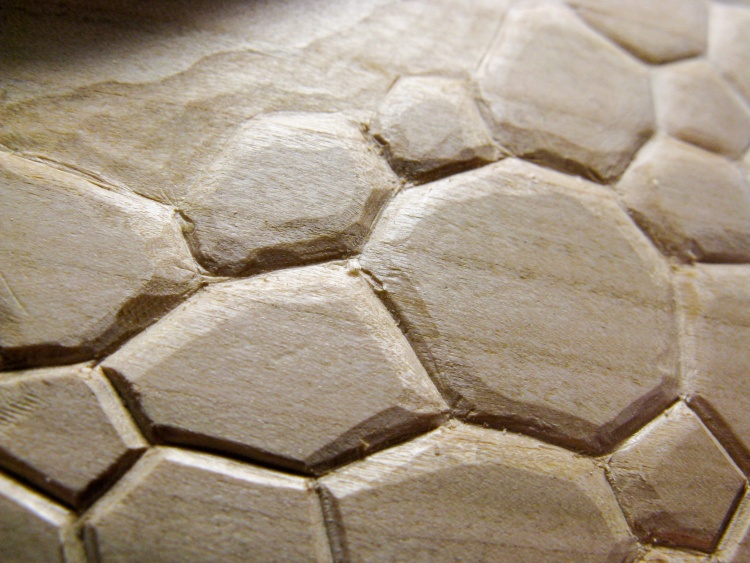
At this magnification the carving looks pretty crude, but the sanding should smooth everything out. As a reference, the height of the bubbles is about the same as three stacked business cards, or 60% of a dime's thickness.
At this magnification the carving looks pretty crude, but the sanding should smooth everything out. As a reference, the height of the bubbles is about the same as three stacked business cards, or 60% of a dime's thickness.
Step 3-3/4: Removing ridge by first row of bubbles
At the top and bottom edges of the circle of bubbles is a ridge the same height as the bubbles which needed to go (apparent two photos up). That ridge was carved flush with the rest of the walls up to the bubbles, with this photo showing some trimming of the bottom edge.
In the previous photo the equivalent trimmed-off area at the top can be seen. Obviously these areas are going to benefit from the sanding process.
In the previous photo the equivalent trimmed-off area at the top can be seen. Obviously these areas are going to benefit from the sanding process.
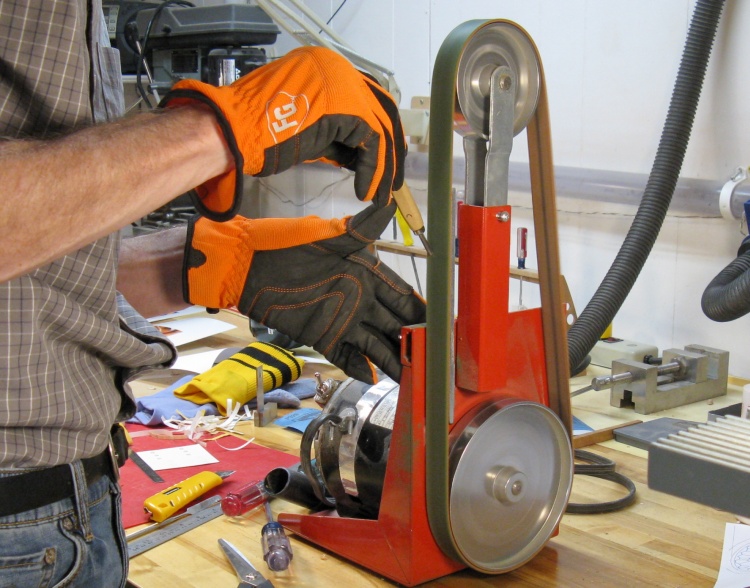
Sharpening (technically honing) a V-gouge
The gouges I used were pretty sharp and only needed to be honed periodically. I use a motorized leather belt for the honing; it gets "charged" with green honing compound and the tools are held against the running belt for only a second or so. I only needed to do this maybe every half-hour of carving.
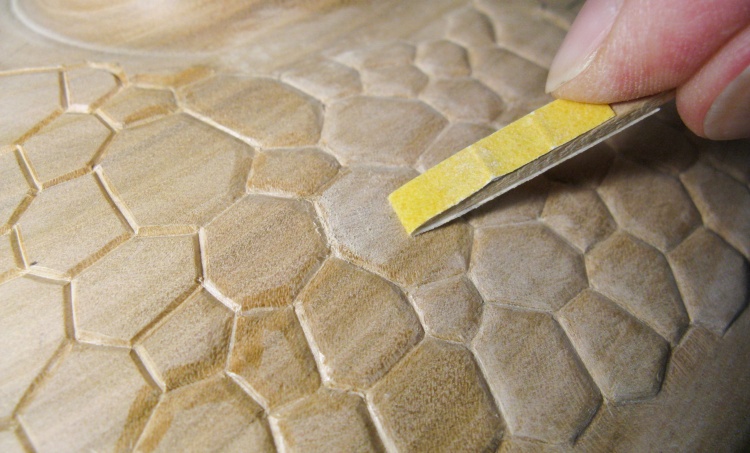
Finally Step 4: Sanding
The final step was sanding the bubble profiles into a nice rounded shape. I used this little wood sanding jig with 220 grit sandpaper stuck to it with double-sided tape.
The sandpaper wore out quickly so I usually changed it after each bubble. The process used only the end 1/4" or so of the paper so I just pulled it off the jig, moved it about a centimeter and stuck it back on. You can tell the paper has been moved a couple times in this photo from the folds visible that used to be at the sharp end of the jig.
The sandpaper wore out quickly so I usually changed it after each bubble. The process used only the end 1/4" or so of the paper so I just pulled it off the jig, moved it about a centimeter and stuck it back on. You can tell the paper has been moved a couple times in this photo from the folds visible that used to be at the sharp end of the jig.
Maybe 1/4 done
Here is a shot with the bubbles partially carved.
I wanted to avoid doing too long a string of one operation (like using the gouge) so I blocked off small sections and went through all the steps to complete that area. Here I've got two sections through the four steps and a third section - on the left - through all steps except the sanding.
I wanted to avoid doing too long a string of one operation (like using the gouge) so I blocked off small sections and went through all the steps to complete that area. Here I've got two sections through the four steps and a third section - on the left - through all steps except the sanding.
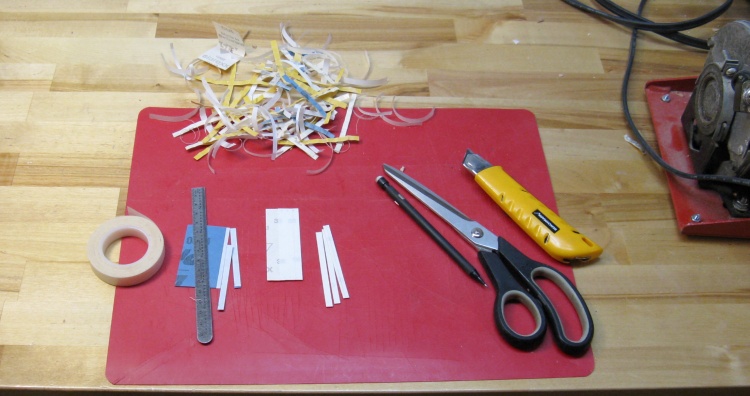
Sandpaper strip manufacturing/disposal
Over on my other bench was a plastic sheet where I added the tape and cut the sandpaper strips. My growing pile of used sandpaper strips sits in the background.
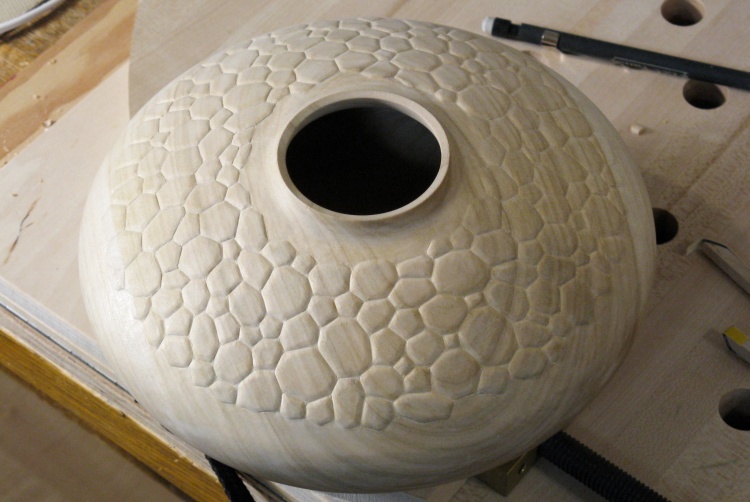
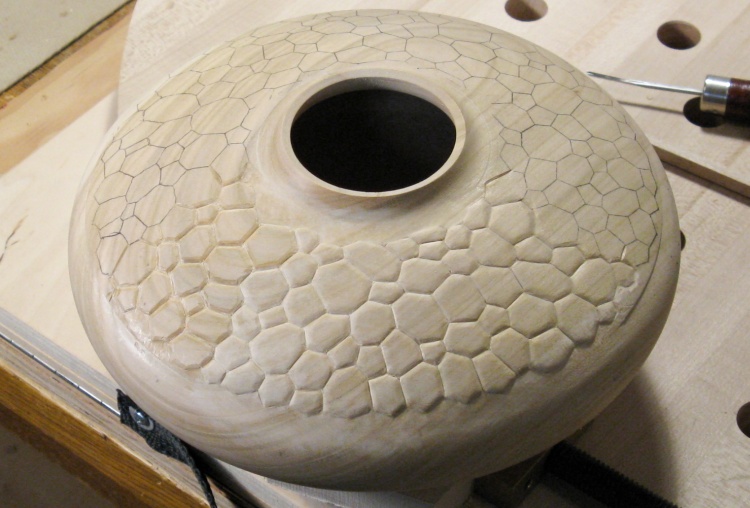
Bubbles done
After rounding all the bubbles, I went over them again with 320 grit to remove any visible scratches. That was an easier process since it wasn't removing much wood.
And eventually (about three weeks of an hour-or-two-a-day work), they were all completed as shown in this photo. My guesstimate was about 6 minutes total per bubble.
And eventually (about three weeks of an hour-or-two-a-day work), they were all completed as shown in this photo. My guesstimate was about 6 minutes total per bubble.

Chunk of scrap wood used for yet another jig
And since I hadn't made a jig for this thing for more than three weeks, I figured one was due.
I started with a somewhat cracked log of perhaps Spruce or Fir and cut out a section on the bandsaw. This is one of the leftovers after cutting out my desired piece.
I started with a somewhat cracked log of perhaps Spruce or Fir and cut out a section on the bandsaw. This is one of the leftovers after cutting out my desired piece.
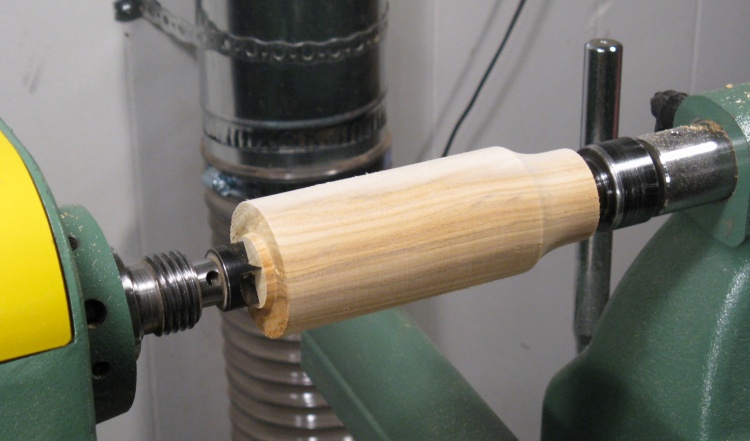
Jig blank on the lathe ready for turning
It was chopped into a crude hexagon on the bandsaw for easier turning, and then it was mounted on the lathe with a spur center so it could be rounded.
I just needed a cylinder to be used to hold the bowl when I work on the bottom.
I just needed a cylinder to be used to hold the bowl when I work on the bottom.
Bowl-securing jig turning finished
A few minutes work resulted in it being rounded and the end reduced in diameter.

Some silicone on the end for grip
In this photo the jig is mounted in the adjustable chuck and a layer of silicone has been added to the end for grip and to avoid marking the bowl. The outside diameter is just a bit smaller than the bowl opening and the siliconed end will contact the bottom of the bowl.
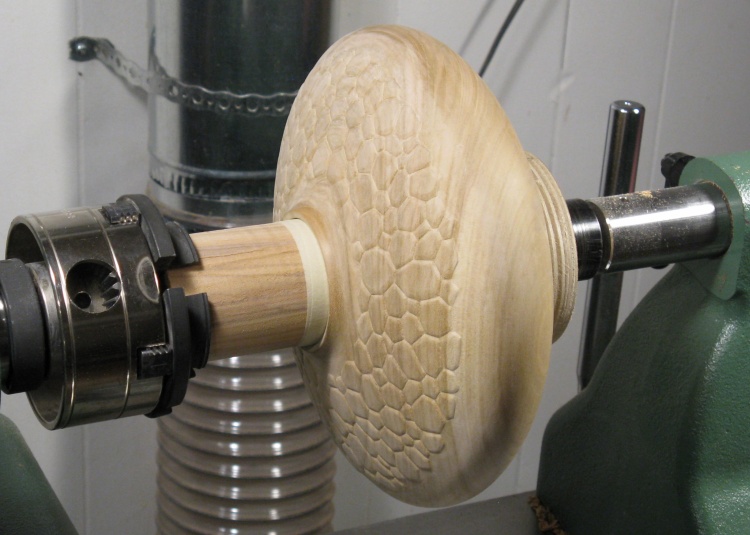
Bowl back on the lathe
A few layers of masking tape were added to bring the jig diameter up to exactly that of the bowl opening and the bowl bottom is squeezed between the jig and the lathe's live center on the right.
Cutting off the plywood bottom
In this photo the plywood bottom is being removed. The jig-to-bowl friction wasn't very high so I needed to make only very light cuts to avoid stalling the bowl's rotation.
Bottom foot formed
With the plywood gone, the round bottom foot was formed. After this shot, the bottom curve of the bowl was resanded and then the bowl came back off the lathe.
Bottom marked and bowl taped in place
Just for the heck of it I decided to give the bowl bottom a bubble motif as well. I made another bubble pattern - this time symmetrical for a change of pace - and traced it on the bottom.
The curved (and thin-sided) bowl would have been difficult to clamp so I mounted the round turning jig in a vise and taped the bowl down to it. Here it is ready to have the bottom carving started.
The curved (and thin-sided) bowl would have been difficult to clamp so I mounted the round turning jig in a vise and taped the bowl down to it. Here it is ready to have the bottom carving started.
A close-up of rounding a bubble edge
Bottom carving went just like the top but rather faster with only 26 bubbles to do (plus, by then I had lots of experience). Here's a nice close-up of rounding off an edge of one of the bubbles.
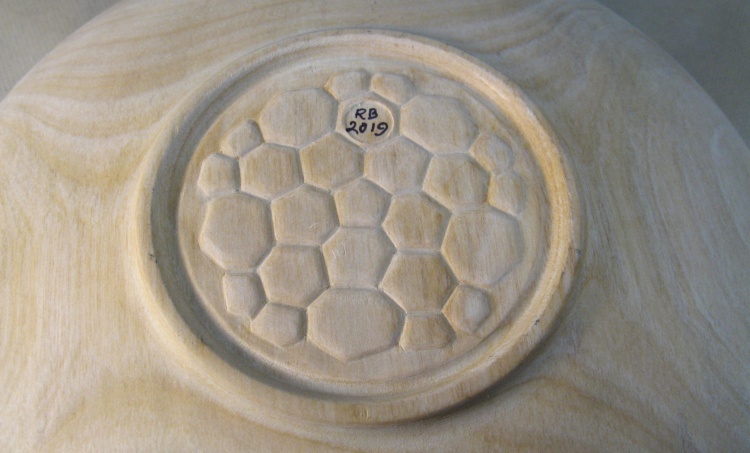
Bottom done
And after the bubble sanding was done and the initial circle added, the bottom was complete.

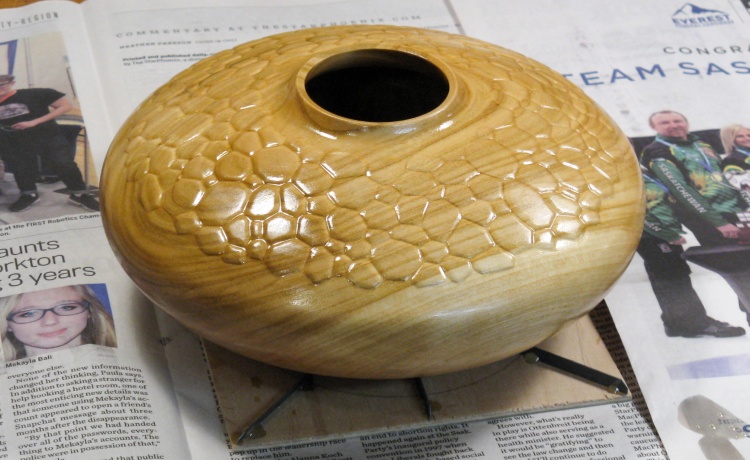
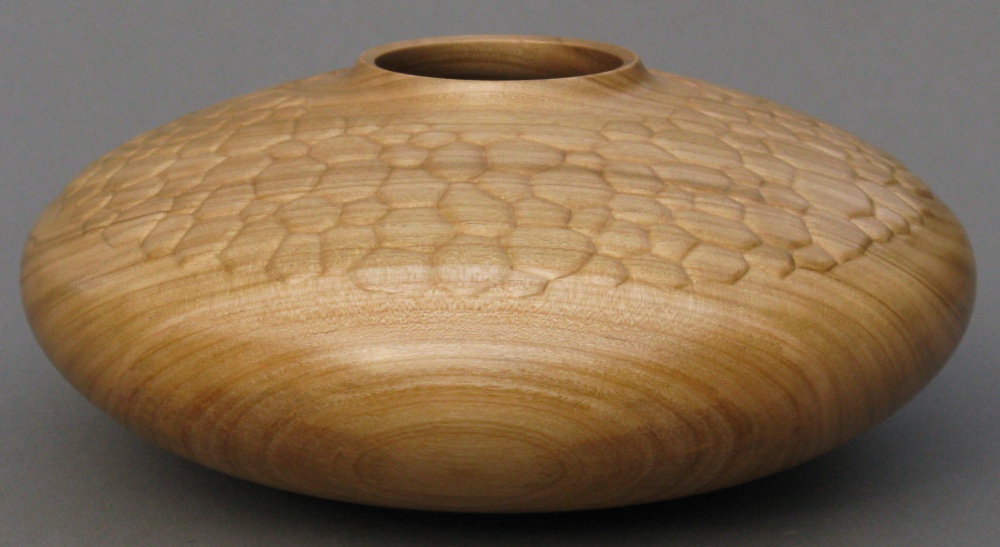
The finished bowl from a high angle
This is the completed bowl, from the top this time.
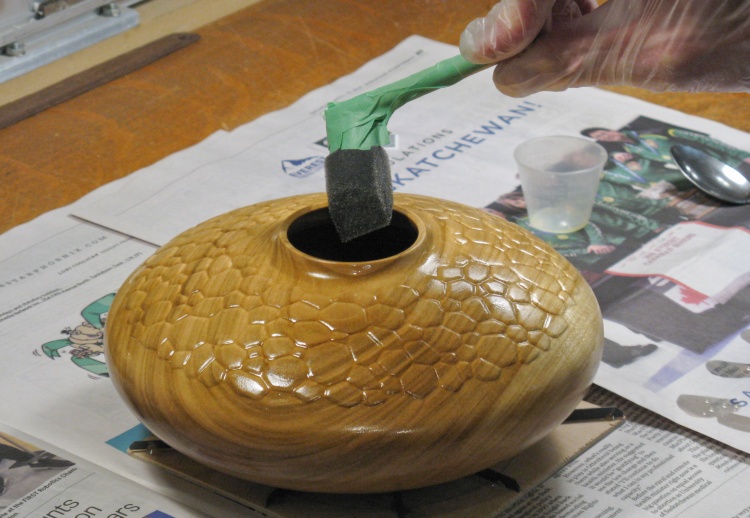
A modified brush for the bowl inside top
I used my standard Fast-Drying Polyurethane varnish as the finish for the bowl.
Given the odd interior shape, I needed an correspondingly odd brush geometry to apply the finish to the underside of the top. The rest of the interior could be reached with your garden-variety straight brush.
Given the odd interior shape, I needed an correspondingly odd brush geometry to apply the finish to the underside of the top. The rest of the interior could be reached with your garden-variety straight brush.
The first coat of varnish still wet
And here of course is the traditional first-coat-of-varnish photo.
I was able to do both inside and outside in one session, with the foot of the bowl resting on the thin supporting edges of the drying base.
I was able to do both inside and outside in one session, with the foot of the bowl resting on the thin supporting edges of the drying base.
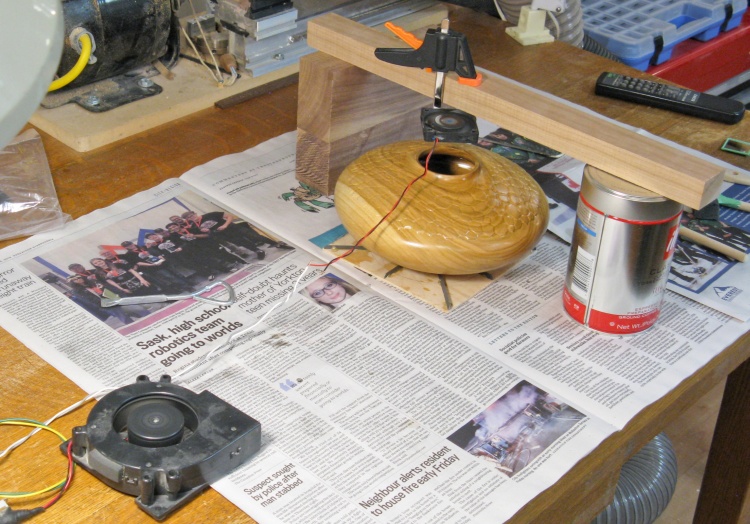
A bit of fan-forced drying help
As occasionally happens, the first coat of varnish still wasn't quite dry even after 24 hours so I set up a couple fans (OK, technically a blower and a fan) to improve air circulation both externally and internally.
Operating the fans from the rated 12V results in loud operation and hurricane-speed winds, both of which were a bit much. Instead ran them from a variable-voltage power supply so I could tweak the airflow to a quiet gentle zephyr.
Operating the fans from the rated 12V results in loud operation and hurricane-speed winds, both of which were a bit much. Instead ran them from a variable-voltage power supply so I could tweak the airflow to a quiet gentle zephyr.
Done
Done.


