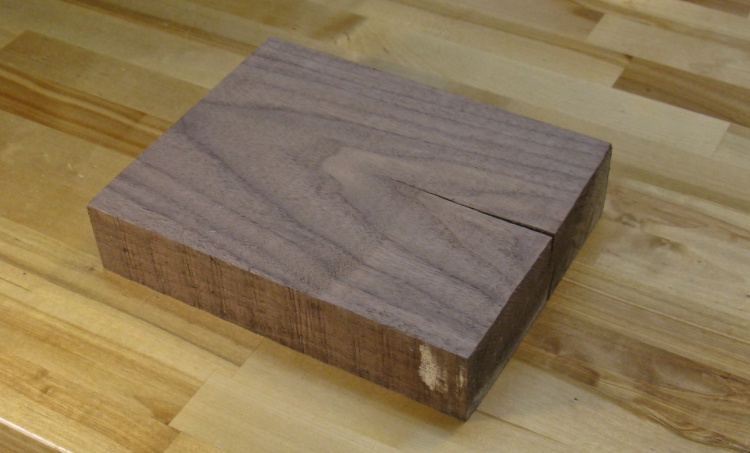
So, no - we don't actually need lots and lots of breadboards. This was made more for the pleasure of doing so than for an actual unfilled need. I even had enough wood kicking around on my wood shelves as leftovers from previous projects, so that was a bonus. In contrast to my recently-made cedar breadboards, this is an "edge grain" board so the regular wood grain pattern is visible on the top and bottom surfaces.
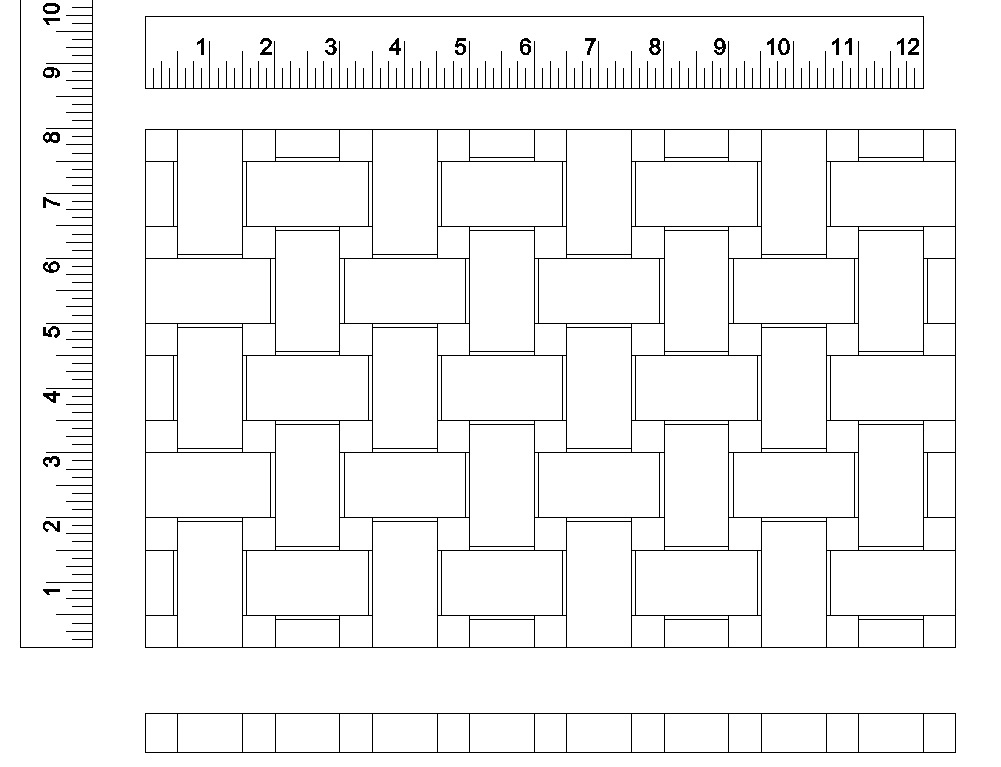
The plan
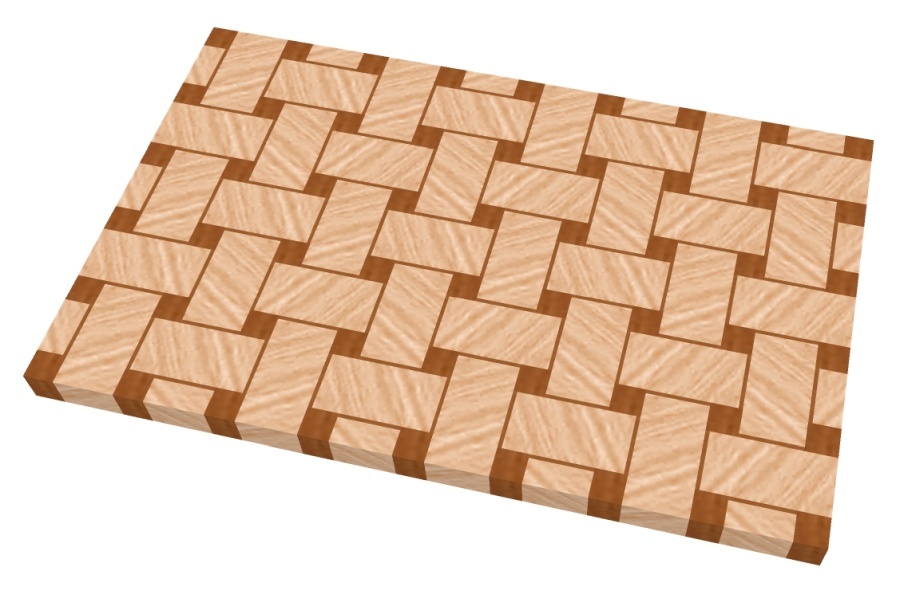
The answer to the "What would this look like in wood?" question
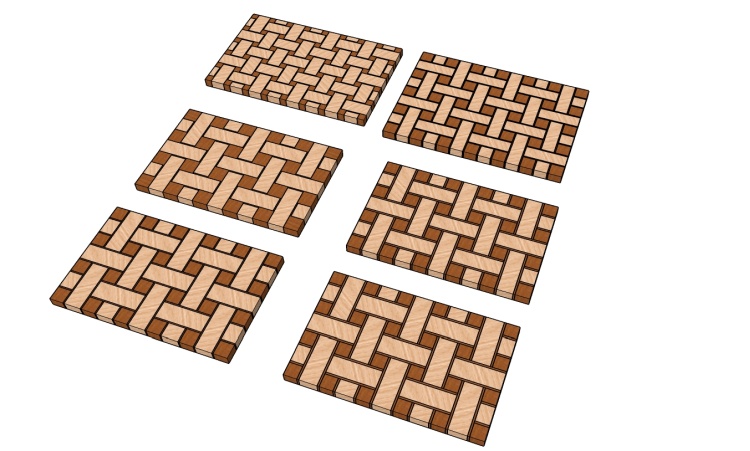
Some options
I played around a bit with proportions of the weave and the shadow size where the strips go "under" the crossing ones. I decided I preferred the tighter weave over the looser look and eventually ended up with the one in the upper-left corner.
This made the between-weave parts pretty small - 1/2" square to be exact - which led to a board composed of a fairly large number of pieces, but they were not particularly tough to make so that was fine.
This made the between-weave parts pretty small - 1/2" square to be exact - which led to a board composed of a fairly large number of pieces, but they were not particularly tough to make so that was fine.
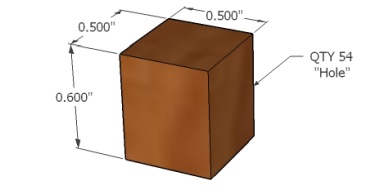
The "cut list"
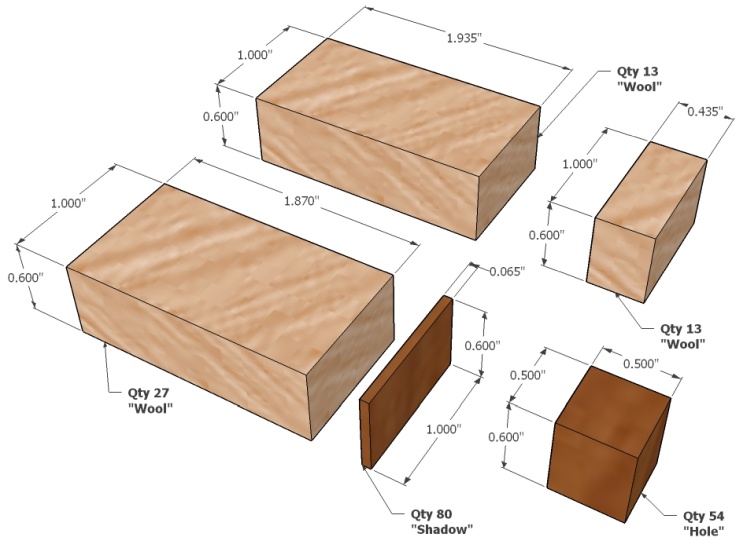
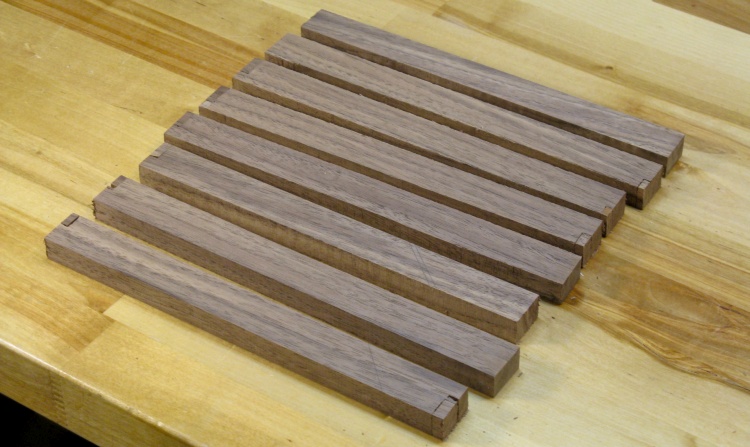
The board required five different pieces. The three lighter ones are just different lengths of the main "wool" of the weave. Then there is the thin "shadow" piece and the square "hole" that fills the spaces between the wool.
These are all shown as 0.6" high which represents the finished size. I actually made the pieces around 0.8" high to allow for some misalignment and post-assembly sanding ("Leave extra" intones the voice of experience).
Ultimately the pieces weren't misaligned or sanded overly much so the actual breadboard ended up at just over 0.7" thick.
"Wool" Tile Fabrication
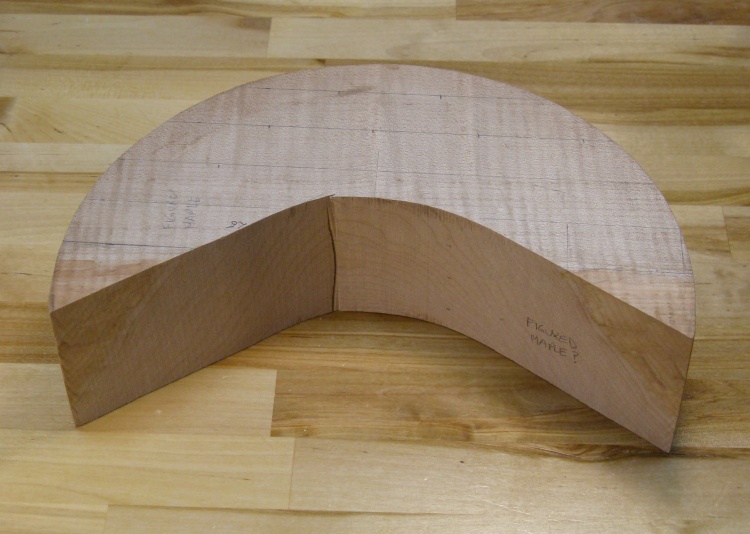
A nice piece of leftover figured maple

The "Wool" tiles
For the light-colored "wool" parts I used figured maple. This is the remains of a large bowl blank from which I took a smaller blank for a yarn bowl in 2016.
It was almost adequate to make all the pieces but it took another smaller scrap I had as well to get enough.
It was almost adequate to make all the pieces but it took another smaller scrap I had as well to get enough.
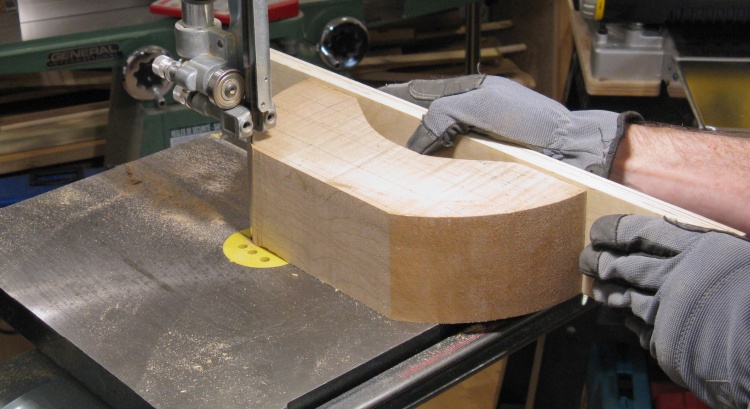
Starting the slicing
I determined how to get the maximum number of breadboard pieces from my oddly-shaped anti-wedge of wood and then set about cutting it up.
Getting it down to 1" wide
I made long pieces where possible that I could first dimension correctly and then cut into proper lengths later.
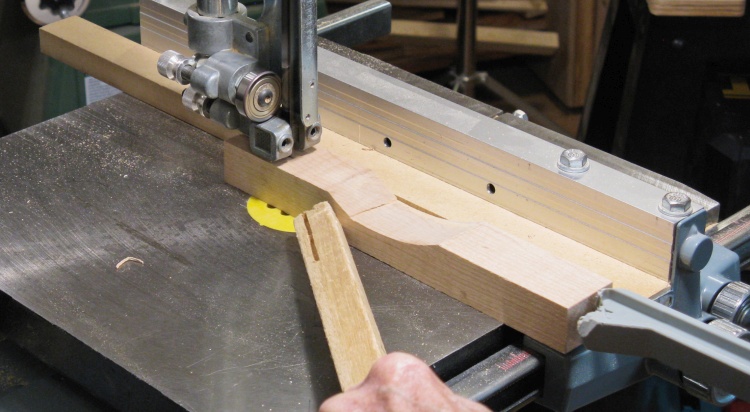
This fairly longish one will yield only two pieces due to the dip in the center.
This fairly longish one will yield only two pieces due to the dip in the center.
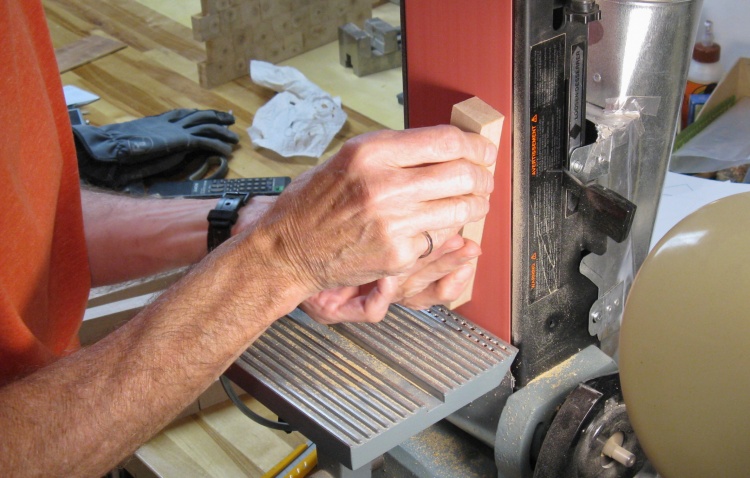
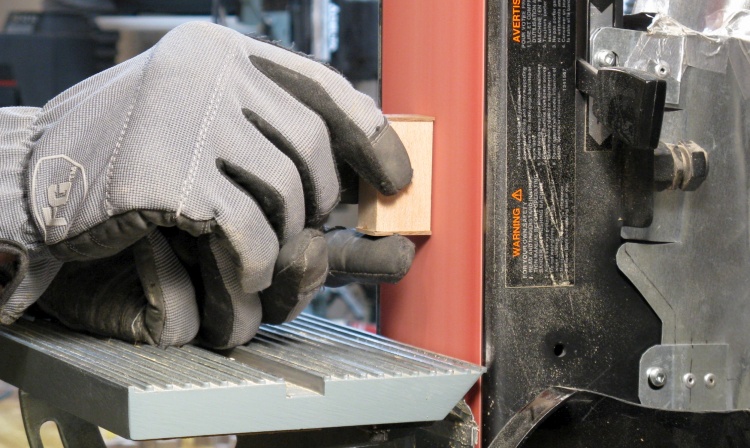
Smoothing off the sawn faces
I sanded the faces on the belt sander to remove the saw marks. The thickness dimension wasn't particularly critical so I didn't need to be too careful with the exact amount sanded off.
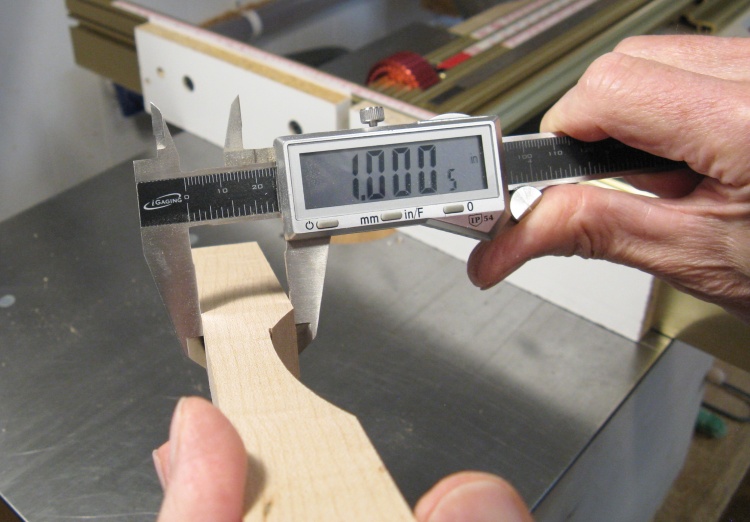
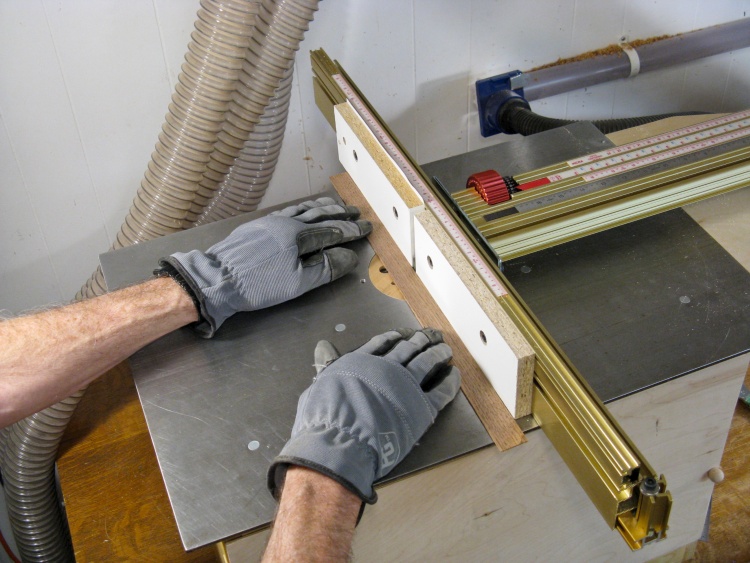
A bit of jointer work and 1" is achieved
I configured my router table as a jointer since my actual full-sized jointer wouldn't work for such small pieces. The jointing process takes off a measured amount from any protruding parts of the side so in one or more passes the side becomes perfectly straight. After the side is straight then it takes off the measured amount from the whole side. I had it set up to take off about 0.003" per pass.
The width needed to be very accurate on these pieces so I jointed one edge to get it straight and then jointed all or parts of the opposite edge until it was parallel and the correct thickness. The piece shown is pretty close to the target of 1" although it was actually a couple thousandths thicker in other spots.
The width needed to be very accurate on these pieces so I jointed one edge to get it straight and then jointed all or parts of the opposite edge until it was parallel and the correct thickness. The piece shown is pretty close to the target of 1" although it was actually a couple thousandths thicker in other spots.
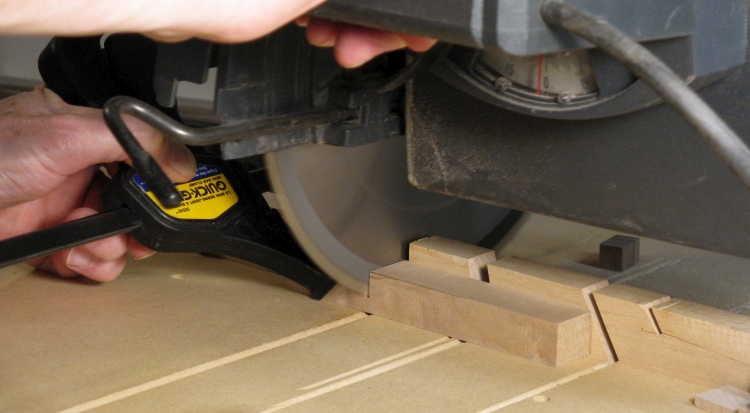
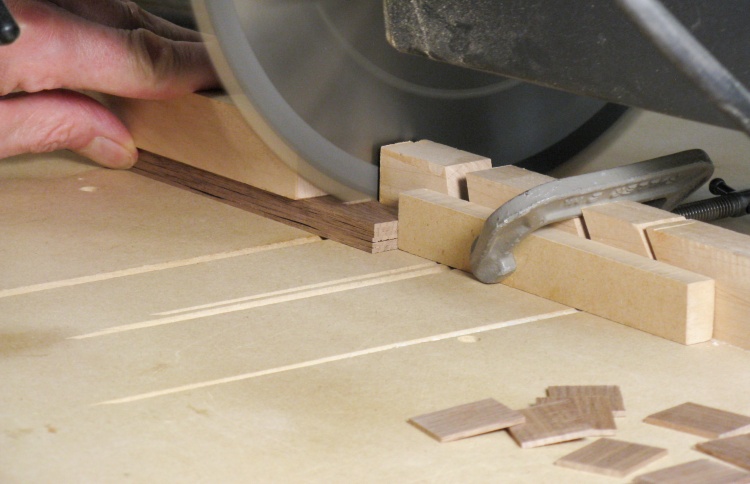
Chopping to proper length
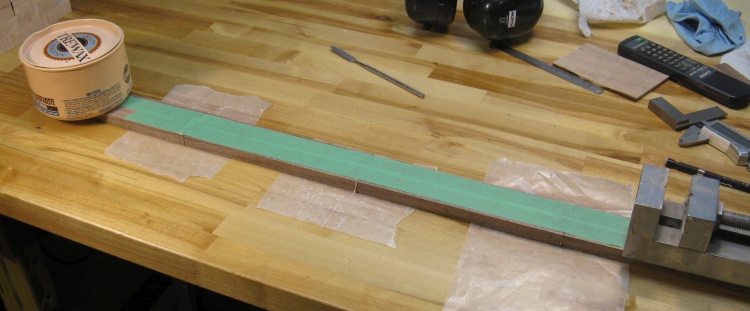
Once the width was correct on all the pieces, I set up the radial arm saw with a stop that determined cut-off length to produce "tiles" of the correct dimension.
The wool tiles need to come in three different lengths so I did three separate setups on the saw.
The wool tiles need to come in three different lengths so I did three separate setups on the saw.
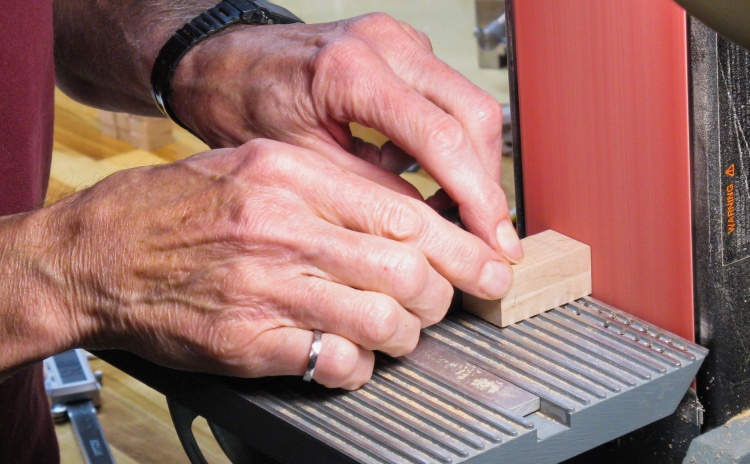
Tweaking to exact length
I cut the tiles a bit long and then sanded one end to get to the precise length I needed.
"Shadow" Tile Fabrication
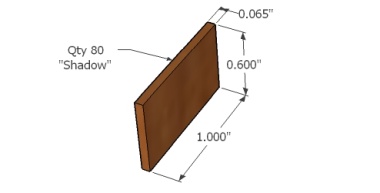
The "Shadow" tile
Next up was the thin shadow tiles. Rather than having to start from scratch, I found some thickish leftover walnut veneer I had made back in 2007 that would work just fine for the tiles (yes, that's why my wood shelves are rather crowded). I ended up using two pieces like this to get enough.
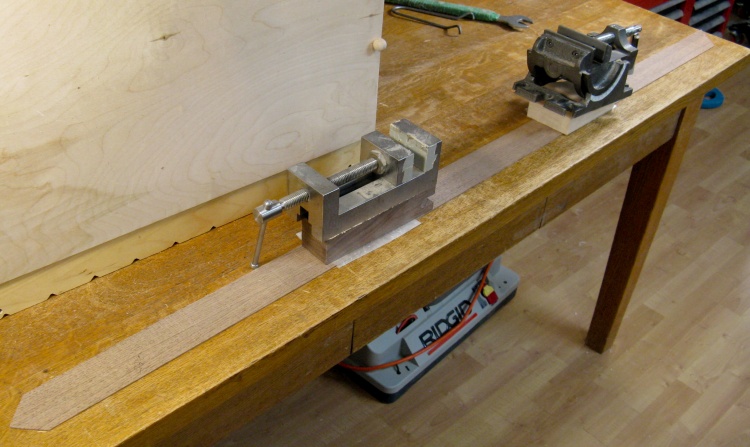
Veneer cut & glued into a more-convenient strip
I was planning to plane the veneer to the proper thickness but it was too short to be able to throw away the ends due to planer snipe (which makes 3" at each end slightly thinner than the middle).
So I cut it into three pieces and glued them together to get a single, longer strip. In this photo the just-glued joints are weighted down with some convenient heavy things.
So I cut it into three pieces and glued them together to get a single, longer strip. In this photo the just-glued joints are weighted down with some convenient heavy things.
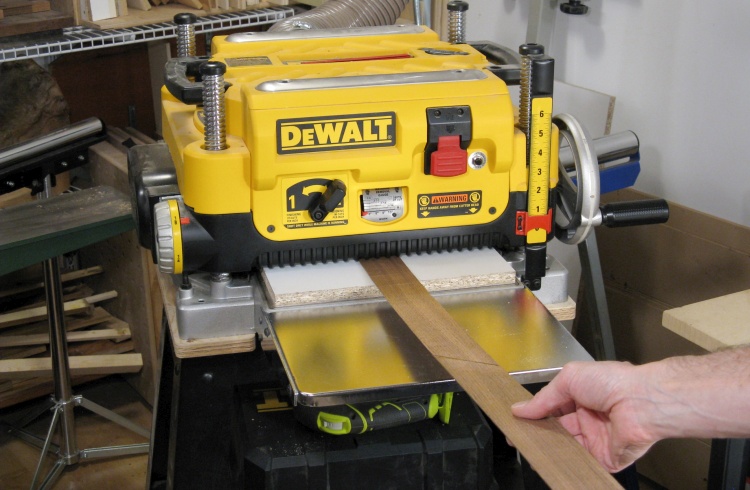
Getting down to exactly 0.065" thick
The shadow tiles needed to be just over 1/16" thick but the planer can't be set below about 1/8".
The solution (as seen in Fine Woodworking magazine!) was to tape a piece of melamine to the planer base. This let the planer be set higher and gave a nice flat and slippery surface to let me feed the strip through.
The solution (as seen in Fine Woodworking magazine!) was to tape a piece of melamine to the planer base. This let the planer be set higher and gave a nice flat and slippery surface to let me feed the strip through.
Straightening the edge
I cut the strip into two and then used the same jointing technique as before to get straight edges.
It was the 0.065" thickness that was important and the width I'm jointing here is just the height of the board, which was less critical.
It was the 0.065" thickness that was important and the width I'm jointing here is just the height of the board, which was less critical.
Chopping up a little pile of veneers
Then as was done with the "wool" tiles, I set up a stop on the radial arm saw to cut the proper length. I stacked up 8 strips to cut at once so there would be fewer cuts to make.
I cut the tiles a bit long in anticipation of sanding them to an exact length later.
I cut the tiles a bit long in anticipation of sanding them to an exact length later.

The fruits of the veneer work
This was the result of the veneer work. Those of an obsessive-compulsive bent will protest that this photo shows only 74 tiles whereas I needed 80 (which in fact is true and due to some not-quite-thick-enough veneer sections) so I later processed another piece of veneer to get the remainder.
"Hole" Tile Fabrication
A nice piece of leftover walnut plank
The "Hole" tile
That left the "holes" to be made - tiles that filled in between the wool pieces.
I selected this short walnut plank although I'm sorry to say I can't recall what it was left over from. It has a utility-limiting crack but since I'm going to cut it into tiny little pieces, that isn't going to be a big issue.
I selected this short walnut plank although I'm sorry to say I can't recall what it was left over from. It has a utility-limiting crack but since I'm going to cut it into tiny little pieces, that isn't going to be a big issue.
Plank prepped for the make-it-long-and-thin treatment
So it was the same deal as with the thin shadow pieces; Make one longer piece that can be put throgh the planer without sacrificing too much to wood-wasting snipe.
I started by cutting the plank into narrower strips and fashioned some basic joints with the bandsaw.
I started by cutting the plank into narrower strips and fashioned some basic joints with the bandsaw.
Glued & taped into a planeable strip
Then those four pieces were glued together to make a single longer piece.
Planed to 1/2" and cut to proper height
After planing to exactly 1/2" thick, I cut the single long piece into 8 easier-to-handle blanks of the proper thickness for the breadboard and sanded the cut edges smooth.

Cutting individual pieces
Then these blanks were cut to exactly 1/2", once again using the radial arm saw with a stop.
The thin strip of plywood under the walnut prevents splintering of the walnut as it is cut.
The thin strip of plywood under the walnut prevents splintering of the walnut as it is cut.
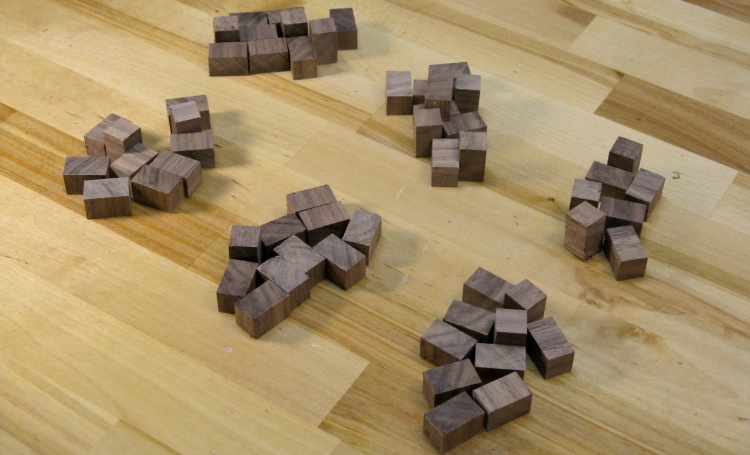
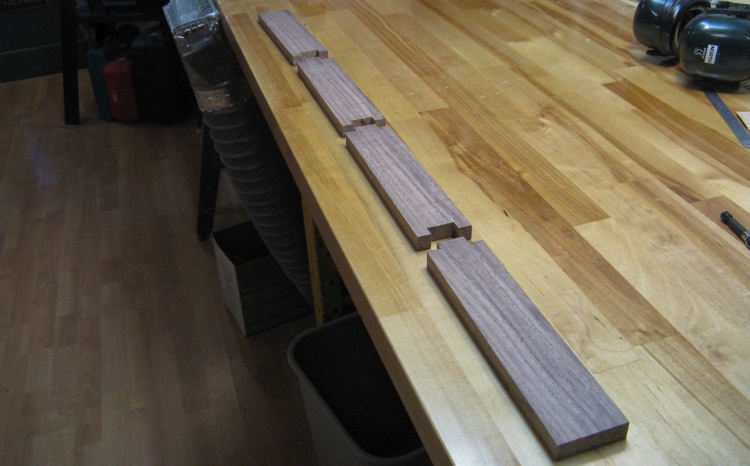
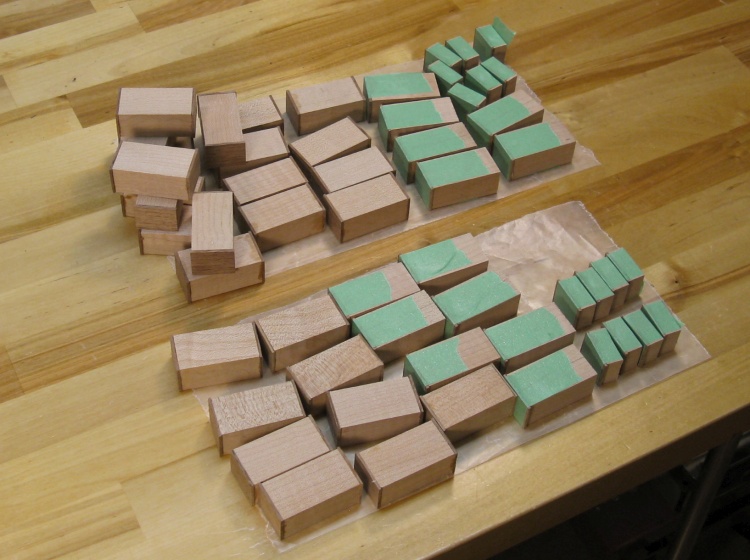
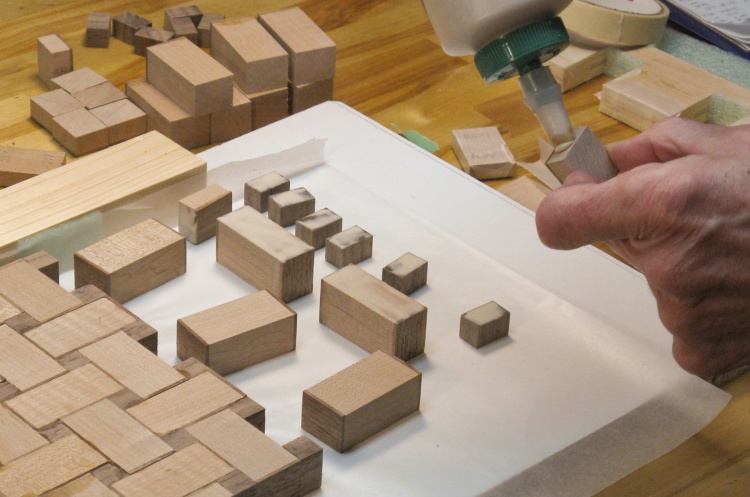
The needed pieces and a few extras
With a few discards for imperfect cuts and the like, that left me with enough pieces plus a few spares.
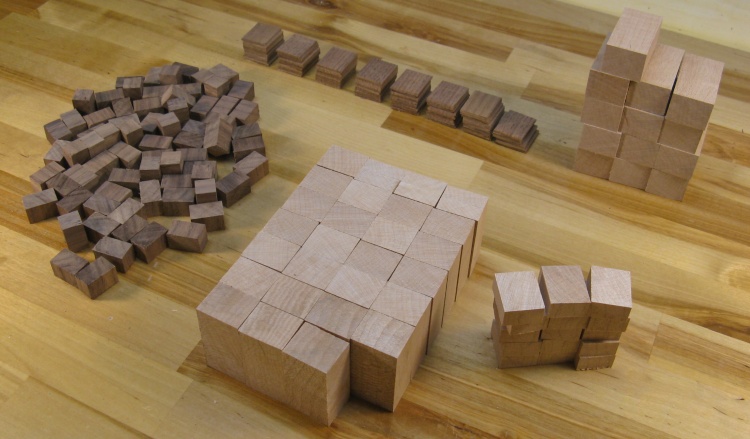
The weave breadboard "kit" ready for assembly
This photo shows all the pieces collected together.
Assembly
Step 1: gluing on end pieces
With so many pieces, gluing was going to have to proceed a bit at at a time.
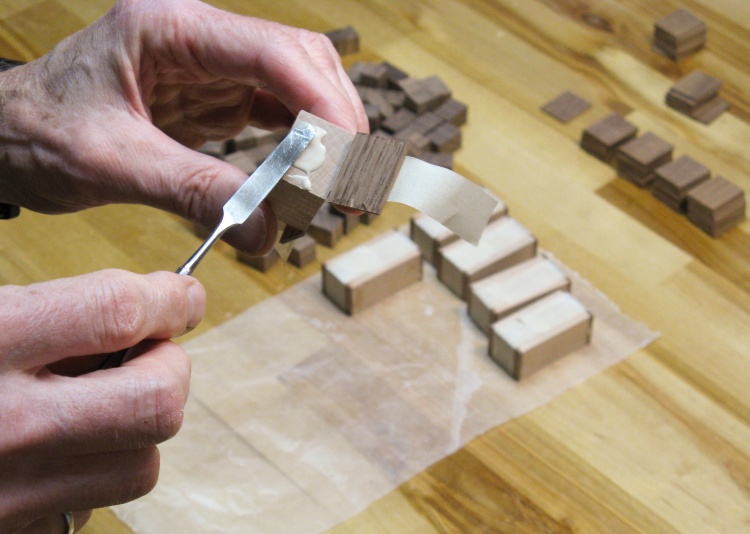
The first "bit" was to attach the shadows to the wool. The middle wool pieces needed a shadow piece attached to both ends while the edge wool pieces needed only a single end done.
Here I've half-taped on the shadow piece and after the glue is applied I'll finish the taping to hold things in place like the fuzzy ones in the background.
Everything that needed an end piece now has one (or two)
Here all the shadow pieces have been attached with the glue still drying on the taped-up ones.
Sanding ends flush with sides
I intentionally made the shadow pieces about 1/16" wider than they needed to be so they would overlap the wool pieces. I needed them to be exactly flush with the wool piece sides and the only practical way to do that was to make them long and then sand them smooth.
And that's what I'm doing here; the shadow edges are sanded just until they are perfectly flush with the sides of the wool pieces.
And that's what I'm doing here; the shadow edges are sanded just until they are perfectly flush with the sides of the wool pieces.
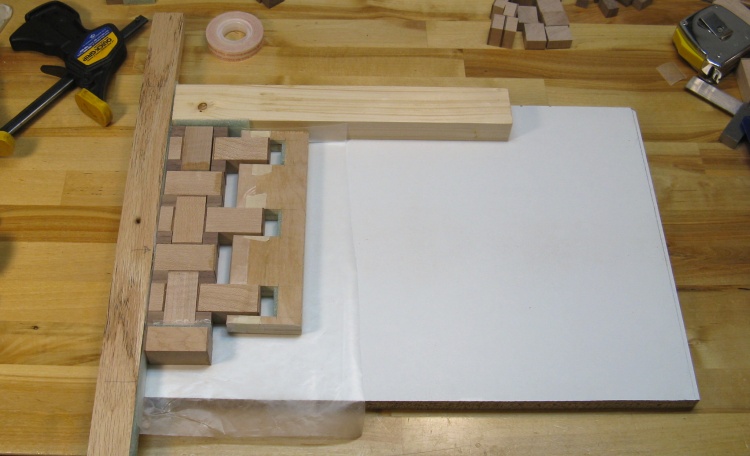
The setup used for gluing
I first set the first bunch of tiles together without glue to make sure everything was going to work OK.
Melamine plywood is nice and flat so I repurposed the piece on the planer base to use as a gluing base. Here I've also taped down a couple boards on the edges to provide a square corner reference.
Also visible is the sort-of-E-shaped piece I made to clamp around the irregular right-hand side of the assembly, but I abandoned it after the first gluing stage.
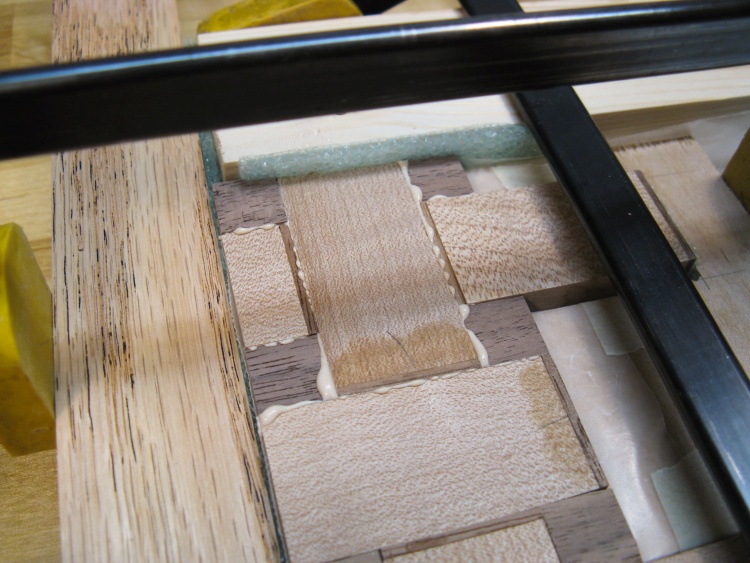
The pieces on the edges of the assembly were not necessarily perfectly flush, so I added the thin green-colored foam to conform to minor differences.
Melamine plywood is nice and flat so I repurposed the piece on the planer base to use as a gluing base. Here I've also taped down a couple boards on the edges to provide a square corner reference.
Also visible is the sort-of-E-shaped piece I made to clamp around the irregular right-hand side of the assembly, but I abandoned it after the first gluing stage.
The pieces on the edges of the assembly were not necessarily perfectly flush, so I added the thin green-colored foam to conform to minor differences.
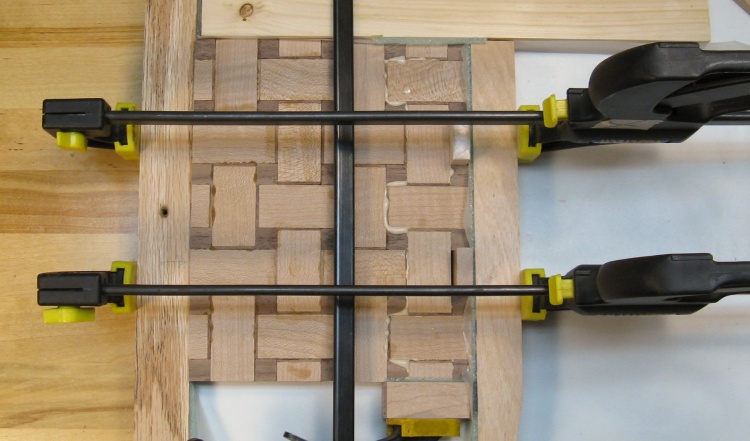
Gluing the first 8 pieces
The first gluing consisted of just the top 8 pieces. They were clamped in two dimensions until dry and then the rest of the row was glued similarly in two more stages.
A few rows later
The positioning of the three wool pieces sticking out to the right in the above arrangement wasn't great so I changed technique to leave those out.
Here we are a few rows further on and the whole row is being glued at once, minus the pieces that stick out to the right. In their places are spacers that make sure the adjacent hole pieces are correctly positioned.
Here we are a few rows further on and the whole row is being glued at once, minus the pieces that stick out to the right. In their places are spacers that make sure the adjacent hole pieces are correctly positioned.
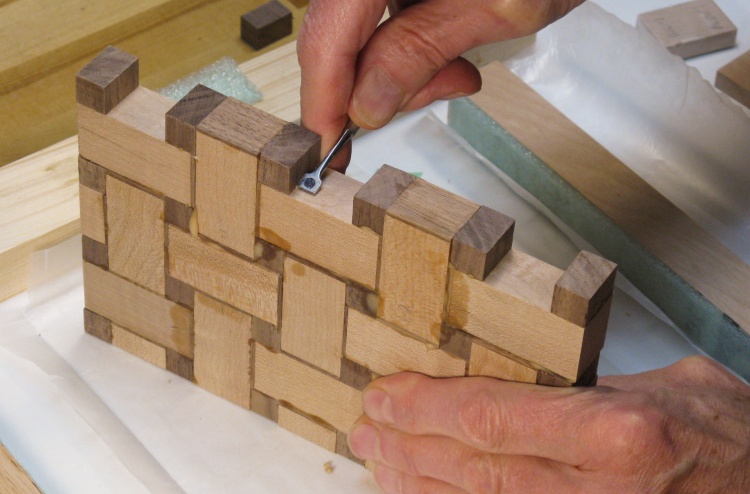
Cleaning up the corners before the next row goes on
With the temporary spacers removed the glue needed to be cleaned out from the corners so the wool tiles of the next row would fit in properly.
Here I'm using a small scraper to do that.
Here I'm using a small scraper to do that.

Evening out the "leading edge"
Here we are a couple rows further on. This shows another advantage of leaving out the end pieces when gluing; it let me sand flush the leading edge. It's all pretty close but having everything evened up exactly with the sander helps minimize the possibility of gaps (and gets rid of any glue squeeze-out to boot).
Gluing action shot!
This photo shows the setup for gluing a row. The first stage is putting all the pieces in place and making any adjustments necessary like replacements, end-to-end flips, sanding, etc.
When that looks good, I separate the pieces, review which edges of which pieces need glue, and then start to apply it to the pieces.
After all the glue is applied, the pieces are positioned together and the clamps applied.
When that looks good, I separate the pieces, review which edges of which pieces need glue, and then start to apply it to the pieces.
After all the glue is applied, the pieces are positioned together and the clamps applied.
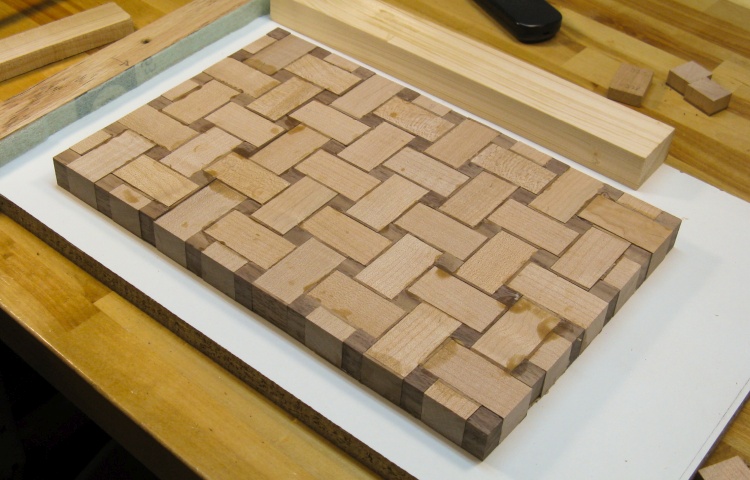
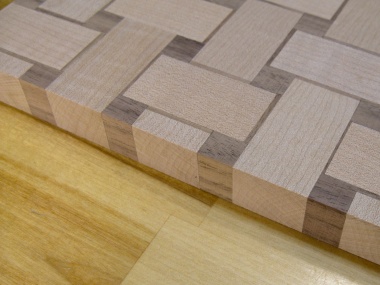
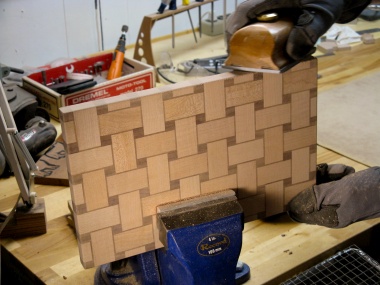
Done with the assembly
And eventually it was all together. I gave it a couple days to make sure all the glue was well hardened before starting the surface sanding.
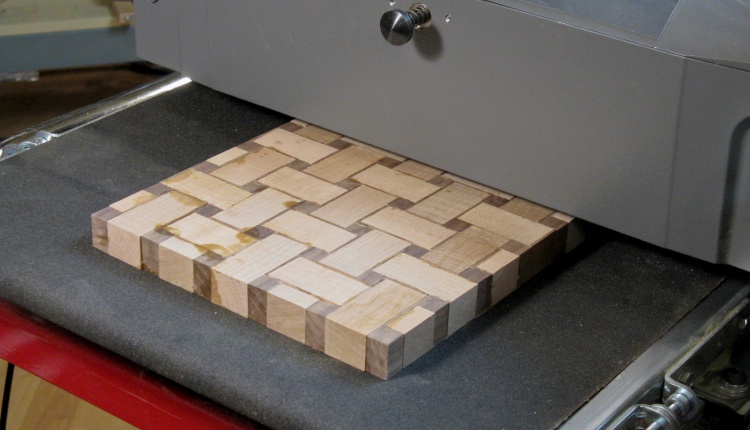
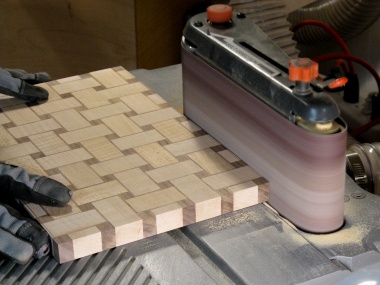
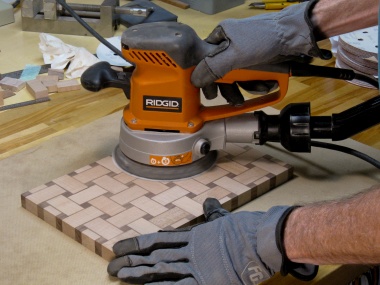
First pass through the sander
I used the drum sander with 80 grit paper to smooth off both sides. Here the board is emerging from the first pass through.
I typically took no more than 0.005" per pass and after the last of the glue was gone I swapped over to 120 grit to remove the worst of the sanding marks.
I typically took no more than 0.005" per pass and after the last of the glue was gone I swapped over to 120 grit to remove the worst of the sanding marks.
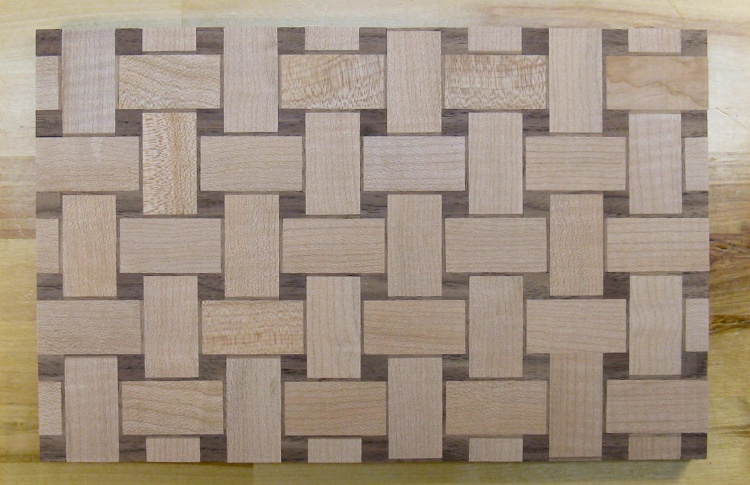
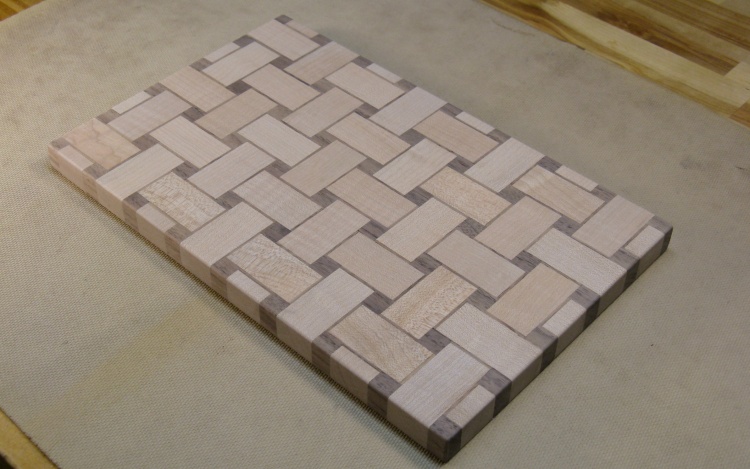
Much less gluey after sanding
This is the post-sanding version of the board. I'll still need to do some finer sanding but first I had some "issues" to address.
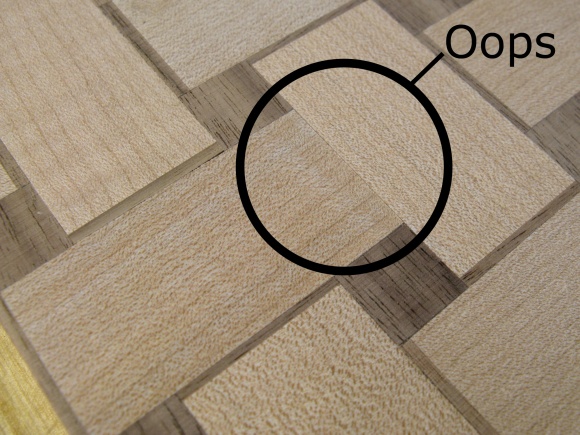
I managed to grab some incorrect pieces when doing the assembly and gluing and in one case, grabbed the right piece but put it in backwards. This particular class of boo-boo resulted in unwanted shadow pieces on the edge of the board. These were fairly obvious errors (to my eyes anyway) so they needed some fixin'. For these I simply sanded off about 0.07" from the long edges which removed the offending walnut but didn't change the look of the board noticably;
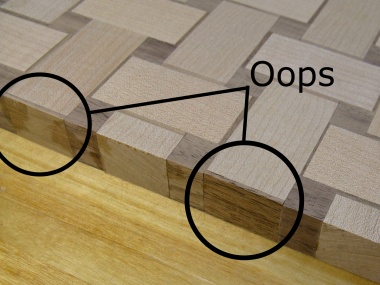
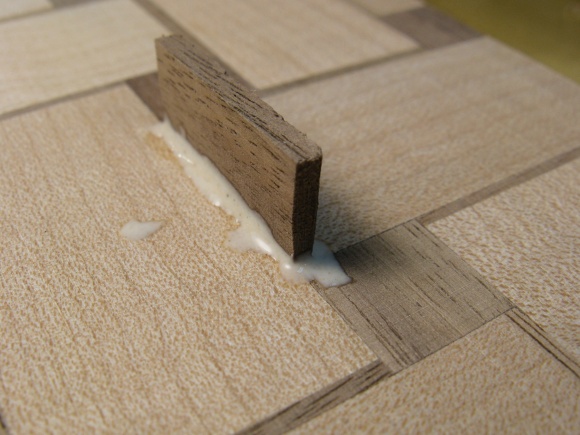
Shouldn't be walnut there
Sand 'er off
That's how it's supposed to look
For the piece I'd put in backwards, there was no shadow piece on the inner end of it. I wasn't going to be able to put in a full shadow piece so what I did instead was to add a thin strip on top and bottom sides where the shadow piece would go, which looks exactly the same;
Some turkey put this piece in backwards
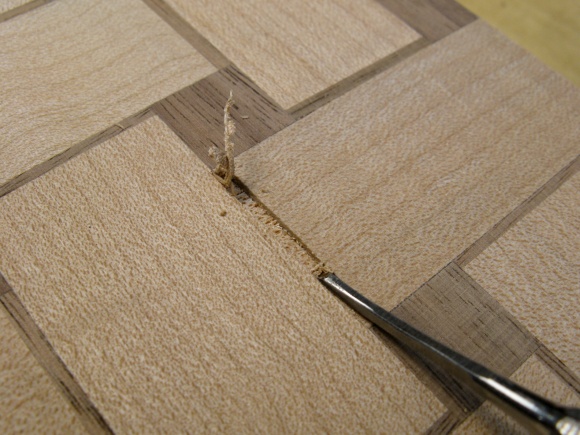
Making a slot for the missing walnut
Gluing in a small wedge
That's how it's supposed to look
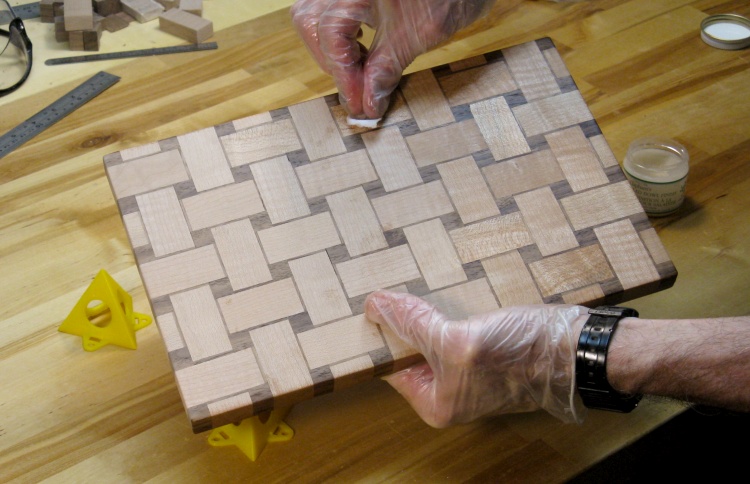
I made a few other minor fixes as well, filling a gap and a chipped piece. Then it was ready for final sanding;
Some random orbital sanding,
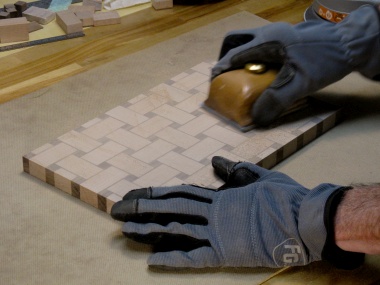
Some surface hand sanding,
and some edge sanding.

Carving in the initials
The last bit of woodworking was to add my initials and the year, which was done on a walnut section near one corner.
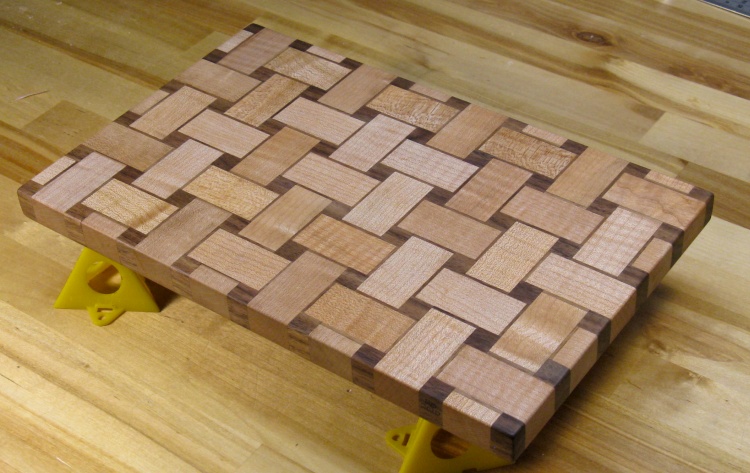
Woodworking done
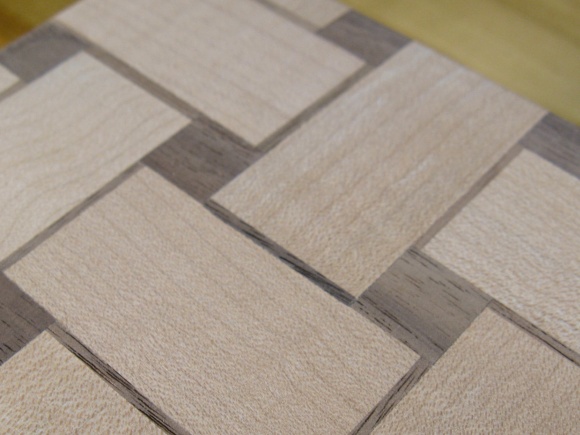
And that was it. This photo shows the completed breadboard before applying finish.
Adding a coat of wax
I used a food-safe wax to finish the breadboard, applied with a small piece of cloth. It then got polished after a couple hours of drying. That was followed with a second coat of wax.
Done
Done.


