
Warning! Long post - skimming advised.
Details
I had hoped to be able to build this style of fence on at least one side of the yard so I was pleased that my South neighbor was game. As an investigation last year I had actually made some prototypes of the fence-top shapes to check the feasibility, and they seemed practical to fabricate. I refined the fence construction details over the winter so I could do an accurate cost estimate and be able to order the correct wood when it became time to start building.
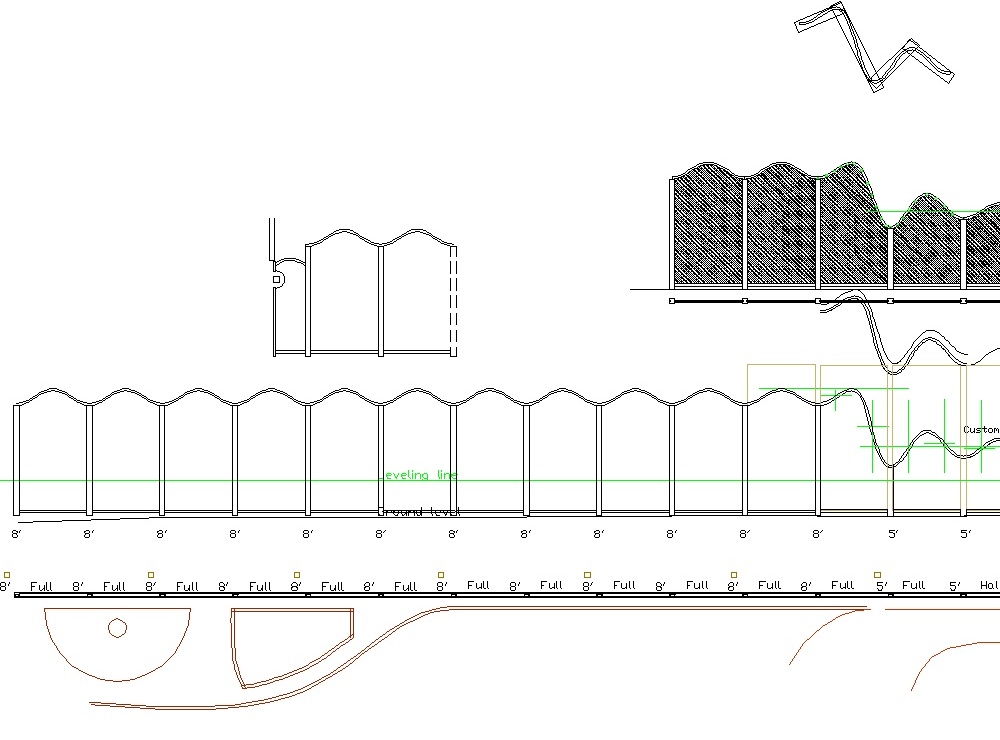
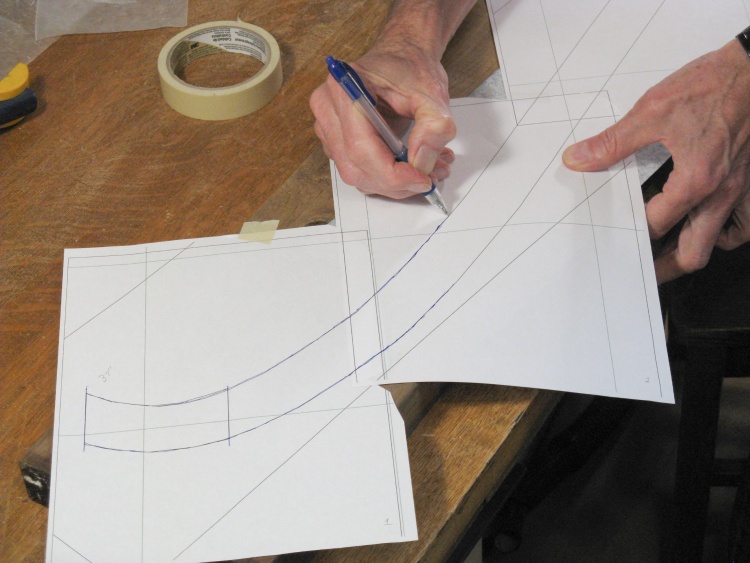
A piece of the plans
A compressed view showing the whole length
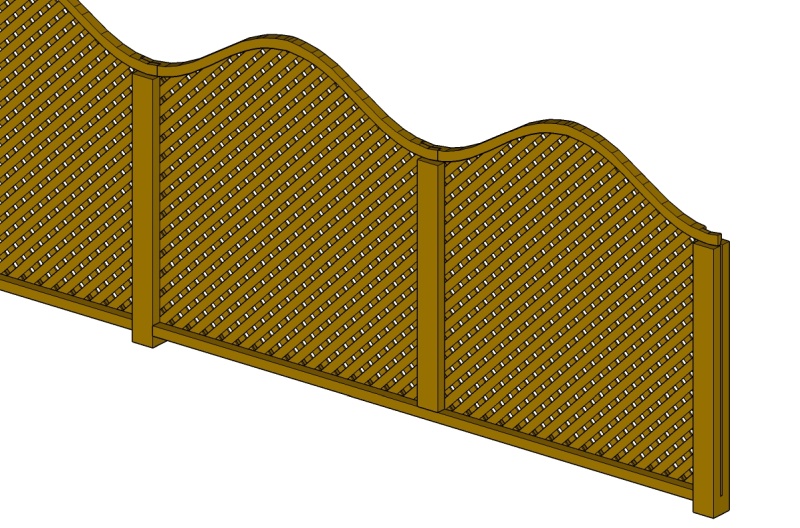
A 3D view of the short section
Design
Some fence elements
I was concerned about the lateral strength of the fence since it needs to stand up to winds and even just someone leaning against it.
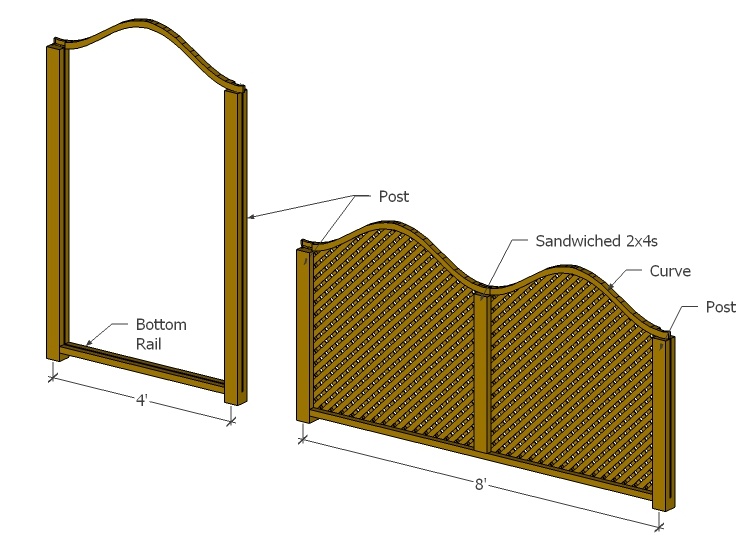
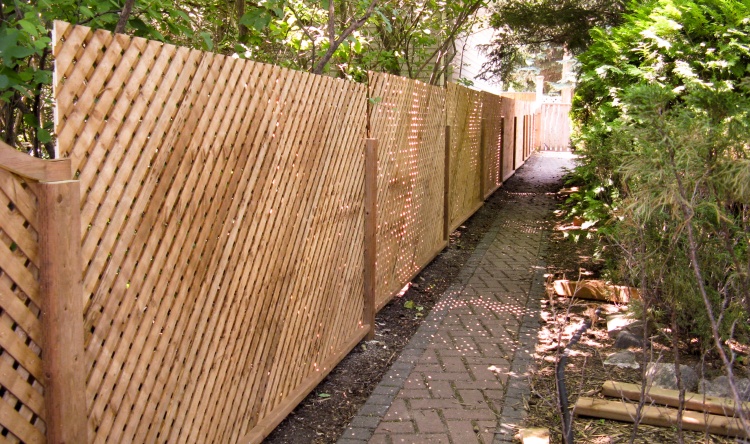
So for the tall sections I opted for posts spaced at 4' (rather than the more-conventional 8' post spacing). That gives a narrower gap which is all spanned by the single sheet of lattice. It still wouldn't be super-strong, but should be adequate.
On the lower sections, I thought I could get away with 8' post spacing due to less wind loading and less torque from something leaning against it due to the lesser height. But to give it the same look, I added "mid-posts" which are just a pair of 2x4s screwed together sandwiching the lattice in the center so that visually there are still 4-foot-long sections.
Details of lower section
Due to having the lattice in the center of the posts, the fence looks the same from both sides, so I suppose it qualifies as a "good neighbor" design.
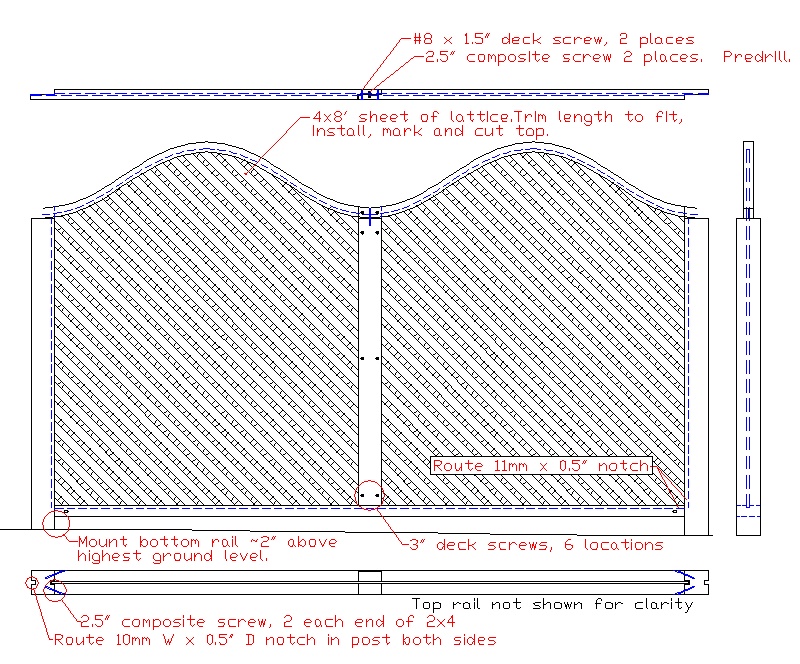
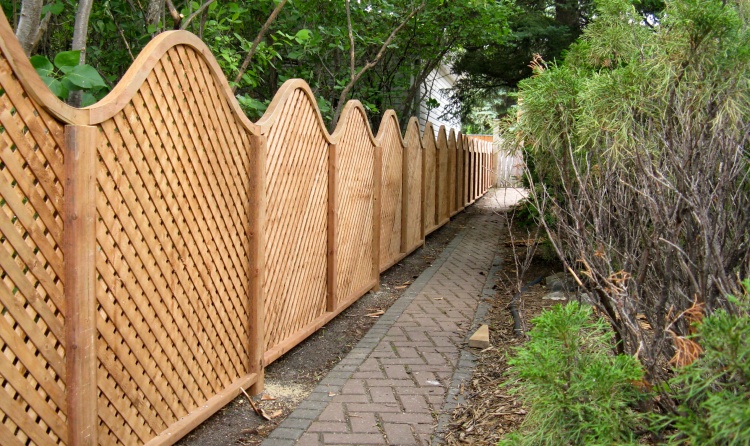
To hold the lattice, the top curve, the posts and the bottom rail are all grooved and the lattice just slides in.
The bottom rail is held to the posts with angled screws and the curves are screwed together and down to the posts. The mid-post is fastened with a half-dozen 3" screws connecting the pair of 2x4s.
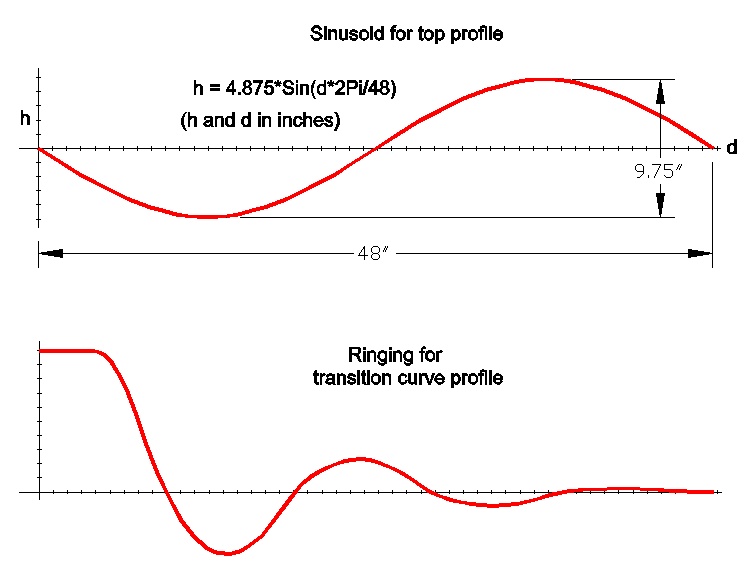
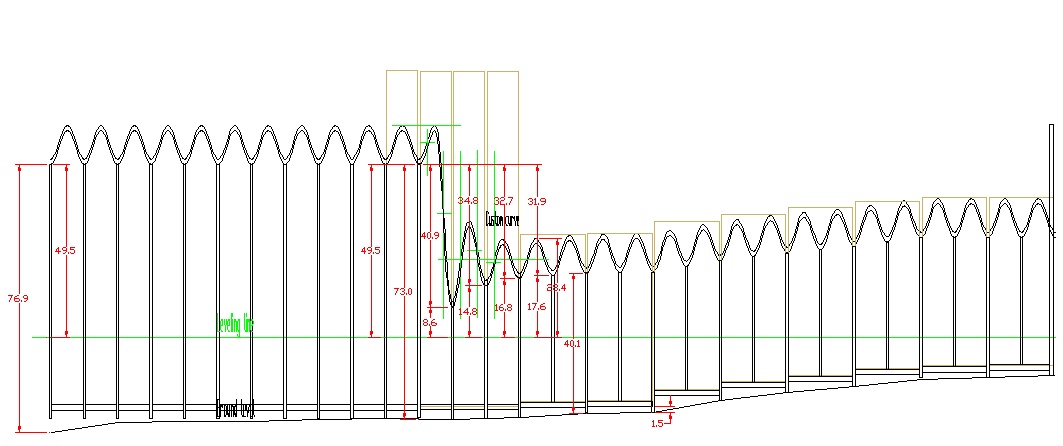
The top profile of the fence is of course sinusoidally-shaped with an amplitude of ±4.875" (so 9.75" overall height) and a period of 48".
The transition area from high to low is a classic underdamped or ringing shape all too commonly seen if you are an electrical engineer like me. Electrical ringing is usually a bad thing but at least it makes for an interesting fence shape.
The transition area from high to low is a classic underdamped or ringing shape all too commonly seen if you are an electrical engineer like me. Electrical ringing is usually a bad thing but at least it makes for an interesting fence shape.
Old Fence
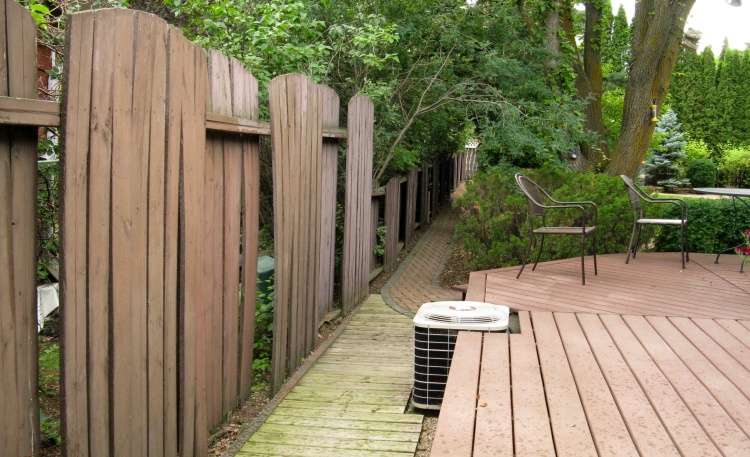
Some warpage detectable in the tall portion of the old fence
To quote the description of the North fence;
"The old fence was a "good neighbour" design with 4-foot sections of pickets on alternating sides. It had mostly sagged to the ground so the bottom rail was largely mulch and there were lots of other rotted parts.
On the other hand, it was made of rough-cut 1"-thick planks with an incredibly durable stain. We assume the fence is 40 or more years old and we haven't stained it in the 25 years we've been here. Of course the color is an odd purpley-reddish with some sections heading toward bluish so the color durability is a bit of a mixed blessing."
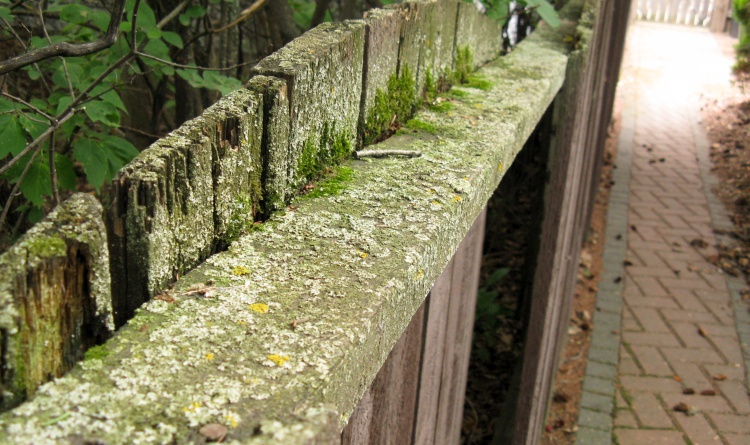
A bit of "weathering" on the top rail
The above shot shows the taller section of fence which is next to the house while this is the lower part that extends to the alley that borders the West side of the yard.
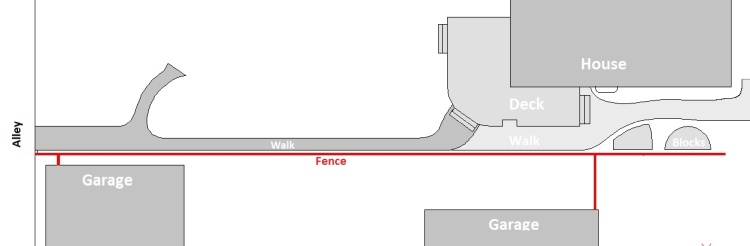
Fence location
To put things in perspective, this shows the location of the fence in red with our house at the top. The fence extends from the alley to the front edge of our house with a couple offshoots to the neighbor's attached and detached garages.
Fence Tops
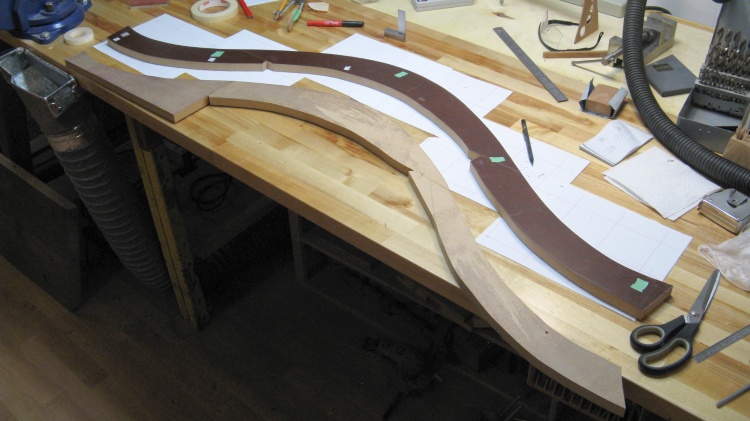
Patterns for the top curves
But before heading outside, there was a bunch of inside work to be done to fabricate the curved tops for the fence.
I made a couple patterns from MDF to enable a consistent curve shape. The right edge of the burgundy pattern is for the top edge of the curve while the right edge of the unfinished pattern is for the bottom edge of the curve.
Here the top-edge pattern has been carefully shaped to conform to the printed-out plan on which it is sitting while the bottom-edge version has been only roughly cut to shape.
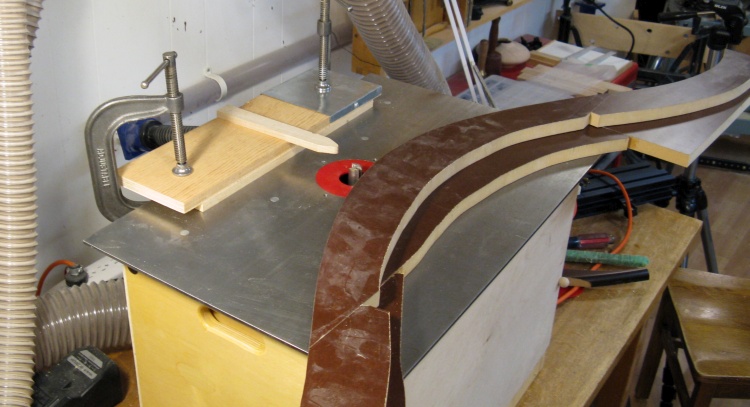
Shaping the bottom-edge pattern to match the top-edge pattern
To ensure the curve made by the patterns was a consistent thickness, I taped the two together and used the accurate top pattern as a...well...pattern to route the rough-cut bottom pattern (both burgundy in this photo since I flipped the bottom one over).
I also drilled holes in three locations through both patterns to enable them to be accurately positioned when in use.
I also drilled holes in three locations through both patterns to enable them to be accurately positioned when in use.
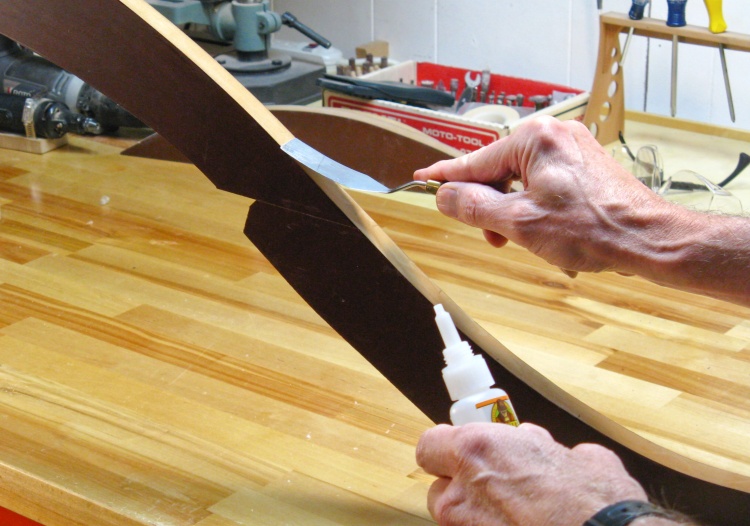
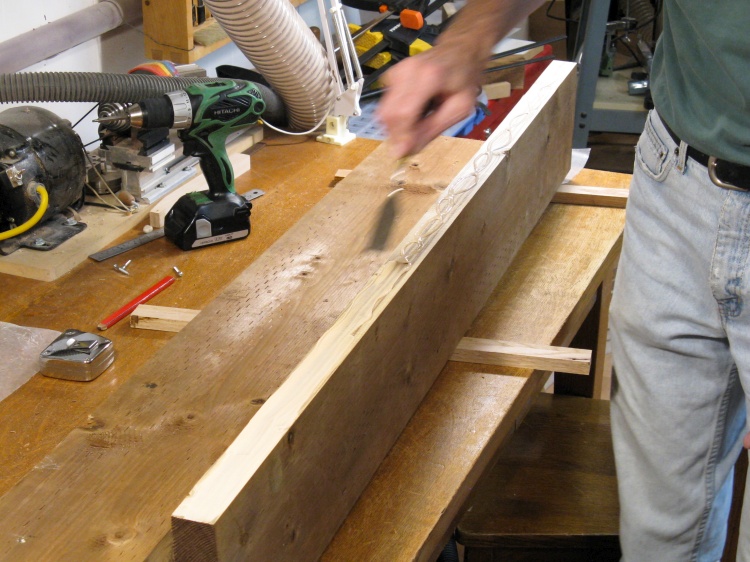
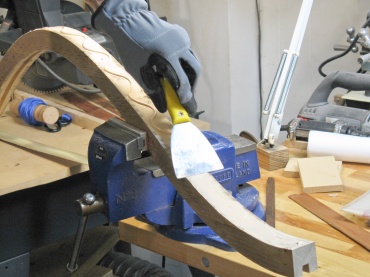
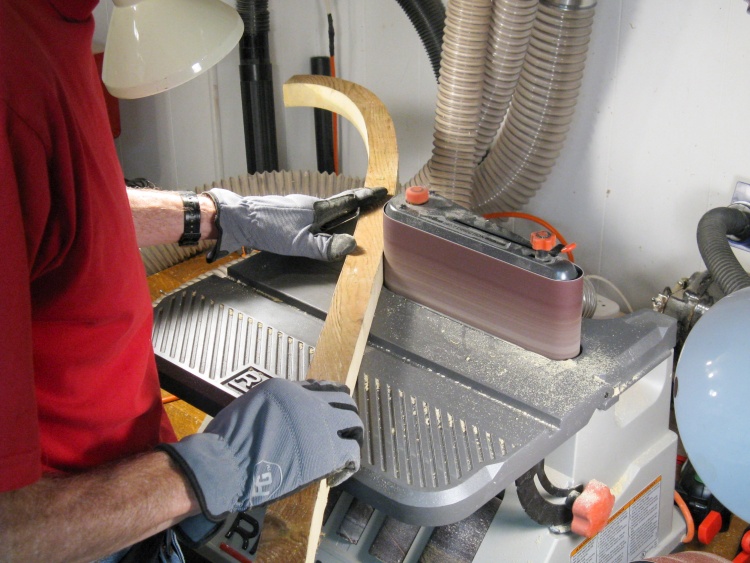
Applying CA glue to toughen the edge
The pattern edges would be rubbing a guide on the band saw numerous times so to toughen up the edges I applied a coat of CA glue (Superglue). This locks the MDF fibers together on the edge and makes it much more resistent to wear.
I actually tried a couple other methods for edge-toughening such as wood glue and varnish but neither worked as well as the CA coating.
I actually tried a couple other methods for edge-toughening such as wood glue and varnish but neither worked as well as the CA coating.
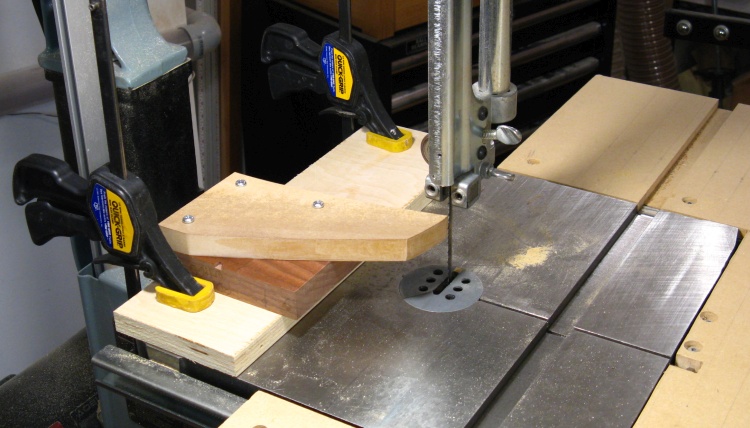
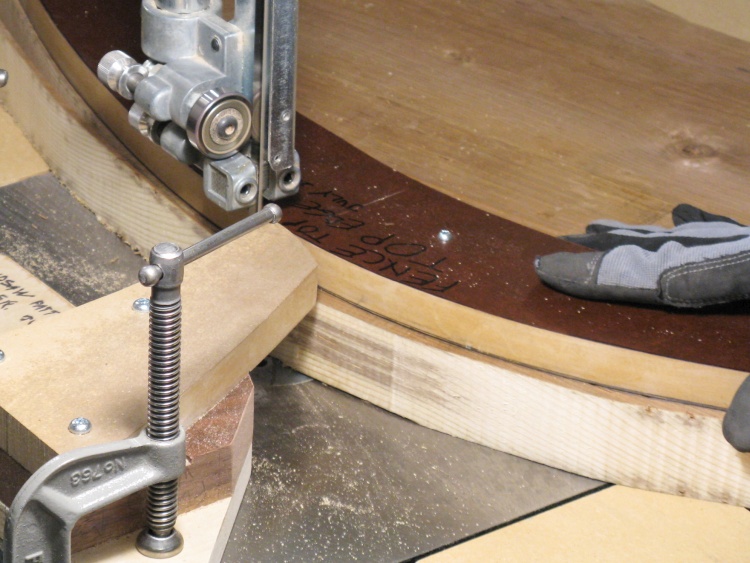
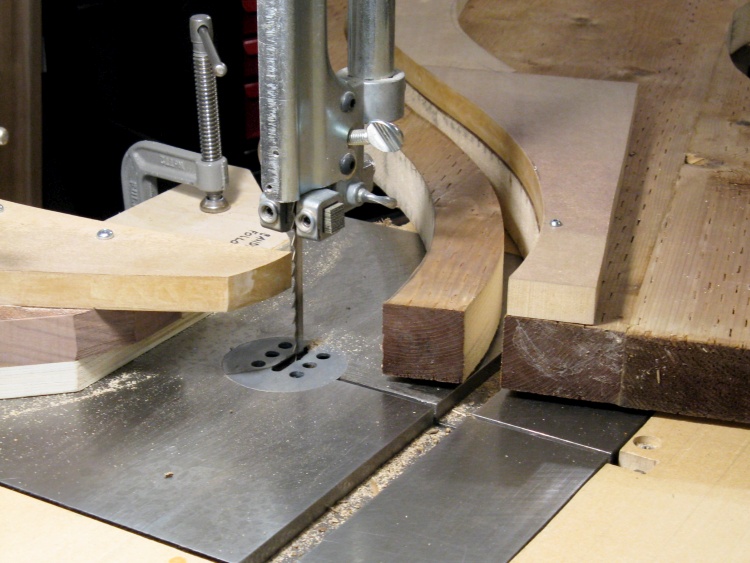
The pattern-following setup on the bandsaw.
This shows the bandsaw pattern-following jig. In practise the pattern rubs against the beak-shaped piece of MDF, whose edge is positioned just past the blade to prevent the blade from contacting the pattern.
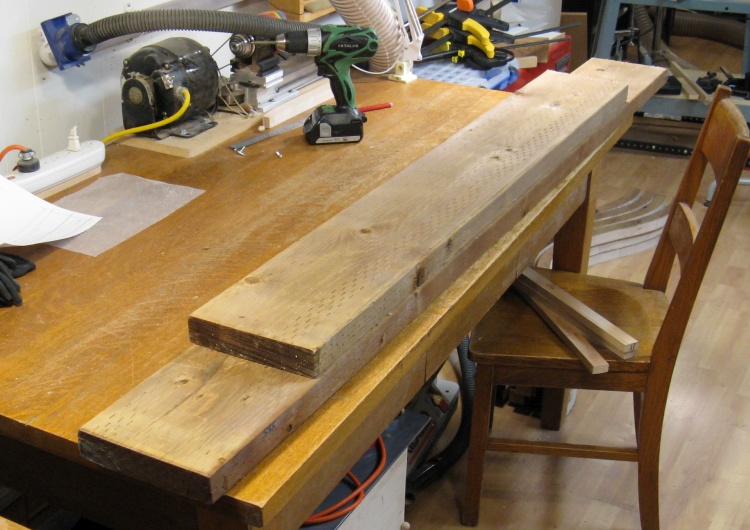
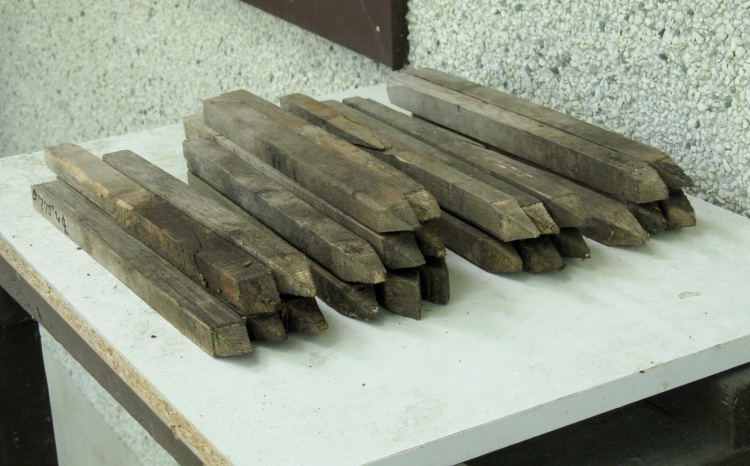
A couple pieces of treated 2x8
The height of the fence-top curves is greater than the width of a single 2x8 so I needed to laminate 2x8s to get an adequate span.
The fence will be constructed of brown treated wood, and these first random-length ones I'm using are actually leftovers from last year's deck-building project.
The fence will be constructed of brown treated wood, and these first random-length ones I'm using are actually leftovers from last year's deck-building project.
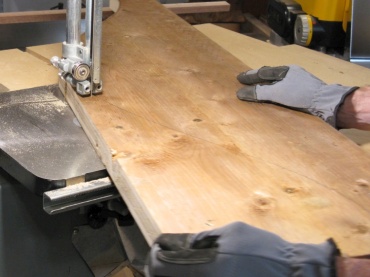
Cutting off the 2x8 edges for later use
I had made a set of curves last year to check out my technique (which worked OK) but since the top edge is cut, it shows an almost-white raw wood color in contrast to the light brown of the sides. I thought the curves would look better if the tops at least were a matching brown. To accomplish that, my plan was to glue thin slices of treated wood edge to the curve tops.
So obviously I was going to need a boatload of edges and most of them I could get from the 2x8s I used for the curves. This shot shows one edge being cut off. This wasn't really a waste since I'd need to remove the 2x8 edge anyway to get rid of the rounded corners so they could be laminated together without a dip at the joint.
So obviously I was going to need a boatload of edges and most of them I could get from the 2x8s I used for the curves. This shot shows one edge being cut off. This wasn't really a waste since I'd need to remove the 2x8 edge anyway to get rid of the rounded corners so they could be laminated together without a dip at the joint.
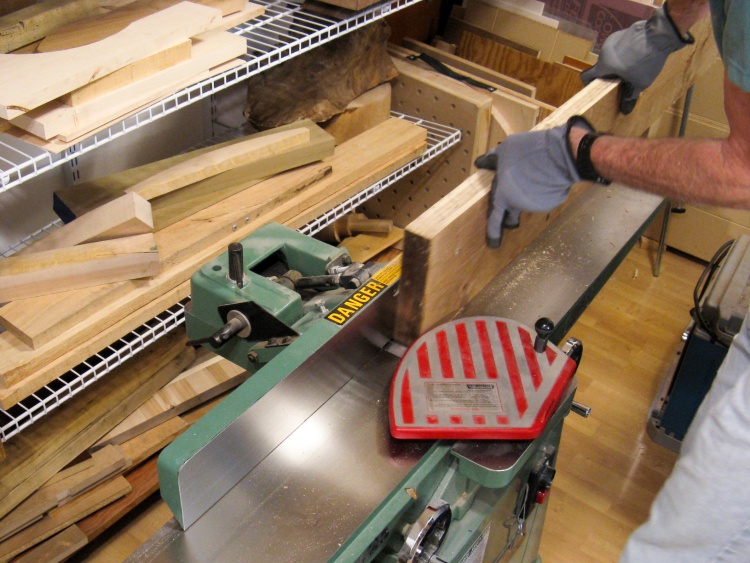
Jointing 2x8 edge to make it nice and straight
The 2x8s were run through the jointer to produce straight edges for a nice tight joint when edge-laminating.
Applying glue to one of the 2x8 edges
Then I applied glue to one of the edges...
Clamping the pair of 2x8s
...and clamped them together.
So that gave me a blank that was wide enough for a curve, but getting only a single curve out of it would be pretty wasteful.
Instead I modified the blank further as shown below...
So that gave me a blank that was wide enough for a curve, but getting only a single curve out of it would be pretty wasteful.
Instead I modified the blank further as shown below...
Marking the top shape
Cutting off the top curved corners
Gluing those corners onto the bottom of the 2x8 assembly
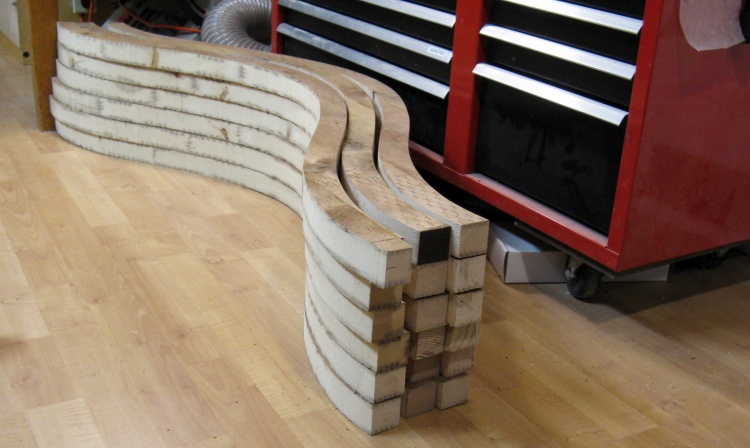
The resulting blank, enough for six curves
...leaving me with the contoured blank shown here that was enough to produce six fence-top curves.
Screwing on the top-edge pattern
So then to the actual curve-making;
Step 1 was to screw the top pattern onto the blank.
Step 1 was to screw the top pattern onto the blank.
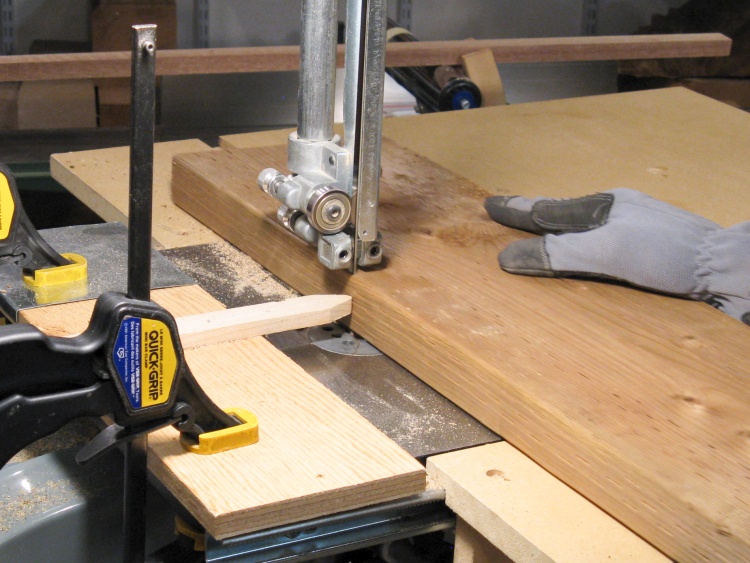
Cutting the top edge to match the pattern
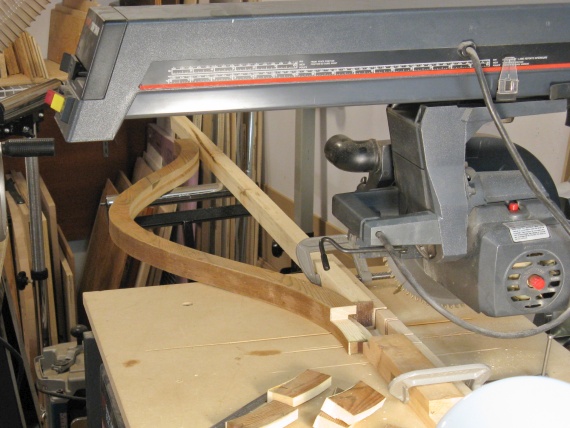
Step 2 was to cut the top of the curve using the pattern-following jig on the bandsaw.
Swapping out the top-edge and bottom-edge patterns
Step 3 was to remove the top pattern and put on the bottom pattern. It used the same screw holes to ensure correct positioning.
Curve cut out by cutting to the bottom-edge pattern
And Step 4 was to cut the bottom of the curve, again using the pattern-following jig on the bandsaw, with this photo showing the end of the cut-off curve.
Then those four steps were repeated starting with the top pattern being installed 1/2" down from the last cut until the blank was used up.
The pattern mounting screws were strategically positioned to land on unused parts of the blank, between curves.
Then those four steps were repeated starting with the top pattern being installed 1/2" down from the last cut until the blank was used up.
The pattern mounting screws were strategically positioned to land on unused parts of the blank, between curves.
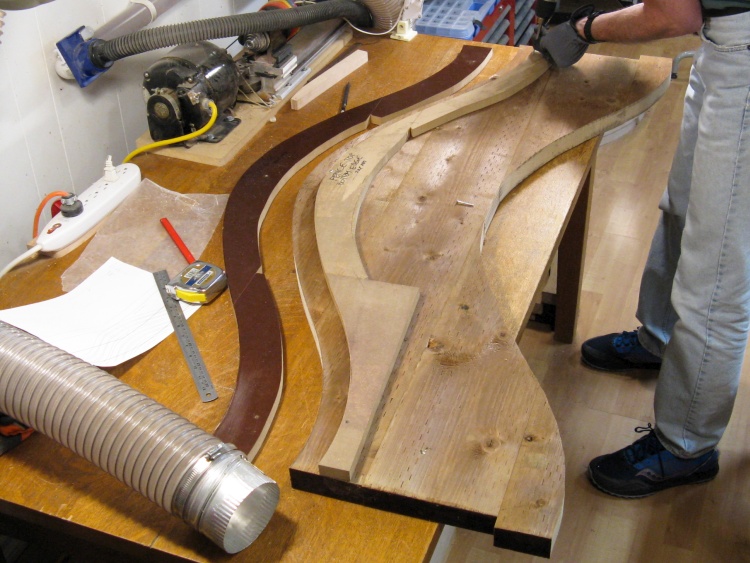
A bit further on with 18 curves already cut
This pile is the fruit of three of those six-piece blanks, which is just over half of the number I needed.
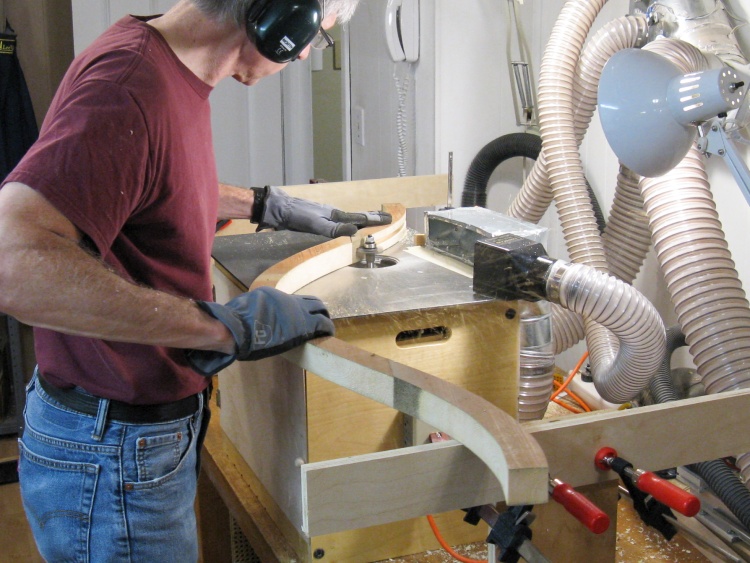
Routing a slot into the bottom of the curves
The curves needed a few more processes before they were done. Next up was to cut a slot into the bottom side to accept the fence lattice.
The slot was just over 11mm wide, which gave a bit of extra room for the nominal 10mm-thick lattice. The depth was around 1/2", which was limited by the router bit I used.
The slot was just over 11mm wide, which gave a bit of extra room for the nominal 10mm-thick lattice. The depth was around 1/2", which was limited by the router bit I used.
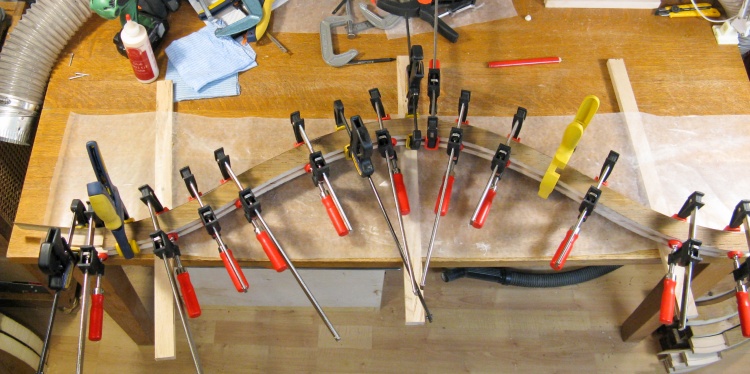
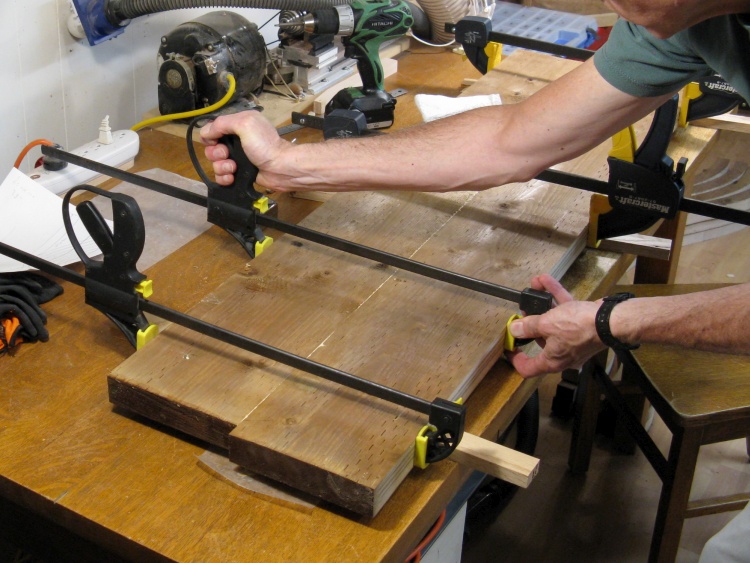
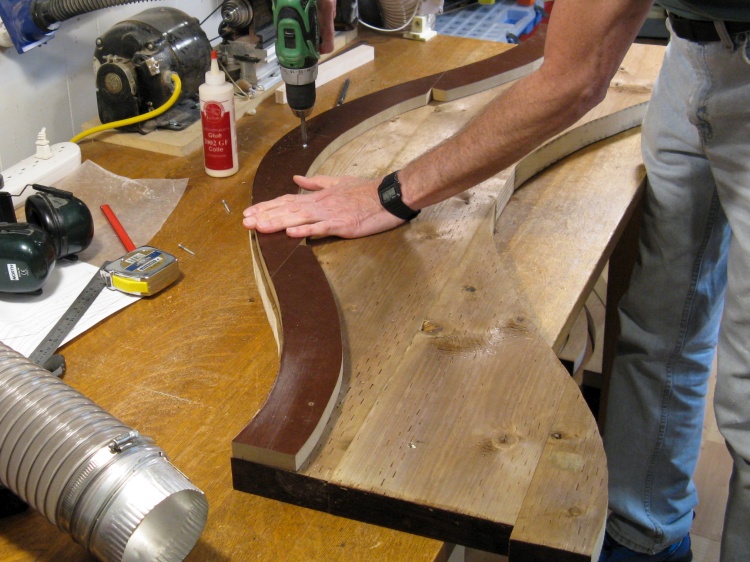
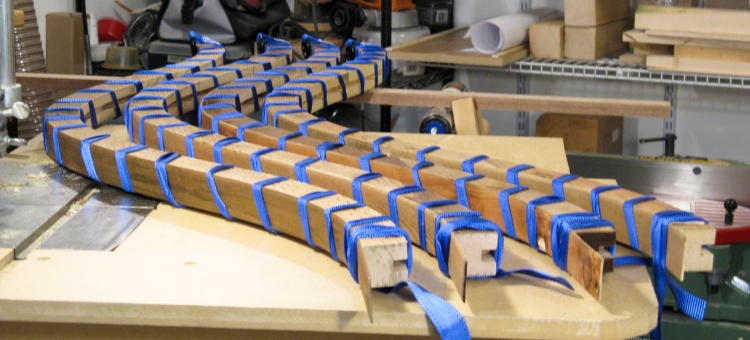
Gluing on those thin 2x8 edges I had saved - Lotsa Clamps method
The next process was to glue on the thin strips I had cut from the 2x8 edges (which I'm calling curve caps).
This was one of my first shots at it, involving many many red clamps.
This process was pretty time-consuming and not very effective either - there were too many places for the cap to flex up off the curve.
Eventually I evolved the following process using straps which was faster, easier and better;
This was one of my first shots at it, involving many many red clamps.
This process was pretty time-consuming and not very effective either - there were too many places for the cap to flex up off the curve.
Eventually I evolved the following process using straps which was faster, easier and better;
Applying glue

Cap installed and being wrapped

Cleaning off squeeze-out
A set of four curves with caps just glued on
As shown above, I used a set of inexpensive 1" x 15' tie-down straps to wrap the cap onto the curve. These held it down every inch or two and were much easier to install and remove.
This photo shows my four straps engaged in clamping four caps to four curves. The straps could come off after about an hour to be used for the next set.
This photo shows my four straps engaged in clamping four caps to four curves. The straps could come off after about an hour to be used for the next set.
Lap joint
The last process forms a simple lap joint at each end which overlaps with the adjacent curve when they are mounted on the fence.
This is just a matter of removing half of the last 3-1/2" from each end as shown below.
This is just a matter of removing half of the last 3-1/2" from each end as shown below.
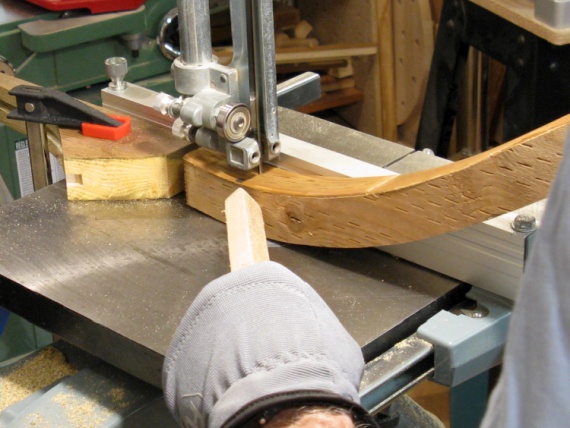
Cutting end in half with bandsaw
Cutting off the unneeded half
Transition Curves
Tracing curve directly onto 2x8
The curves made in the previous section cover most of the fence, but a few different curves were needed for where it transitions from high to low.
These guys
There were three transition curves, each 4' long. One was close enough to a regular curve to just cut it out of a standard blank but the others need to be made separately.
I printed out full-size plans and then traced the curves directly onto 2x8s. The curves were large enough that each needed to be made from two half-curves that were later joined.
I printed out full-size plans and then traced the curves directly onto 2x8s. The curves were large enough that each needed to be made from two half-curves that were later joined.

Free-hand cutting of curve to the line
The curves were just cut out by hand on the bandsaw...
Smoothing off the cut edges
...and then smoothed closer to the marked line with the belt sander.
A prototype joint cut using the radial arm saw
I decided on finger joints to join each half-curve into the full curve. I thought I'd try using the radial arm saw to make the joints since its cuts should be straighter and cleaner than the bandsaw (or god forbid, cutting by hand). A router table is often used for finger joints but the geometry of these particular joints made that impractical.
Shown here is a prototype joint I made to try out the technique on a couple pieces of scrap and while not perfect, is certainly adequate for a backyard fence.
Shown here is a prototype joint I made to try out the technique on a couple pieces of scrap and while not perfect, is certainly adequate for a backyard fence.
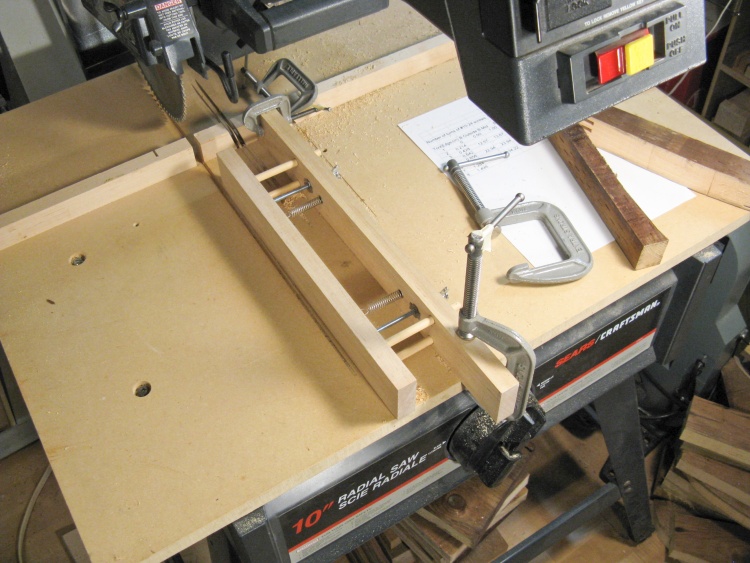
Joint-cutting setup
This is the setup I used. The jig is actually an old veneer cutting jig, which has a pair of screws that will advance the position of a movable fence by a known amount, based on the number of turns.
I made a spreadsheet giving the number of screw turns for each cut and for each side of the joint. I kept that close by and just went through the sequence, adjusting and then cutting.
I made a spreadsheet giving the number of screw turns for each cut and for each side of the joint. I kept that close by and just went through the sequence, adjusting and then cutting.
Curve pieces with bases temporarily glued on
The ends of the half-curves needed to be oriented properly; each end must point directly toward the center of the circular blade. I added some appropriately-curved supports so alignment would be correct when the supports were set flat on the table.

A curve piece with the joint cut
Then I clamped a half-curve to the movable fence, set the screw turn number and made a cut, doing that sequence twice more to get the width of slot I needed. I did one slot at a time and then backed off the screws and did the same slot on the other curve.
It was rather tedious since there were about 80 cuts in total but the biggest challenge was not losing count of how many turns were on the screws. Which I did only once.
It was rather tedious since there were about 80 cuts in total but the biggest challenge was not losing count of how many turns were on the screws. Which I did only once.
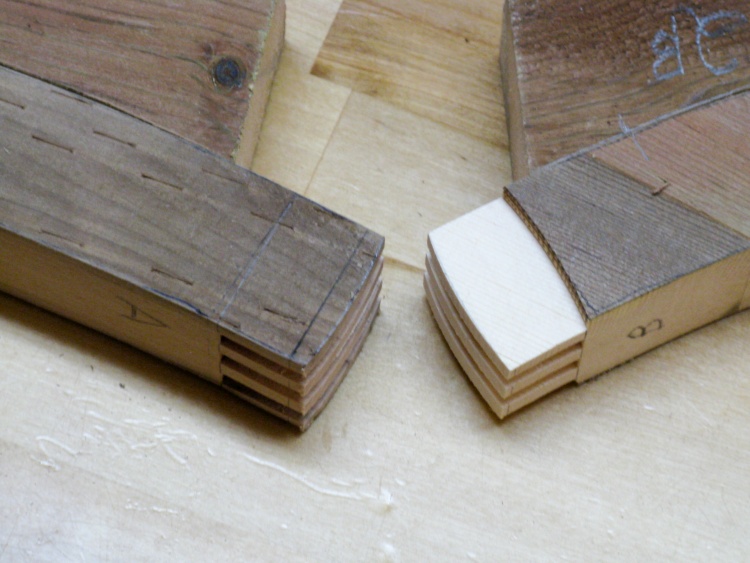
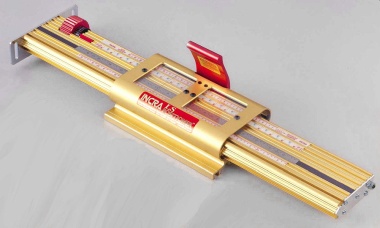
A completed joint
Interestingly I recently purchased a jig that works on the same principle but would have been about 750 times easier to use if I'd had it in time. Oh well, I'll appreciate it more now...
Ooh...Shiny!
Due to the 10" diameter of the blade, the slots had a curved bottom profile. For a better fit, I sanded the fingers into approximately the same shape, with the two halves of a matched joint shown here.

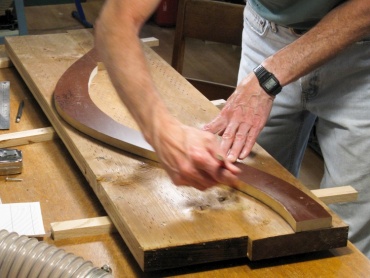
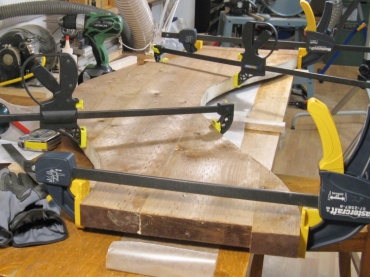
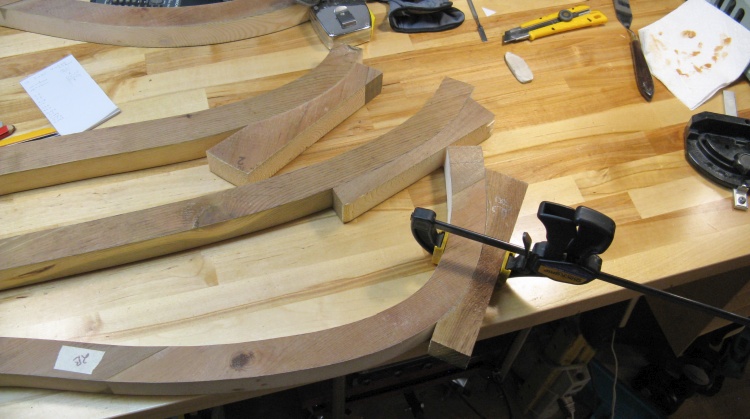
Gluing joints to form the full curves
And then four half-curves were glued together to form two full curves. Here they sit on their plans so I know they are correctly positioned as the glue dries.
These curves get the same post-forming processes as the others; slot routed, cap glued on and ends cut.
These curves get the same post-forming processes as the others; slot routed, cap glued on and ends cut.
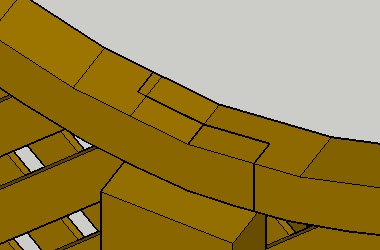
The full transition shape when assembled
This is a down-the-shop-floor view of the three transition curves laid end-to-end (plus a regular curve at the near end).
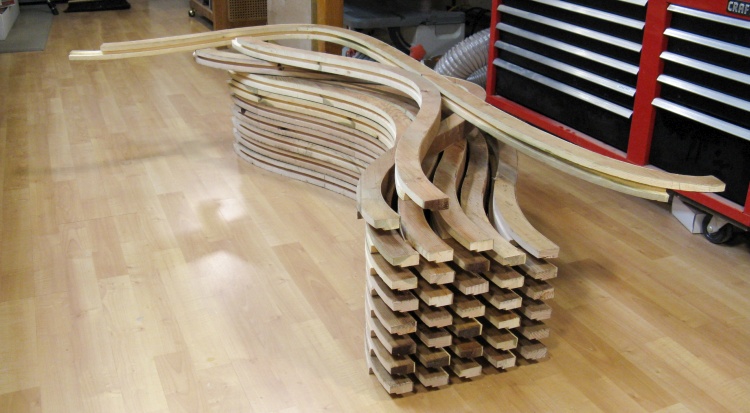
The pile of all the completed curve pieces
All in all, the fence needed 32 curves, each spanning a 4' gap (curves are actually 4' 3-1/2" total width since they since they overlap).
This photo shows the pile of completed curves, with a few spares for breakage or replacement or whatever.
It took about 10 days to fabricate all the curves, working a few hours a day.
This photo shows the pile of completed curves, with a few spares for breakage or replacement or whatever.
It took about 10 days to fabricate all the curves, working a few hours a day.
Fence Disassembly
Finally! Fence disassembly
Whew! Finally get to go outside and deal with that old fence.
Here I am starting to disassemble the tall portion of the fence. There was going to be a fair volume of wood (around 3 or 4 yards) so I went for a neat disassembly process rather than a smash-it-into-bits approach.
My strategy was to open the area behind these sections of fence and use the mostly-empty space next to my neighbor's garage to stack old, and later new wood.
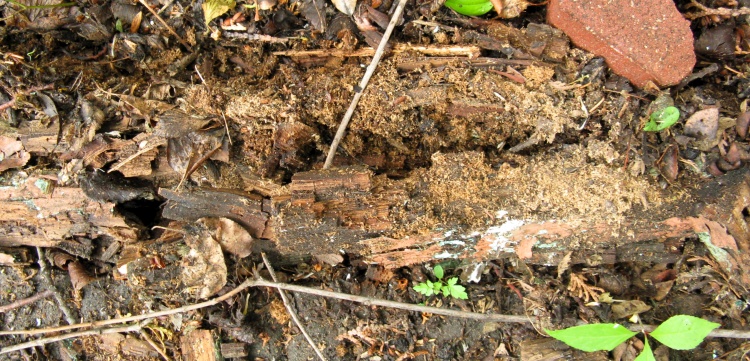
The decayed remains of bottom rail
The rotted top and bottom rails had mostly been reinforced with a second 2x4 (before we moved in) and while some top rails survived, many of the bottom rails had "become one with nature" like this example here.
Clearing out an area for wood storage
I did a bit of cleanup of the area to be used for storage, which gave a sizable space to stack the old wood, some of which can be seen here already.
I just bent over the nails in the pickets so that the wood could stack compactly. However many of the tall pickets had screws reinforcing them, and those needed to be removed with a cordless driver since they held on way better than nails.
I just bent over the nails in the pickets so that the wood could stack compactly. However many of the tall pickets had screws reinforcing them, and those needed to be removed with a cordless driver since they held on way better than nails.
High-rise condo for ants
The top of one of the tall posts was home for a thriving ant colony. These were sizable beasties of close to 1/2" long but they all took off when I removed the top rail, burdened by furniture, small appliances, portable electronics, etc.
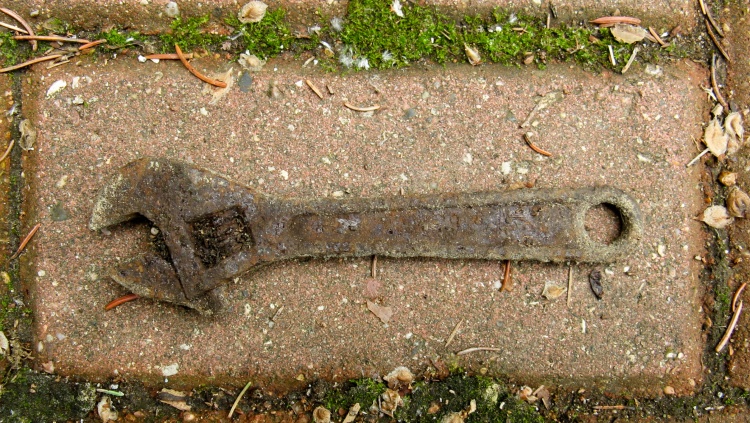
Some sort of pre-historic crescent wrench
This somewhat weathered tool was found next to the fence where it had probably fallen off the top rail into the leaf mulch many years ago.
It might have been extremely satisfying to chip off the rust, polish it up and have a like-new shiny crescent wrench from this encrusted thing, but we'll never know since I just threw it away.
It might have been extremely satisfying to chip off the rust, polish it up and have a like-new shiny crescent wrench from this encrusted thing, but we'll never know since I just threw it away.
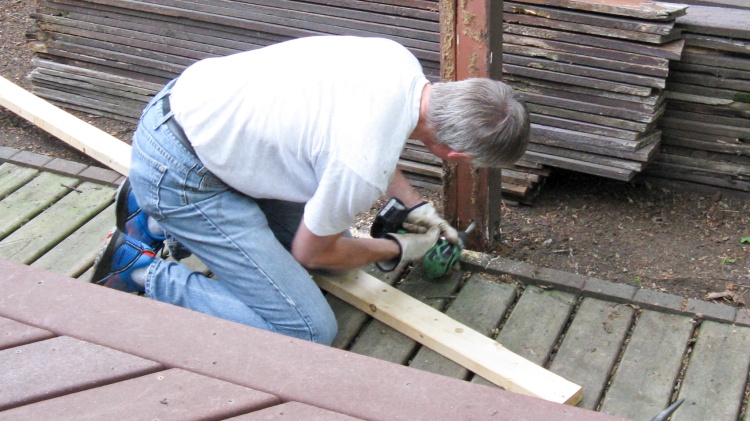
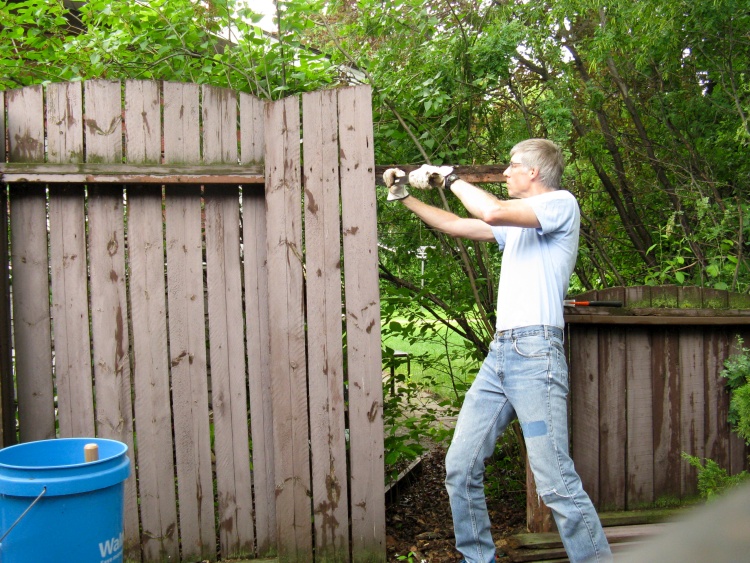
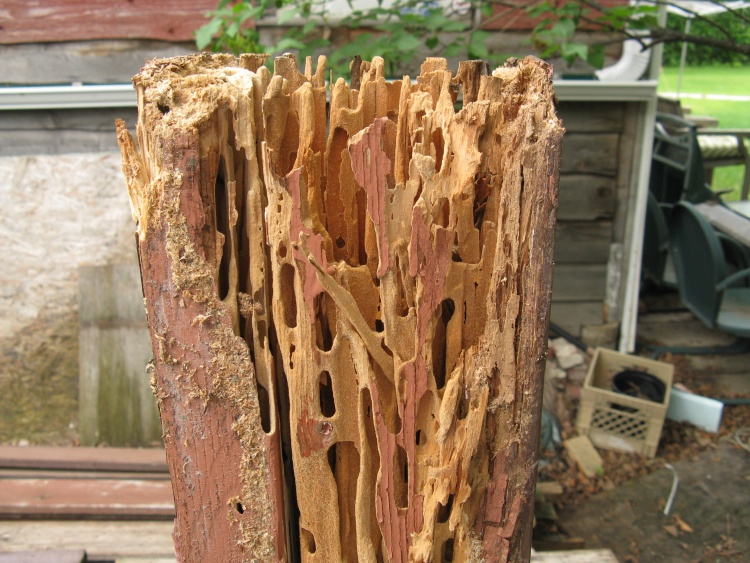
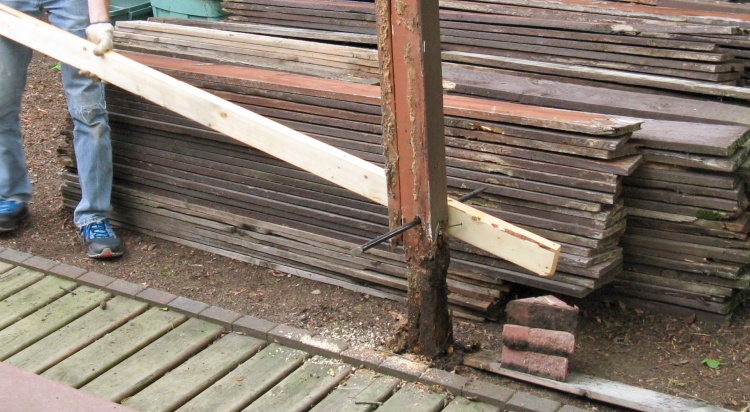
Post-pulling Step 1: Drill post
Once all the pickets and rails were down, it was time to pull the posts. Only three or 4 posts were rotted off, leaving a dozen or so to be pulled.
On the North fence, I used a hydraulic floor jack to pull posts. This worked well, but the thing weighs a freakin' ton and it needs a wide and stable base, plus attaching a cleat to the post is a pain; I needed a better method.
So presenting Post-Pulling Plan 2.0:
Step 1: Drill big-ish hole in the post.
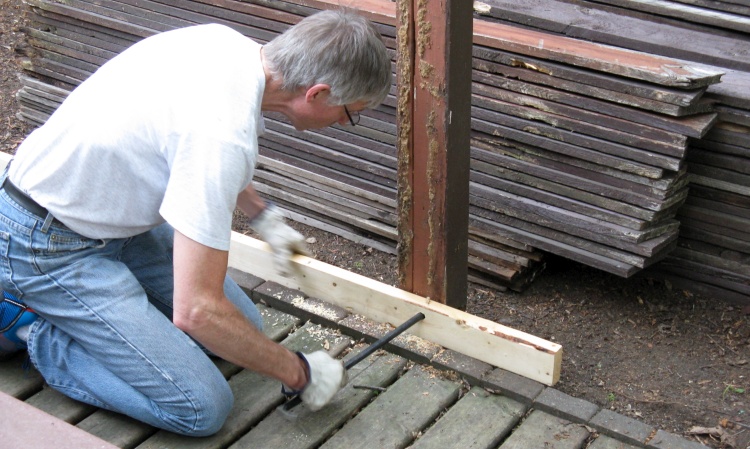
Step 2: Insert rod
Step 2:
Insert robust steel rod through a hole in a long 2x4 and then the post.
Insert robust steel rod through a hole in a long 2x4 and then the post.
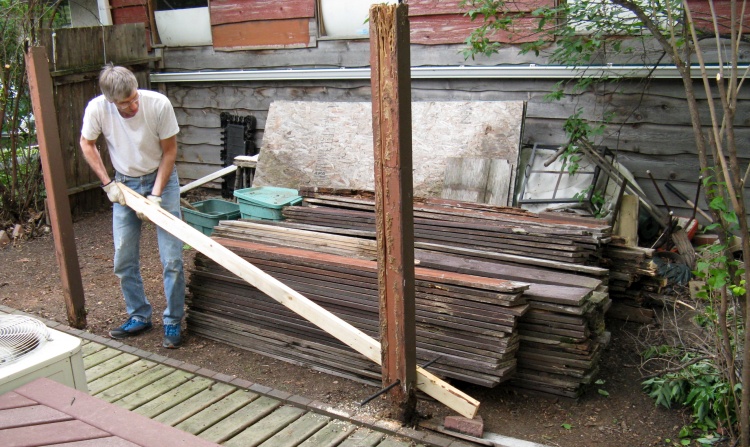
Step 3: Lift!
Step 3:
Heave!
Heave!
Out far enough to lift by hand
It actually took a few individual heaves, separated by progressively piling up wood or paving stones under the short end of the lever.
However, this method worked well and was really simple and quick. Once the post was 12 or 14" out, it could usually be lifted out the rest of the way by hand.
However, this method worked well and was really simple and quick. Once the post was 12 or 14" out, it could usually be lifted out the rest of the way by hand.
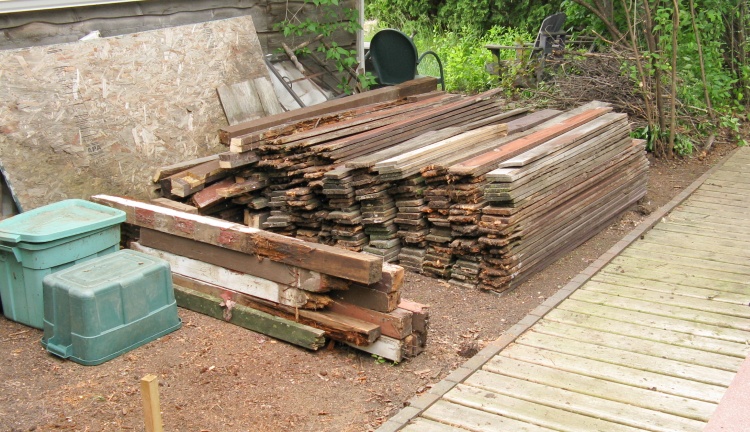
The World's Neatest Pile of Scrap Wood
And there's the pile of all the fence wood. I called Len's hauling one day and they were around a few hours later with a big truck and three guys. It was all loaded and gone in 20 minutes.
I'm pretty sure they appreciated the neat and orderly stacking of the scrap wood. I can only assume that they just forgot to mention it.
I'm pretty sure they appreciated the neat and orderly stacking of the scrap wood. I can only assume that they just forgot to mention it.
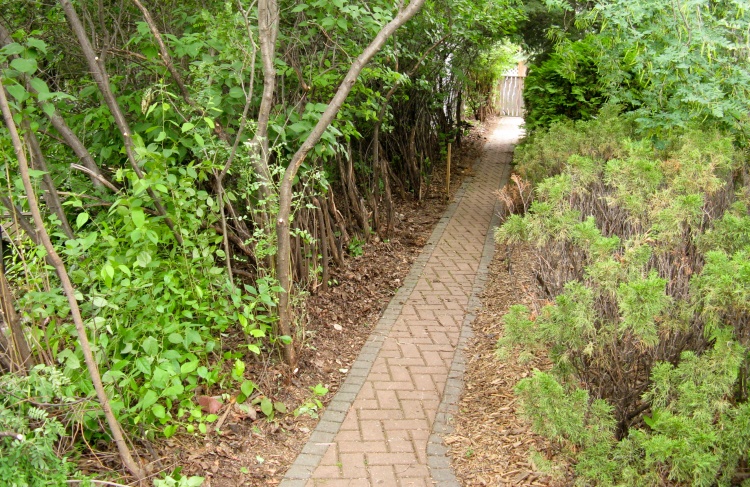
Back path with fence removed
Here's a view down the back path with the fence out. So OK, the fence may not be particularly functional down at this end since it is all shielded by bushes anyway, but it'll look better once we get the new one in place.
New Post Planting
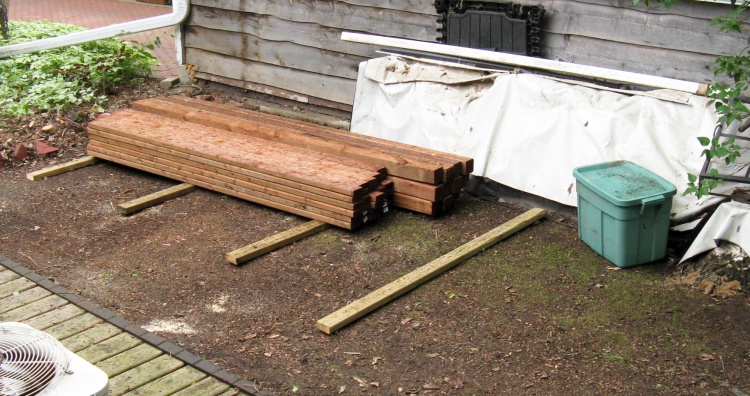
The first bits of new wood
OK, so that's the easy stuff done.
I ordered the posts and rails from Co-Op and this is a partial order since I might have made a tiny little error in my wood order and maybe I had to send the wrong stuff back and reorder, or something like that.
But that didn't affect execution of the next step, which was digging holes for the new posts.
Marking new post positions with stakes
I stretched a line from front to back along the fence route and here I'm pounding in the last of the wooden stakes that mark the position of a fence post.

This post hole is going to be a problem (that's a stump)
Here's a stake that didn't get get pounded in because: stump.
This post hole is going to take longer than average.
[Spoiler alert]: Yah, it took about 90 minutes for this one hole, versus 12 to 15 on average for most other holes.
This post hole is going to take longer than average.
[Spoiler alert]: Yah, it took about 90 minutes for this one hole, versus 12 to 15 on average for most other holes.
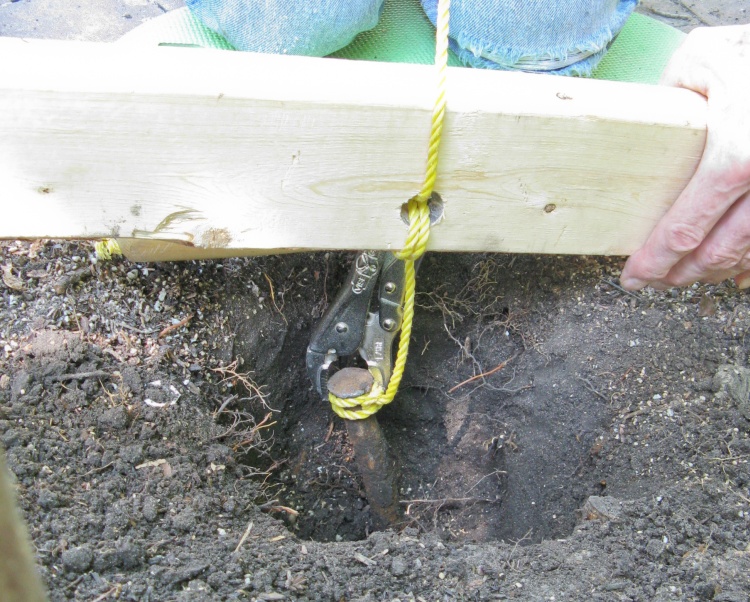
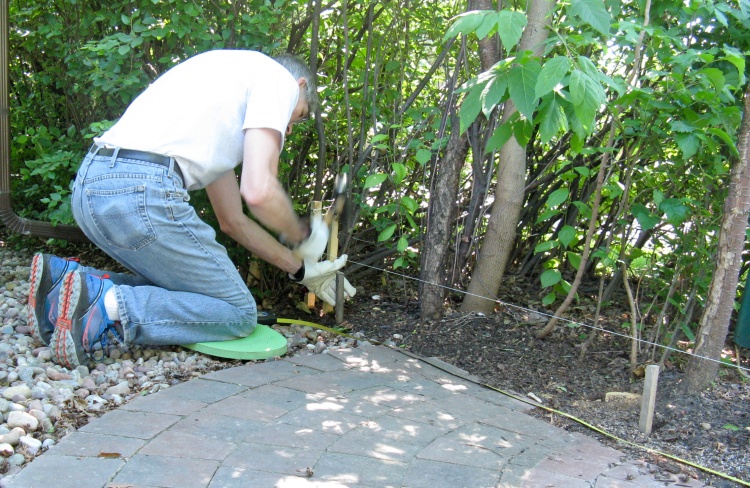
Buried spike gets Big Lever treatment
Here is another problem hole; I ran into the head of a steel spike a few inches down.
So with the aid of some rope and vice grips, it got the Big Lever treatment.
So with the aid of some rope and vice grips, it got the Big Lever treatment.
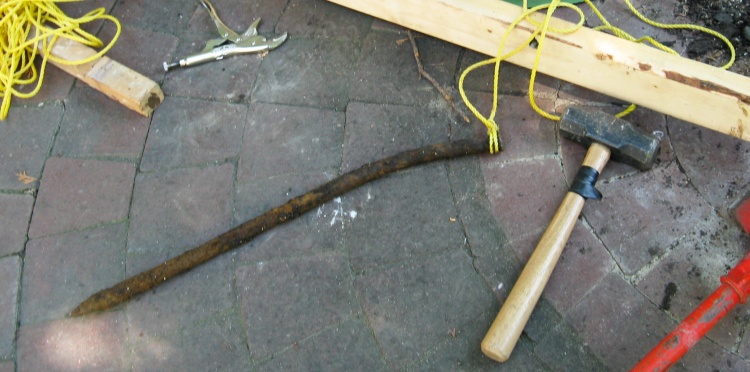
Extracted spike
Long, rusty and bent. Not sure what that would have been doing in there. Holding down a circus tent?
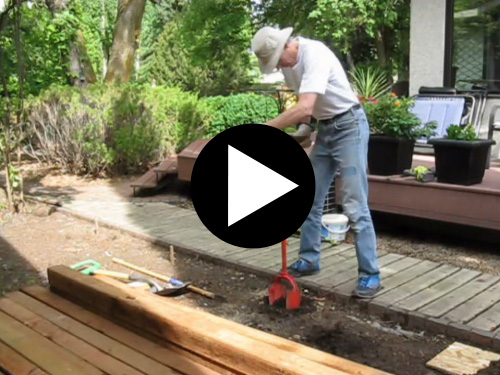
How to dig a post hole in 30 seconds
This little time-lapse video (at about 25X speed) shows one of the easier holes being dug. It had only one or two smaller roots which required the use of the root-cutting tool I had made for the previous fence. Other than that it was pretty clear sailing. Larger roots in other holes got the attention of a reciprocating saw.
Holes were dug about 28 inches deep which with some gravel at the bottom gave at least 2' of post in the ground. I had felt-markered depths on the auger shaft as a guide.
Holes were dug about 28 inches deep which with some gravel at the bottom gave at least 2' of post in the ground. I had felt-markered depths on the auger shaft as a guide.
Graphical post-hole progress
I piled up the stakes for each post hole I had dug, grouped by day out from the wall. So this photo tells a story of 5, 6, 8 and 5 holes dug on successive days.
I was pretty happy to have finished digging the post holes.
I was pretty happy to have finished digging the post holes.
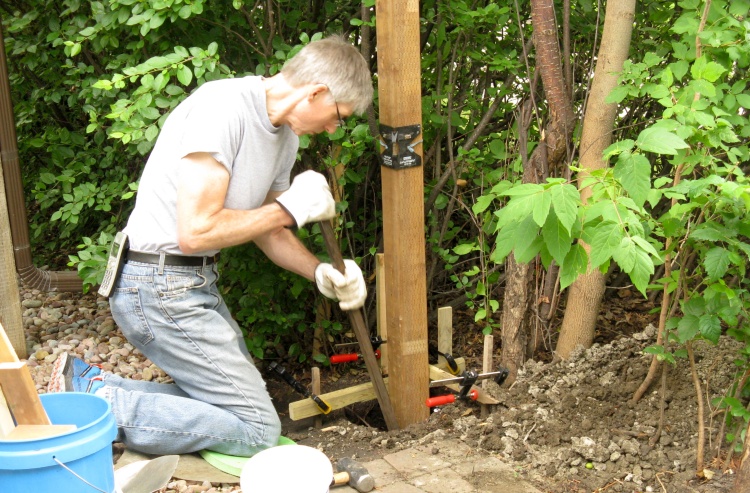
Planting the first post
So next up was post planting.
I started with the Easternmost post. I set up some wooden guides at ground level to make sure the positioning was correct for this one. The post level ensures* the post is put in vertically. Here I'm using the metal tamping bar to compress the fill that I've shoveled into the hole.
*Yah, actually not. After noticing a significantly wonky post, I checked the post level closer and it didn't do a very good job. Buying a new one didn't help much either. The problem seems to be that the short length isn't a good "average" of the post's angle since it could sit on some unevenness and read several degrees off (being out by 1/16" over the 4" height of the post level would result in the post top being about 1" out of place). So then I switched to using longer levels strapped to the posts.
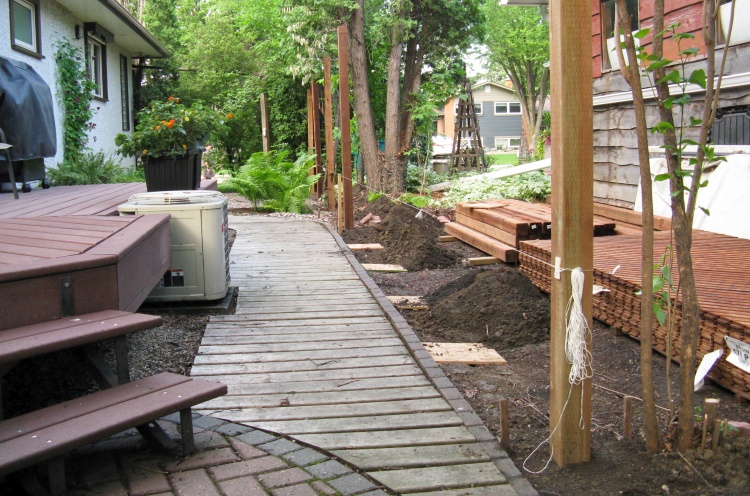
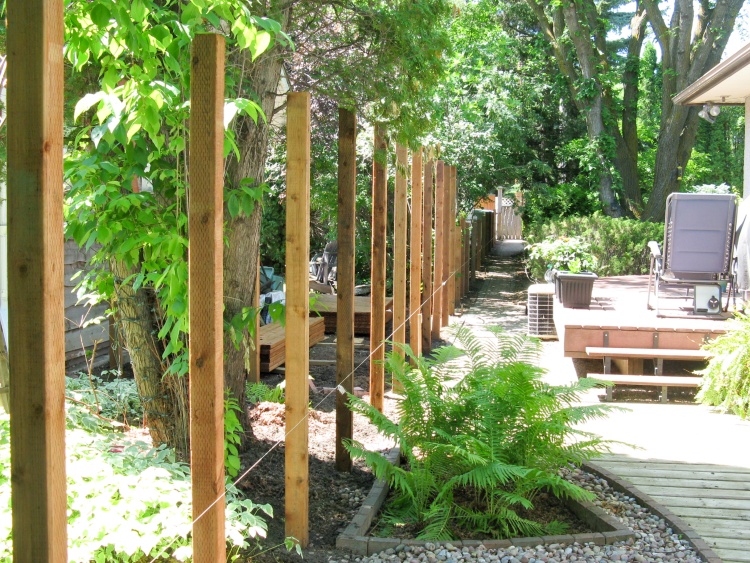
A few tall posts in place with a guide string
That first Easternmost post was followed by the Westernmost of the tall posts. Then I strung a line between them and started to do the posts in between, a couple of which are in place here.
That string line is level and I marked its position on the posts so they would all have a common height reference for future operations.
You can also see to the right that the rest of the posts as well as the lattice has been delivered, which is everything needed for the fence.
The wood squares beside the path are covering the leg-eating post holes.
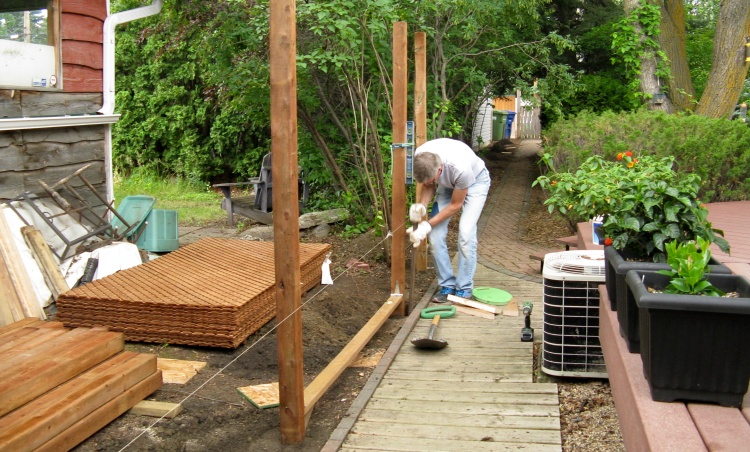
Doing some tamping
In this shot I'm working on the next-to-Westernmost tall post (got that?). The 2x4 at the bottom is temporarily screwed to the next post over and the one going in. It spaces the posts at exactly 8' centers and makes sure they are square. The spacer gets moved to the next post when this one is in.
Once I finished spacing posts at 8', I modified my spacer 2x4 for a 4' spacing and then did all the 4'-spaced posts (which was the rest of the tall ones and a couple short ones).
Once I finished spacing posts at 8', I modified my spacer 2x4 for a 4' spacing and then did all the 4'-spaced posts (which was the rest of the tall ones and a couple short ones).
For fans of frantic action, here's another time-lapse video showing the planting of one of the short posts near the alley end. I'll just note that the short texting session is not actually an integral part of the post planting processs.
The small bucket in the background holds the gravel that I forgot to put into this hole before adding the post during the video. I can only assume that I must have been too distracted by the director, camera crew, catering people, etc. filling up the back yard.
The small bucket in the background holds the gravel that I forgot to put into this hole before adding the post during the video. I can only assume that I must have been too distracted by the director, camera crew, catering people, etc. filling up the back yard.
All posts in place
Here's a shot Westward stretching off to infinity after all the posts were in place.
OK, it really only goes to the alley, but it felt pretty long when I was out digging post holes.
OK, it really only goes to the alley, but it felt pretty long when I was out digging post holes.
Fence Assembly
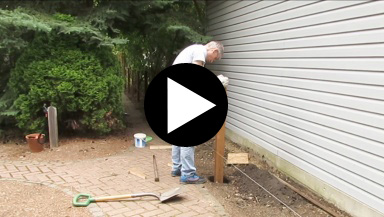
Trimming off the post tops
When placing posts, I needed to ensure they were correctly positioned in the East-West and North-South directions, vertical in the East-West and North-South directions, and rotated to match other posts. With all that, I didn't want to have to worry about the exact height as well. So my strategy was just to make them too long and then cut them off to the desired height.
I used 9' posts for the tall ones and 12' posts (cut into two 6' posts) for the short ones. That gave me 24-26" in the ground and extra above-ground height.
Here I have a cutting jig clamped to the post and I'm cutting it to the correct height with a circular saw. The saw cuts only 60% of the way through so the post needs to be cut from both sides. The jig makes sure I'm cutting square and that the cuts from both sides are the same height.
This video shows the post-cutting technique, and more importantly the super-slo-mo on Sue's phone.
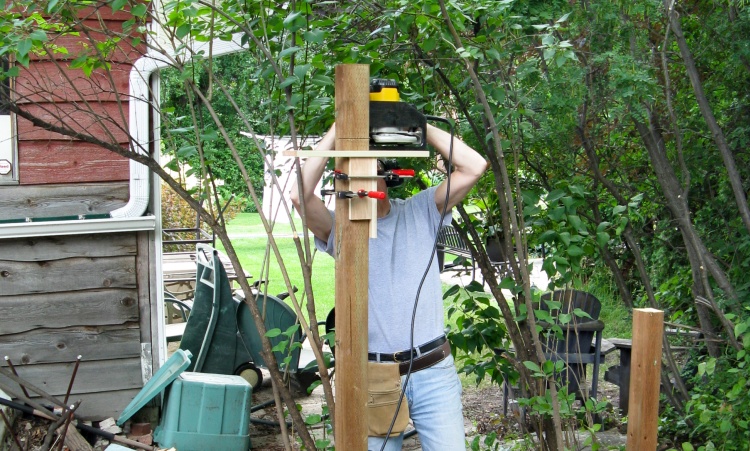
Routing slots into the post sides
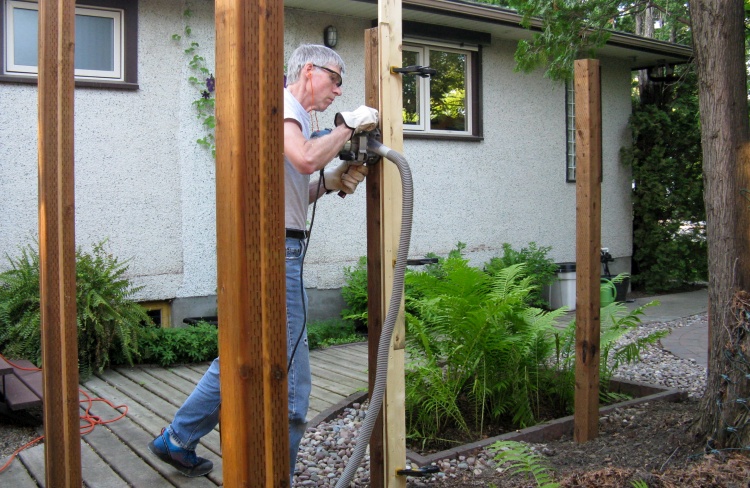
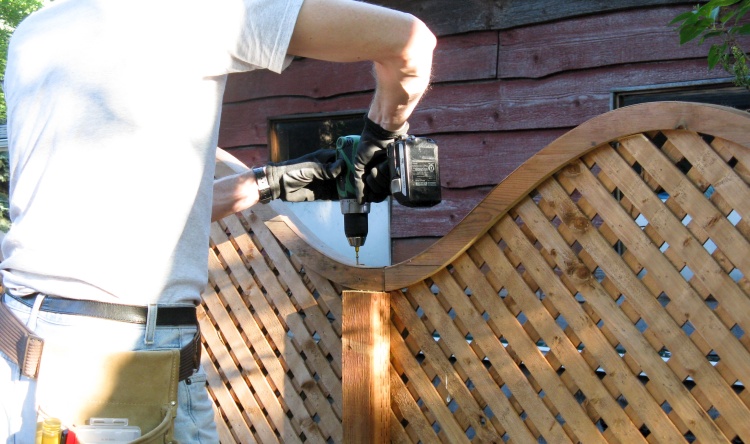
The plan to hold the lattice was to have slots in all edges. That included the posts and here I'm routing a vertical slot in a post using a hand-held router with an edge guide clamped to the post.
The forground of this picture shows a post with the slot already cut. The slots are 7/16" wide and about 1/2" deep. A shop-vac at the other end of the grey hose helps collect the copious amount of sawdust this creates.
The forground of this picture shows a post with the slot already cut. The slots are 7/16" wide and about 1/2" deep. A shop-vac at the other end of the grey hose helps collect the copious amount of sawdust this creates.

Routing slots into the bottom rails
The bottom rails also need slots. These were cut inside on the router table using the same sideways-cutting bit as was used for the curves. This bit cuts much faster and cleaner than the standard rotary bit used for the posts.
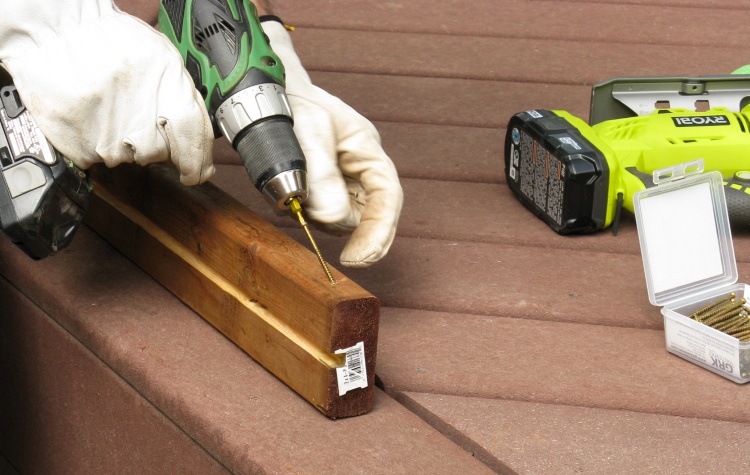
Adding screws to a bottom rail
The bottom rails were screwed to the posts using angled screws. Here the rail has been cut to length and I'm starting the screws up on the deck where it's a bit easier to do.
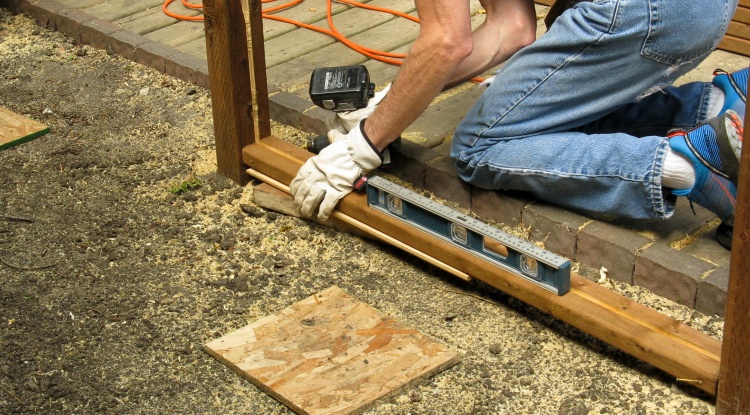
Attaching bottom rail
Then the rail was positioned about 2" from the highest ground level under it (as determined by a couple pieces of stacked wood) and the screws driven in. The level was used to ensure the rail was as close to horizontal as I could get it.
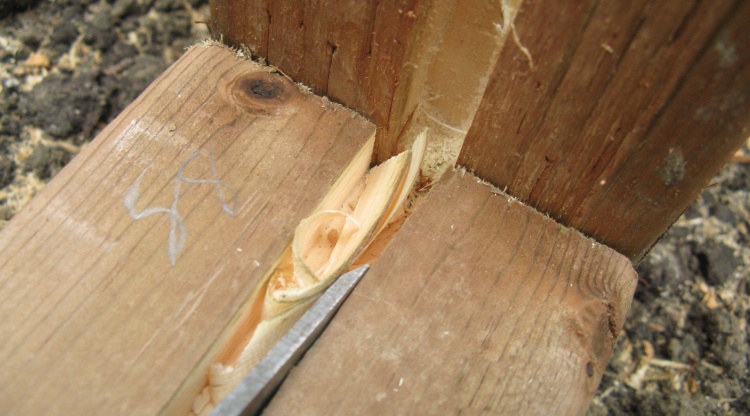
Trimming the edge of the slot
Unfortunately out of around 60 rail-to-post connections, maybe 3 of them lined up exactly. For the other 57, I needed to carve the rail slot a bit at the ends to make sure the lattice could fit in. A chisel made quick work of this in the soft wood of the rails.
With the bottom rail on, the section was ready for the lattice. The lattice was trimmed to size using the circular saw based on my measurements of the width of the section at top and bottom. As shown below I clamped on a straight 2x4 as a cutting guide, which was spaced 1.5" from the cut line using my calibrated wood chunk (which corresponds to the baseplate-to-blade distance of the saw). After cutting I used a sanding disc to bevel the edges of the lattice a bit to make it easier to get into place.
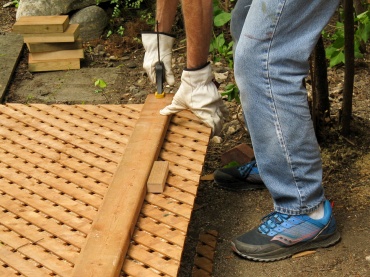
Clamping 2x4 as guide
Cutting lattice to width

Bevelling edges
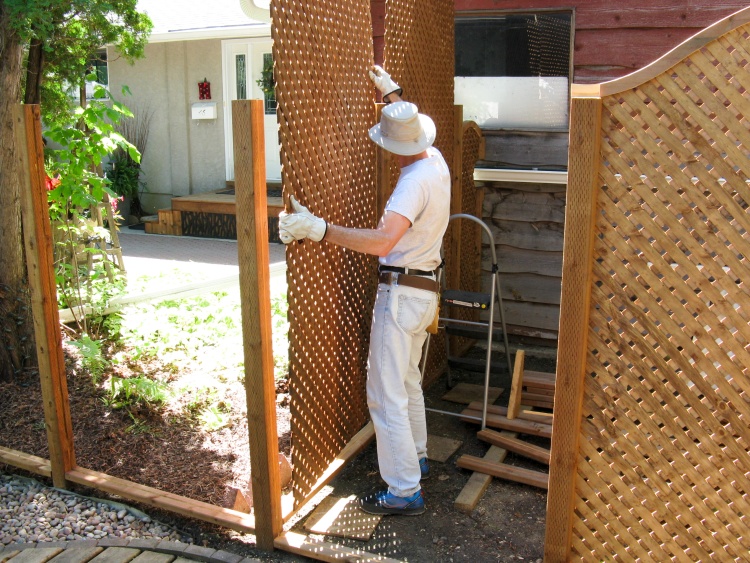
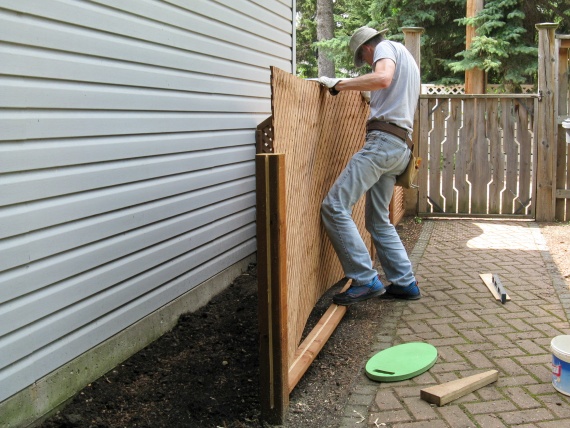
Installing lattice
I inserted the lattice into the post notch on one side and then by flexing it in the center was able to get the other edge past the second post and to its notch. Then I whacked it downwards to drive it into the slot in the bottom rail, with the ocassional stop to push recalcitrant lattice slats into the slot.
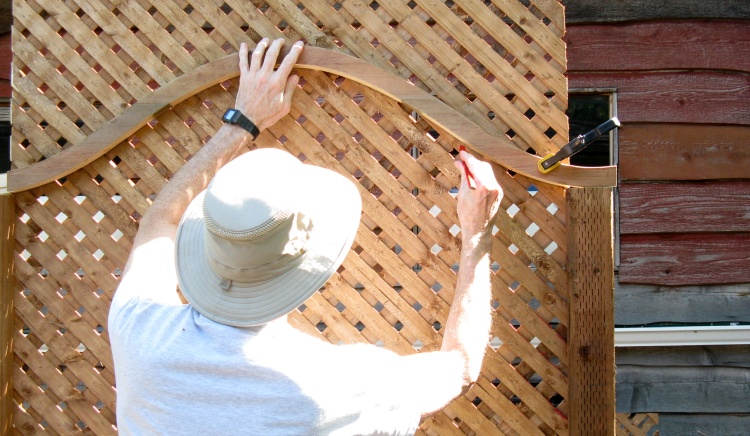
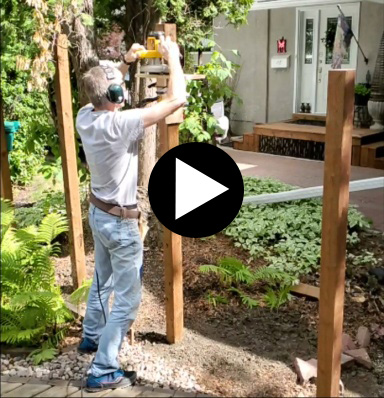
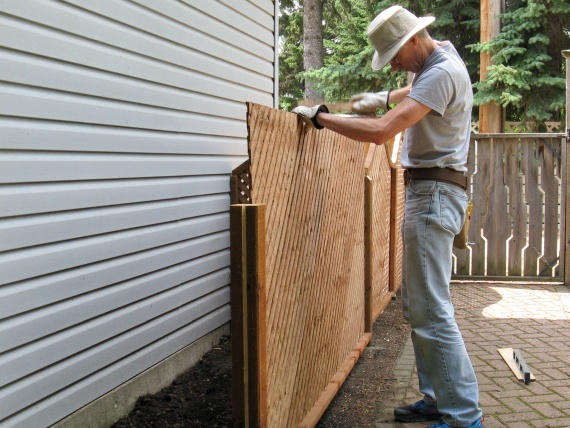
Marking bottom of curve
With the lattice in place the next step was to mark the shape of the curve which I am shown doing here using a pencil. The fence-top curve I am going to use is just clamped against the lattice for this operation.
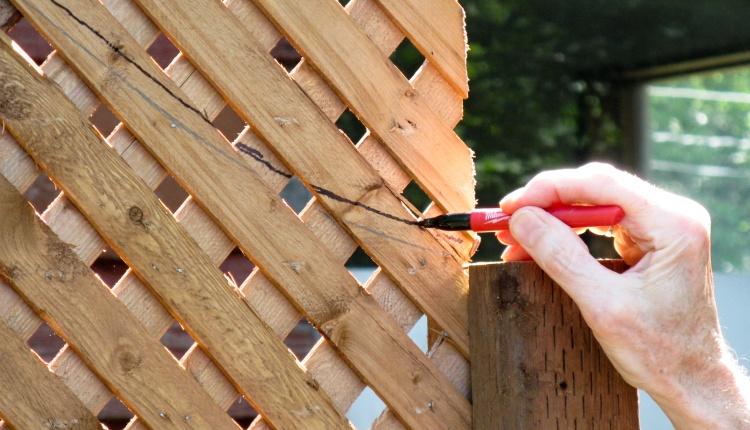
Drawing a cut line
Of course, the lattice needs to slide into the slot of the curve so the cut needs to be made about 1/2" outside the pencil line I just drew.
This offset cut line I just drew manually, using a felt marker for good contrast.
I probably should have made a template for marking the cut line, but I never did get around to it.
This offset cut line I just drew manually, using a felt marker for good contrast.
I probably should have made a template for marking the cut line, but I never did get around to it.
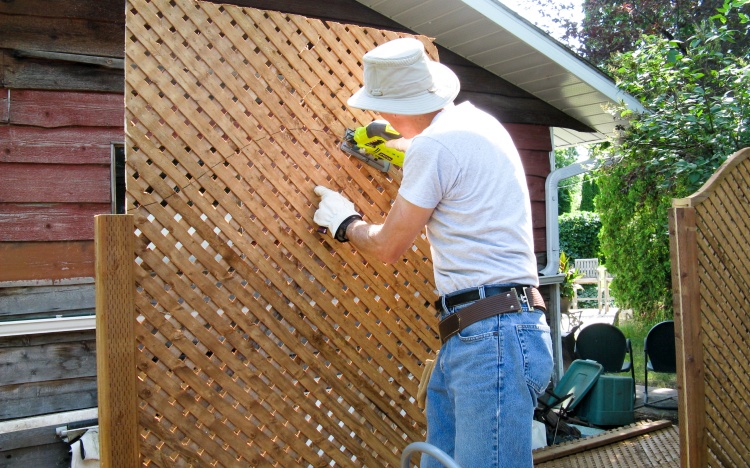
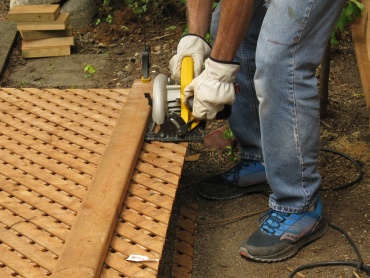
Using a jigsaw to cut curve
Then it was a matter of cutting along the felt-pen line using a jigsaw.
There are thick staples holding the lattice together at half of the crossing points so I usually need to saw through one or two staples when doing a curve. For this reason, I used a metal-cutting blade in the saw since it has no problem cutting wood, and goes through the staples as well without dulling.
There are thick staples holding the lattice together at half of the crossing points so I usually need to saw through one or two staples when doing a curve. For this reason, I used a metal-cutting blade in the saw since it has no problem cutting wood, and goes through the staples as well without dulling.
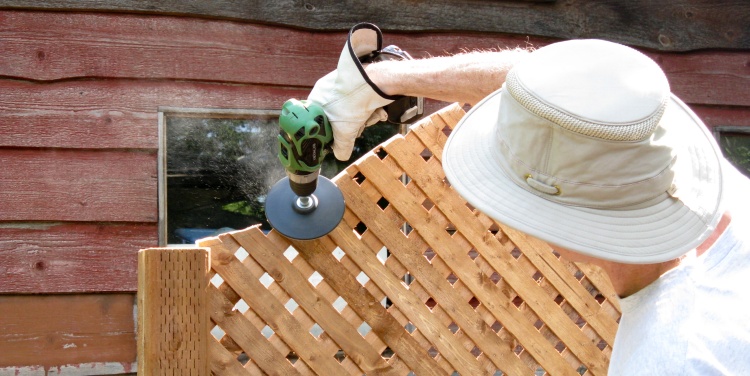
Bevelling the top
The cut edge was pretty rough so to make it easier to slide on the top curve, I bevelled the corners of the lattice top using a sanding disc.
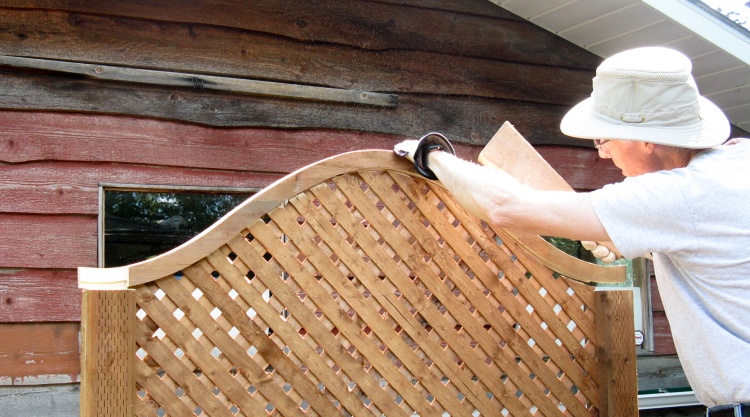
Tapping the curve into place
And then it was just a matter of tapping the curve into place.
Minor Landscaping Tangent
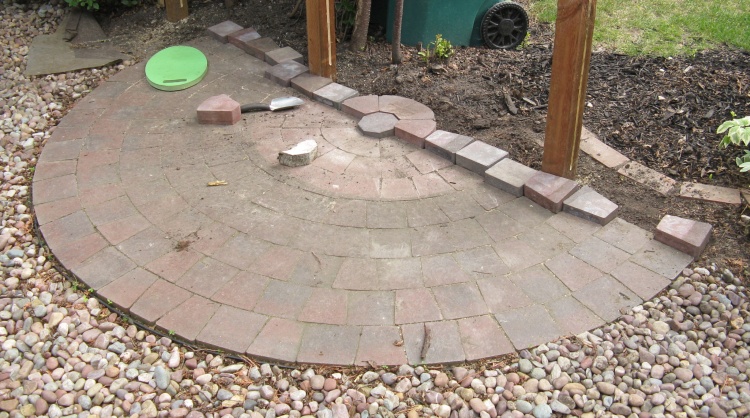
Paving stone semi-circle needs to be extended a bit
The fence was going to be few inches over from the old one so our paving-stone circle (used as a sweepable area under a bird feeder) needed to be a bit wider if it was to go right up to the fence. Just one additional row of bricks would be enough, and here I've selected some suitable shapes to do the expansion.
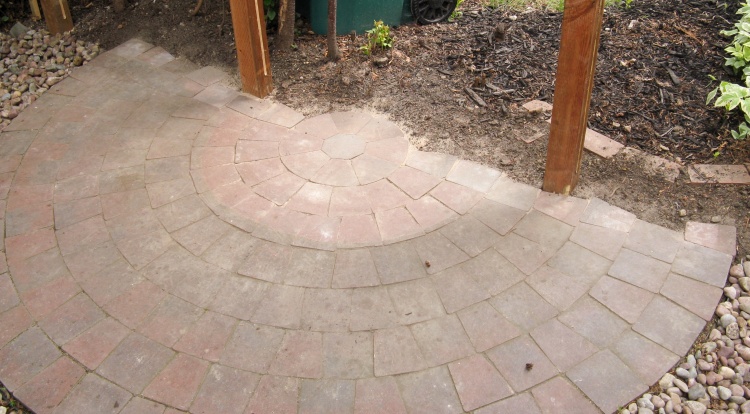
New paving stones in place
Then some digging, some base gravel, some compacting, some sand, some block placement, some crack-filling sand and some dirt backfilling got us to this point.
Gravel area extended to new fence line
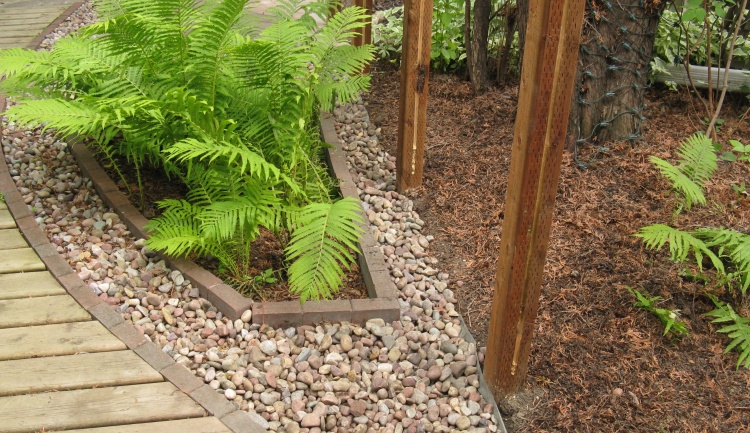
There was also a thin section of gravel behind the block-lined fern bed which needed to get a bit wider, so some digging and landscape cloth fixed that up as well.
Aaand...Back To the Fence
The set of photos below show a low section going together. It was the same basic process as the tall sections except it got the 2x4-based mid-post added before the top was shaped for two fence-top curves.
Installing 8' lattice
Snapping the other edge in place
Tapping down into bottom rail slot
Installing faux post
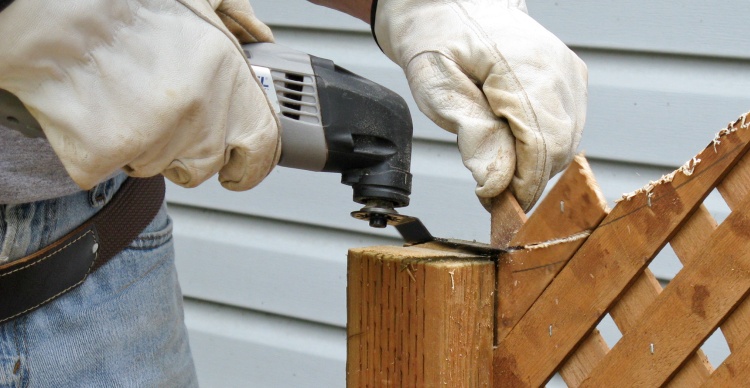
Trimming the corners
When cutting the curve in the top, the jigsaw can't reach quite to the post so it tended to leave some uncut corners. I used an oscillating tool to remove those little corners.
Lattice loaded in short sections
This shot shows a number of short sections with the lattice pieces installed. The top of each section is the same height off the ground so the level differences in the latttice top edges are due to the slope of the yard.
Short sections complete
And here are those sections with the top curves installed.
That finishes off all the lower sections - just a few high sections left to complete.
That finishes off all the lower sections - just a few high sections left to complete.

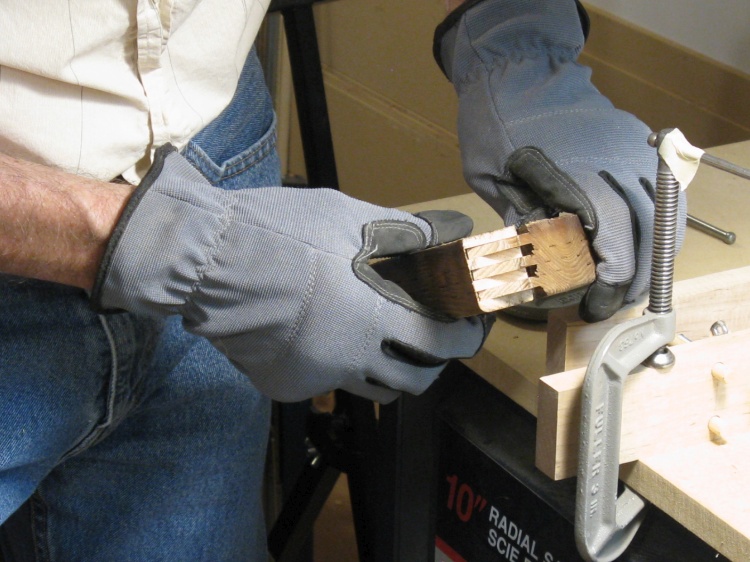
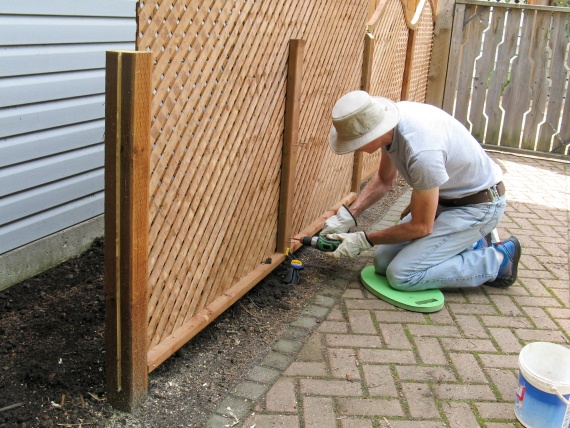
A joint with screws installed
The joints had a pair of #8 x 1-1/2" deck screws holding the lap joint between the curves together, as well as a couple 2-1/2" "composite" screws holding the curves to the post.
The composite screws are made for screwing down a composite deck and have small Torx heads.
I drilled pilot holes for all the screws to prevent the relatively thin wood sections from splitting.
The composite screws are made for screwing down a composite deck and have small Torx heads.
I drilled pilot holes for all the screws to prevent the relatively thin wood sections from splitting.
Here are a couple more shots of the fence. These are the only odd-width sections, both going to the neighbor's garages. They were not wide enough to fit a full curve so I just used the appropriately-wide center section for the tops.
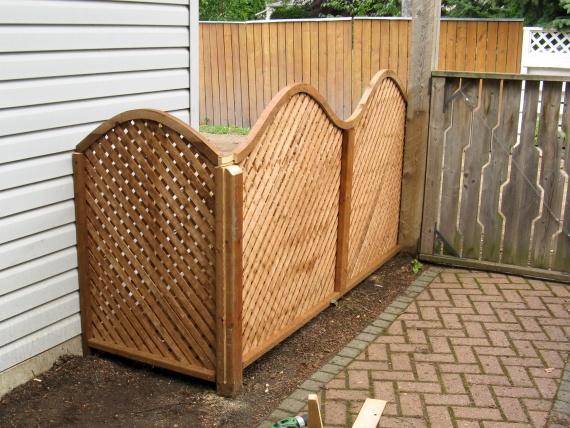
Narrow back section
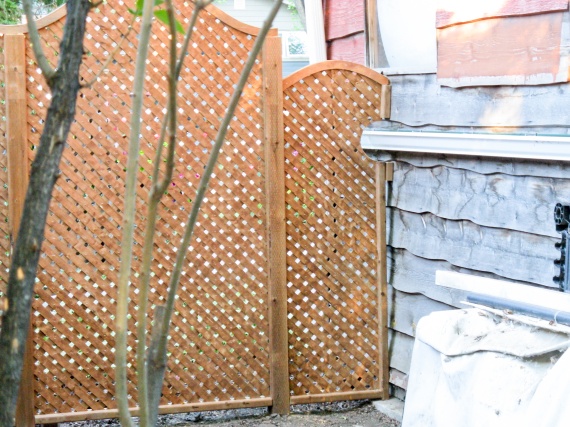
Narrow front section
The Last Screw
And after about 6 weeks, it was done. This shows me installing the final screw in the final curve of the final...well, you get the idea.
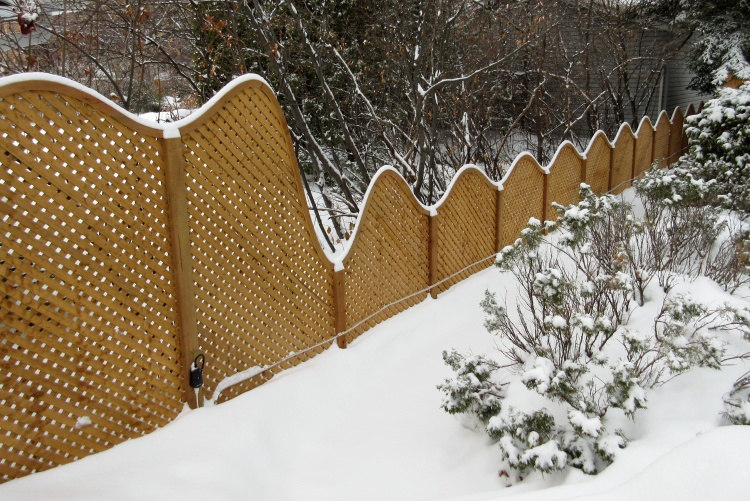
The other season
This is a view of the fence after a light snowfall the following winter. I've added some rope lights held on with modified brass cup hooks that we can turn on to light up the path for those late-night runs out to the garbage, recycle or green bins.


