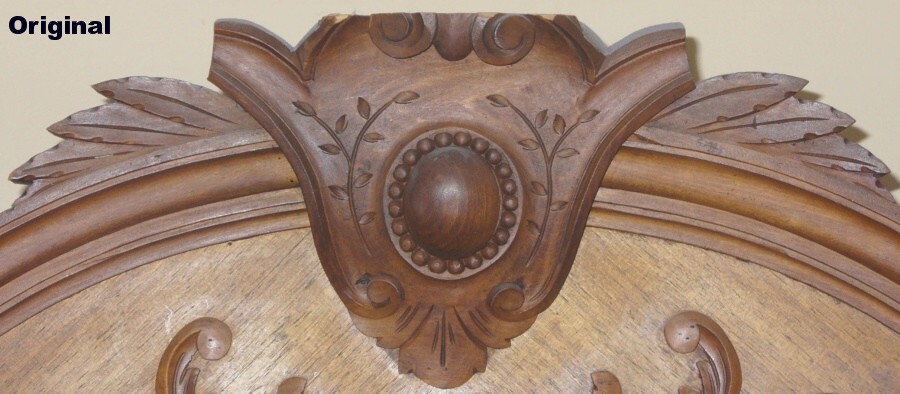
The headboard was made to match an antique armoire we've had for a number of years, which was dated (with unknown reliability) by the antique store guy as from the early 1900s. The headboard is pretty much just a stretched version of the decorative parts of the armoire, with various design details unimaginatively copied creatively rendered in various places. One thing that struck me while building this was the skill at woodworking the builders of the armoire must have had. Presumably most operations were performed by hand, including fabricating the moldings and making joints, etc. I would hate to think how long it would have taken had I been deprived of my cherished power tools.

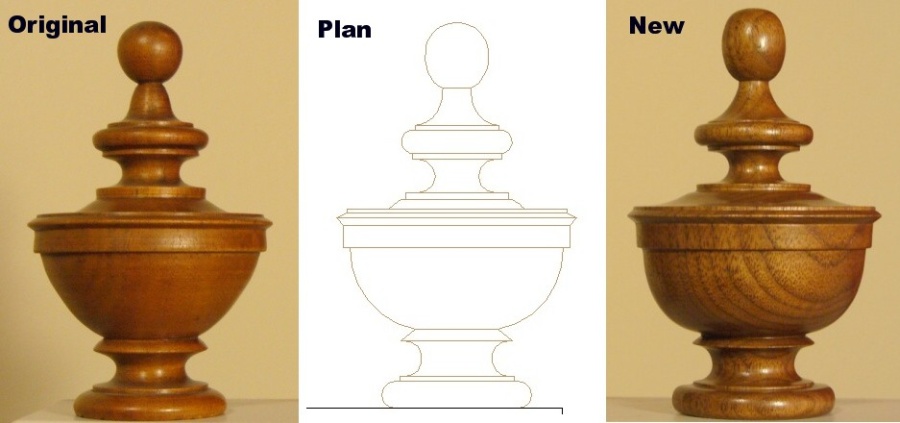
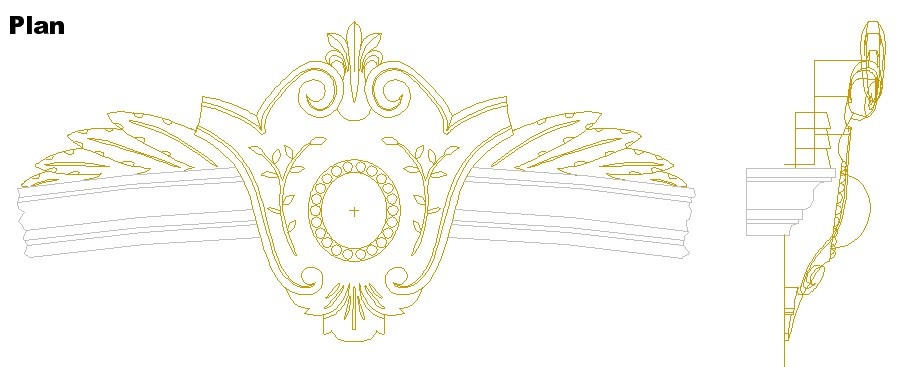
A piece of the plans
Wood
Pretty much everything in the headboard is walnut except for the cores of the headboard and cabinets. It mostly came from 2x6" or 2x8" planks of various lengths. In total it took about 30 board-feet (of which I estimate 20 board-feet or more ended up as sawdust), as well as 36 sq. ft. of walnut veneer. The veneer is really a kick in the head, cost wise. It works out to about $130 per board foot (as opposed to around $10 for solid walnut). But hey, it saves some time.
Leaves
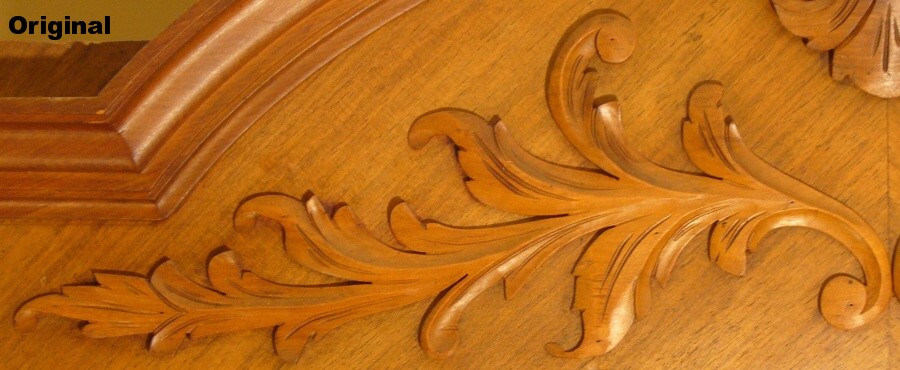
I thought I would start out by making the large carved leaves. That way, if I totally blew them, I wouldn't need to bother with the rest of the headboard. No such luck. Anyway, I wanted to copy the shape without having to pry one off the armoire I was using as a model, so I took a digital photograph of one of the leaves and then using a CAD program, traced over the outlines of the leaf image to produce a line drawing to use as a pattern. I then transferred the pattern by taping it to a wood blank and poking with an awl along the lines on the paper into the wood. I could then "connect the dots" on the wood with a pen to draw a continuous line.
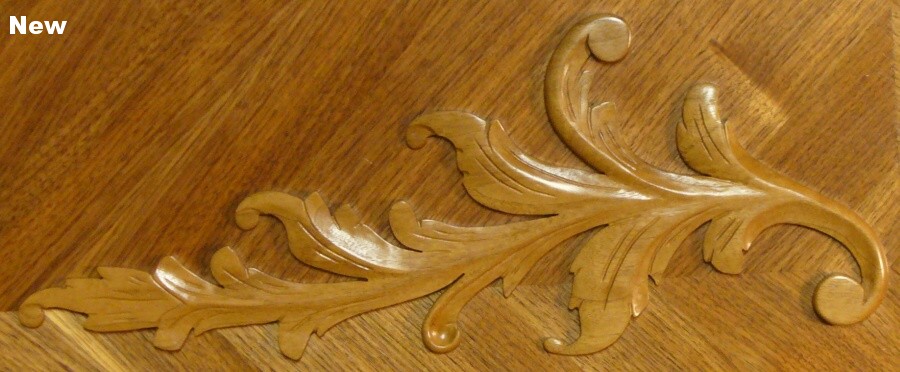
The leaves were cut out and then shaped to the outline by sanding and using needle files. Each was then glued to a board using a removable latex glue. This allowed me to carve the individual fronds with little danger of their breaking off. It was mostly chiseled out using hand power alone, except for a few times I was feeling reckless enough to use a mallet with the chisels. The leaves were removed from the boards when all done. They took about 35 hours in total.
The leaves were cut out and then shaped to the outline by sanding and using needle files. Each was then glued to a board using a removable latex glue. This allowed me to carve the individual fronds with little danger of their breaking off. It was mostly chiseled out using hand power alone, except for a few times I was feeling reckless enough to use a mallet with the chisels. The leaves were removed from the boards when all done. They took about 35 hours in total.

Crown Moldings
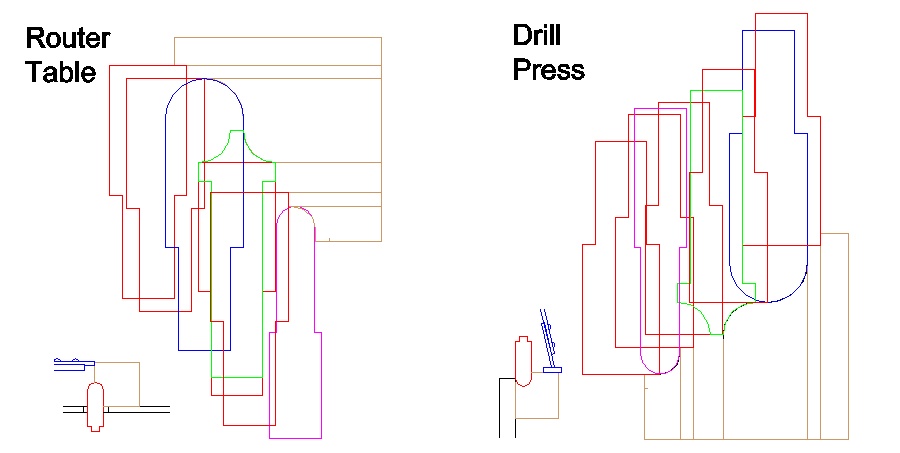
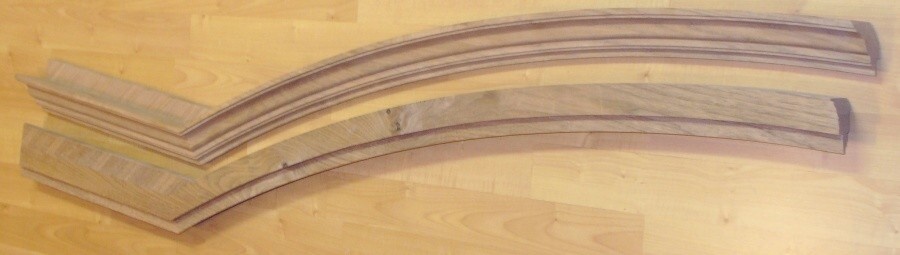
One of the most tricky-to-fabricate parts of the headboard was the crown moldings. Or more specifically, the right crown molding. The left could just be made on the router table (with merely 7 different settings of 4 different bits, and a couple dozen passes). The problem was that the router turned the wrong way for the right-side molding. Due to the curve of the wood, this resulted in the router bit making cuts into the grain, which gouged the wood. I tried several different techniques - climb cutting, different bits, tiny cutting depths, but could not prevent nasty tear-out from happening. What I needed was a router that turned the other direction and the appropriate selection of backwards router bits. Since those didn't particularly exist, I looked for other methods.
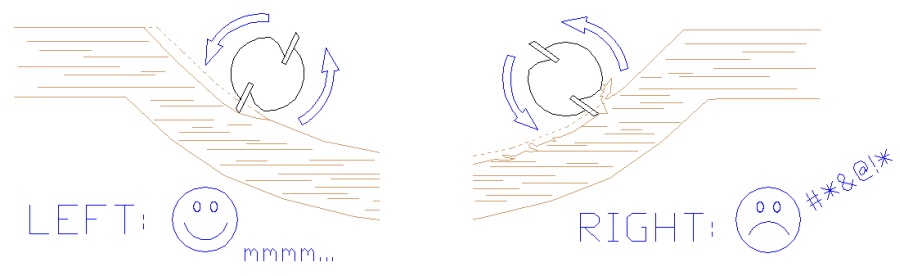
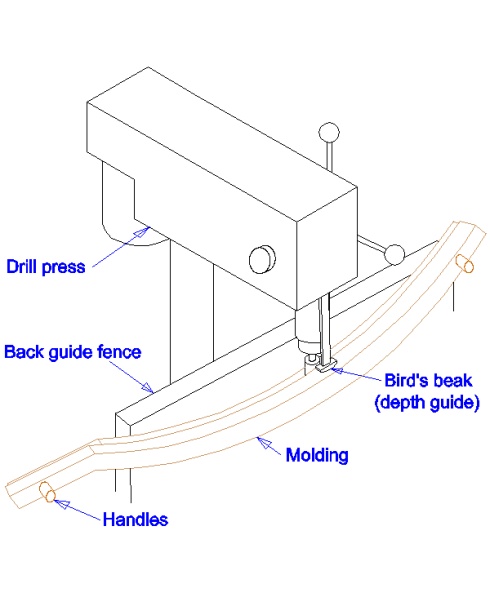
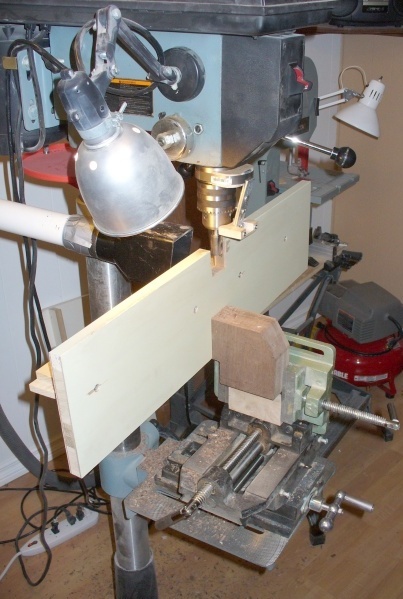
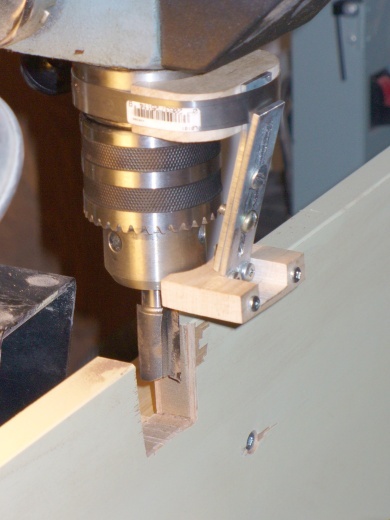
I finally ended up making a jig for my drill press so that I could use it like an upside-down router, so this made the cuts from the curved side of the molding rather than the flat side, to prevent cutting directly into the grain. This couldn't be done with the router table since I needed to make the cuts from the concave side of the molding, meaning there must be room for the work piece to extend past the plane of the cutting bit. The drawing below shows the router bit shapes used on each part of the molding for the two setups, with the little sketches showing the general routing geometry.
I glued some temporary handles onto the molding blank for convenience, since I needed to hold it by hand up against the bit and a guide fence. Other than being a very nerve-wracking few hours of work, it ended up working out reasonably well (it took about 7 hours of routing, but a single major error on any of the dozens of hand-held passes would have required that I started over).
The blanks for each of the moldings consisted of two 8 x 2" planks glued together. I used a string-and-pencil compass to mark the inner and outer radii (around 72"), and then used the bandsaw to cut out the basic shape. The inside of the molding needed to be the correct curve, since it acted as a reference for routing the molding. I have a spindle sander, but it is very difficult to sand curves that are much larger than the spindle diameter (which is only around 2" max) without producing little ripples in the curve.
Fortunately, the sander also has a horizontal belt attachment, so I ended up making a curved insert to go under the belt to make a large-radius sander. The insert was just a thin curved piece of MDF with a metal sheath on the belt side to reduce friction and abrasion. It can be seen in the photo below as the cream-coloured insert just under the white label on the sander. It was made with a radius a bit smaller than what I needed for the molding, so this let me produce a nice smooth curve Once the inside curve of the molding was sanded to shape, it was used as a reference for the routing.
It wasn't possible to use a standard fence for routing since the piece was curved., so I made adjustable "birds-beak" attachments for both the the router table and the drill press to control the offset of the cut. The inside of the molding would bear against the "beak" allowing the cutters to shape the molding at a consistent distance from the inside of the piece.

Overall the two moldings took about 28 hours, with another half-dozen hours for testing and jig construction. The moldings also needed separate little walls at the straight ends (just 'cause the armoire had them). They were made separately of veneered wood, and glued into place.
Veneer
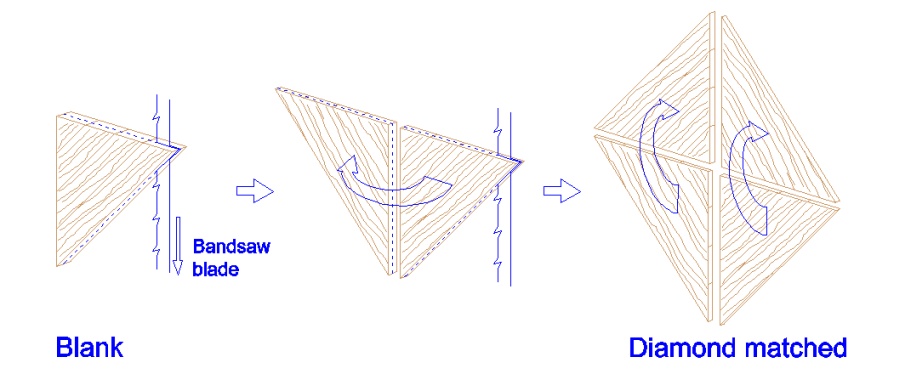
One of the noteworthy features of the armoire was the veneer graining. The main sections looked to me like quarter-sawn walnut, with the grain at 45 degrees to the vertical. The sides used the same veneer, but diamond matched. I checked specialty veneer houses on the internet, but was unable to find what I needed, so I made that myself. I hadn't run across any quarter-sawn walnut for the veneer, but a 2 x 6" plank of flat-sawn wood is the same as a 6 x 2" plank of quarter-sawn wood. The problem being, of course, that the latter is only 2" wide. Hence to make a 12" wide piece of veneer, you need to glue six 2-inch strips together. Fortunately, quarter-sawn wood has lotsa longitudinal grain, so the joint lines are not obvious, and combining numerous narrow pieces usually looks fine.
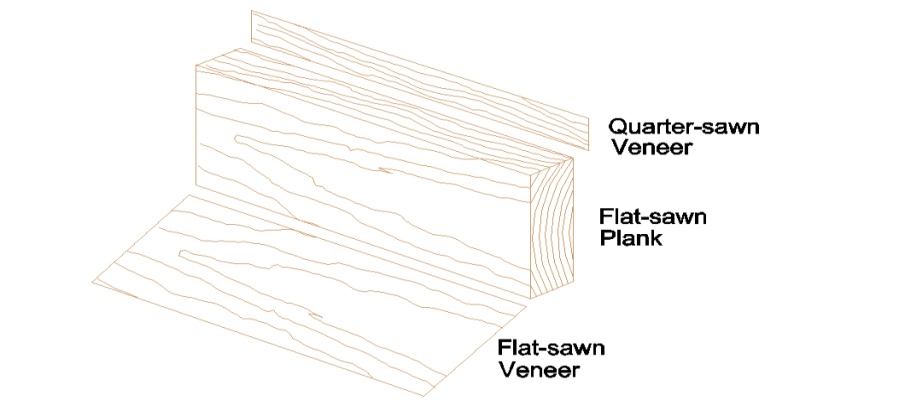
To make the matched veneer, I needed to start with a piece that could be cut into four layers and unfolded to have the grain line up. I cut my planks into 1/2" thick pieces, and assembled them into suitably-sized 1/2" thick boards, usually no more than 6 or 8" wide. I then cut the board in half to make two boards 1/4" thick, and then cut each of those in half again so I ended up with four boards 1/8" thick. This stack of four thin boards was unfolded in the proper arrangement to match the grain patterns. In practice, due to saw-kerf thickness, the final "boards" (i.e. veneer pieces) were around 0.05" to 0.08" thick.
To prevent warping of the core material when veneering, it is important to have the same forces exerted on both the front and the back of the wood (so they say). The forces are due to expansion and contraction of the veneer, so you want the same type, thickness and grain direction of veneer on both sides. Consequently the back of the headboard has a similar veneer pattern to the front, except I didn't bother to make the decorative end sections, and I made my own flat veneer on the bottom portion rather than using purchased veneer. I guess time will tell if that was adequate.
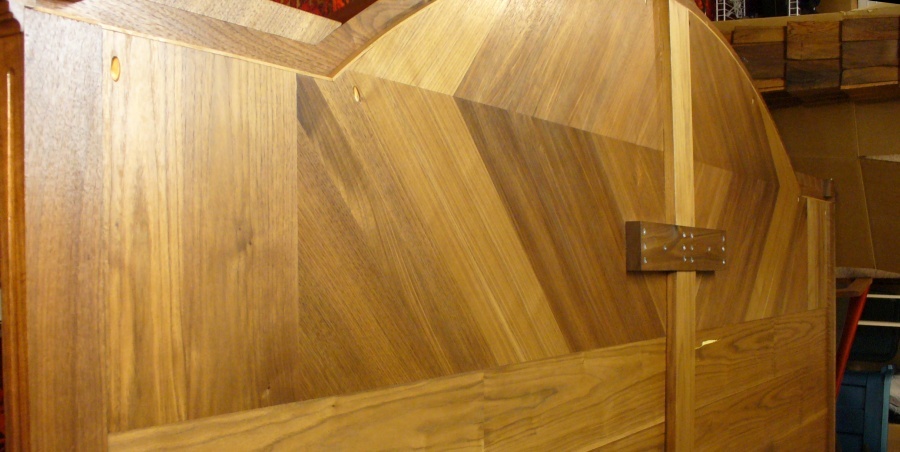
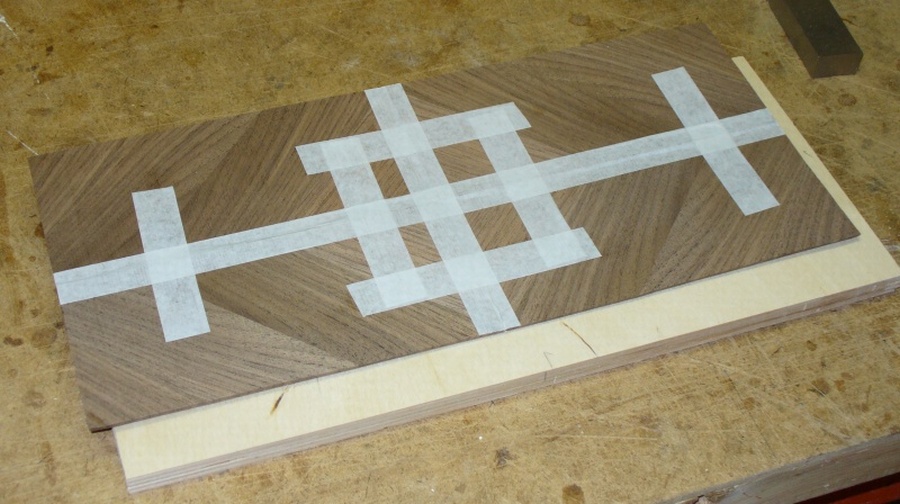
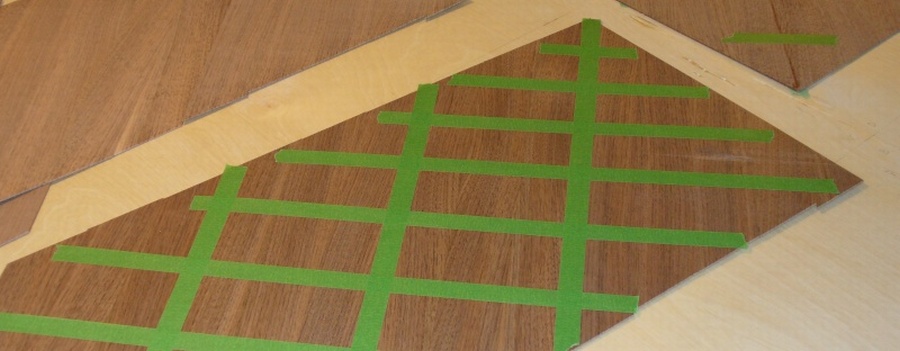
All the home-made veneer pieces and sub-pieces (original 2" wide sections) had the joined edges squared and straightened with the jointer and/or a straight sanding block. This minimized the visibility of the joints. Masking tape or veneer tape was used to assemble the 2" strips into veneer sheets. The veneer tape is a paper tape with an adhesive that you moisten to activate. As the tape dries on the wood, it contracts slightly, drawing the pieces closer (or tighter) together. Masking tape seemed to work almost as well, so I used that on a number of the pieces, since it has the advantage of not needing to dry. The first photo below is a diamond-matched veneer piece for one of the surfaces of the cabinets, with four separate pieces held together with veneer tape. The lower shot is one quadrant of the main headboard diamond-matched veneer being assembled from 6" and 8" sections of veneer, and held together with masking tape.
There are specialized tools often used for working on veneer, including saws and hammers. I tried out a veneer saw, but it was difficult to use and I found I wasn't able to do a good job with it. For cutting the veneer, I used a heavy-duty snap-off blade cutter and took multiple passes to cut through the veneer. It took maybe one or two passes for the thinnest veneer of 0.02", and a dozen or more for the thicker pieces of up to 0.1" or so. I had also tried a rotary-blade knife, but it didn't do a very good job either. And I don't even know what a veneer hammer is for.
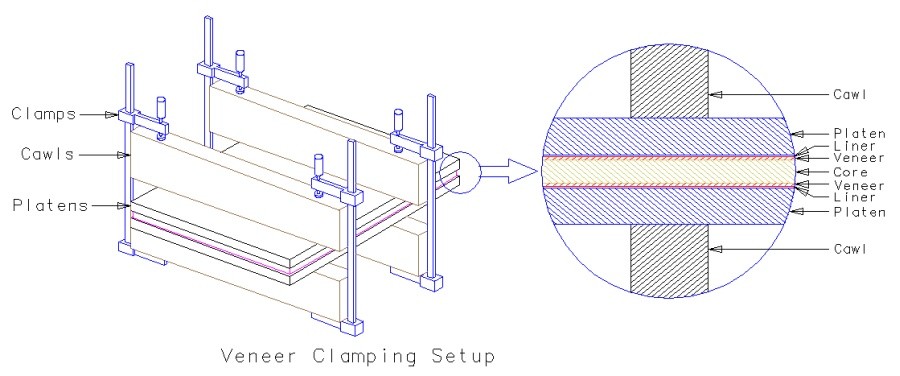
All the veneer was attached with standard wood glue. This needs lots of pressure while gluing, especially with thin veneer. When doing small panels (maybe 12" square), I used a half-dozen clamps, which was about right. I wasn't able to provide that much pressure on the larger portions of the headboard proper, and I have bubbles in the veneer to prove it (in non-critical areas, fortunately). The ideal setup would probably have been a large vacuum press, which I was seriously considering, since it can be little more than a large plastic bag and a vacuum pump. However, after describing this to a woodworking buddy of mine, he whacked me over the head (figuratively, this time) and said "cauls". Or maybe it was "cawls". Anyway, a board that spans the piece and applies pressure via clamps placed at the ends. The pressure is applied to platens, which distribute the force of the cawls. To prevent further cranial/psychological trauma, I decided to use this technique. I curved the cawls slightly on the bottom to ensure that the force is distributed more evenly. I also used a liner of paper towel to absorb any glue that made it through the veneer. That was mostly an issue for the commercial veneer since it was only 0.02 to 0.03" thick. For cases where there was significant thickness variation in the glued-together veneer (i.e the home-made stuff), I used a thin piece of foam (as would be used under a laminate floor) for the liner.
After attachment, the veneer was sanded down to a consistent thickness using a random orbital sander. Making the headboard veneer took a bit over 50 hours all told.
Frame
The frame of the headboard is made from a single 4x8 sheet of 3/4" 11-ply plywood. The frame had to be longer than 8', so I added a few inches to each end with 3" tongue-and-groove sections. I originally wanted the option of being able to move the completed headboard in two pieces, so the frame was made in two halves with overlapping screwed-in joining pieces. However, I later decided that rigidity was more important than this convenience, and ended up gluing the assembly together. The plywood joint-spanning pieces on the back were veneered so they did not look quite so out-of-place.
Cabinets
The original driving force for making the headboard was to get bedside tables out of the deal, so they were integrated into the headboard. I used an arrangement of an open-ended enclosed shelf with a drawer below. The drawer was made narrower to provide a bit more clearance to the bed. The cabinets are made from 1/2" veneered Baltic Birch plywood and have rabbit, dado and mitered joints as appropriate. They have diamond-matched veneers on the sides, a book-matched veneer on the tops, and plain flat veneer on all other surfaces. Like the headboard, they are veneered on both sides, but using just plain veneer on the backside, since the small panel sizes seemed to make warpage less of a risk. The cabinets were first assembled dry using screws in order to ensure that everything fit before gluing all the pieces together. In fact, with seven pieces and around ten joints each, I couldn't see any way of gluing the cabinet all together at once, short of a well-trained F1-type pit crew for woodworking. To avoid that, I glued it together in stages, which provided enough time in each stage to ensure things were in the right position, were tightly clamped, aligned, square, etc.

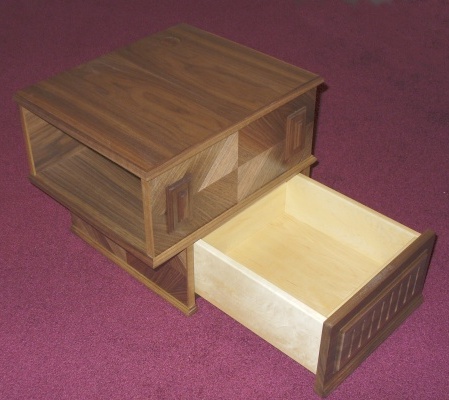
Of course, with veneered wood, all the edges need to be "dealt with" since they show the core material. I decided to make small decorative moldings that I called beadings to cover the edges, which were based on beadings found on the armoire. They cover the horizontal edges on the top, middle and bottom of the cabinets. The vertical edges were dealt with using flat pieces of solid wood. There are also some little rectangular gewgaws in the corners of the armoire that I replicated on the front corners of the cabinets.
The drawer-front pattern was again based on the armoire. In lieu of a knob or handle, the drawer front has a section cut out of the rear at the bottom to be used as a finger grip. And rather then use the rather crude wood-on-wood slide arrangement as in the armoire, I used some full-extension slides that fit under the drawer. The slides are notable for having a mechanism to automatically close the drawer for the last 2 or 3 inches - each has a spring that is "loaded" by pulling the drawer out, and then a mechanism trips when the drawer is pushed back in, which engages the spring action for the final closing. The slides also have adjustments to tweak the height at the front and back of the slide to help align the drawer front. Did I mention they were kind of expensive? But there were "better" ones too - instead of just crudely pulling the drawer closed, they had a nice damped motion. I figured I could live without that.
The open cavity has a hole near the back to feed wires through for alarm clocks and such, and the top has a similar hole, with a matching plug. Of course, the hole edges in the top needed to be "dealt with" as well, so I ended up making some slightly tapered wood rings on the lathe to line the holes. This let them be tapped (okay, whacked pretty good) into place, to make the joint tight and less obvious. My crappy photography makes it much less obvious as well - it is near the upper corner of the photo on the left.
Feature
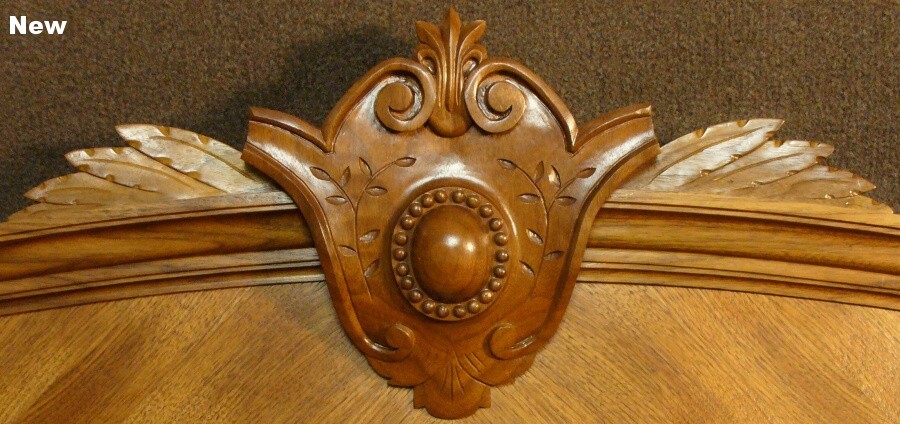
I imagine there is an official name for the big wood feature thingy at the top of the armoire, but if so, I haven't run across it. Hence "feature". The one on the armoire has been rudely trimmed off at the top, presumably to make it fit under someone's ceiling. I made an effort to find other furniture pieces with a similar feature to determine what the top might have looked like, but didn't have any luck. I decided to use a standard fleur-de-lis pattern, which is not uncommon on antiques of this vintage.
Most of the feature was carved from a single piece, but after blowing the carving of the central dome, I cheated and made it as a separate piece. I was vindicated when I later noticed that the original was a separate piece too. Ah-ha. Unfortunately, pretty much the same thing happened for the little beads surrounding it, and I ended up making those separately and gluing them on as well. Despite an intensive examination of the original, there was no vindication for those. The feature took about 40 hours to carve and sand. The leaf stacks on the sides were carved as separate pieces.
Most of the feature was carved from a single piece, but after blowing the carving of the central dome, I cheated and made it as a separate piece. I was vindicated when I later noticed that the original was a separate piece too. Ah-ha. Unfortunately, pretty much the same thing happened for the little beads surrounding it, and I ended up making those separately and gluing them on as well. Despite an intensive examination of the original, there was no vindication for those. The feature took about 40 hours to carve and sand. The leaf stacks on the sides were carved as separate pieces.
Spindles
The corners of the headboard have decorative spindles, or more precisely, semi-spindles. They match the ones found on the front corners of the armoire, but given the limited thickness of the headboard, the side against the wall is flat. That is good, since it meant I could make just one spindle and cut it in half rather than trying to make two exactly the same. The spindle was just turned on the lathe with the aid of a cardboard outline to help get it similar to the originals. In retrospect, I can't say they are identical twins. Maybe the new one is an older brother. With a different father. But I actually like the curve of mine better anyway - the old one kind of has a "weak chin" look to it. Besides, they will be 6 or 8 feet apart, so the differences shouldn't be too obvious. And let the record show that the two on the armoire are not identical either. It took about 7 hours to turn it, sand, and cut them apart. Like the originals, they are just mounted to the headboard with unglued dowels so they can be pulled off for moving.