A relation of mine whose funeral planning included cremation had asked if I would make a wooden funeral urn. We looked at various ideas and ultimately settled on this fern-motif design which is based on the work of Ron Fleming; an expert wood turner and carver from Oklahoma. He has an extensive and varied body of work which includes several vessels based on this stylized fern design.
The originals were made from redwood so to acheive a similar look I ordered a large-ish piece of redwood from a supplier in California. Normally it's difficult to find wood in large blocks but since the redwood can grow to over a hundred feet tall and 6-12 ft. diameter, it was less of an issue than would normally be the case. The redwood trees (Sequoia Sempervirens) grow in California and many areas of them are protected (although there is still live-tree harvesting in non-protected areas), but the firm I ordered from just harvests deadwood from the forest floor - mostly previously cut logs and stumps. This is possible since redwood resists both insects and fungi and has been found still solid even after hundreds of years on the forest floor.
The originals were made from redwood so to acheive a similar look I ordered a large-ish piece of redwood from a supplier in California. Normally it's difficult to find wood in large blocks but since the redwood can grow to over a hundred feet tall and 6-12 ft. diameter, it was less of an issue than would normally be the case. The redwood trees (Sequoia Sempervirens) grow in California and many areas of them are protected (although there is still live-tree harvesting in non-protected areas), but the firm I ordered from just harvests deadwood from the forest floor - mostly previously cut logs and stumps. This is possible since redwood resists both insects and fungi and has been found still solid even after hundreds of years on the forest floor.
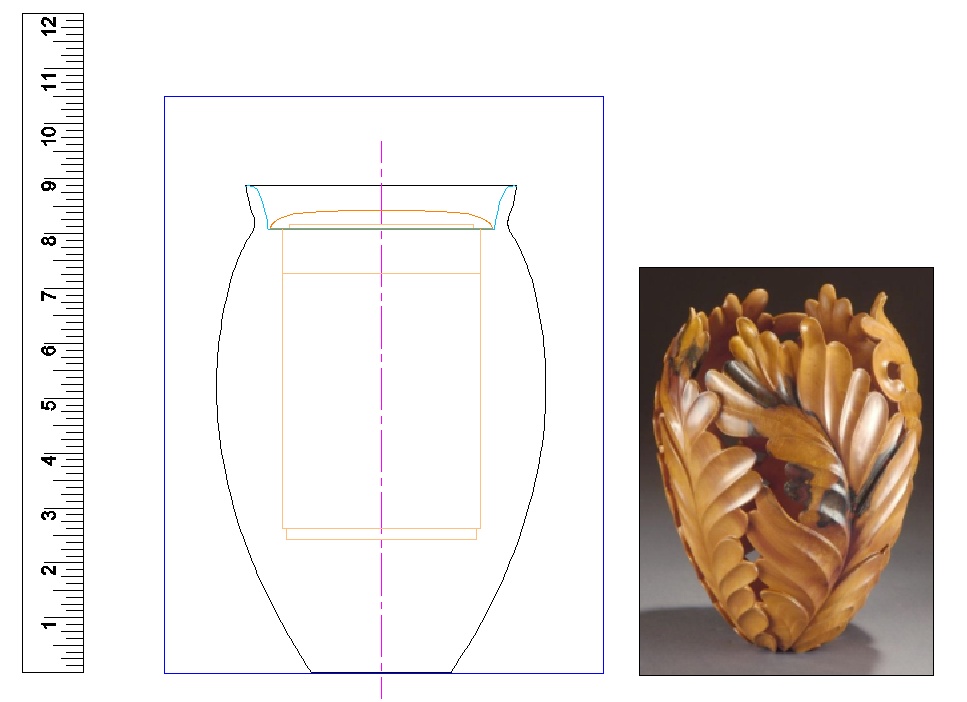
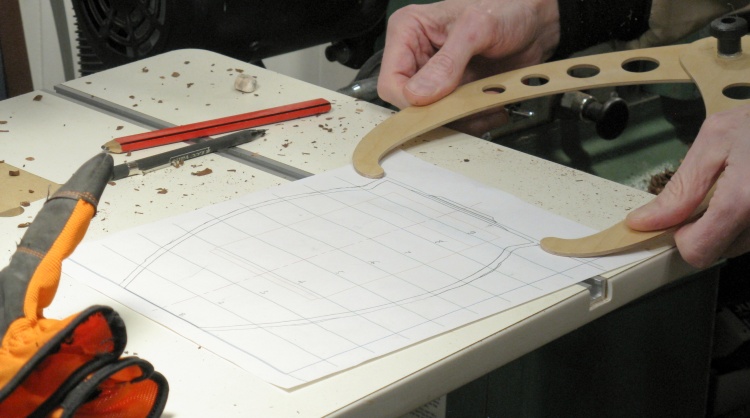
The simplified plan and an example vessel
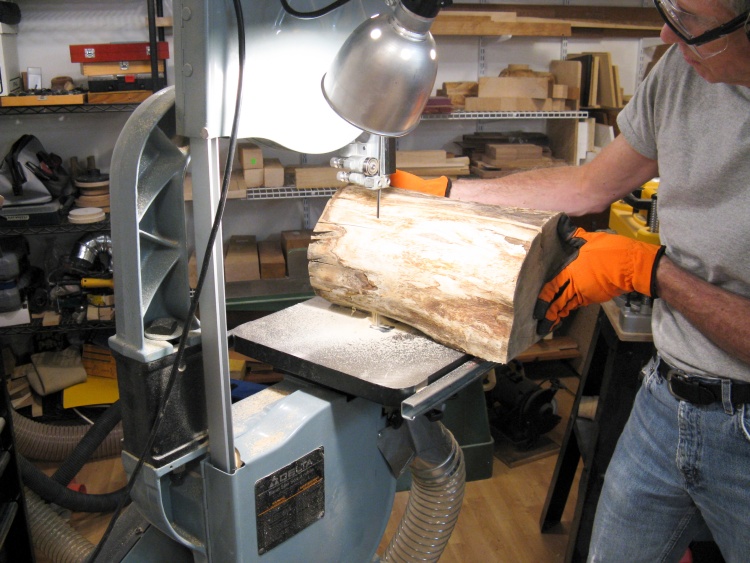
Cutting up a practice log
Unfortunately the supplier had a perfect storm of problems including customs form confusion, parcel addressing issues, computer operation problems and staffing issues, so my order had a number of false starts and it took a couple months before the wood actually arrived.
So rather than twiddling my thumbs I thought I'd maybe do a practice piece and figure out the best way to do a couple of the operations on whose processes I was a bit fuzzy.
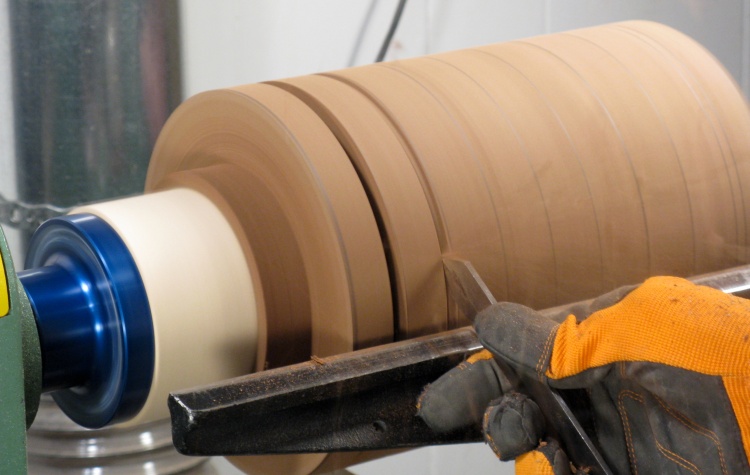
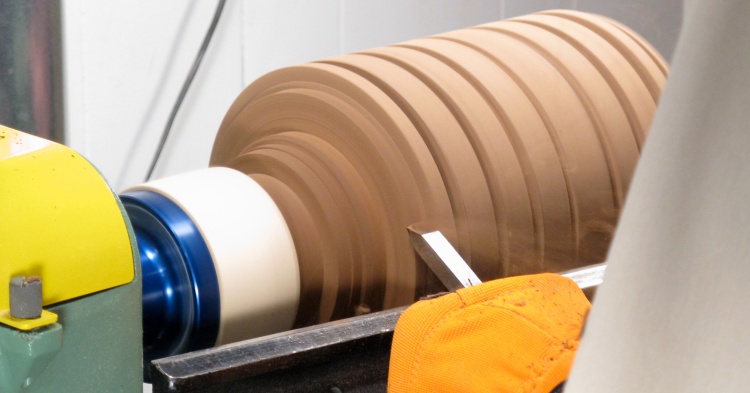
I acquired a couple logs from a cut-down tree, probably spruce since it is the most common softwood 'round these parts. Here I'm cutting one of them to size to make a turning blank. They were weathered and cracked but would be good enough for my test purposes.
So rather than twiddling my thumbs I thought I'd maybe do a practice piece and figure out the best way to do a couple of the operations on whose processes I was a bit fuzzy.
I acquired a couple logs from a cut-down tree, probably spruce since it is the most common softwood 'round these parts. Here I'm cutting one of them to size to make a turning blank. They were weathered and cracked but would be good enough for my test purposes.
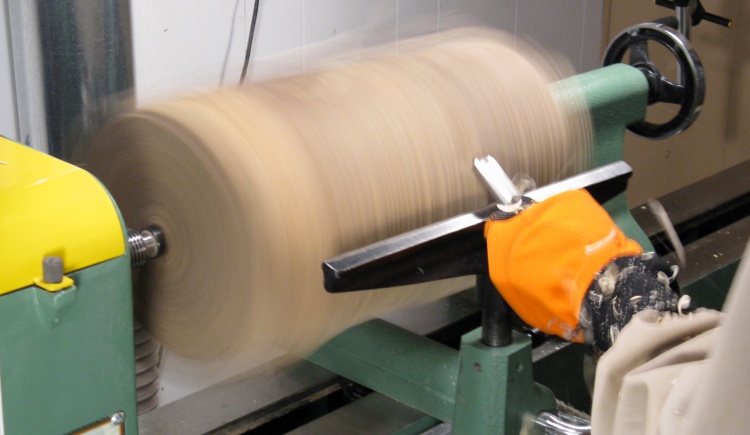
Rounding off a very non-round log
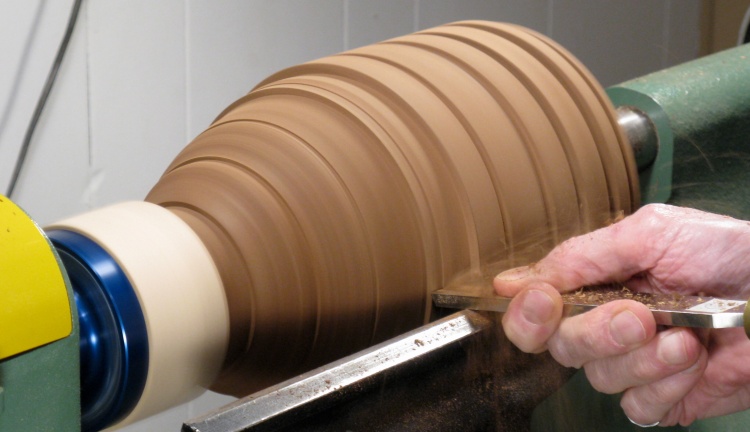
This not-very-round-or-balanced blank went on the lathe where it was tamed using the roughing gouge.

Rounded and much less dangerous-looking
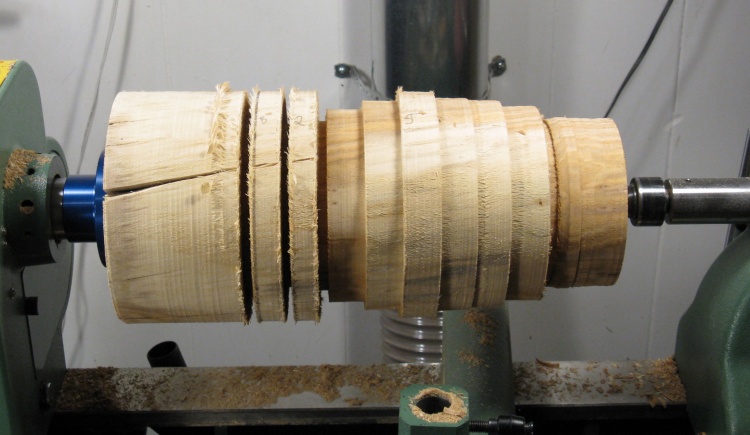
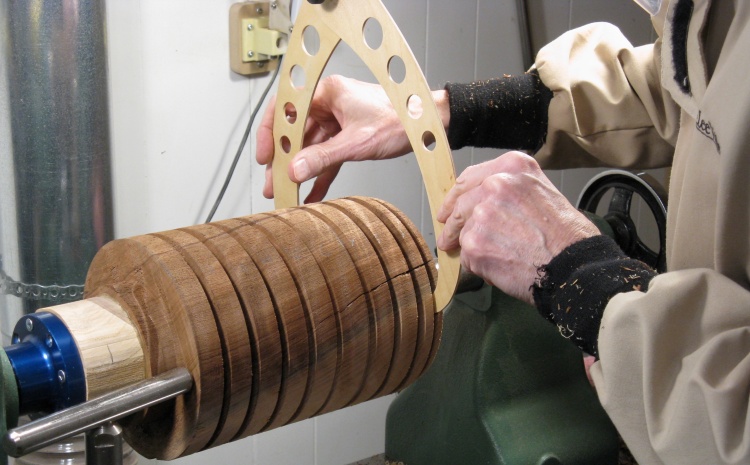
That got it to the cylinder stage shown here. I then marked lines every inch or so in preparation for cutting slots to the appropriate depth.
Guide-cuts made and partially shaped
At this stage, I've cut all the guide slots and removed excess wood except at the bottom.
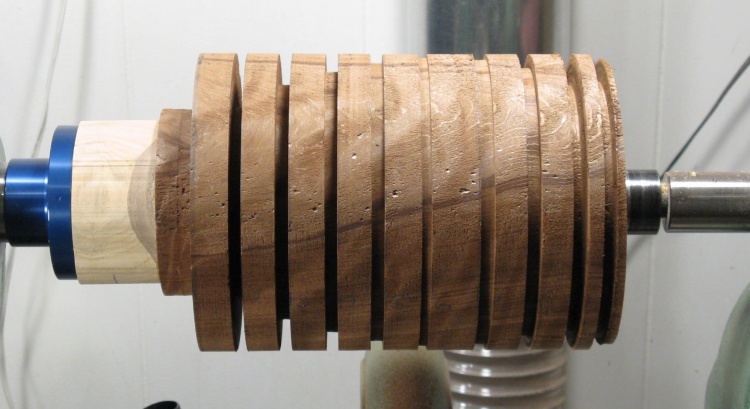
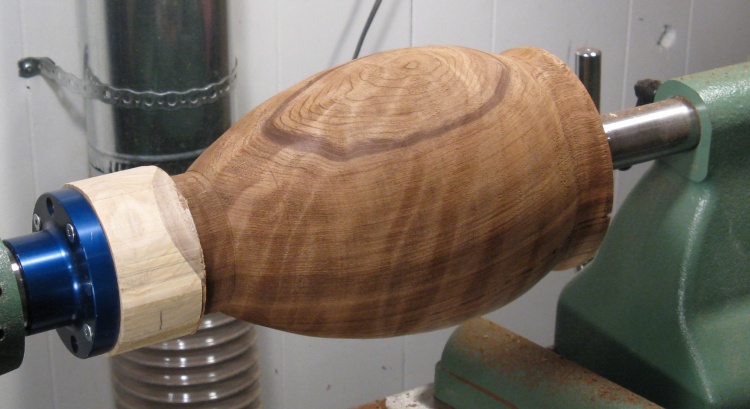
Test piece now shaped and roughly sanded
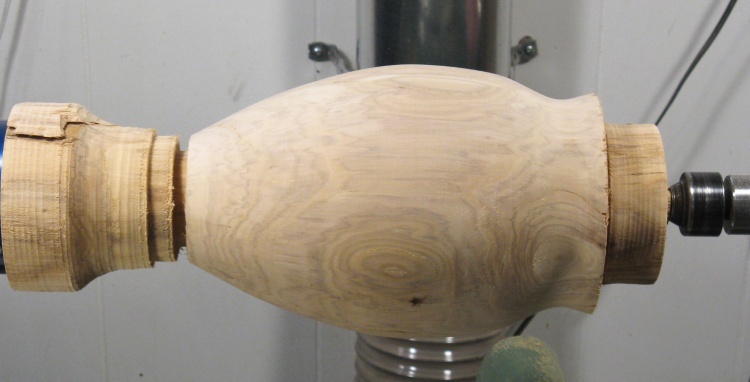
The final profile is revealed after the remainder of the excess wood is removed and the shape rounded using a scraper. I've done some rough sanding as well to make it easier to draw a pattern on the test blank (which due to being a fairly soft wood was a bit fuzzy after being shaped).
The actual urn will of course need to be hollow but since I was only concerned about the outside on this test piece, I left it solid.
The actual urn will of course need to be hollow but since I was only concerned about the outside on this test piece, I left it solid.
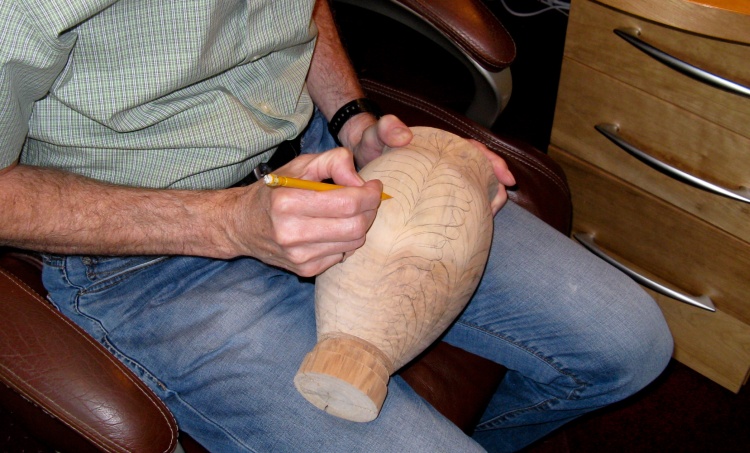
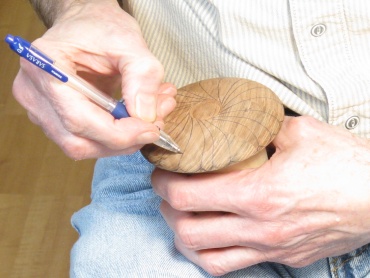
Drawing on the leaves
With pictures of a few of the example carved vessels as inspiration, I just manually drew in the stems and leaves using pencil which let me erase and redraw where necessary. It was often necessary.
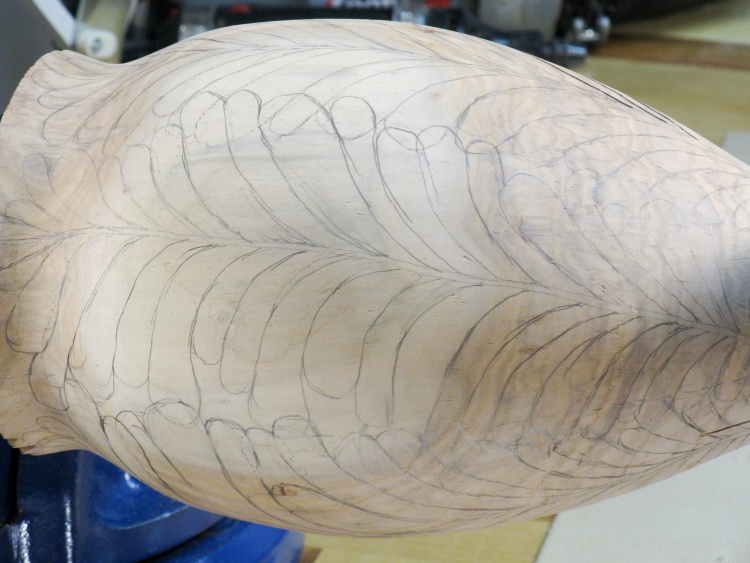
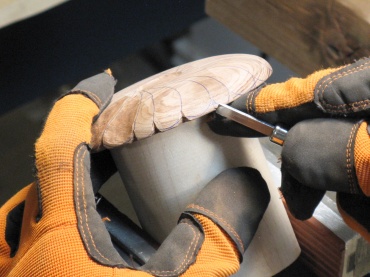
The leaf patterns completed and ready to carve
The leaf design can be seen here with the test piece mounted on the workbench ready for carving.
The astute reader will observe that the leaves overlap on side-by-side rows. For that reason each pair of adjacent rows will have one of the rows carved overtop the other.
The astute reader will observe that the leaves overlap on side-by-side rows. For that reason each pair of adjacent rows will have one of the rows carved overtop the other.

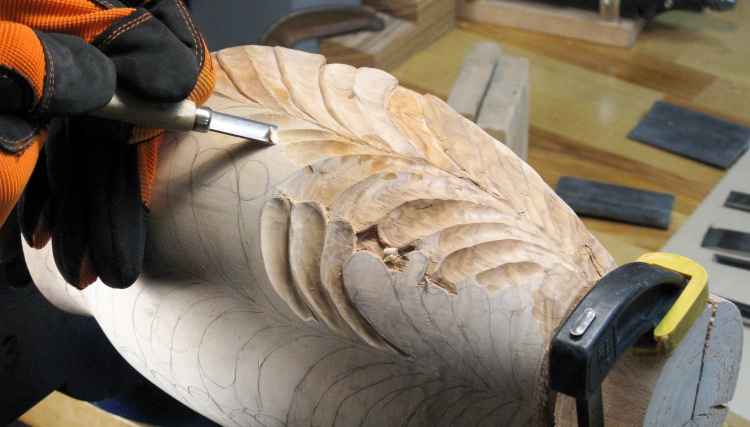
Some leaves have been shaped and the underlying row lowered
One of my goals was to find a good way to carve the leaf shapes and the transition to the stem, so I tried out a few techniques. The wood in this test piece was pretty soft and so it was very easy to carve. But the flip side was that it also lacked strength so chipping was a danger (like on the largest leaf in this photo).
I also needed to check the over/under carving techniques. Obviously I needed to carve the "under" parts lower before drawing in the leaves since otherwise I just end up carving off the pattern like I did here.
I also needed to check the over/under carving techniques. Obviously I needed to carve the "under" parts lower before drawing in the leaves since otherwise I just end up carving off the pattern like I did here.
Carving, sanding, lowering, etc. all seem OK
This is some carving happening a bit further along. Here I've also tried out the "hole" where there is no leaf cover. I didn't plan to go much further with this piece since it was just for investigation purposes.
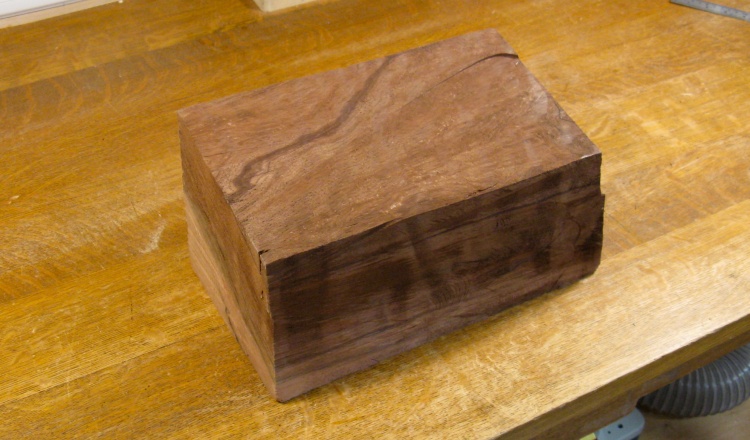
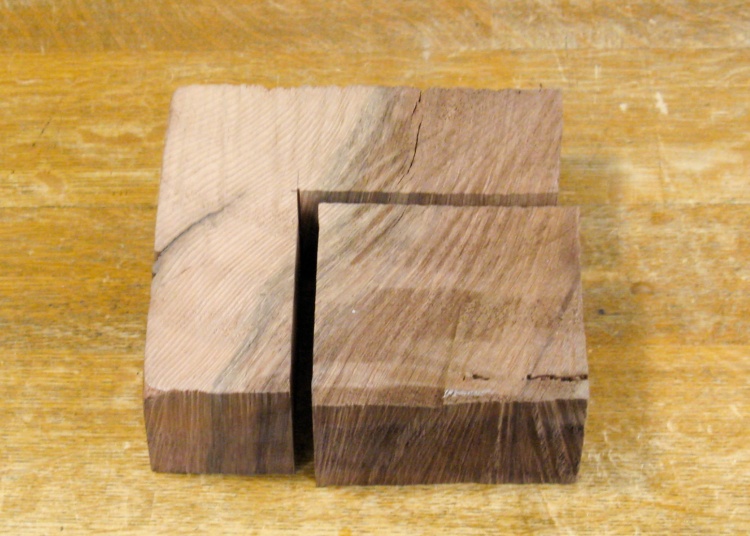
Finally the actual redwood arrived
Finally the redwood arrived. This isn't the piece I originally ordered since it sounded like that one was mistakenly sent to Timbucktu (the figurative one rather than the actual one near Mali, one assumes). But in one of several conversations with the proprietor, I let him know what size I needed and he selected this piece to send.
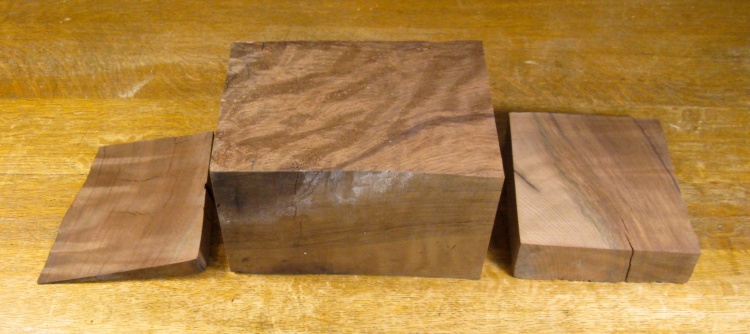
Chopping off the uneven ends
I started by cutting off the somewhat angled ends to get it ready for turning. The thicker piece on the right will be used for the top cover.
This is evidently considered "new growth" redwood (younger than a couple hundred years old) as evidenced by the light-colored sapwood on one edge which wouldn't be visible in old-growth redwood. The slight curvature between the lighter sapwood and darker heartwood on the piece at right gives an indication of the girth of the tree this came from, which was...pretty big.
This is evidently considered "new growth" redwood (younger than a couple hundred years old) as evidenced by the light-colored sapwood on one edge which wouldn't be visible in old-growth redwood. The slight curvature between the lighter sapwood and darker heartwood on the piece at right gives an indication of the girth of the tree this came from, which was...pretty big.

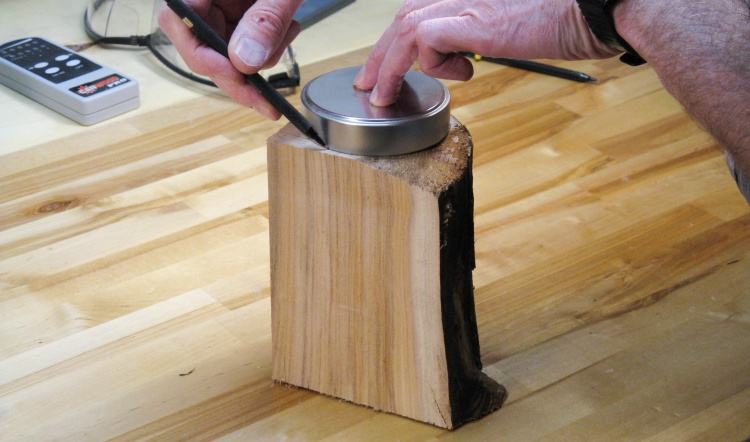
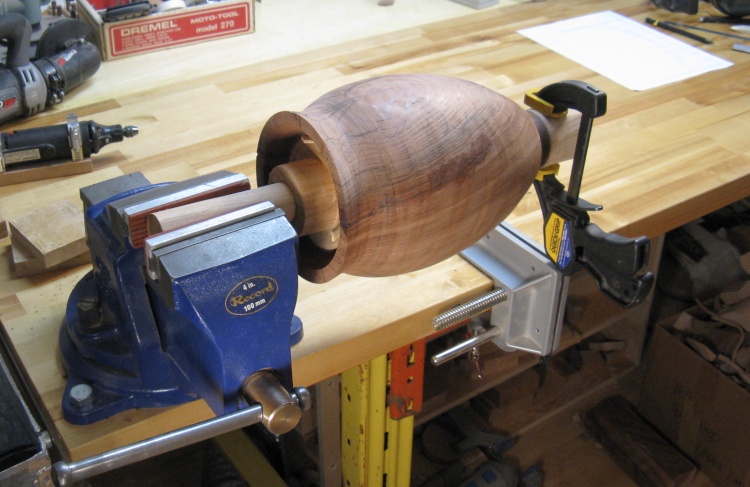
Removing corners prior to turning
I glued a scrap piece of wood onto one end to accept the mounting screws of the small blue faceplate so they wouldn't use up any length in the rather harder-to-come-by redwood.
Here I'm chopping off the corners to make the rounding on the lathe a bit easier.
Here I'm chopping off the corners to make the rounding on the lathe a bit easier.
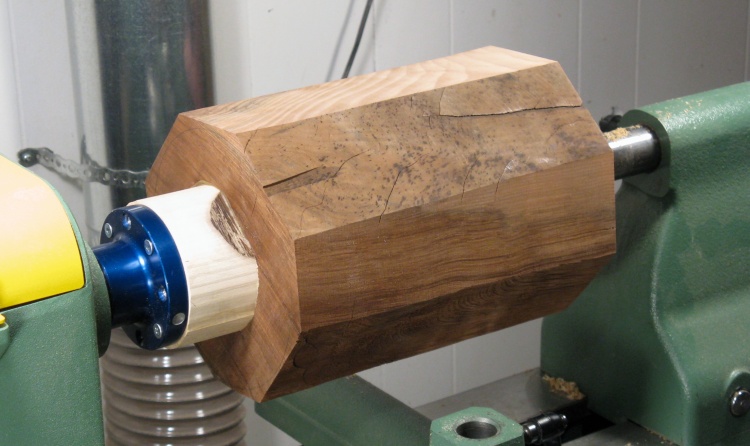
Ready to start rounding
And here the blank is mounted on the lathe and ready to get rounded off.
Rounded off and guide lines marked
As before the roughing gouge was used to remove the corners and round off the blank to a cylinder. In this photo, I've already drawn the guide lines with one-inch spacing to help transfer the shape from the plan to the wood.
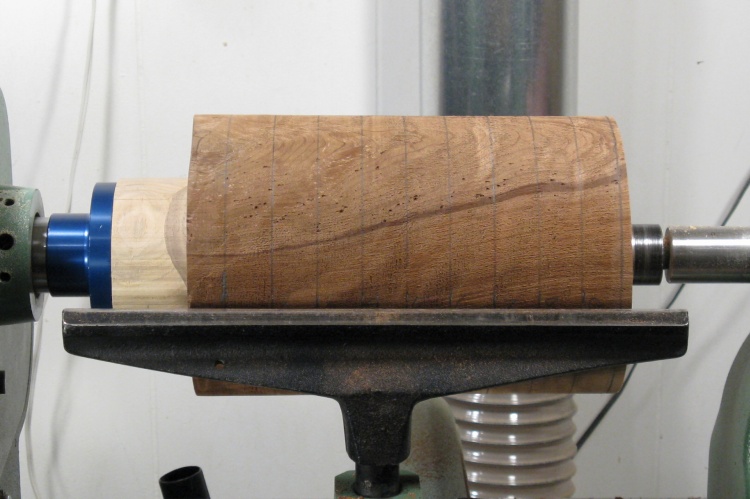
Oddly, the piece was unbalanced even after being rounded off. Evidently the lighter-colored sapwood along one side is significantly more dense than the brown heartwood.
Oddly, the piece was unbalanced even after being rounded off. Evidently the lighter-colored sapwood along one side is significantly more dense than the brown heartwood.
Cutting depth guide slots
Then it was SOP of cutting slots down to the desired profile at each of the marked lines using a large parting tool.
Setting calipers to check slot diameter
Regular readers of these pages will be familiar with the large wooden calipers I use to transfer the slot diameter to the plan for size comparison.
Checking diameter on full-sized plan
The caliper opening is then checked against the full-size plan to see if my slot has been cut deep enough.
This largish table on the adjacent drill press is a convenient place to hold the plans as well as measuring and cutting tools when I'm turning.
This largish table on the adjacent drill press is a convenient place to hold the plans as well as measuring and cutting tools when I'm turning.
All depth slots cut
This is a photo of the blank with all the depth slots cut. The vessel shape can sort of be made out from the bottoms of the slots.
Using a chisel to remove the bulk of extra wood
I used this rather stout chisel to remove the bulk of the extra wood, especially at the bottom where there was lots to get rid of.
Large scraper used to round off the shape
Then the edges of the guide slots were connected with smooth curves using a wide scraper. Here I'm almost down to the slot bottoms on the lower half of the urn (and no, the curves don't qualify as "smooth" yet).
Outside shaped
Then a bit more scraper work (with some smaller ones to shape around the neck at the top) and a bit of sanding brings us to this point where the outside shape is almost done.
The section on the top looking like a contour map is the heavier sapwood. There is also some nice figuring visible running through the whole shape.
I left a bit of extra material on thinnest section of the neck since the steady-rest wheels will ride there for hollowing. When that is done, I'll cut that wood out since it may be compressed from the pressure of the wheels.

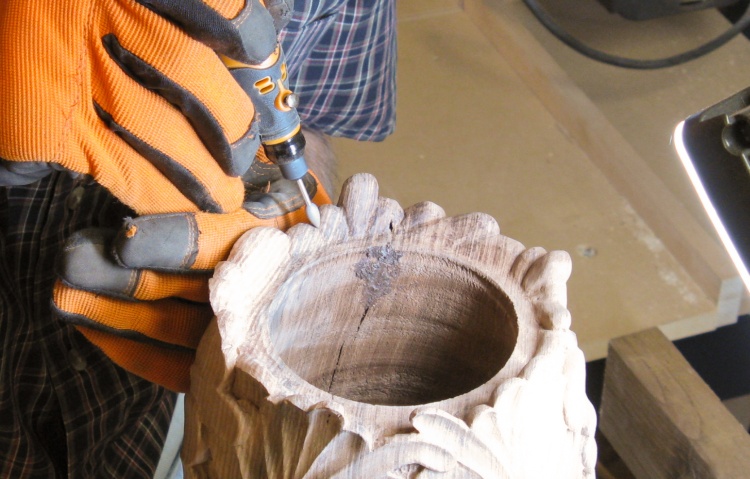
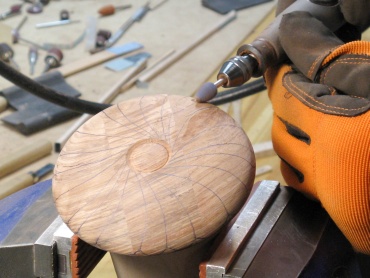
Getting ready to drill a large starter hole
The urn needs to be hollowed to be able to accommodate a metal liner which ensures long-term integrity. I needed a hole about 3.6" diameter and around 5" deep.
The steady-rest was added to support the neck of the urn and I started by drilling a pilot hole using my largest Forstner bit.
The steady-rest was added to support the neck of the urn and I started by drilling a pilot hole using my largest Forstner bit.
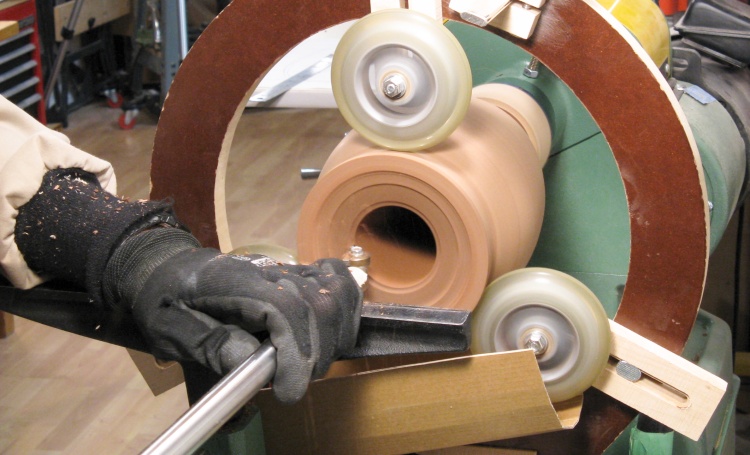
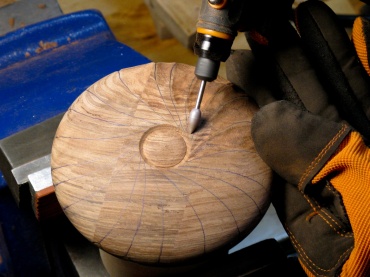
Starting to expand hole to proper dimensions
Here the pilot hole has been drilled and I'm starting to expand the hole using the hollowing tool.
The cardboard trough on the bottom is just there to direct any fallen shavings to the dust collection duct on the front of the lathe. For reference, this slightly confusing shot angle is taken from the back of the lathe.
The cardboard trough on the bottom is just there to direct any fallen shavings to the dust collection duct on the front of the lathe. For reference, this slightly confusing shot angle is taken from the back of the lathe.
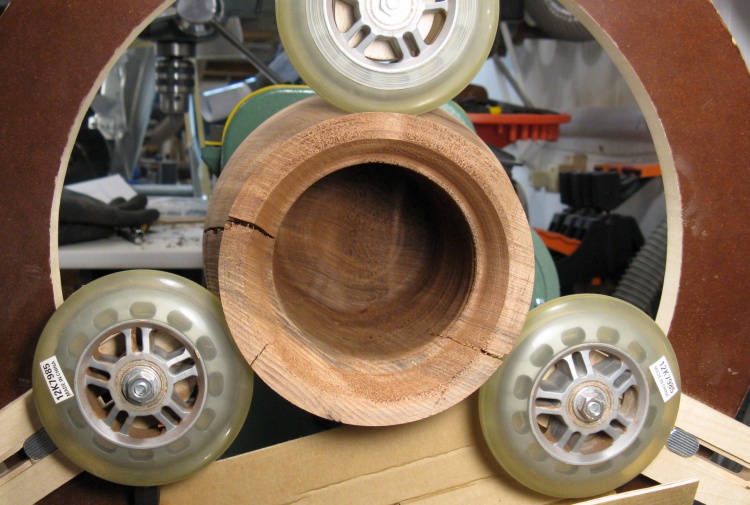
Center hole completed
Hollowing was pretty straightforward - the urn just needed a nice straight-sided hole.
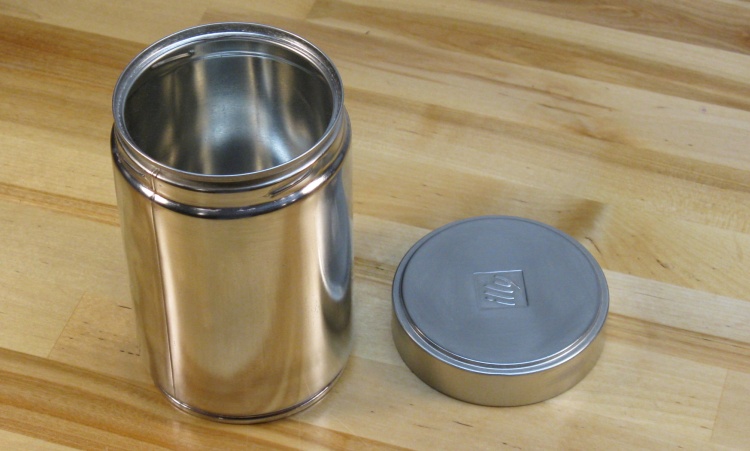
The metal liner to be used in the urn
This is the metal liner that will go into the urn when completed. It is made from tin-plated steel and has a screw-on top. The previous resident of this liner before steel-wool-assisted removal of the label was "illy"-brand coffee as is betrayed by the embossed lid.
Filling some of the larger cracks
I hadn't been too worried about the cracks in the spruce test piece I made since it wasn't to be used for anything but the redwood actually has worse cracking. I filled the larger cracks with a glue/sawdust mixture in two or three stages to both stabilize and fill the cracks. In this shot the second round of glue is still wet.
Bottom smoothed off
The final task while on the lathe was to flatten the bottom and make a shallow foot for it to stand on.
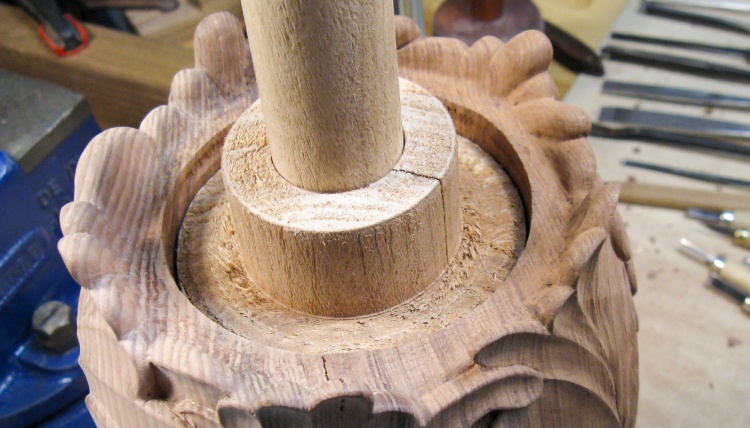
The large central piece of wood will remain in place for now to enable clamping the urn for carving.
The large central piece of wood will remain in place for now to enable clamping the urn for carving.
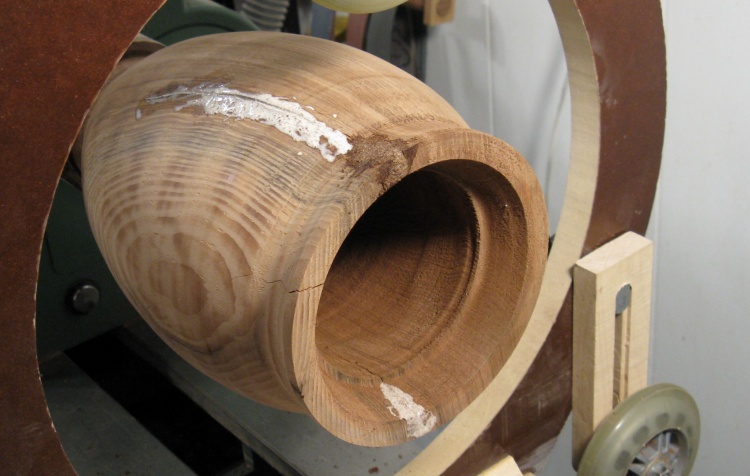
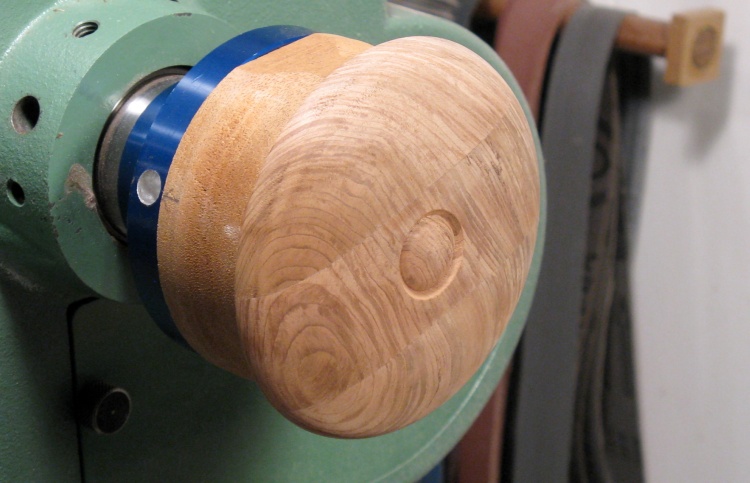
Completed outside profile
The neck of the urn was recut to remove any compressed wood and that completed the turning activities.
The surface is rather imperfect with some tear-out visible due to the softness of the wood. However, the whole surface will be removed by carving so this won't present much of a problem.
The surface is rather imperfect with some tear-out visible due to the softness of the wood. However, the whole surface will be removed by carving so this won't present much of a problem.
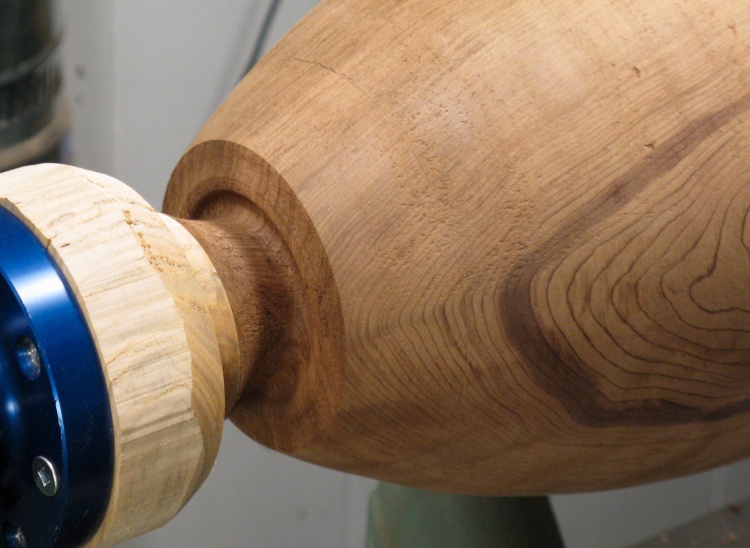
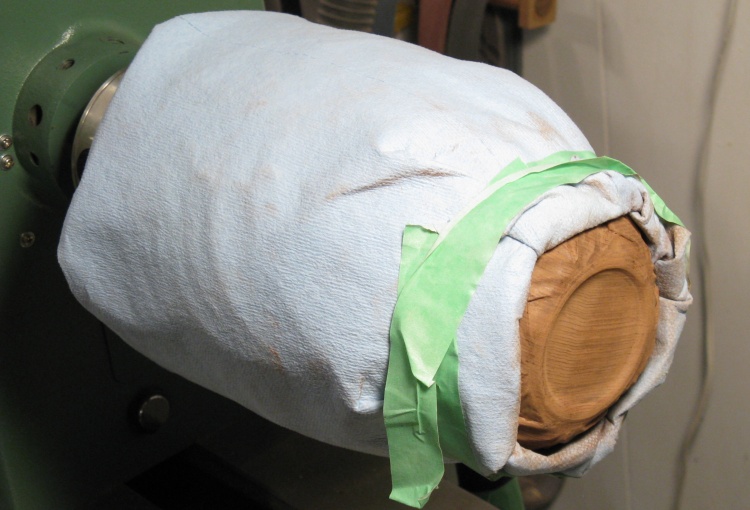
Making a filler to help support urn for carving
I had the protruding central piece of wood on the bottom to aid in clamping, but the top was just a big hole. To be able to hold the top too, I made a big wooden plug with a protruding dowel.
Here I'm using another piece of the scrap log and marking the diameter on it in preparation for making the plug. For a crappy piece of spruce from an old wood pile, it actually has a pretty nice grain.
Here I'm using another piece of the scrap log and marking the diameter on it in preparation for making the plug. For a crappy piece of spruce from an old wood pile, it actually has a pretty nice grain.
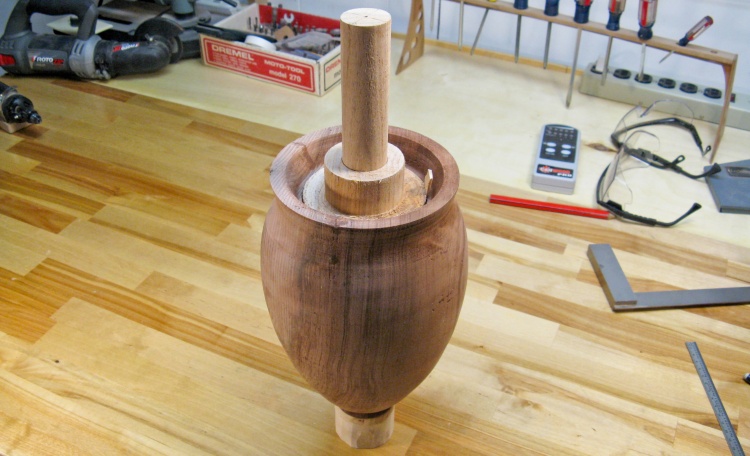
Urn with filler and dowel in place
I trimmed down the diameter of the wood on the bottom to make it easier to hold, and just inserted the plug & dowel into the top hole as can be seen here.
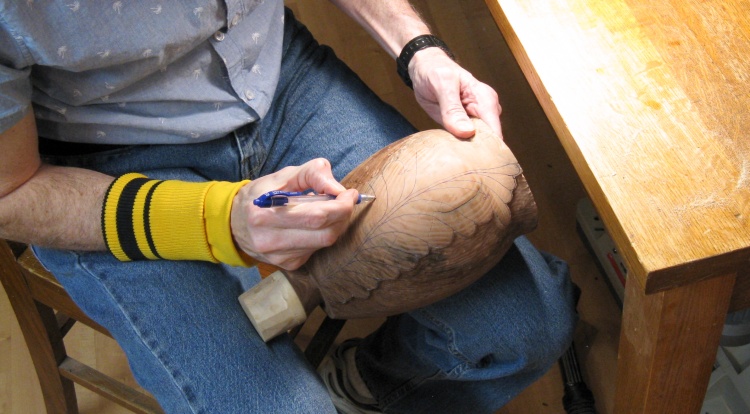
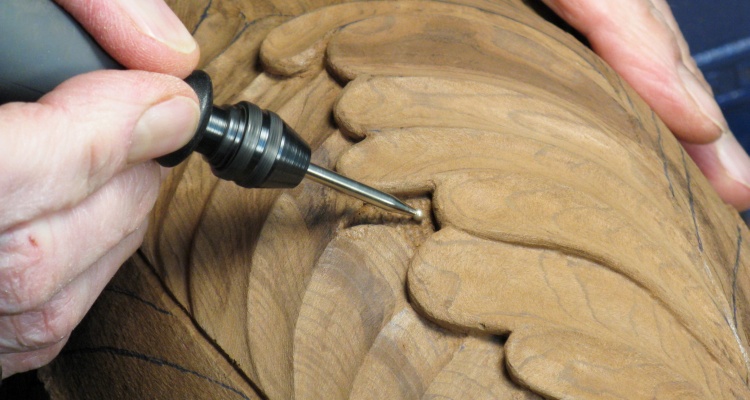
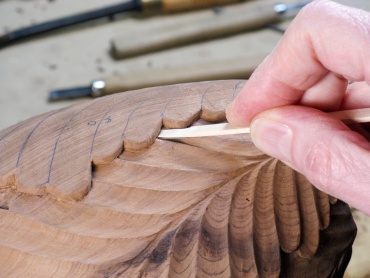
Manually drawing on the "over" rows of the leaves
Then it was back upstairs to draw on the first leaf patterns. I'd do just the "over" sections of leaves and then I could lower the "under" sections before drawing in their leaves.
Secured to main bench for carving
This shows the urn secured to my main bench in a spot which put it at a convenient height to carve while standing.
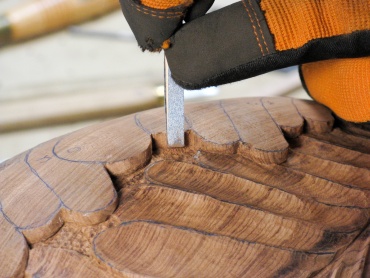
Outlining the edges of the overlying row of leaves
I started by outlining the first set of top leaves, which would let me lower the wood level for the adjacent row of leaves that went "under" these.
Underlying rows lowered and ready for leaf outlines
This shows the stage where the first of five sets of leaves has been outlined and the adjacent wood lowered.
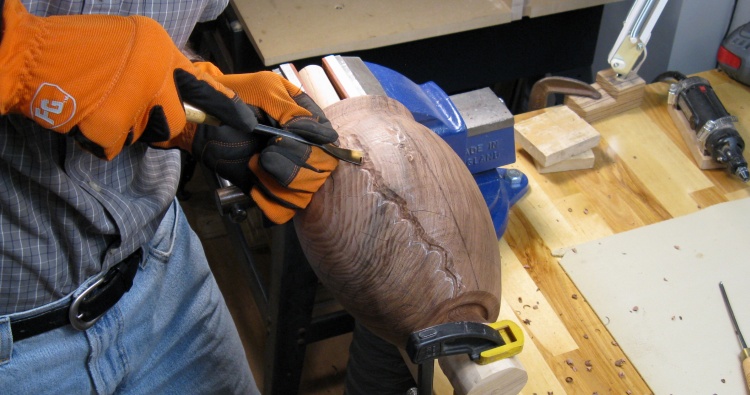
I started in the sapwood section which turned out to be extremely hard wood - one of the hardest I've carved.
I started in the sapwood section which turned out to be extremely hard wood - one of the hardest I've carved.
Inking in the leaf shapes for better contrast
The pencil lines forming the pattern had a very poor contrast with the redwood, so I ended up tracing over with a blue ink pen which not only gave better contrast but didn't rub off with handling either.
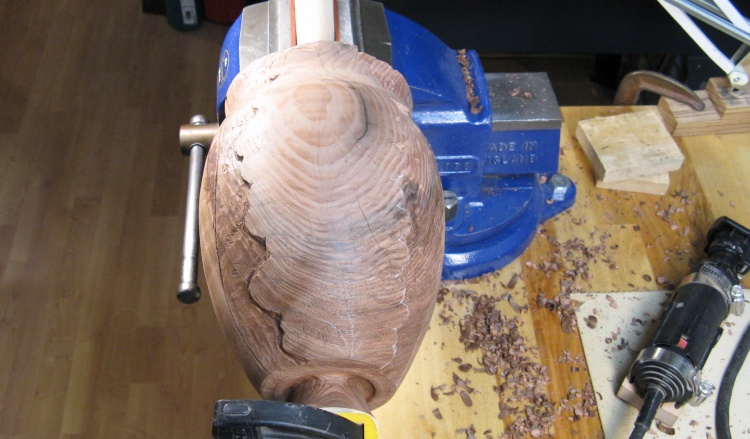
A section of very hard wood - cuts are quite short
This photo shows a small section of the very hard sapwood. The small cuts are a testament to the hardness.
A section of very soft wood - can't get a clean cut any direction
By contrast, the heartwood was much softer and in many places was so soft that it was not practical to make a clean cut regardless of the direction of the cut or sharpness of the tool. This is one such soft section, with most cuts showing tearing of the wood.
Switching to grinding for uncarvable wood sections
Softwoods can purportedly be more-cleanly carved using a trailing skew cut, but that isn't practical to do with standard carving tools and besides is infeasible when many fine details need to be carved.
Solution: grinding. That let me remove wood while achieving a reasonable surface texture which could be readily sanded to a smooth finish.
Here I'm working along one edge of a row of leaves to lower the adjacent wood level before marking the "below" leaf shapes.
Solution: grinding. That let me remove wood while achieving a reasonable surface texture which could be readily sanded to a smooth finish.
Here I'm working along one edge of a row of leaves to lower the adjacent wood level before marking the "below" leaf shapes.
The over/under profiles are visible in this shot
This view from the top shows the contour after completing the wood removal for leaf overlap.

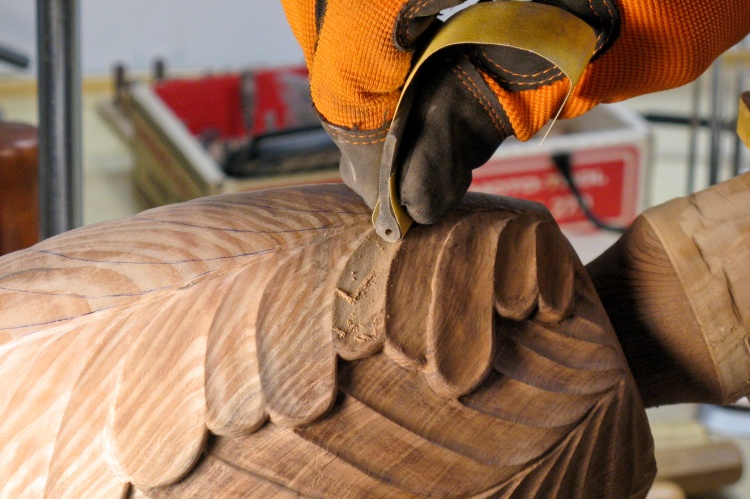
Using an abrasive sphere on leaf contours
Then after marking on the rest of the leaves, I got into the shaping;
I already had the edges of all the top leaves shaped, so the next step was to shape the bottom leaves up to those edges.
In this photo, the first section of the bottom leaves are done and I've switched over to working on the top leaf shapes. I usually started with a tungsten-carbide grinder (like two photos up) for coarse shaping and then smoothed things off with a ruby abrasive bit like this one.
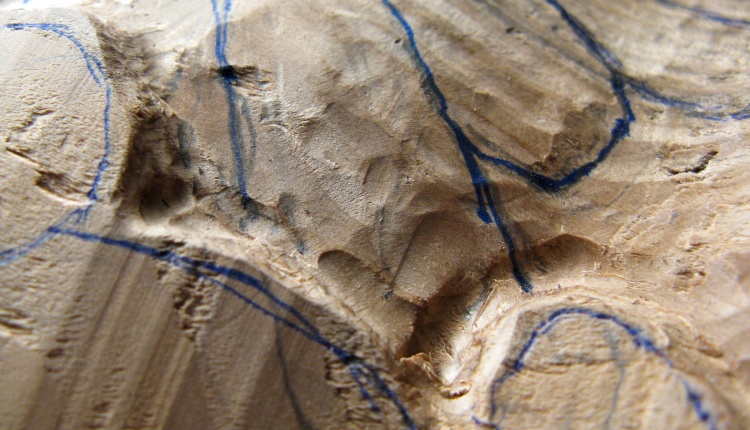
"Open" areas not covered by leaves get a textured floor
There are a number of places where the leaves don't completely overlap so these areas were lowered and given a texture using a small spherical grinding bit.
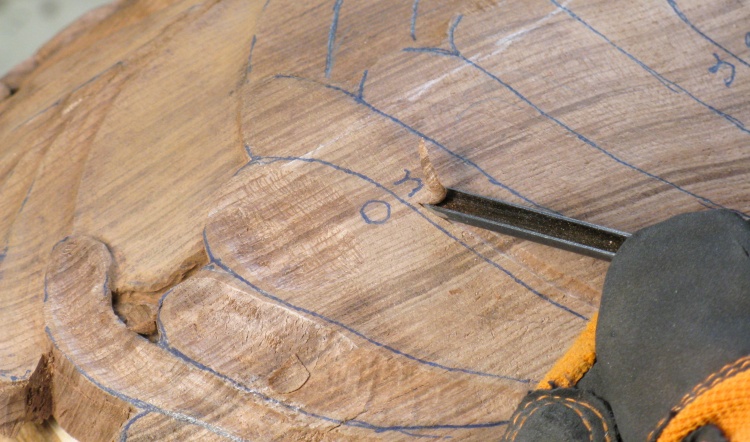
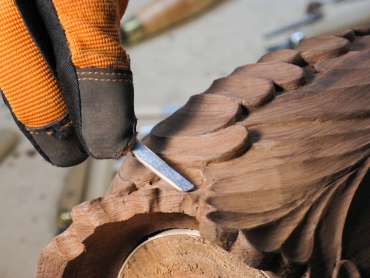
Here an "under" leaf is lowered beside the "over" leaf
There are also a number of places where adjacent leaves in the same row overlap. These were marked with O or U for the over and under leaves. Here I'm cutting the "under" leaf lower before going on to the contouring step.
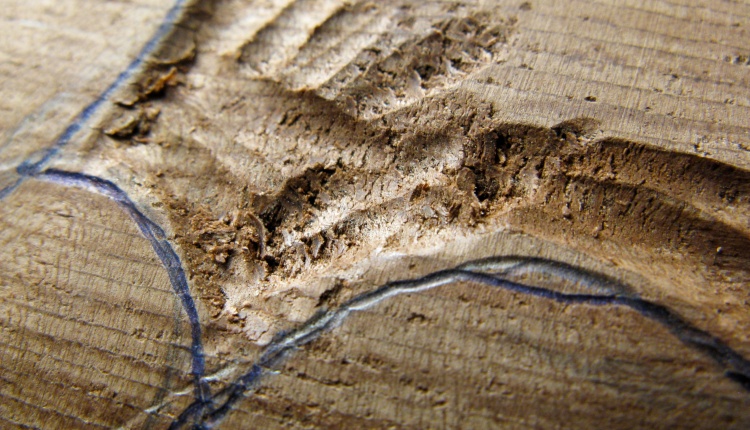
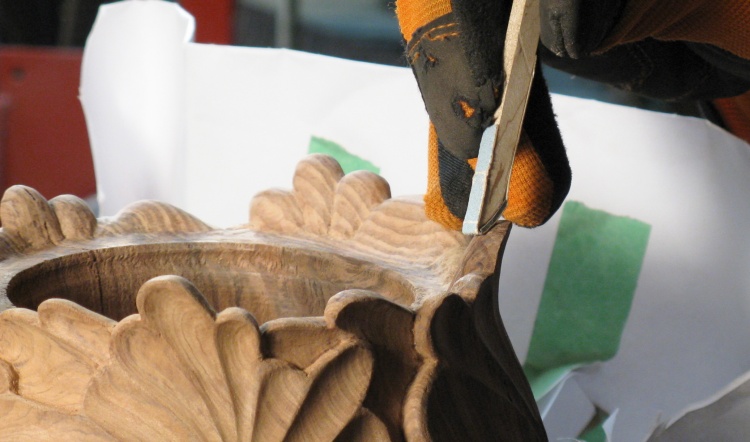
This area of wood happened to be hard enough that it could be cut cleanly with a chisel (which felt more like honest woodcarving than using a grinder).
This area of wood happened to be hard enough that it could be cut cleanly with a chisel (which felt more like honest woodcarving than using a grinder).
Shaping the bases of the leaves
The bases of the leaves tapered down to the stem so there were some narrow areas to be shaped. To do those, I used a fine ruby bit to make the contours.
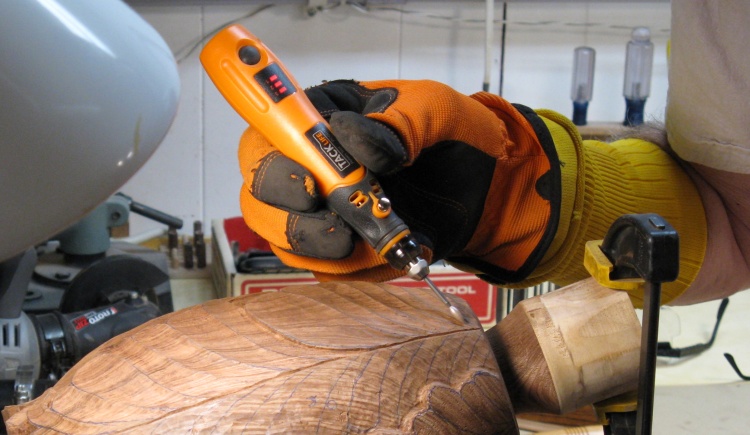
I used both a Dremel-powered cable and this small cordless rotary tool for doing the grinding. This tool wasn't as powerful but was easier to maneuver since it didn't have the thick cable of the Dremel.
I used both a Dremel-powered cable and this small cordless rotary tool for doing the grinding. This tool wasn't as powerful but was easier to maneuver since it didn't have the thick cable of the Dremel.
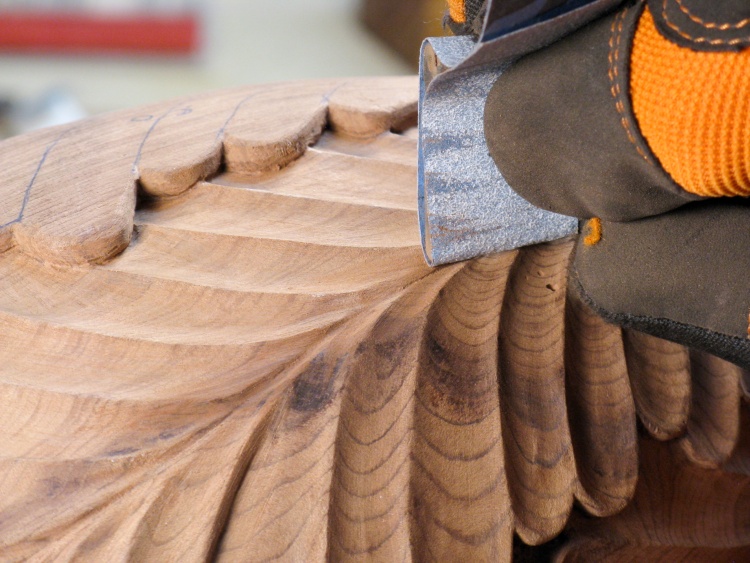
Sanding the leaves
And then of course it all needed to be sanded to even out all the curves and eliminate any scratch marks remaining from the grinding bits.
This photo shows a cylindrical rubber form for the sandpaper being used to sand the concave face of a leaf.
I started with 150 grit and then went over again with 220 grit and a final time with 320 grit for a better finish.
This photo shows a cylindrical rubber form for the sandpaper being used to sand the concave face of a leaf.
I started with 150 grit and then went over again with 220 grit and a final time with 320 grit for a better finish.
A finer sanding form used for leaf bases
The curves get smaller at the bases so there I used a finer sanding form as shown here.
I generally did the sanding on each row of leaves before moving on to shaping the next row so things were spread out and I wouldn't be faced with weeks of only sanding. Sanding is not my favorite activity.
I generally did the sanding on each row of leaves before moving on to shaping the next row so things were spread out and I wouldn't be faced with weeks of only sanding. Sanding is not my favorite activity.
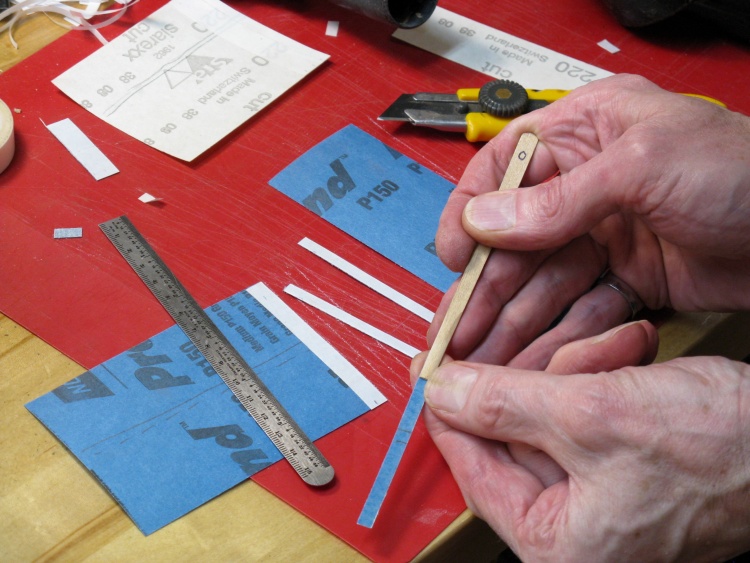
Adding a sandpaper strip to one of the sanding jigs
With the overlapping layers of leaves, there were lots of edges, corners and crannies to be sanded too. I used a few small wooden forms for this, with this photo showing me sticking a new strip of sandpaper to one of the forms.
Sanding around leaf edges
Sanding leaf ends
Sanding under the edge
...and more sanding
The above group shows sanding of some of the more difficult-to-acess areas using various sanding jigs.
This is just a shot of more sanding, this time with the finer 220 grit and a smaller form to suit the narrower leaf shapes.
This is just a shot of more sanding, this time with the finer 220 grit and a smaller form to suit the narrower leaf shapes.
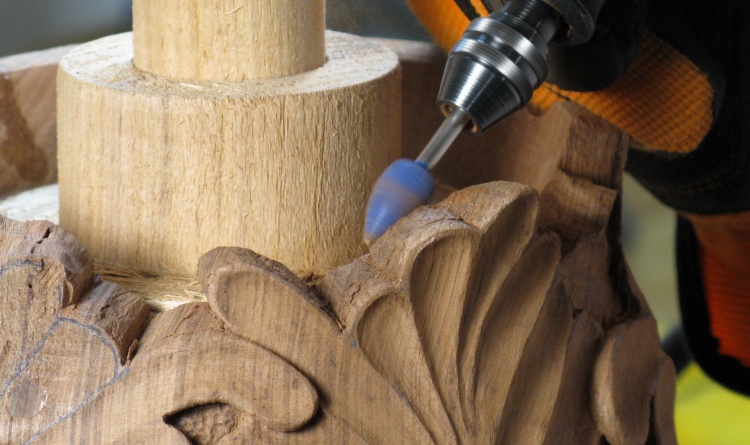
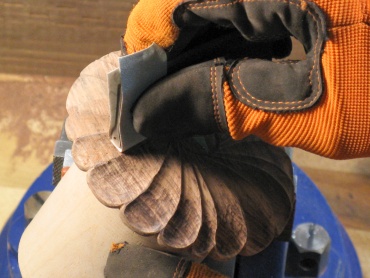
Shaping leaves on top of urn
Once the leaves were all shaped and sanded, I turned my attention to the top. The leaves that protruded above the top of the solid section needed to have proper profiles formed.
Here I'm using the coarse grinder to remove excess material from the backs of the leafs.
Here I'm using the coarse grinder to remove excess material from the backs of the leafs.
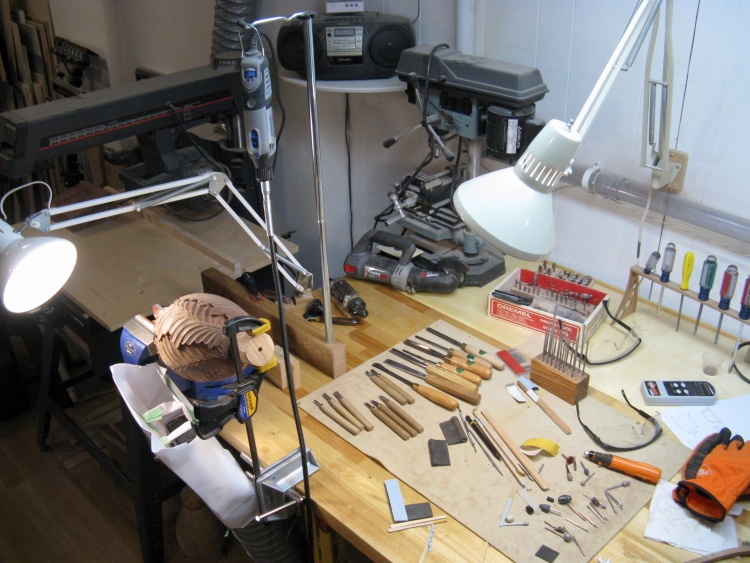
The carving corner of the bench
This shows the corner of the bench that I used for carving. It has a couple of rotary tools (used a lot), the carving tools (not used too much), the grinding bits (used a lot) and the sanding tools (used way too much). There's also some small files but they didn't end up being too useful.
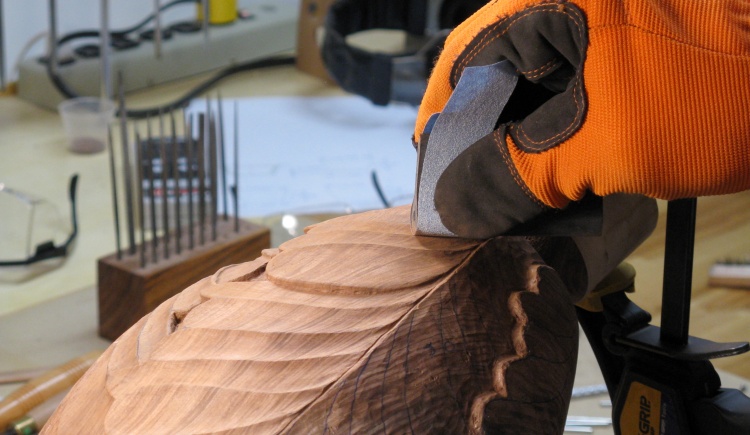
Shaping the leaf backs
Leaf-back shaping was mostly accomplished with various fine grinding bits...
Sanding the leaf backs
...followed of course by sanding.
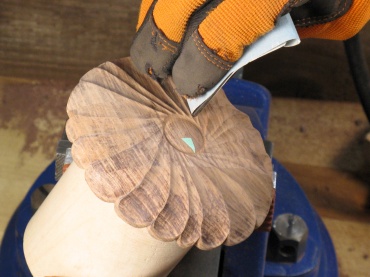
Top leaf shaping done
This shows the top of the urn with the protruding leaves after they were completed.
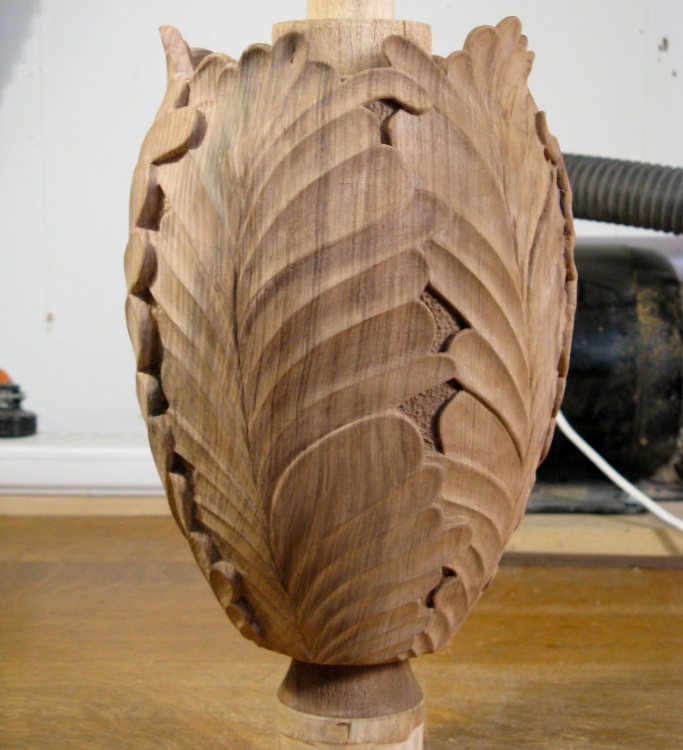
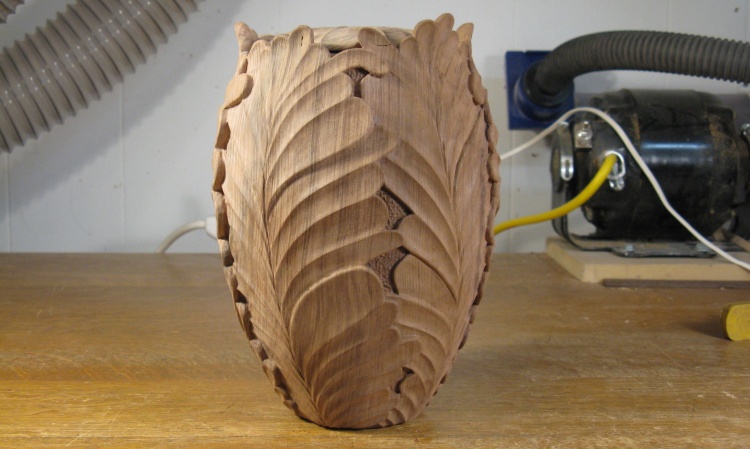
The urn with all the side shaping done
And that was it for most of the outside woodworking. This shot shows the urn after the outside and top leaves have been completed.
Still left to do: Top and bottom.
Still left to do: Top and bottom.
The saved redwood piece to use for the cover
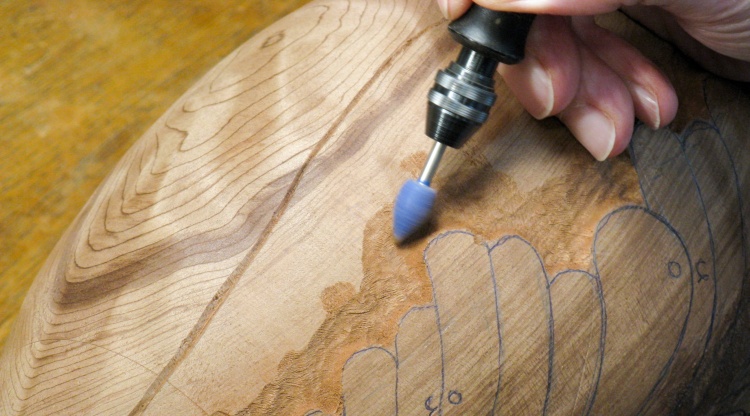
Next I thought I'd tackle the cover. I decide to go with a matching leaf-motif for the cover in a simple circular pattern.
This is the larger reserved piece I had cut from the original piece of redwood.
This is the larger reserved piece I had cut from the original piece of redwood.
A laminated blank for the cover
Unfortunately the reserved piece has the grain running in the wrong direction (up through the cover rather than from side-to-side). I actually made a cover with the original grain orientation thinking it might be OK, but the details were not very crisp, so I needed to laminate some segments to get the grain orientation how I wanted it.
Here a few pieces have been laminated, mounted to the lathe and cut to a circle.
Here a few pieces have been laminated, mounted to the lathe and cut to a circle.
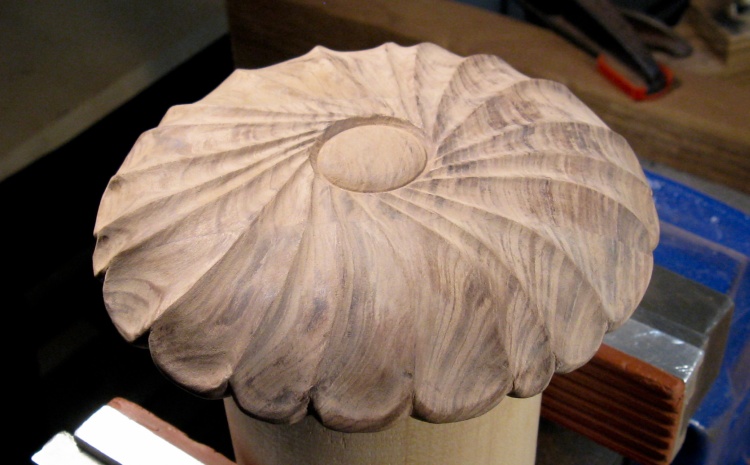
The basic cover shape after turning
I cut a recessed circular section on the bottom of the cover to fit the urn liner lid and then flipped it over to this orientation and shaped the profile, including a domed central button.
The cover went through pretty much the same carving sequence as the sides of the urn, with the notable exception of not having any overlapping leaves to worry about (they were the most involved and time-consuming bits of the carving process). The following little gallery shows the sequence in brief;
Marking leaves
Shaping between leaves
Coarse grinding of leaf shapes
Some finer grinding at leaf bases
Sanding leaves
Some finer sanding
Cover shaping done
The cover had been taped to a stout dowel to provide a handle to grip for the shaping. Here the dowel is clamped in the vise where I did most of the work, and the shaping is complete.
Chopping off the bottom nub
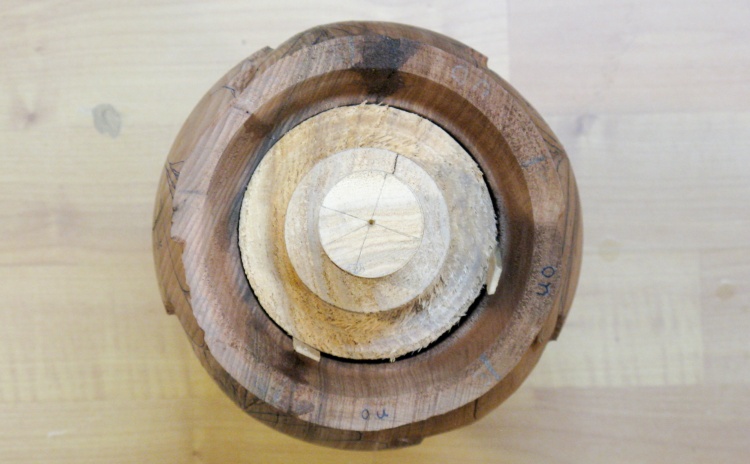
Then it was back to finish off the main body by completing the bottom.
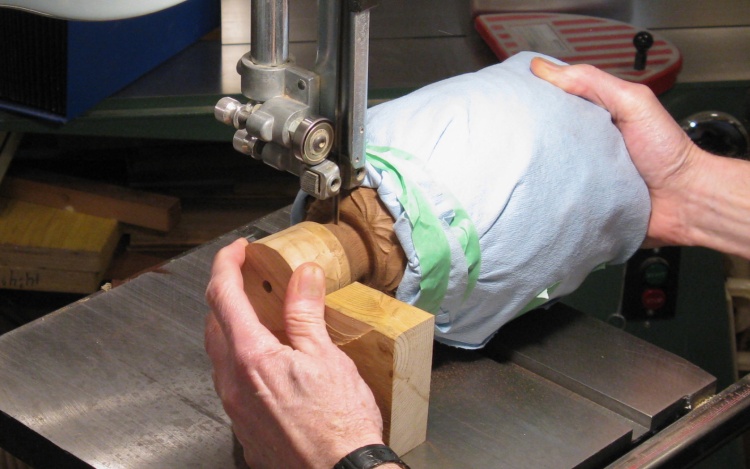
The base still had the protruding wood from the turning process which needed to be removed and in this photo it is getting cut off with the bandsaw.
The base still had the protruding wood from the turning process which needed to be removed and in this photo it is getting cut off with the bandsaw.
Bottom all cleaned ups
I inserted the center cyllinder again and used that to mount the urn on the lathe so I could re-turn the bottom.
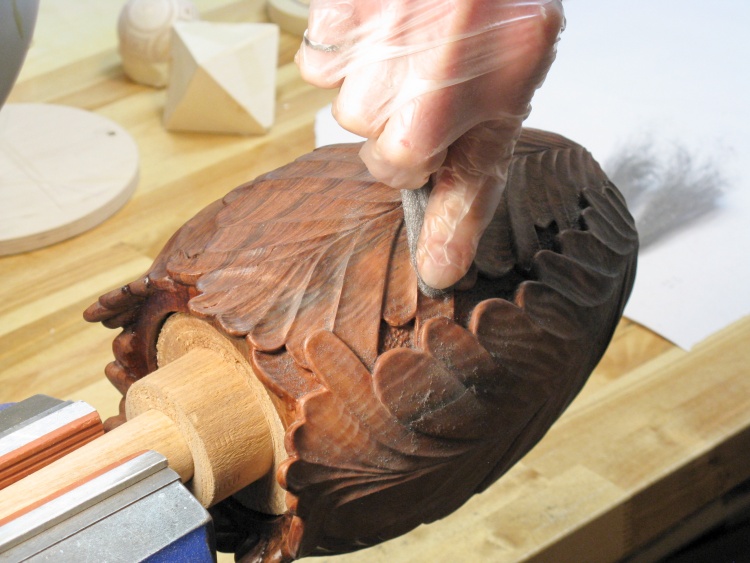
As expected, the bottom wasn't perfectly centered with this ad-hoc mounting so wood removal was done at low speed using a grinder followed by sanding to eventually produce the shape seen here.
As expected, the bottom wasn't perfectly centered with this ad-hoc mounting so wood removal was done at low speed using a grinder followed by sanding to eventually produce the shape seen here.
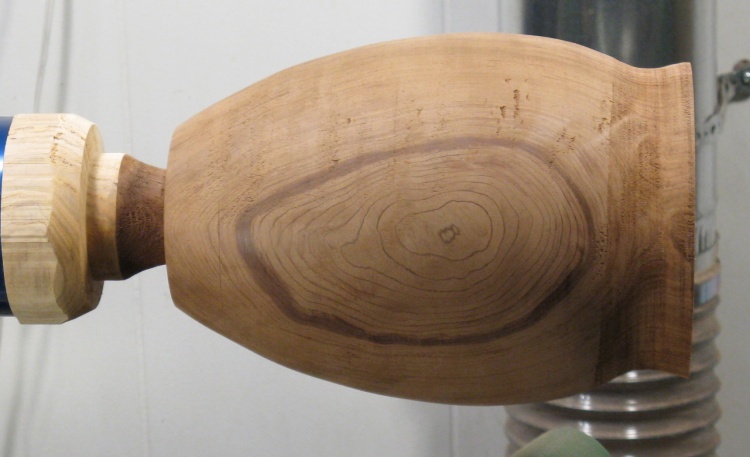
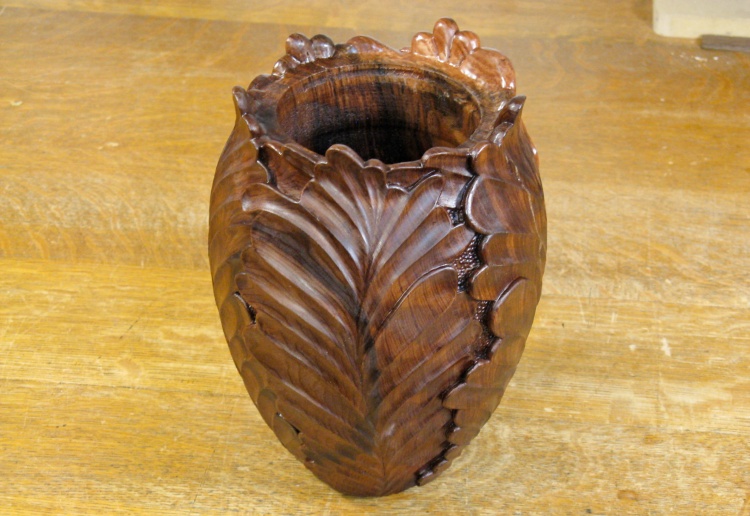
Woodworking is complete!
That was it for the woodworking; here's a shot of the completed urn before varnishing.
Actually, after this photo I did go over the outside a couple times cleaning up edges and surfaces. And then it was done.
Overall, I'd estimate that it took about 50-70 hours, spread out over a couple months.
Actually, after this photo I did go over the outside a couple times cleaning up edges and surfaces. And then it was done.
Overall, I'd estimate that it took about 50-70 hours, spread out over a couple months.
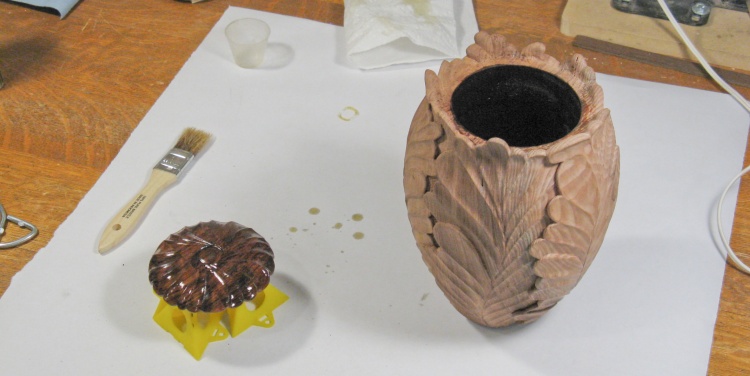
First coat of varnish on cover and inside
Then it was time to start putting the finish on. I began by varnishing the cover and just the inside of the urn, which both received three coats.
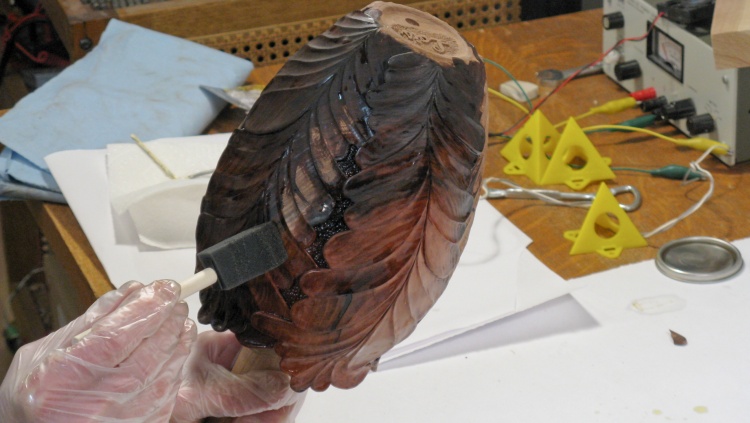
Starting on the outside
With the inside done and dried, I stuck the center piece back in and used the dowel as a handle so I could put varnish on the outside.
The soft redwood absorbed lots of varnish and as you can see here, the wood got quite a bit deeper in color.
The soft redwood absorbed lots of varnish and as you can see here, the wood got quite a bit deeper in color.
Steel-wool treatmant between varnish coats
I clamped the dowel in a vise until the varnish on the sides and bottom dried, and then rubbed the entire surface with fine steel wool between coats.
Varnishing done
This is the look of the vessel with the three coats of varnish.
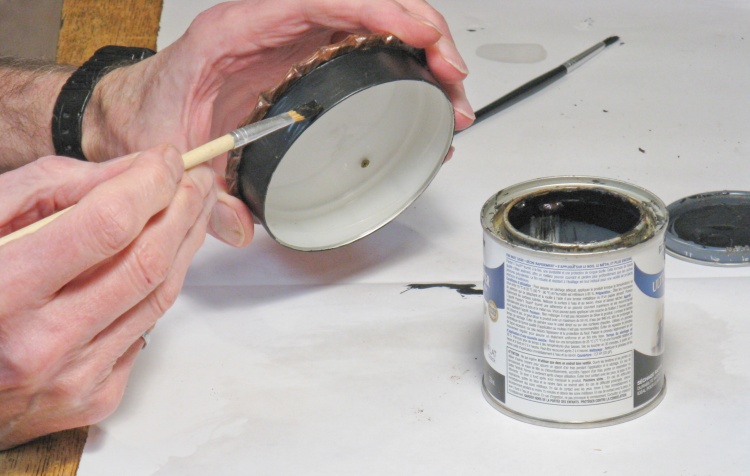
Painting lid so it is less visible
The silvery lid could be seen under the wood cover at certain angles so to make it less visible, I painted it a flat black.
I just painted the whole outside of the lid so it would look consistent, but that made it fit too tightly, so later I removed all but a thin line of paint near the cover.
I just painted the whole outside of the lid so it would look consistent, but that made it fit too tightly, so later I removed all but a thin line of paint near the cover.
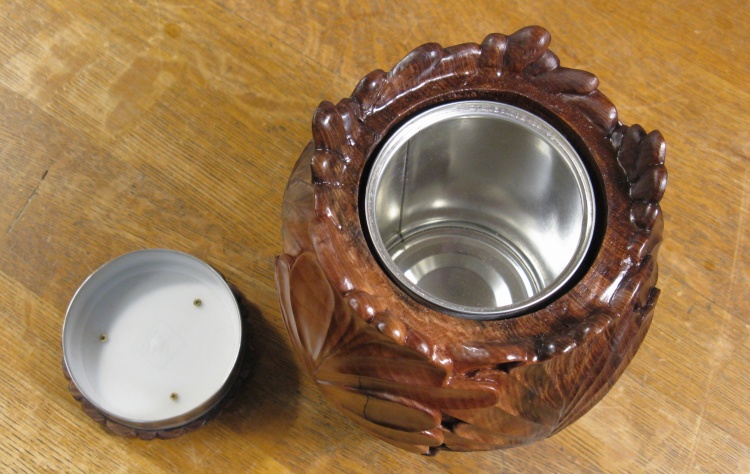
Urn with liner and lid
This is a shot of the inside with the liner in place. The wood cover with attached liner lid sits beside.

The completed urn with cover in place
Done.


