I decided to try a narrow-opening vessel as a first test of a new hollowing system. Of course, you should generally try something simple when just starting with a new tool, but I figured I could do simple by hand, so I might as well see if the new system was better than that. Ultimately it worked out reasonably well, although a narrow-opening vessel isn't the ideal situation for this tool.
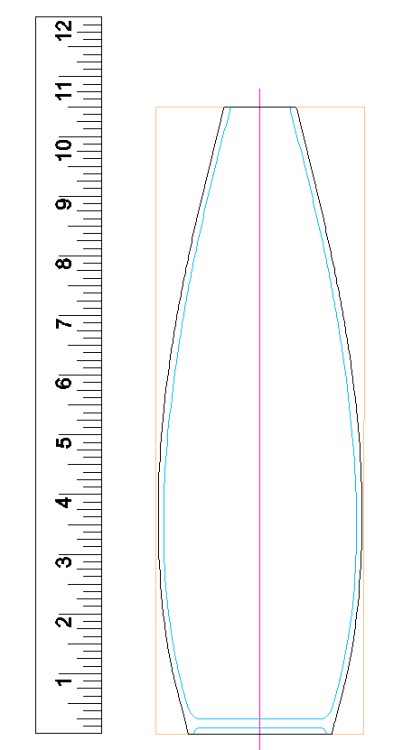
Highly detailed plan
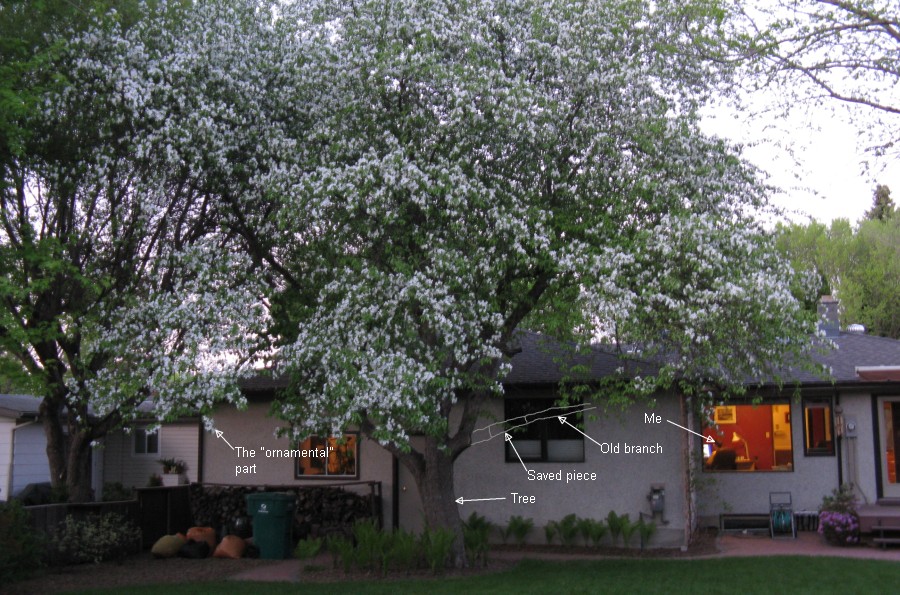
The original tree
This is the Ornamental Crab tree in our back yard that donated the wood. This is a spring shot of course, and it is in full "ornamental" mode, which is nice but only lasts a week or two.
It also produces many thousands of tiny (1/2" dia) apples that it pre-rots (or at least pre-softens) and then drops each spring, which are somewhat less ornamental.
It also produces many thousands of tiny (1/2" dia) apples that it pre-rots (or at least pre-softens) and then drops each spring, which are somewhat less ornamental.

The log
A branch needed to be removed back in 2004 to be able to fit in a piece of heavy equipment during some house renovations and this is a piece of that branch.
When I stored this, I had painted the ends of the branch section with wax to slow the drying (and more specifically the associated cracking) and the piece seemed to have come through fairly well.
When I stored this, I had painted the ends of the branch section with wax to slow the drying (and more specifically the associated cracking) and the piece seemed to have come through fairly well.
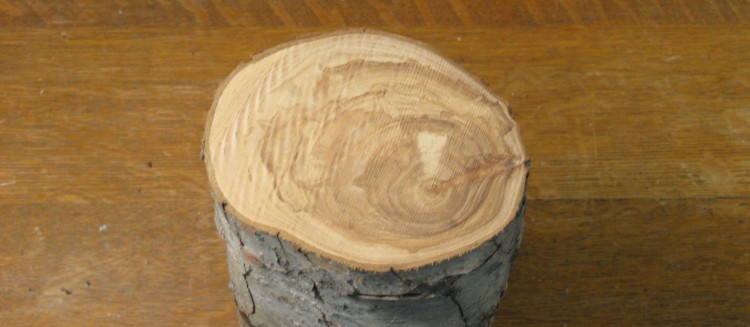
Rather assymetric ring pattern
The branch grew almost horizontally (as evident in my photo-realistic depiction above) so the growth was pretty assymetric and the core ended up being closer to one edge than to the center.
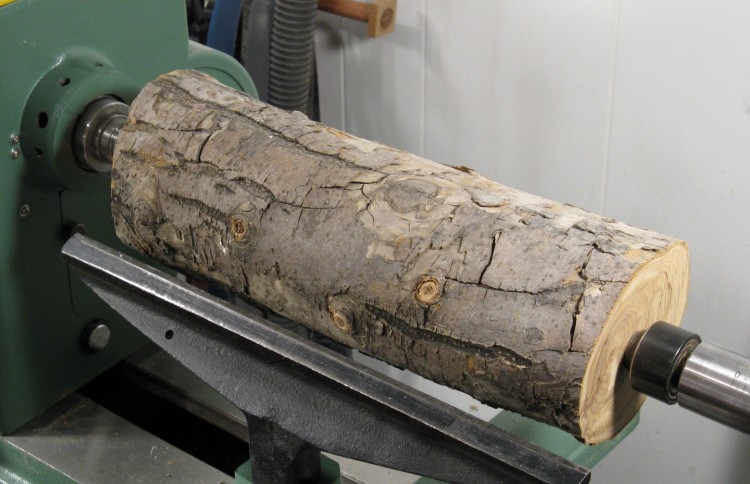
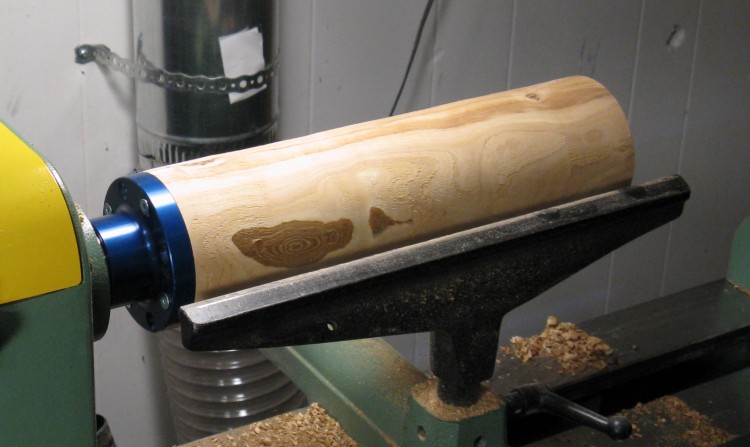
Mounted "between centers" on lathe
I trimmed the ends on the bandsaw to square them up a bit and then mounted it on the lathe. Here it is positioned to do the initial rounding between the drive spur and a live center.

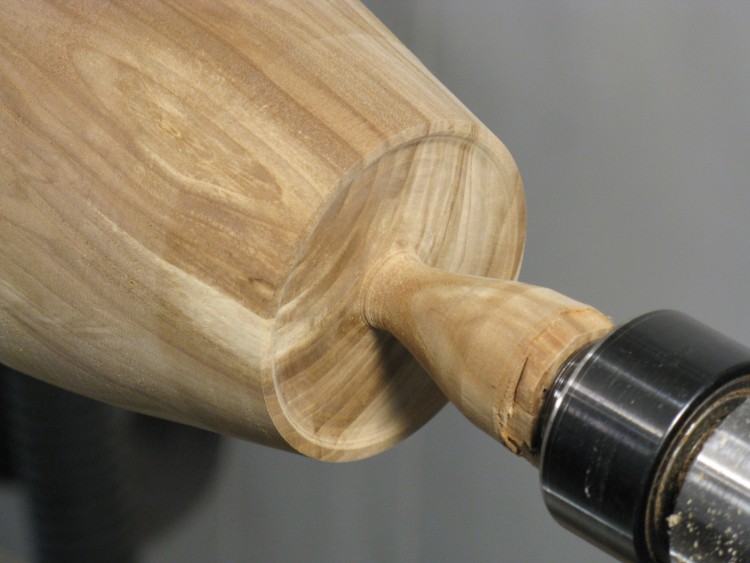
Having faceplate added after rounding
The piece was turned down to get rid of the bark and the round piece that was left had a diameter of about 3 1/2".
Here it has been taken off the lathe and the nice shiny blue aluminum faceplate is being put on. The black center piece and protruding rod allow the faceplate to be accurately centered on the divot left by the spur used to do the initial turning.
The faceplate will hold the wood from just one end so the other end is clear for hollowing.
Ready to go again on lathe
Here the blank is back on the lathe and ready to have the outside shaping started.
I had evened up the near end on the lathe before taking it off, so the faceplate mounted squarely to the piece and the wood was almost perfectly centered when it went back on.
With the hollowing jig came a couple videos by the maker, Lyle Jamieson. I used a technique mentioned there which was to cut the face a bit concave so the full outside of the faceplate is guaranteed to contact the wood, as opposed to teetering on some other part due to a high spot in an imperfect "flat" cut of the end.
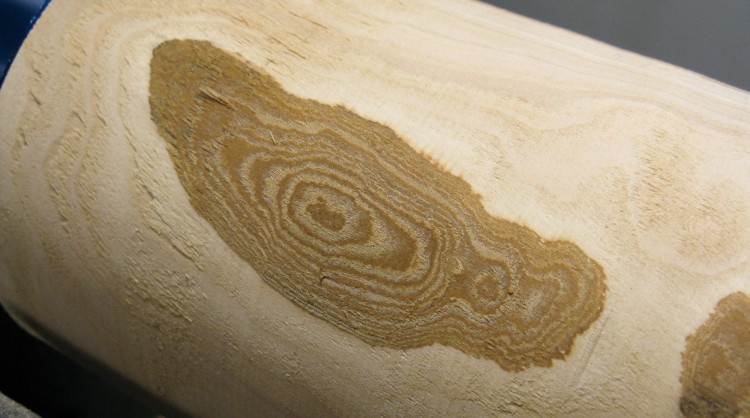
Interesting bark rings
There was a bit of bark left on the piece which was rather striking in having its own distinctive grain.
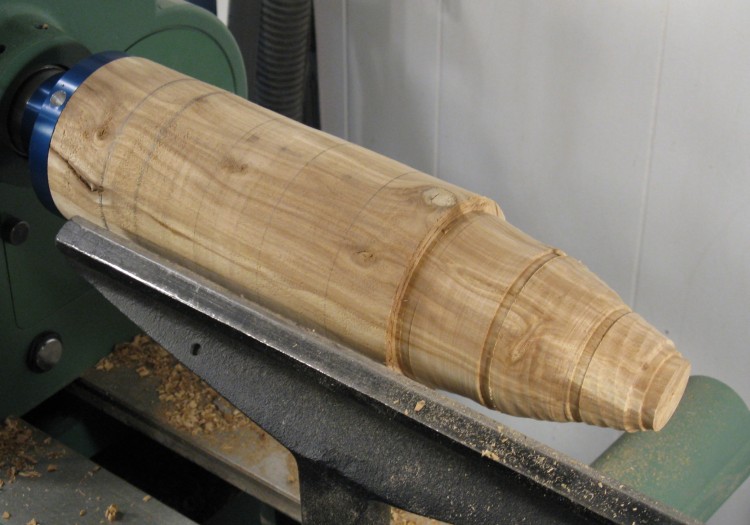
Starting the shaping
OK - on to the shaping. In this photo you can see where in a few spots I cut down to the desired depth with a thin tool and have started removing the extra wood between those places.
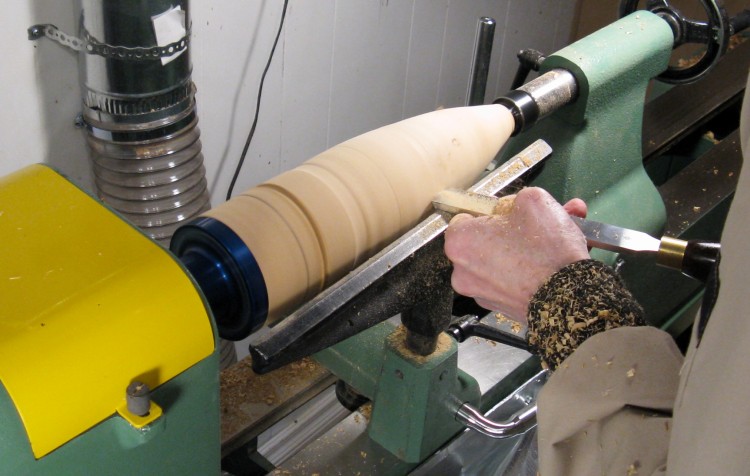
Using a scraper to form the outside profile
I mostly used a roughing gouge to remove the bulk of the wood, but it leaves a pretty "groovy" texture. For a smoother surface I like to use a large scraper as shown here - it works well for making smoothly curved surfaces and leaves a decent finish.
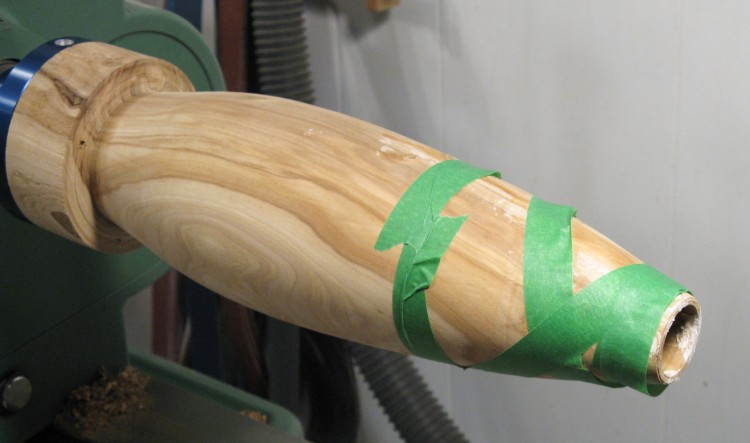
Outside shaping done
The outside shape has been finished and I'm getting ready to start the hollowing.
The first step in the hollowing was to drill a center hole in the piece, which I did on the lathe with a long drill bit (not shown).
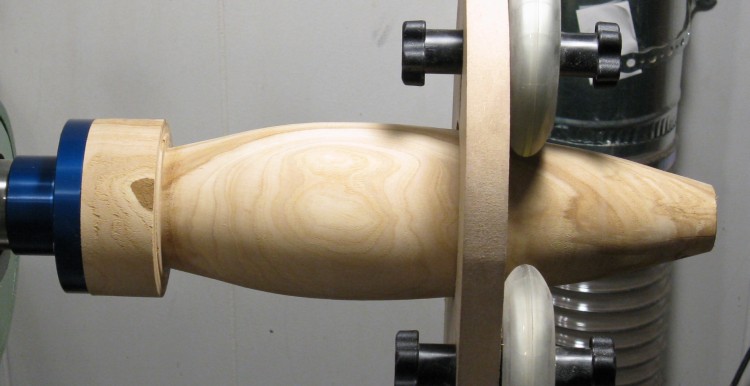
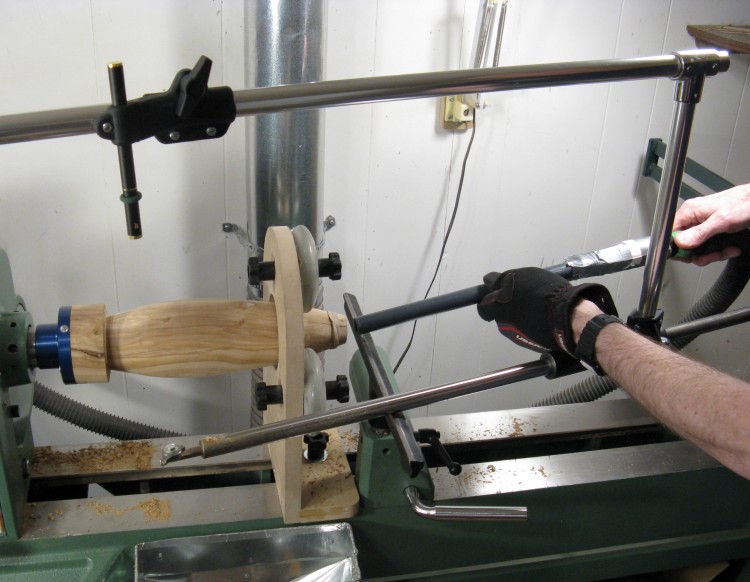
The vessel is not very large so there isn't a great deal of support for the wood from the faceplate. I decided I would need to add the three-wheeled steady rest shown here to reduce vibration.
The first step in the hollowing was to drill a center hole in the piece, which I did on the lathe with a long drill bit (not shown).
The vessel is not very large so there isn't a great deal of support for the wood from the faceplate. I decided I would need to add the three-wheeled steady rest shown here to reduce vibration.
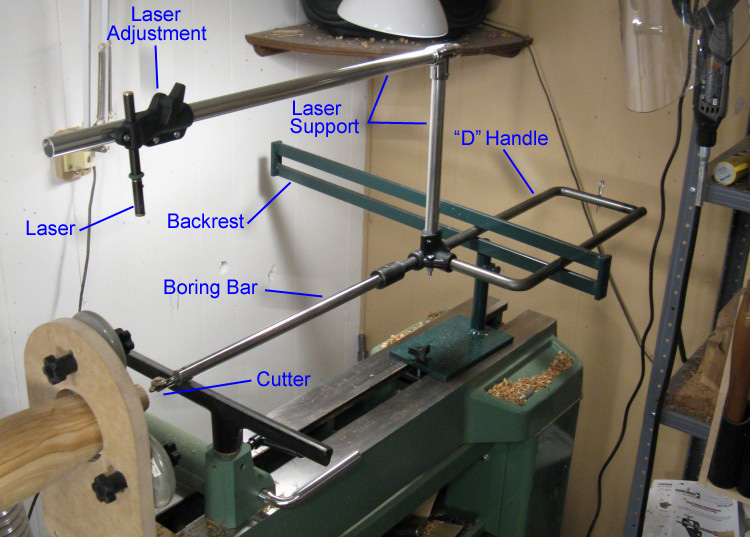
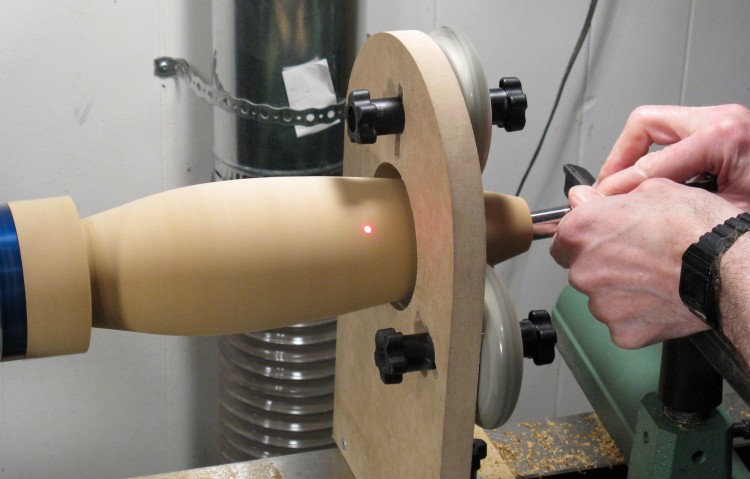
Hollowing jig
This shows the hollowing jig, made by woodturner Lyle Jamieson. The main functions are:
1. Support the cutter against downward forces from the turning wood
2. Prevent cutter rotation against the turning wood, and
3. Indicate the position of the cutter in the wood.
The "D" handle and slotted backrest prevent cutter downward movement and rotation. The cutter can be moved easily into the wood by hand (holding the boring bar or D handle) while the metalwork counters the forces.
From the arm above, the laser shines down onto the turning wood and the spot indicates the position of the cutter. The laser pointing direction can be set to indicate the edge of the cutter but more often it is set a small distance from the edge of the cutter representing the desired thickness of the wall of the vessel.
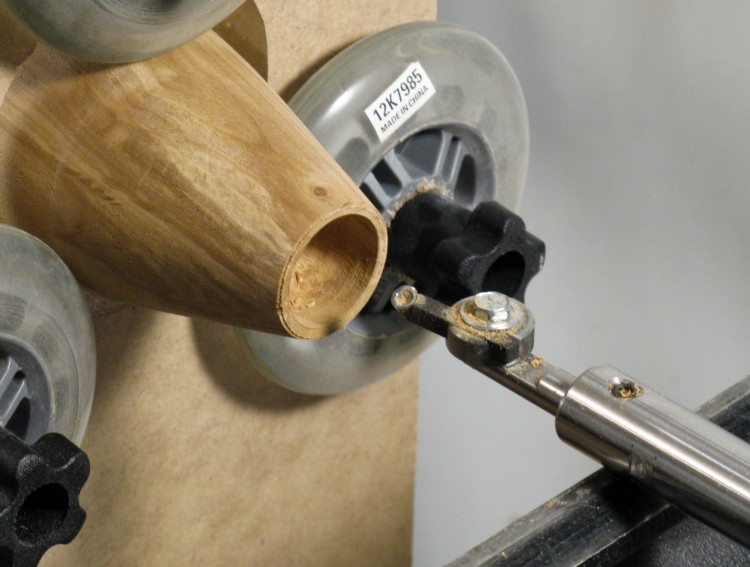
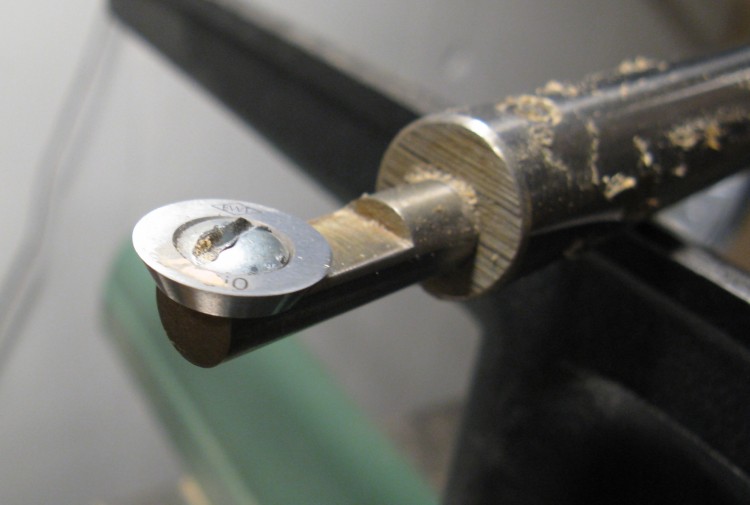
Carbide cutter
This is a closer shot of the business end. The boring bar has a tiny carbide cutter (the small tilted circular piece on the end) mounted on the tool holder. The cutter theoretically stays sharp through dozens of hours of use.
In this shot, I've started the hollowing and the wood has been cut away to maybe 1/2" depth.
In this shot, I've started the hollowing and the wood has been cut away to maybe 1/2" depth.
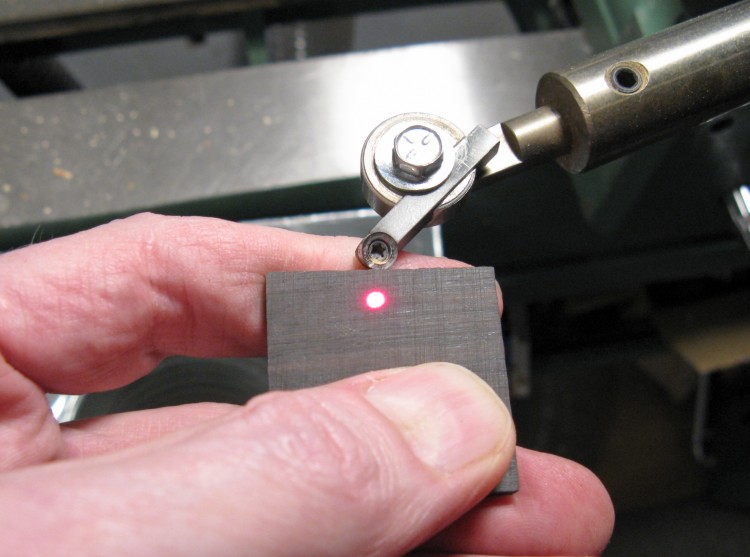
Setting laser
Here is an example of setting up the laser. The idea is to offset the laser spot from the edge of the cutter a distance equal to the desired wall thickness, and at right angles to the section of wood that is being cut. Then when the laser just "falls off the edge" of the wood, the cutter is the set distance inside and the wall is the correct thickness.
Here I'm using a piece of black wood to see the laser position since the laser is pretty bright and it becomes a bit difficult to see the edge of the spot of light if a more reflective surface is used.
By loosening off the bolt seen here, the angle of the shaft holding the cutter can be adjusted relative to the boring bar to reach more to the side (compare against the almost-straight position in the last photo).
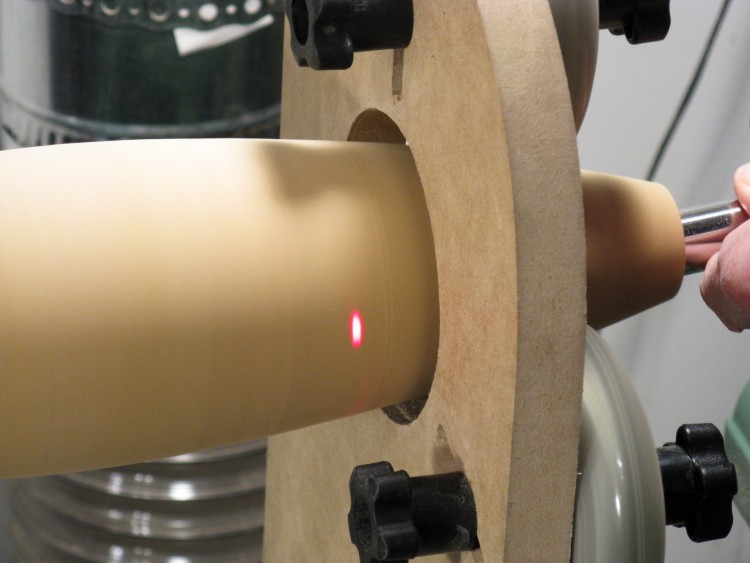
Laser spot showing depth of cutter
Here is a shot illustrating how the laser indicates the cutter position in the wood. It's about an inch past the steady rest and getting close to the edge.
When hollowing by hand, depth into the vessel and distance from the wall are crude guesses at best, so this is a great thing to have.
When hollowing by hand, depth into the vessel and distance from the wall are crude guesses at best, so this is a great thing to have.
Laser showing cutter is at desired wall thickness
Here is the same situation as above, but now the wall thickness is almost right. There is still a bit of the laser visible on the edge so the cutter needs to move a bit closer yet.

Hollowing started
The general strategy is to cut out all the wood from the opening inwards, and to get to the desired wall thickess before moving deeper. With thin walls the wood tends to vibrate so you don't want to have to go back and try to thin the walls further after most of the wood is cut away.
Here the center hole is also visible. I drilled it only part way to start and then went back and drilled it all the way to the bottom later.
Here the center hole is also visible. I drilled it only part way to start and then went back and drilled it all the way to the bottom later.
Alternative cutter
Removing wood at the center is a bit difficult with the cutter on this jig. Ideally, there would be a fairly large hole in the center which makes this unnecessary, but I had only a relatively small drill bit (3/8" dia) of sufficient length so there was still some close-to-center wood. To help with this, I changed the cutter to another larger carbide cutter I happened to have from previous hollowing projects. The one shown here was used for some of the difficult center-clearing sections.
Vacuuming out the vessel
With the small cutter on this jig, the wood shavings weren't much of a problem (they can clog other types of cutters). However, to visually check progress, I vacuumed out the vessel using a plastic hose extension which was able to reach all the way inside.
As I cut further into the wood, I was surprised to find that the boring bar came out covered with condensation. I had assumed that the wood had dried over the dozen years it was sitting in the basement, but in fact it must have been "green" in most of the center parts since the inside was quite moist.
As I cut further into the wood, I was surprised to find that the boring bar came out covered with condensation. I had assumed that the wood had dried over the dozen years it was sitting in the basement, but in fact it must have been "green" in most of the center parts since the inside was quite moist.

Down to the bottom
Here the vessel has been hollowed to the desired depth and I'm just completing the thinning of the wall at the bottonm.
Gluing cracks
By the time I was done hollowing, the vessel was a bit distorted at the top and had a few cracks, both of which I attributed to the originally-moist wood drying out. So I glued the cracks, using the vacuum to pull the glue into the cracks and taped it up to dry as shown here.
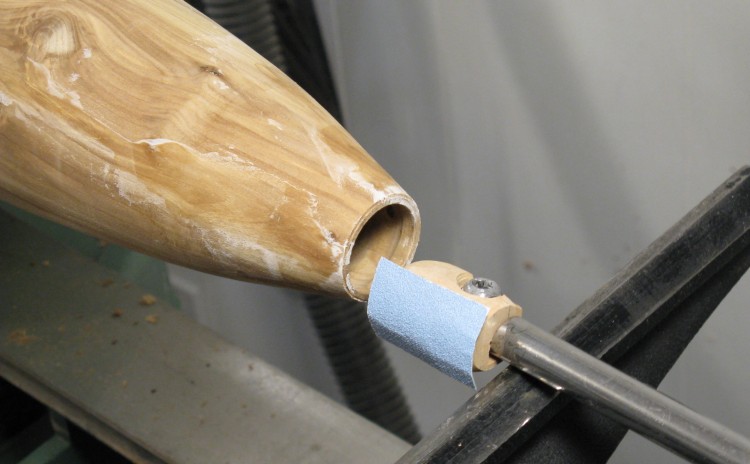
Ready to sand the inside
In this photo, I'm getting ready to do some sanding of the inside using a wooden jig on a handled tool. I had made one of these sanding jigs for a recent project, but I needed to make a smaller one that could squeeze through the opening of the vessel.
The inside wasn't very smooth - I evidently need more practise. The wall thickness varied from about 0.09" to at least 0.11". That range is only the equivalent of the thickness of a couple business cards, but the variation can be easily seen and felt. I didn't try to sand it even; only removed the worst roughness.
And the ugly alkali-flats look of the surface is just due to the glue.
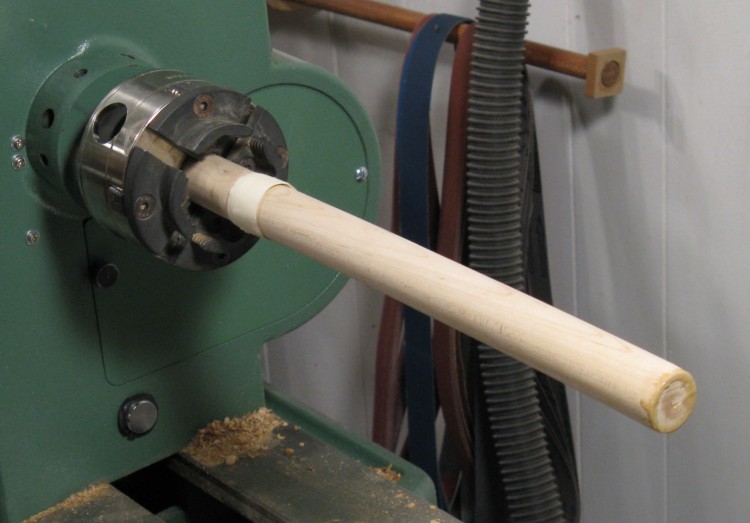
Dowel for reverse mounting
The next step was to remove the circular faceplate mounting block and complete the bottom. To do that, the piece would need to be turned around and remounted on the lathe. I didn't want to have to clamp on to the fairly fragile top opening, so I used this dowel to reach inside. The bottom of the vessel would then be squeezed between the dowel and the tailstock. The masking tape on the dowel gives a snug fit for the vessel opening to keep it from rattling around.
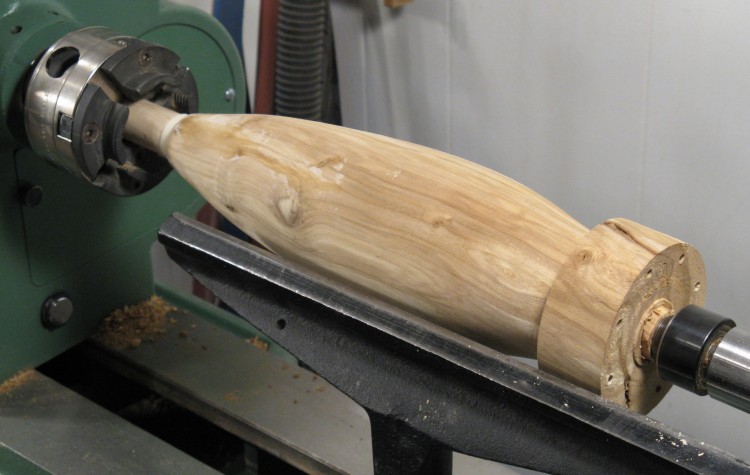
Back on the lathe reversed
Here the faceplate has been removed, the vessel flipped around and the tailstock with live center (the black circular piece on the right) moved in to hold the bottom.
When doing this type of mounting, usually an interface material like cloth, rubber or leather is used between the dowel and the piece to provide friction without marking the vessel. However, the small opening made it very difficult to put anything in place. So instead I applied a thickish coat of rubbery glue to the end of the dowel and let it dry (visible in the previous photo). This gave a nice grippy, non-marking surface.
When doing this type of mounting, usually an interface material like cloth, rubber or leather is used between the dowel and the piece to provide friction without marking the vessel. However, the small opening made it very difficult to put anything in place. So instead I applied a thickish coat of rubbery glue to the end of the dowel and let it dry (visible in the previous photo). This gave a nice grippy, non-marking surface.
Bottom foot shaped
At this point, the excess wood has been removed and the middle of the bottom has been cut away a bit to leave the circular outside "foot". The mounting protrusion in the center will be removed after the piece is taken off the lathe.
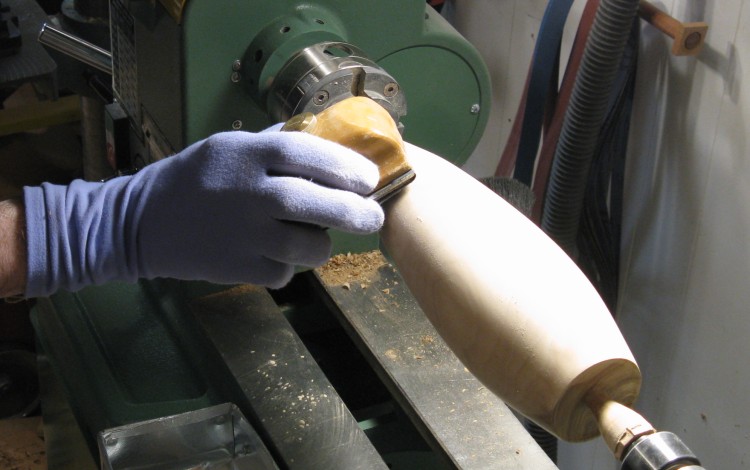
Sanding the outside
I decided to sand the outside while still on the lathe. Often this is done with the lathe spinning, but that sands in the wrong direction (at right angles to the grain). With complex shapes like detailed spindles, that may be the only practical way to sand them, but since the surface of this piece is a simple curve, with the lathe off I just sanded by hand in the direction of the grain: top to bottom. The benefit is that the scratches from the sandpaper are less visible.
I used the lamp at a low angle to check the surface for scratches and imperfections while sanding from 150 grit through to 600 grit.
I used the lamp at a low angle to check the surface for scratches and imperfections while sanding from 150 grit through to 600 grit.
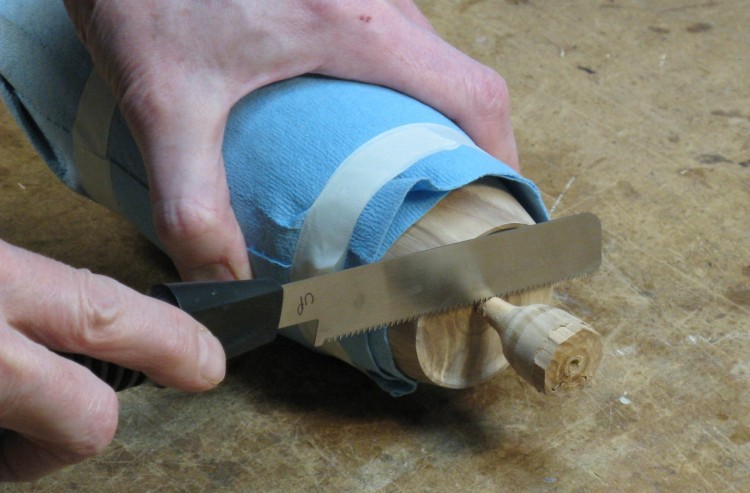
Cutting off stub
I reduced the bottom stub to about as narrow as I dared and then pulled the vessel off the lathe. Since the outside was completely sanded, I wrapped it in the blue shop cloths to protect it from scratches and skin oils. Here the bottom stub is being cut off.
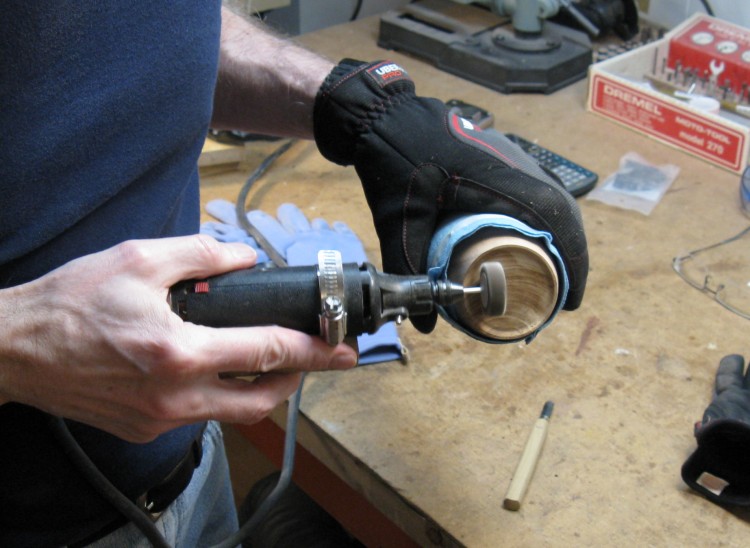
Sanding the bottom smooth
After a bit of grinding with a Dremel cutter, I sanded off the last of the stub with a "flapwheel sander" as shown here.
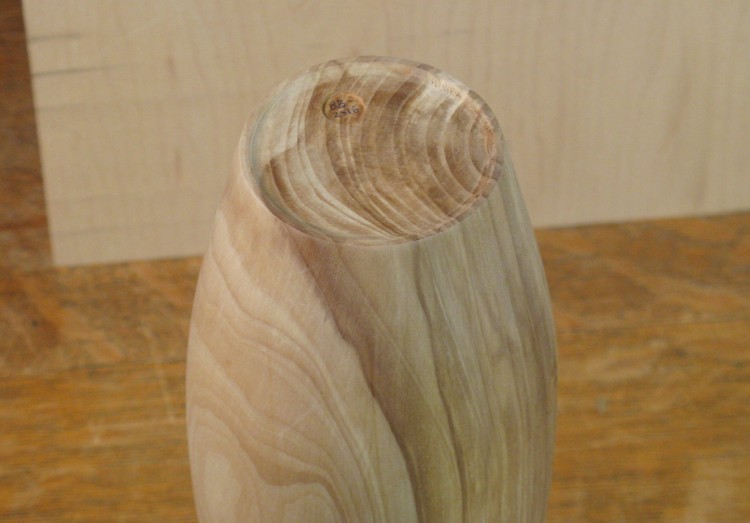
Rounding the top edge
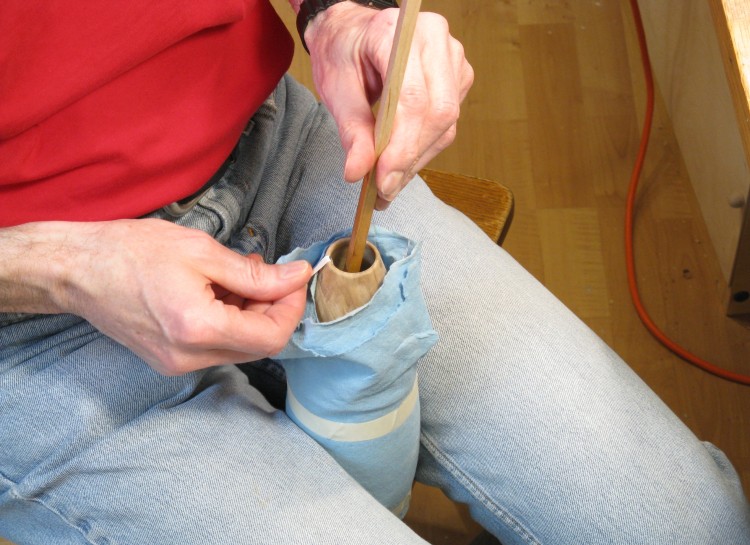
The lip of the vessel was flat-topped when it came off the lathe so the final bit of finishing was to round it over. I used strips of sandpaper with one end taped to a stick to reach inside and then the strip was pulled up and down over the top edge to round the corners while being secured with the "thigh clamp".
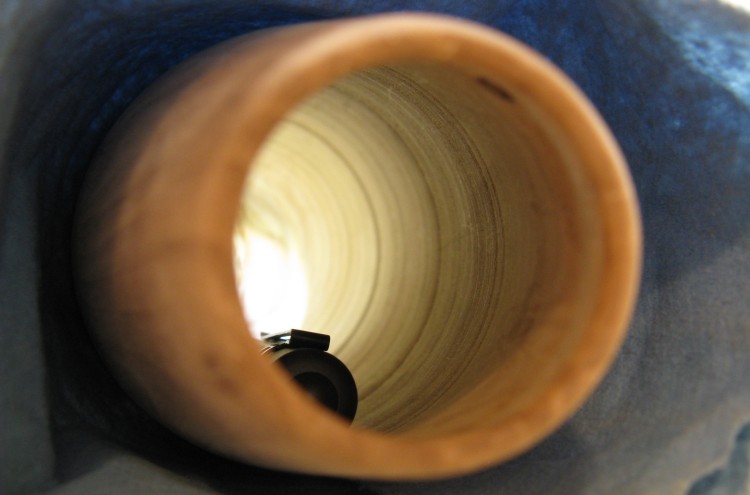
Inside view
Here's a shot of the inside wall, showing the...let's say...imperfect? smoothness.
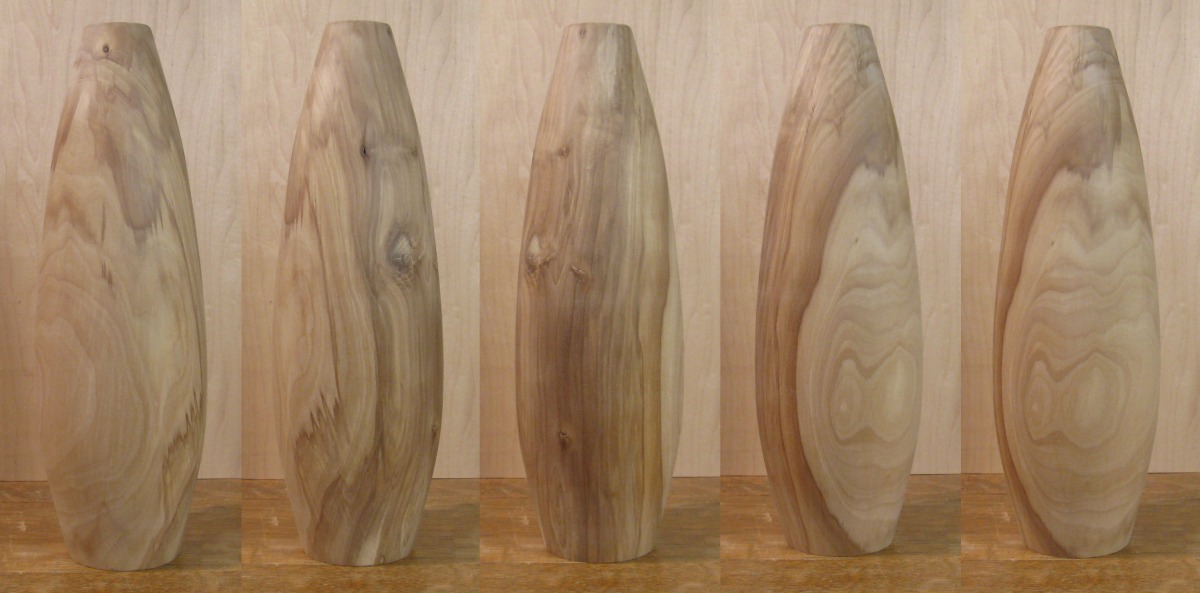
Composite shot
Bottom view
The above composite shows the side view of the completed vessel at a few different rotations.
Here the bottom is shown. The circular area is something I try to put on most things I make, which just has my initials and the year.
Here the bottom is shown. The circular area is something I try to put on most things I make, which just has my initials and the year.
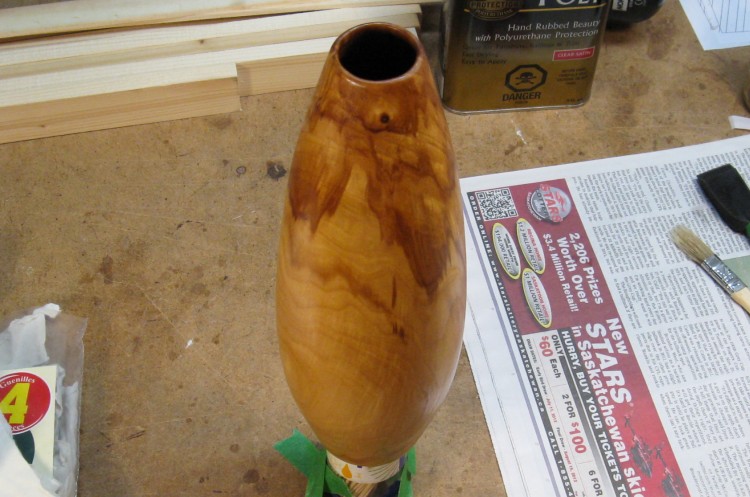
First coat of finish
And here of course is the traditional "first coat of varnish" shot. It ended up with the typical three coats of Wipe-on Poly.
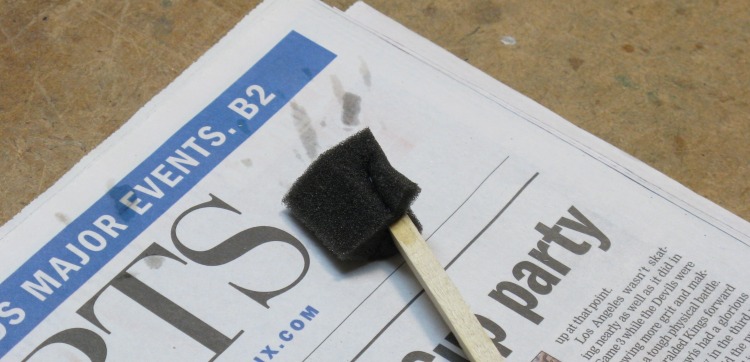
Custom inside brush
To varnish the inside, I made a sideways-firing foam brush by stapling the end of a foam brush onto a long wood handle as shown here.
For the outside I used a cloth to wipe the varnish on. I think that gave a bit smoother finish than my usual technique of using a foam brush.
For the outside I used a cloth to wipe the varnish on. I think that gave a bit smoother finish than my usual technique of using a foam brush.
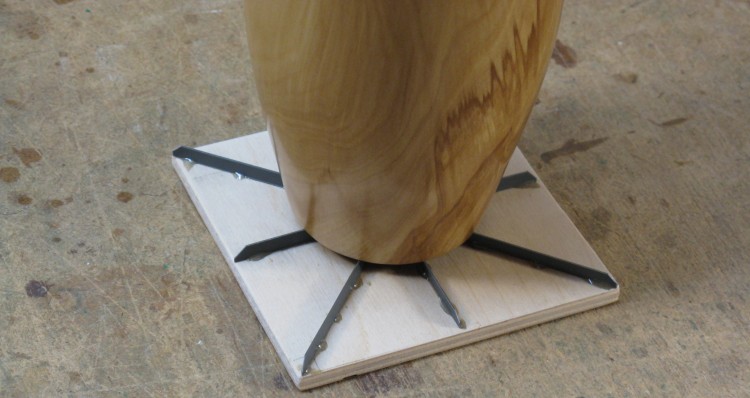
Drying base
It's always a bit of a problem holding a newly-varnished piece. I can use little plastic pyramids for large flat items but they weren't an option on this narrow-bottomed guy. The shot above shows a pathetic attempt using a plastic toothpick container but that badly needed to be improved upon.
So I made up a rather more effective drying base from some thin strips of plastic glued to a square of plywood as shown here. This provided support over the circumference of the vessel so it was less tippy and easier to touch up those last spots without knocking it over.
So I made up a rather more effective drying base from some thin strips of plastic glued to a square of plywood as shown here. This provided support over the circumference of the vessel so it was less tippy and easier to touch up those last spots without knocking it over.
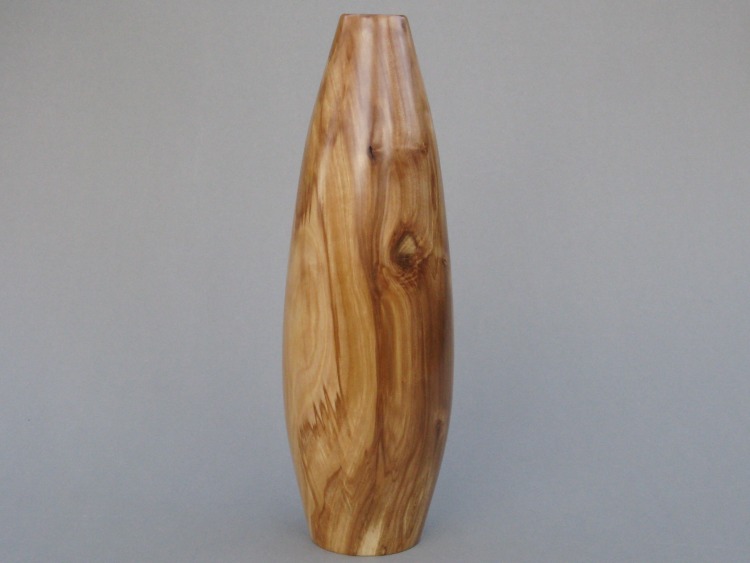
Completed
And here is the completed vessel in the official grey-background shot.


