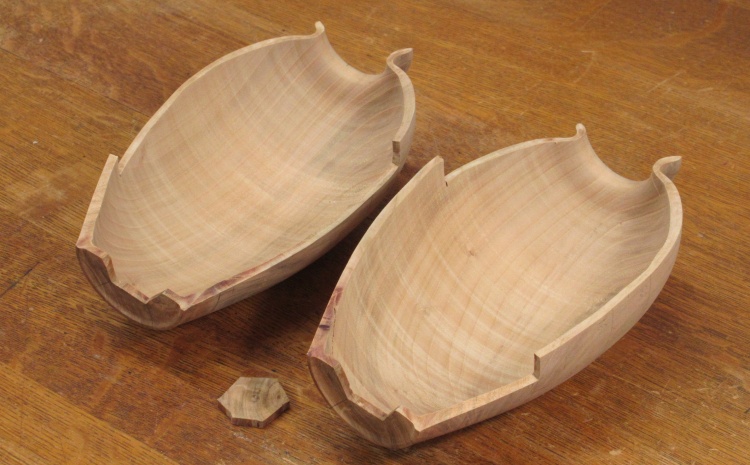
After finishing a multi-part assembly project I thought I should switch things up a bit and maybe turn something on the lathe. I'll also note that after doing a number of turnings I've evolved to treat it as more of a starting point rather than an end in itself, so that usually means some post-turning work. In this case, that work ended up being the saw-apart-and-sew-back-together process that formed this vessel. Ironically, that made it into another multi-part assembly project. But at least it's a little different.
I've used sewing techniques to fabricate a box hinge in the past and this design is an extension of that idea. As usual I did some on-line searching to see what kind of existing work was out there but was a bit surprised when I failed to turn up any examples of sewn-together vessels. It's hard to believe that there isn't something like this out there somewhere but perhaps it's weird enough to at least be rare.
Completing all the processes needed for this vessel took a fair amount of time but I managed to squeeze in one or two smaller projects while I worked on this one.
Contents:
• The Starting Vessel
• Making the Patches
• Some Sewing Tests
• The Carving Phase
• Finishing the Finishing
• Sewing It Up
• 360° view
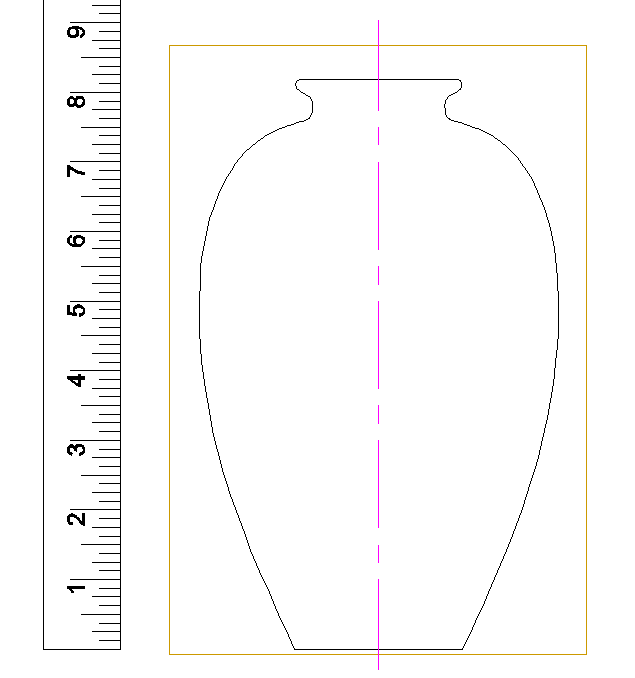
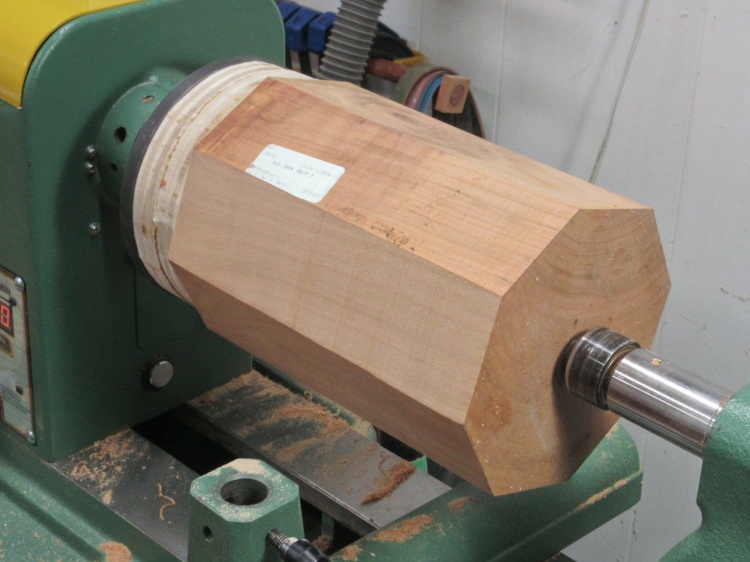
The plan for the general shape. Gotta start somewhere.
The Starting Vessel
To make a vessel composed of "patches" of wood, I suppose one could have made each patch independently, but that goes beyond painstaking and into bizarrely involved. Instead, I satisfied my turning urges by making the target vessel and then cut the patches out of that, guaranteeing a decent fit. And saving a year or two of work.
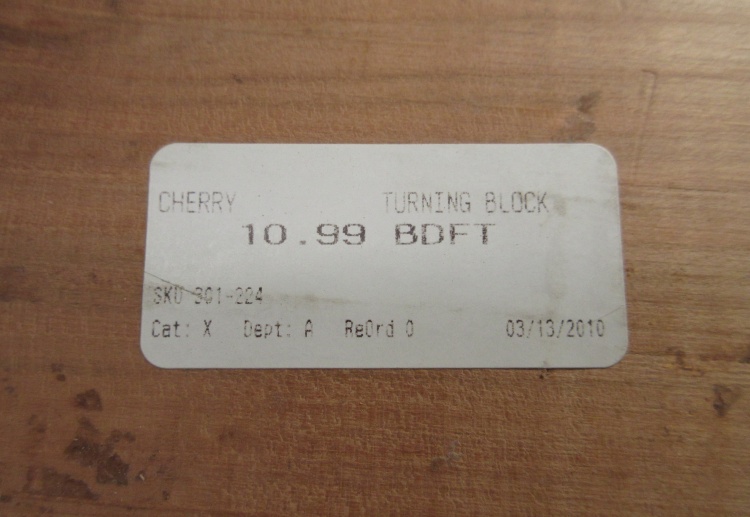
A well-aged cherry block to start from
I had a nice 6 x 6 x 9" cherry block that had been sitting around my shop waiting for a project for over a decade and this seemed like a fine use for it. Plus, my shop now has 0.1875 cu. ft. more free space.
I actually failed to take a photo of the actual block but in general it was...block shaped.
I actually failed to take a photo of the actual block but in general it was...block shaped.
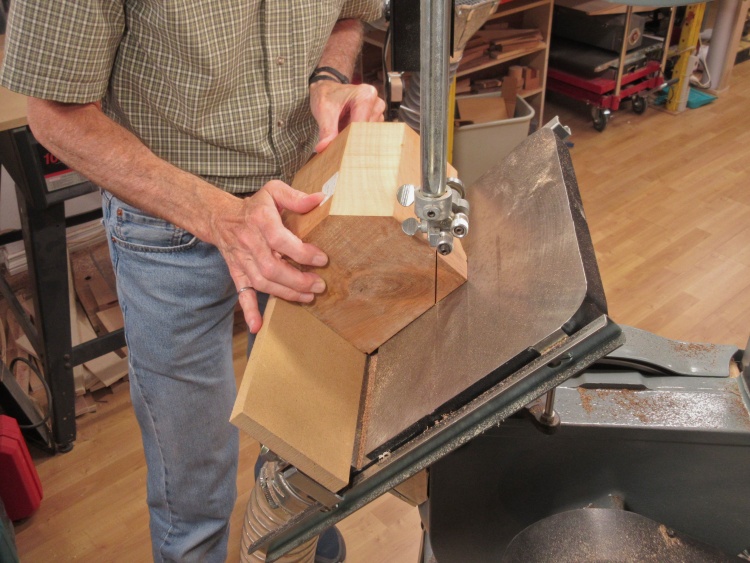
Chopping off the corners
See? Block-shaped. At any rate I decided to cut off the corners to reduce the amount of sawdust the turning would generate.
Of course almost any sort of hollow lathe-work ends up turning the vast majority of the wood to sawdust. I estimate that over 95% of the wood would be rendered into dust by the time the vessel was done.
But how much was sawdust reduced by cutting off the corners?
Glad you asked; A not-insignificant 17%.
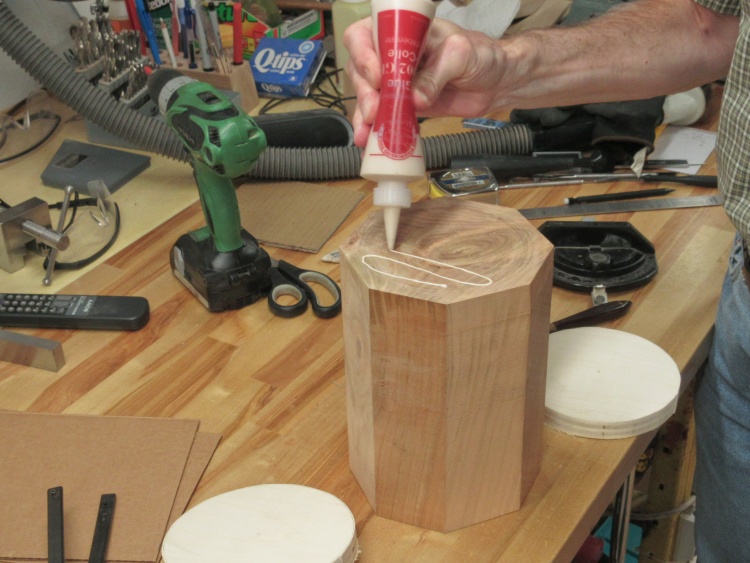
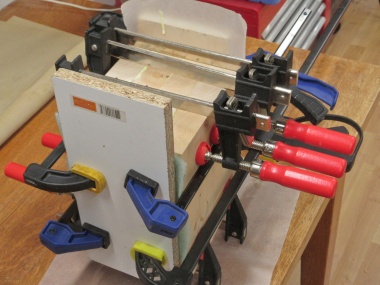
Gluing on a couple of plywood plates to aid in mounting
I was planning to use the full length of the block so I needed some extra length for the faceplate screws.
To get that I glued onto one end those two rounds of 3/4" plywood visible in this shot of my messy bench.
To get that I glued onto one end those two rounds of 3/4" plywood visible in this shot of my messy bench.
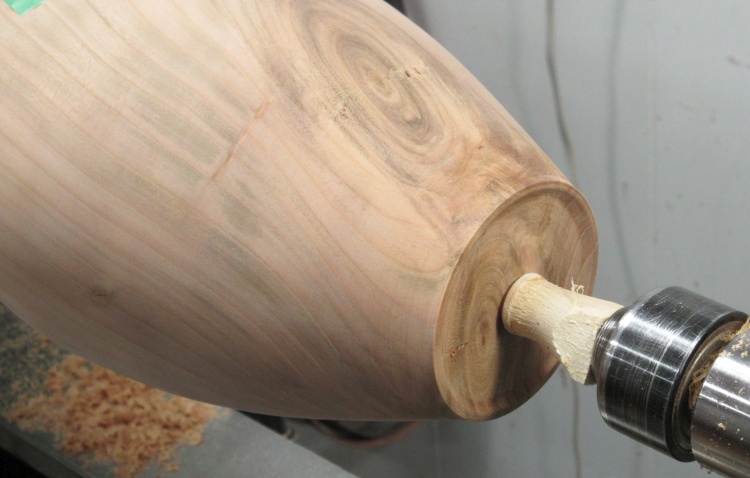
Mounted to the lathe and ready to spin
My largest faceplate was screwed to the plywood and then whole shebang was mounted to the lathe. The live center was engaged with the end to help stabilize the piece for turning.
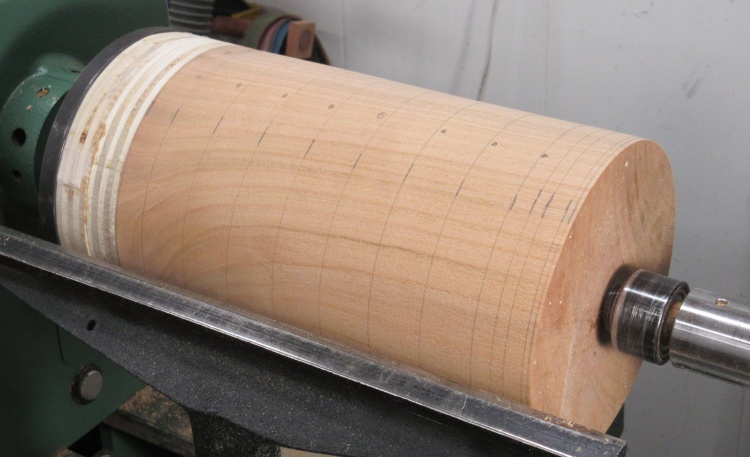
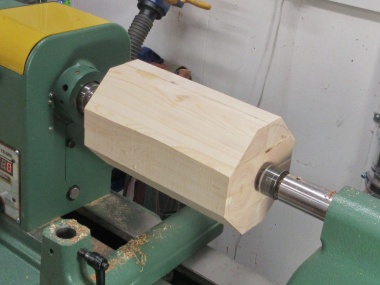
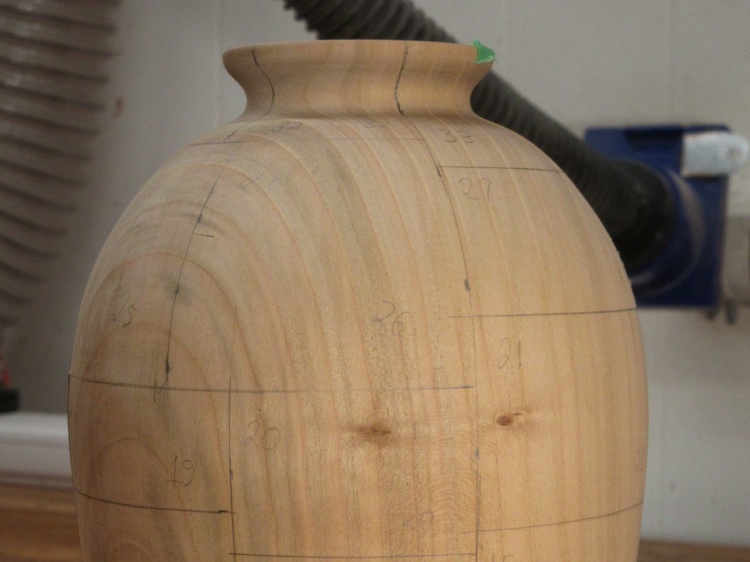
Rounded and marked for diameter cutting
A few minutes work with a roughing gouge and then a large scraper for some smoothing resulted in this round version.
Here you can also see the pencilled-on reference lines that will aid in cutting to the profile I want (mostly at 1-inch intervals).
Here you can also see the pencilled-on reference lines that will aid in cutting to the profile I want (mostly at 1-inch intervals).
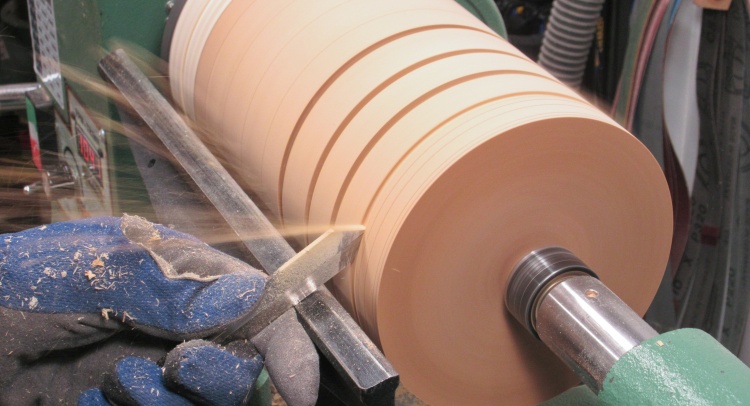
Cutting in a diameter-defining slot
And then I used my usual technique of cutting narrow slots at the guide lines to the proper depth.
The wood needs to be stopped numerous times to measure the diameter getting cut and once I went back to the wrong slot and ended up making it smaller than it was supposed to be. ARRRGHHHH! Fortunately I was able to recover by scaling the vessel down by only 5% from the original size, so it wasn't as big a disaster as it originally seemed.
The wood needs to be stopped numerous times to measure the diameter getting cut and once I went back to the wrong slot and ended up making it smaller than it was supposed to be. ARRRGHHHH! Fortunately I was able to recover by scaling the vessel down by only 5% from the original size, so it wasn't as big a disaster as it originally seemed.
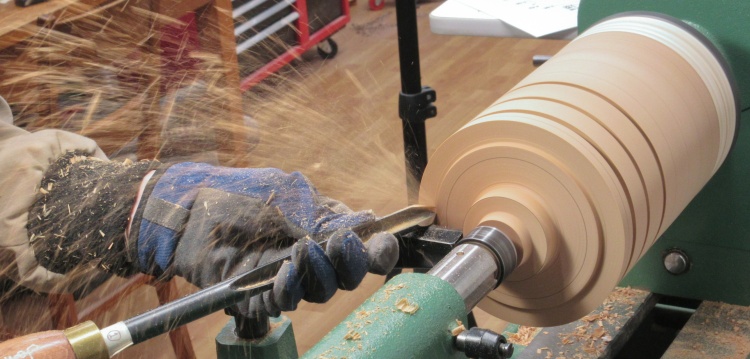
Cleaning off some end wood
I reduced the diameter near the top of the vessel since that was easier than cutting really deep slots.
This bowl gouge is especially effective at shooting shavings around the shop.
This bowl gouge is especially effective at shooting shavings around the shop.
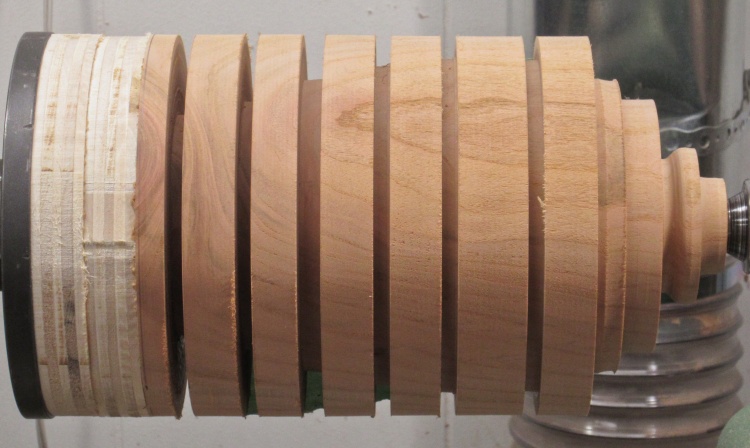
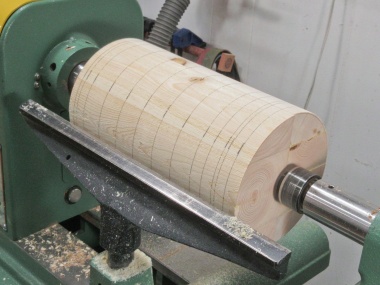
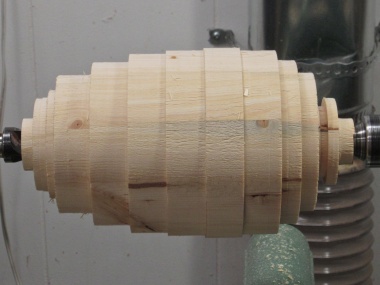
Diameters mostly cut
Here all the reference diameters are cut (although the bottom ones need to go down a bit further still). The next step was to clean off everything extra.
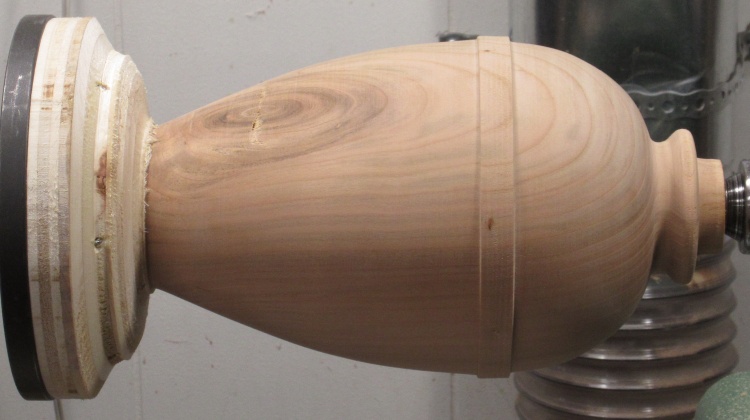
Shaping (and some sanding) done
And here all that extra has been reduced to shavings and sawdust. The neck has been shaped and the outside has had some sanding done as well.
The boss at the largest-diameter point was formed to give the wheels of the steady-rest a place on which to run.
A biggish knot and some cracking has been exposed near the bottom but those shouldn't be a problem.
The boss at the largest-diameter point was formed to give the wheels of the steady-rest a place on which to run.
A biggish knot and some cracking has been exposed near the bottom but those shouldn't be a problem.
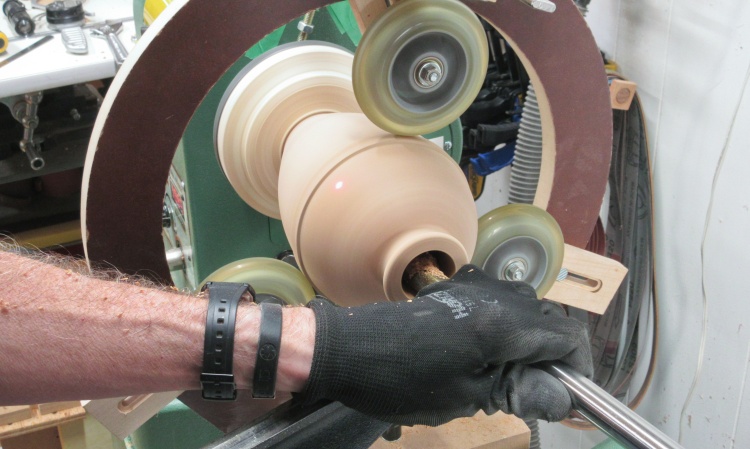
Starting on the hollowing
Next up was the hollowing. The steady rest went into place and the hollowing setup came out.
In this shot the laser dot shows that I'm already a couple inches into the vessel.
In this shot the laser dot shows that I'm already a couple inches into the vessel.
Now the hollowing tool is very convenient but hollowing the vessel out to the walls requires the cutter to be at various angles and reaches. It needs to be set to effectively cut the wood to the end or the side as required, but this allows only a limited amount of cutting before the cutter is too deep and blocked by the holder or the angle becomes such that it doesn't cut effectively.
This setup is complicated by the narrow neck which limits the sideways movement and even how far off to the side the cutter can be set so that it can still get through the neck. The upshot of all this is that the cutter needs to be adjusted frequently. This montage shows the first dozen or so settings used which include a couple of different cutters and an extender.
This setup is complicated by the narrow neck which limits the sideways movement and even how far off to the side the cutter can be set so that it can still get through the neck. The upshot of all this is that the cutter needs to be adjusted frequently. This montage shows the first dozen or so settings used which include a couple of different cutters and an extender.
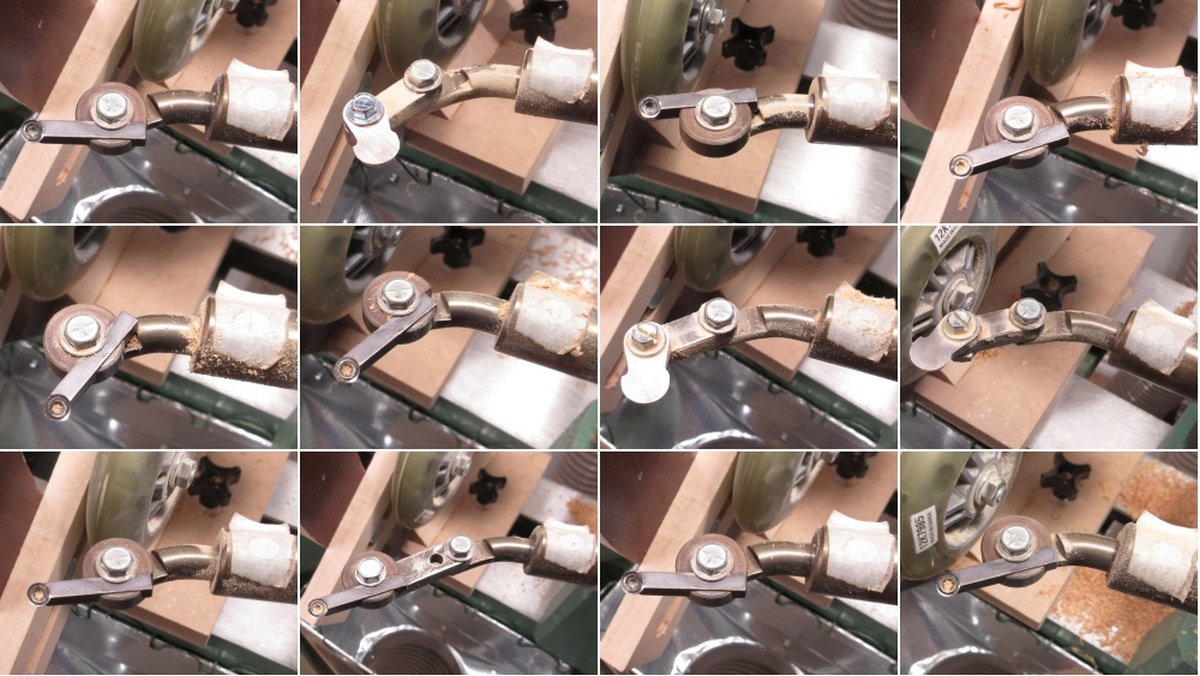
Hollowing takes a variety of bits, lengths and angles
broken-off and re-glued plywood ply
Unfortunately about halfway in there was a "catch" which jerked the vessel hard enough to break off a layer of the plywood I had used on the bottom. Presumably the plywood was a bit short on glue in that spot.
In this photo you can see just around the base where I have glued the ply back on (where the glue is gooshing out).
In this photo you can see just around the base where I have glued the ply back on (where the glue is gooshing out).
A bit of extra reinforcement
The ply broke off again shortly after re-starting the hollowing so I glued it again and added these crude reinforcements to help anchor the problem ply to the next one. These patches were made from 1/8" Baltic Birch plywood, crudely sanded to better conform the corners they were stuck into.
Despite the crude nature, they seemed to work as the vessel was solid after that.
Despite the crude nature, they seemed to work as the vessel was solid after that.
So then it was back to setting the cutter and working my way down the inside of the vessel. This montage shows the ten additional cutter settings I used to complete the hollowing.
Each setting change requires loosening/tightening the holding screws or disassembly/reassembly if the cutter or extension is to be changed. Then the laser pointing needs to be reset to correspond to the new cutter position. You can also see that I changed to a thicker holding bar for the last three settings. Flexure of the bar becomes more of a problem as the cutting is deeper into the vessel since the cutter is further from the tool rest. A larger bar reduces the resulting movement or vibration of the cutter.
Each setting change requires loosening/tightening the holding screws or disassembly/reassembly if the cutter or extension is to be changed. Then the laser pointing needs to be reset to correspond to the new cutter position. You can also see that I changed to a thicker holding bar for the last three settings. Flexure of the bar becomes more of a problem as the cutting is deeper into the vessel since the cutter is further from the tool rest. A larger bar reduces the resulting movement or vibration of the cutter.

And then back to the hollowing
Then a bit of internal sanding
After the hollowing was done, I did a bit of internal sanding using this jig and another made to fit through the vessel neck.
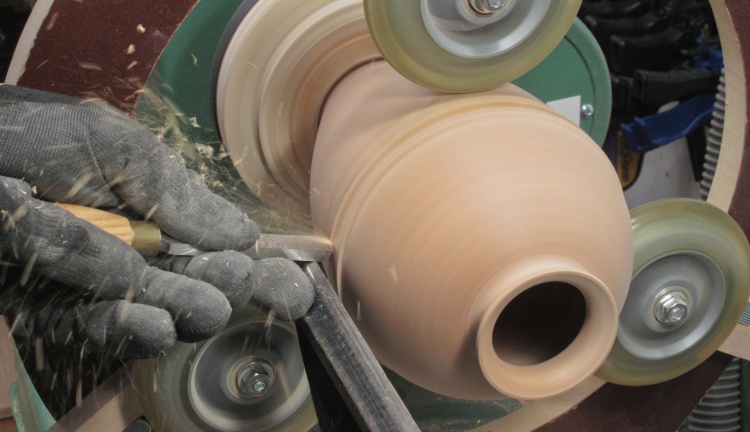
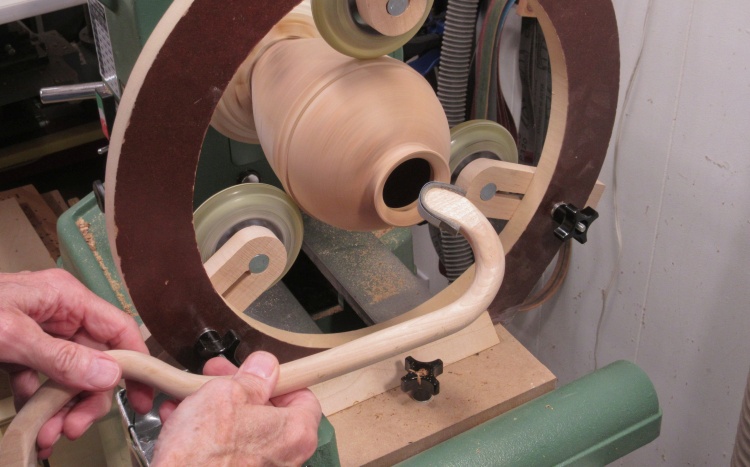
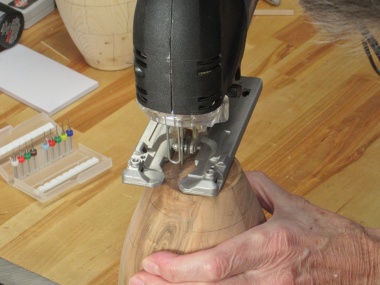
Removing the wheel boss
The last task on the lathe was to remove the wheel boss. I've moved the wheels back to give me some room and then used a scraper to remove the boss.
~Aside~
In addition to spending time in the shop turning perfectly good wood into sawdust and shavings, I'm also an avid book reader - mostly fiction of one type or another. And it's always something of a shock to read any mention of Canada. Oh, there's the odd comic-relief throw-away comment like "crazy Bob ran off to Canada and no one's heard from him since" but to see an actual mention of something Canadian is much less usual. The current book I'm reading mentioned someone walking past a Royal Bank. I sat up straight: "What - this author is Canadian?". A check revealed this was so (since it is exceedingly rate for a non-Canadian to write anything about Canada) and later in the book was a reference to Ontario, the RCMP (well, it was a murder mystery) and even - egads! - Saskatoon. Although I'll have to admit that even among Canadians, references to Saskatoon are typically comic-relief throw-away lines.
In addition to spending time in the shop turning perfectly good wood into sawdust and shavings, I'm also an avid book reader - mostly fiction of one type or another. And it's always something of a shock to read any mention of Canada. Oh, there's the odd comic-relief throw-away comment like "crazy Bob ran off to Canada and no one's heard from him since" but to see an actual mention of something Canadian is much less usual. The current book I'm reading mentioned someone walking past a Royal Bank. I sat up straight: "What - this author is Canadian?". A check revealed this was so (since it is exceedingly rate for a non-Canadian to write anything about Canada) and later in the book was a reference to Ontario, the RCMP (well, it was a murder mystery) and even - egads! - Saskatoon. Although I'll have to admit that even among Canadians, references to Saskatoon are typically comic-relief throw-away lines.

Chopping off the extra bits on the bottom
The next thing on the do-list was finishing off the vessel bottom.
At present the bottom was glued to those iffy plywood disks so the bandsaw was used to chop off as much as practical of the extra stuff.
At present the bottom was glued to those iffy plywood disks so the bandsaw was used to chop off as much as practical of the extra stuff.

Vessel returns to the lathe
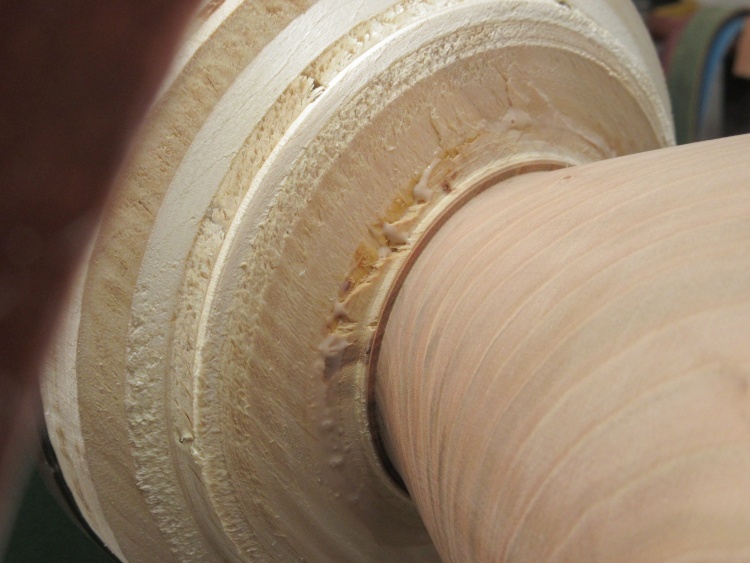
I glued a temporary stub to the middle of the bottom to give some room between the bottom and the tailstock.
When the glue was dry I mounted the vessel back on the lathe, employing a large dowel to reach inside and contact the bottom. This avoided putting pressure on the not-very-strong neck and top flange. The dowel was equipped with custom ring to keep the neck from rattling around.
There was no center reference on the newly-cut-off bottom so I set up the dial gauge to help with the centering. I rotated the vessel by hand while observing the gauge and tapped the vessel bottom over periodically to move it closer to being centered.
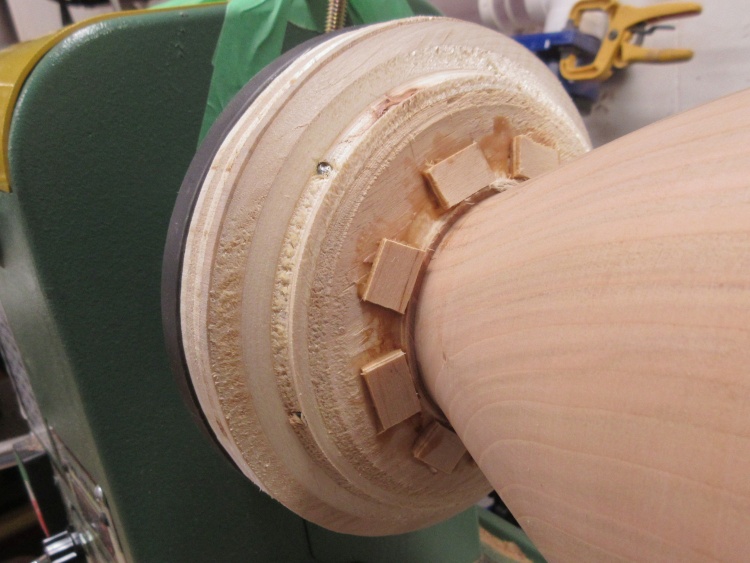
Bottom mostly finished
Then the remnants of the plywood were removed and the center hollowed to leave a foot around the outside.
In this shot the bottom is done except for removing that temporary stub.
In this shot the bottom is done except for removing that temporary stub.

And that's it for the vessel
With the stub removed and the bottom smoothed, the vessel is done.
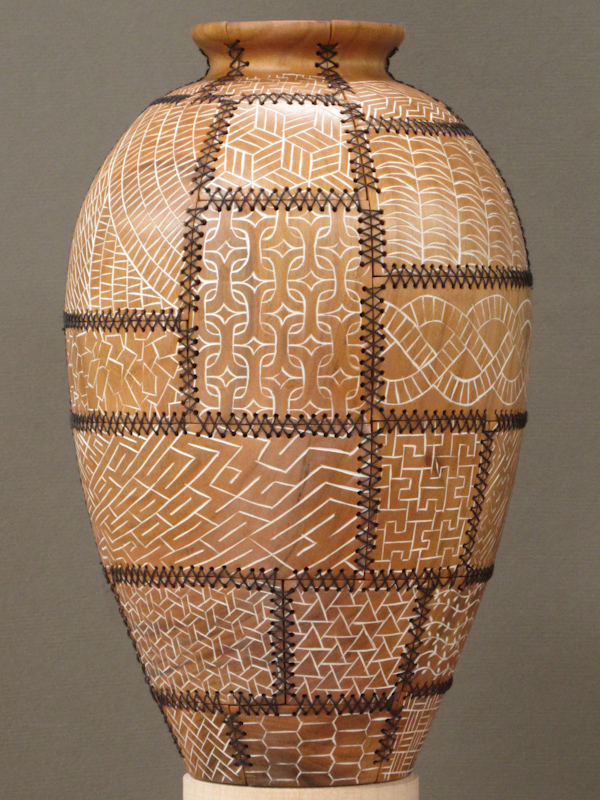
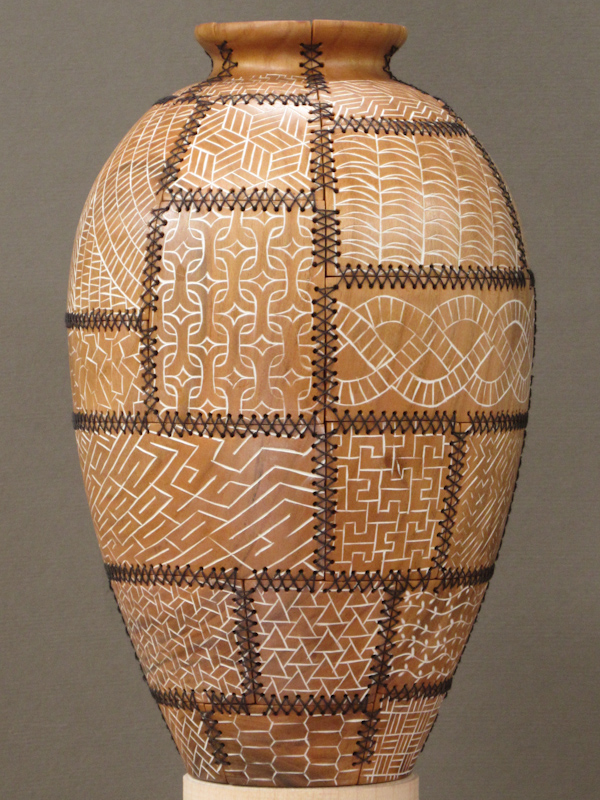
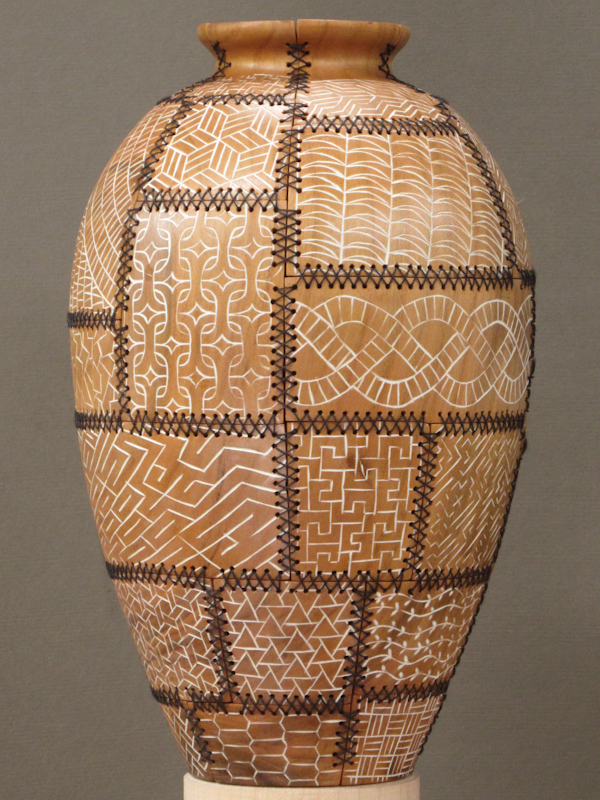
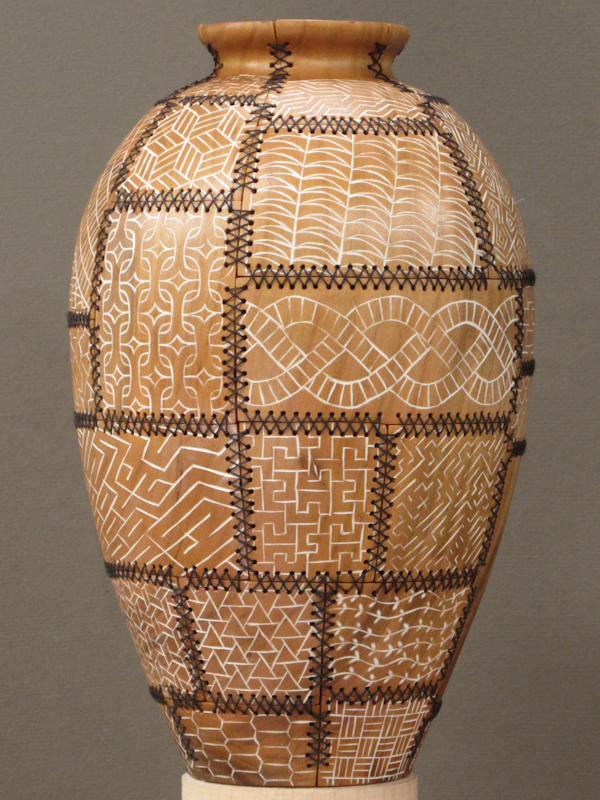
Making the "Patches"
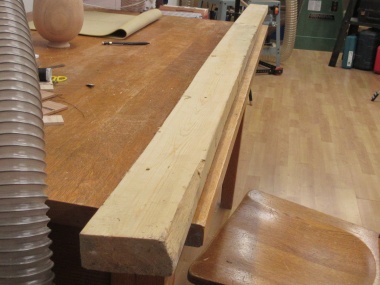
My cunning plan was to draw patches on the vessel and cut it up. However I wasn't sure how many tries it would take to draw out suitably-shaped patches so I thought I'd make a quickie duplicate and do the drawing/erasing etc. on that one. This didn't need to be made from a particularly good material so I popped out to the garage and grabbed your basic construction 2 x 4 which was probably Spruce.
The following photo matrix shows the completion of the duplicate vessel, in a nice almost-white suitable for scribbling on in pencil. This vessel took only about a day to make, mostly because it didn't need to be hollowed.
The following photo matrix shows the completion of the duplicate vessel, in a nice almost-white suitable for scribbling on in pencil. This vessel took only about a day to make, mostly because it didn't need to be hollowed.
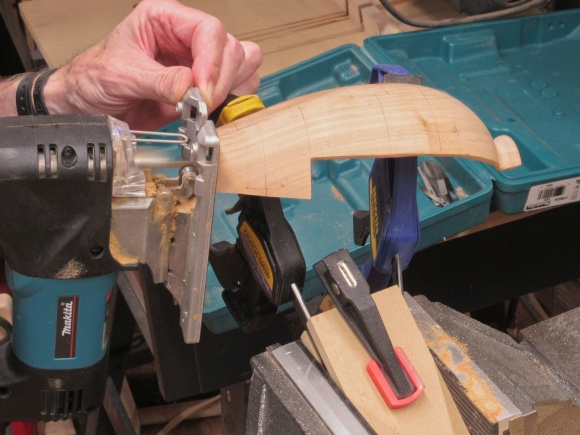
A gracefully curved 2 by 4

Making it shorter
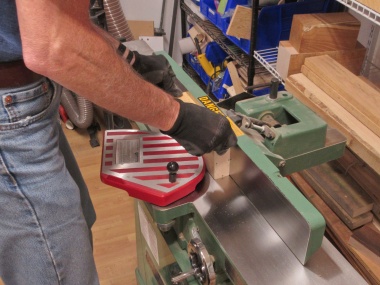
...and flatter
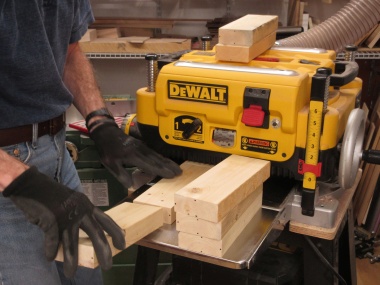
...and a consistent thickness
Glued into a single block
Getting corners removed
Mounted to the lathe
Rounded & marked
Reference diameters cut

The original and the (not hollow) dummy
Wow - you can hardly tell them apart!
Marking "patches" on the dummy
So then I grabbed a pencil and started to draw patches.
The patches were rectangular (or at least a rectangle projected on a curved surface) and I tried to get a variety of sizes and shapes.
Each cut between patches removes a bit of material so to avoid gaps when it went back together I would need a consistent number of cuts on any vertical line on the vessel. The same applied for any horizontal ring around the vessel. I ended up choosing six cuts (coincidentally) for both those parameters.
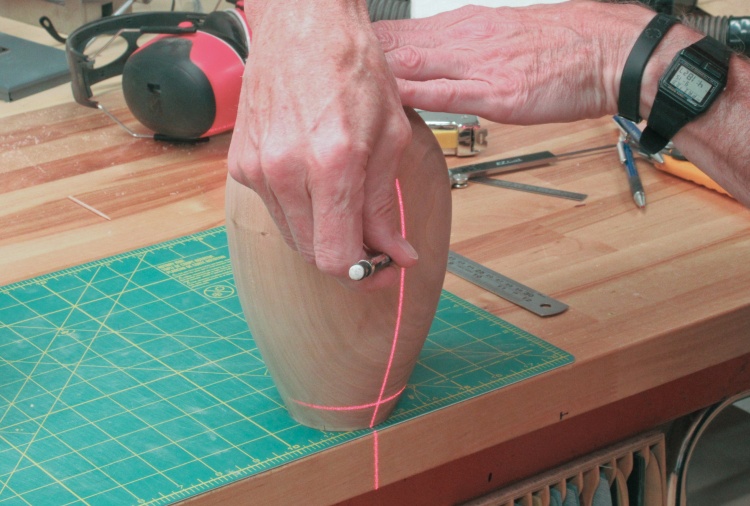
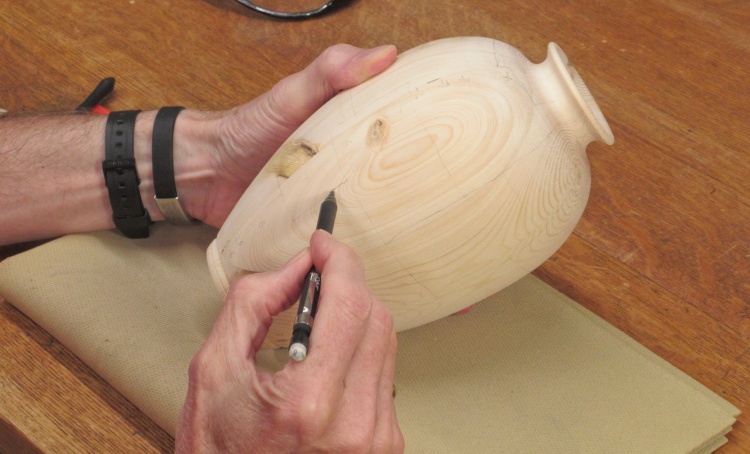
Marking vertical lines on the original
Once I was satisfied with the patches drawn on the spruce version, I transferred the locations to the cherry vessel.
I'd just hand-drawn the originals but I wanted the real lines to be more consistent so for the vertical lines I traced a laser-level line as seen here.
I'd just hand-drawn the originals but I wanted the real lines to be more consistent so for the vertical lines I traced a laser-level line as seen here.

Drawing horizontal lines
And then the horizontal lines were pencilled on with the vessel mounted in the lathe and turned by hand.
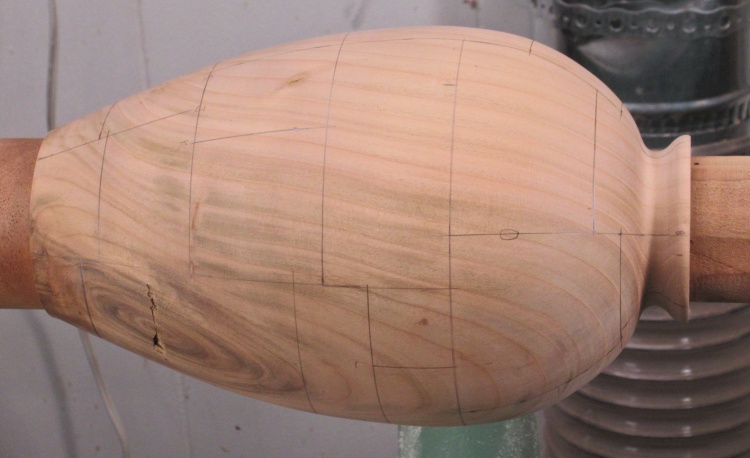
The original marked with patches
This shows the cherry vessel with all the patches marked on it. Most patch sizes were somewhat random but I had made a largish patch to fully encompass the knot visible on the lower left.
The virtual version, already cut apart
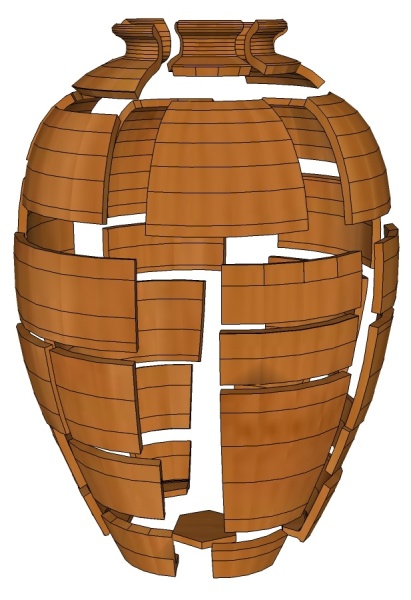
I also made a completely gratuitous 3D model of the patches, shown here in partially-exploded form.
It actually took longer to make the 3D version on the computer than to mark and cut apart the actual wooden one but I enjoyed the challenge of figuring out how to do it accurately.
That biggish patch low down and just to the right of center is the one encompassing the knot mentioned above.
It actually took longer to make the 3D version on the computer than to mark and cut apart the actual wooden one but I enjoyed the challenge of figuring out how to do it accurately.
That biggish patch low down and just to the right of center is the one encompassing the knot mentioned above.
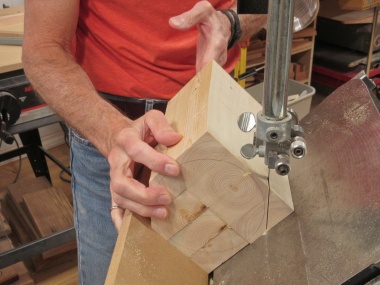
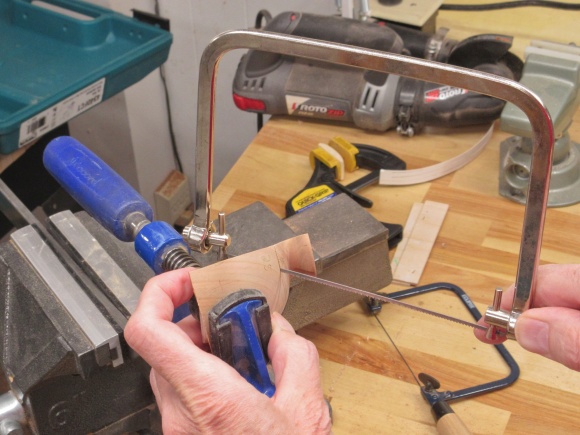
To cut the vessel apart there were a number of blind cuts needed (ones in which there was no open edge to start on) and the first six were on the bottom hexagonal-shaped center piece. These shots show the process for those cuts; I started by drilling some small almost-overlapping holes, lengthened that short section with a fine saw and then used a thinned-down blade in the jigsaw to complete the cut.
Drilling a line of tiny holes
Starting cut with tiny saw
Finishing cut with jigsaw

Cutting some major joints
The above technique was used for a couple other short horizontal cuts on the body and then I cut in from the top and bottom so the vessel could be split into two almost-halves. That gave me lots of edge from which to start cuts.
I used the jigsaw for those major cuts as shown here.
I used the jigsaw for those major cuts as shown here.
Cut into
This photo shows the two halves plus the bottom hexagon, making my lousy job of sanding the inside fairly obvious.
Patches are numbered because Order is Good
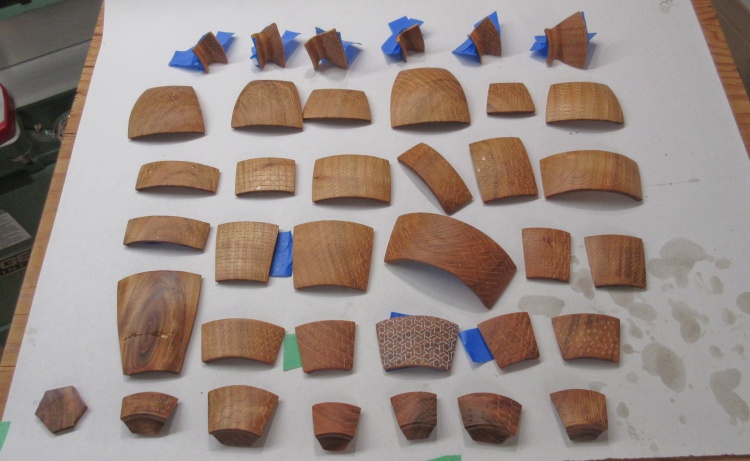
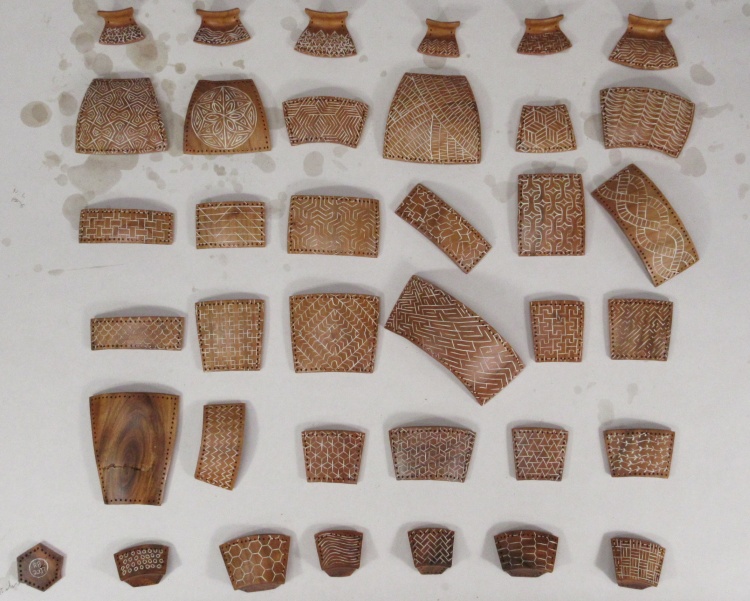
To help keep track of the pieces (and make it less of a puzzle to put back together), each piece received a number from 1 to 37.
The two halves were taped back together for this photo and the numbers can be seen scribbled on in pencil.
The two halves were taped back together for this photo and the numbers can be seen scribbled on in pencil.
Then it was time to separate the individual pieces. I started with the jigsaw since it was pretty fast but on one cut the reciprocating action broke off a big piece, necessitating an emergency glue job.
After having learned my lesson I stuck with a pair of coping saws. The hand saws worked well but biggest issue was trying to firmly hold oddly-shaped curved pieces while leaving room for the saw. This was complicated by the desire to have the cuts reasonably perpendicular to the curved surface which required that the cutting angle changed across each piece. A couple custom jigs helped with the holding issue.
After having learned my lesson I stuck with a pair of coping saws. The hand saws worked well but biggest issue was trying to firmly hold oddly-shaped curved pieces while leaving room for the saw. This was complicated by the desire to have the cuts reasonably perpendicular to the curved surface which required that the cutting angle changed across each piece. A couple custom jigs helped with the holding issue.
Some jigsaw cutting action

Using coping saw on smaller piece
Larger coping saw on a round cut

Some fancy clamping
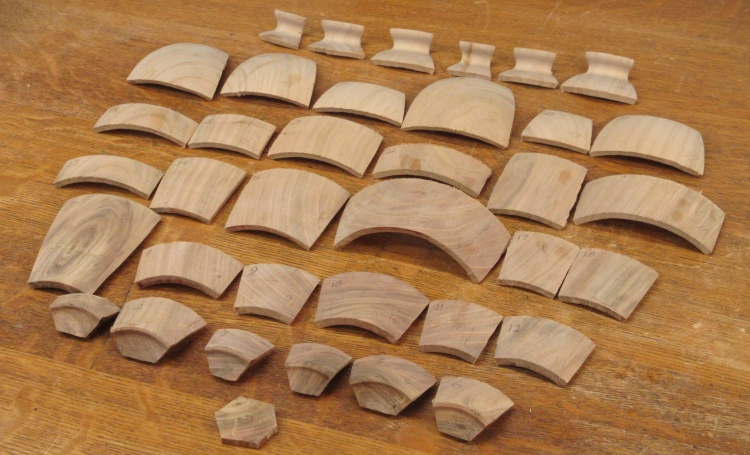
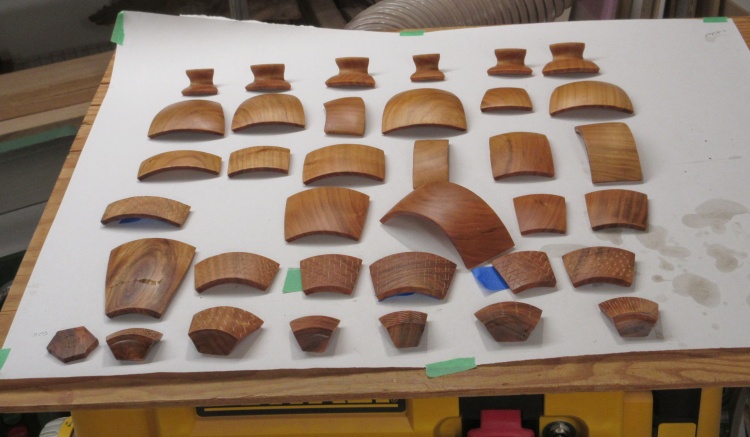
The 37 patches separated
This was the result after all the cutting was done. And yes, they are supposed to be different sizes.
Some Sewing Tests
The ultimate plan (a number of steps further on) was to recombine the patches by sewing them together. I thought I should check the feasibility of the whole sewing thing so I tried out a number of different stitches, hole spacings and thread types.
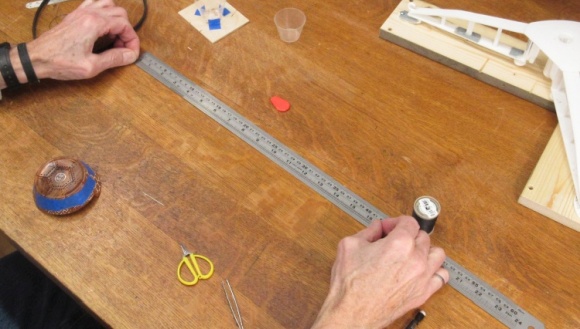
I had wanted to try out some threads of different thickness so I went to the local fabric store to see what range they could provide. In my technical-background-based naivety I had envisioned selecting a specific gauge of thread like may be done with metal sheets, wire diameters, drill bits, etc. etc. Ha! It was totally based on brand subdivided by material and application (general purpose, embroidery, jean thread, etc.). I just wanted some thickish black thread (probably polyester due to extra stretchiness) but comparing the thickness of two different threads meant grabbing some bobbins, teasing out a thread end from each and just comparing by eye. I was eventually able to get a couple heavier threads to try out but ultimately I went with one I already had on hand as its thickness seemed to look the best.
I had wanted to try out some threads of different thickness so I went to the local fabric store to see what range they could provide. In my technical-background-based naivety I had envisioned selecting a specific gauge of thread like may be done with metal sheets, wire diameters, drill bits, etc. etc. Ha! It was totally based on brand subdivided by material and application (general purpose, embroidery, jean thread, etc.). I just wanted some thickish black thread (probably polyester due to extra stretchiness) but comparing the thickness of two different threads meant grabbing some bobbins, teasing out a thread end from each and just comparing by eye. I was eventually able to get a couple heavier threads to try out but ultimately I went with one I already had on hand as its thickness seemed to look the best.
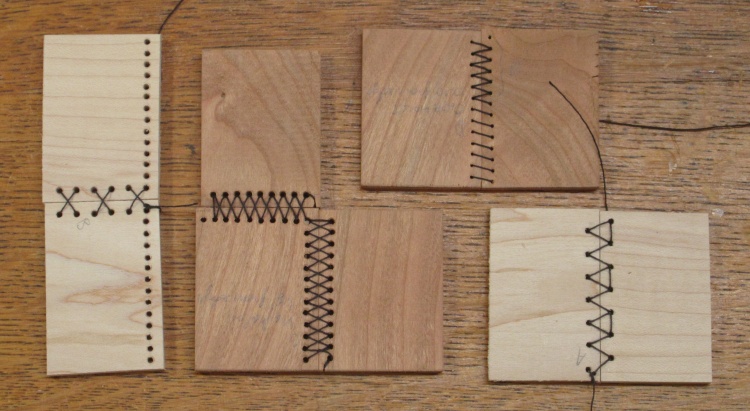
Trying out some sewing variations
This shot shows a number of test pieces that allowed me to try out some variations in the sewing parameters.
While the stitch is a bit more time-consuming to do than the others, I thought the middle L-shaped group looked the best. The parameters I settled on were:
- 0.125" hole pitch
- Holes aligned on opposite sides
- Holes spaced 0.1" from the edge
- 0.046" diameter holes, deburred both sides
- A "heavy" thread (Coats & Clark S950 Dual Duty XP Heavy Polyester)
- An "X" stitch the same on front and back
My initial tests had established the sewing feasibility but I thought I should do another test that was even closer to the finished product. I started by making some curved pieces that were more like the actual patch shapes and then went through the full finishing process. That included:
• Three coats of Danish Oil finish
• Carving
• Application of white gesso, immediately wiped off
• Drilling and deburring sewing holes
• Two more coats of Danish Oil finish, and finally:
• Sewing together.
• Three coats of Danish Oil finish
• Carving
• Application of white gesso, immediately wiped off
• Drilling and deburring sewing holes
• Two more coats of Danish Oil finish, and finally:
• Sewing together.
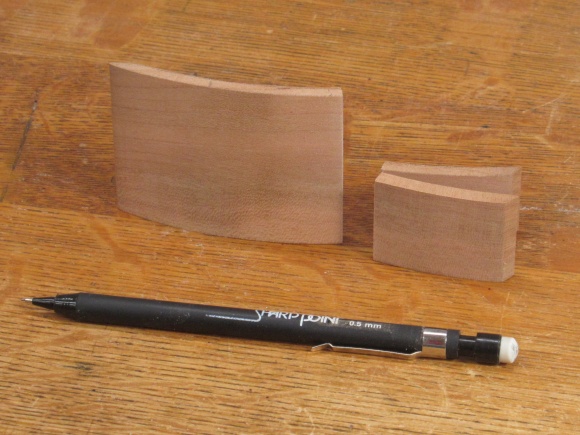
Some curvey test pieces
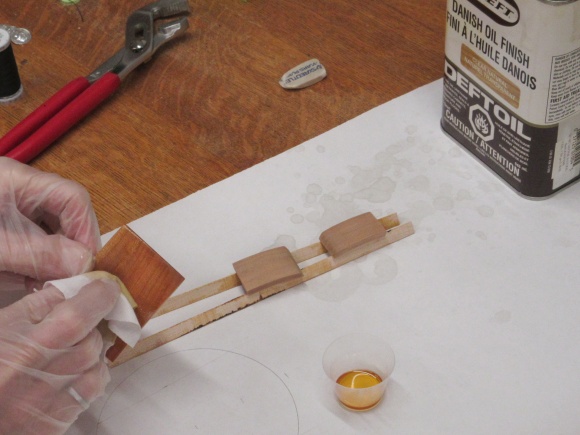
Starting the first finish coat
Already painted, now drilling holes for thread
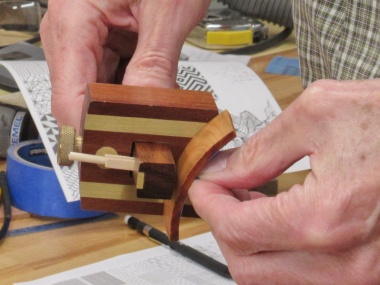
Sewing the smaller pieces together
The completed test piece
This shows the completed test piece. As I expected, the sewing part went OK. I also tried using an engraver to mark the patterns but it looked more ragged (E) than patterns carved with a small v-tool (C)
I had been holding off further work on the vessel until I was sure the entire process was going to work out but this looked good enough to forge ahead.
I had been holding off further work on the vessel until I was sure the entire process was going to work out but this looked good enough to forge ahead.
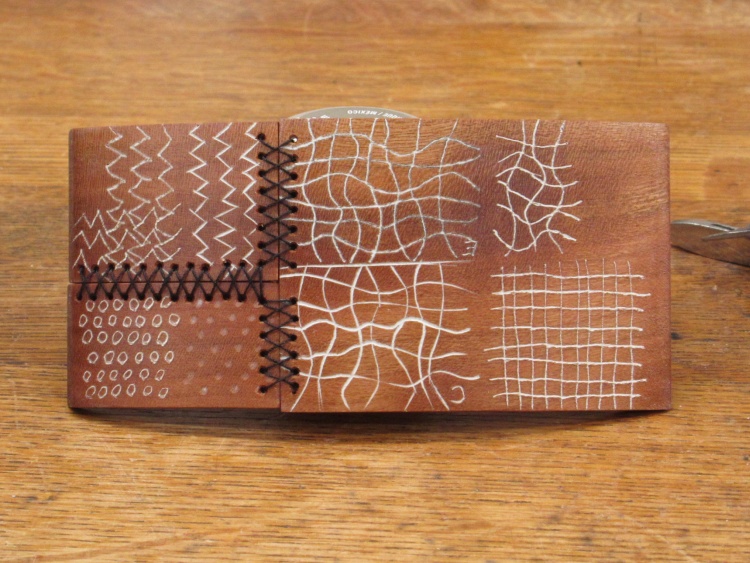
In my previous endeavour with paint-filled designs, I had needed to make test boards to try various things out so I whipped up a half-dozen plain test boards which was hopefully going to be an excessive quantity.
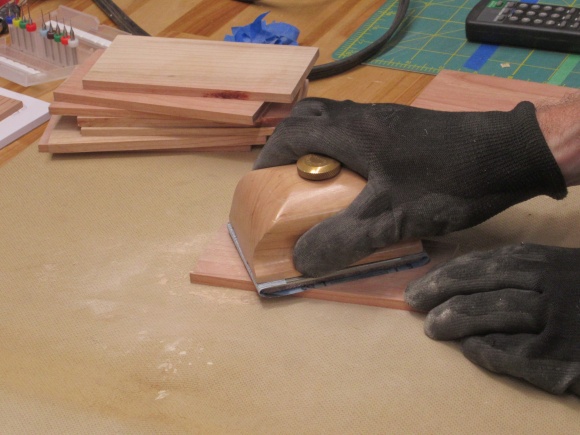
Sanding some carving test boards
Test board finishing
The Carving Phase
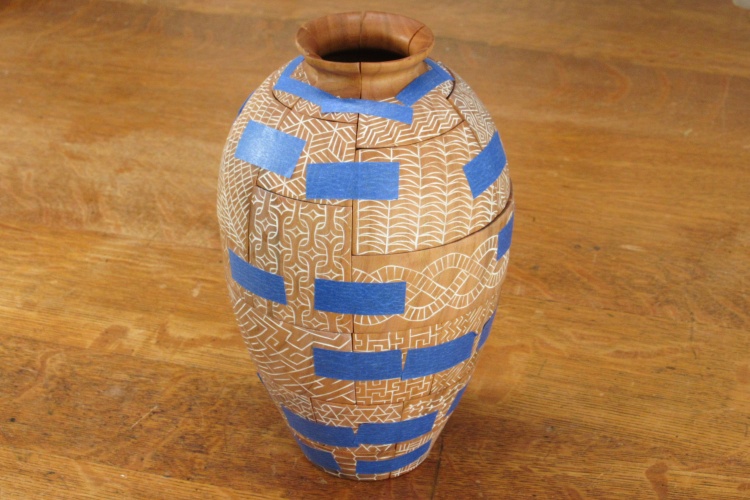
Vessel taped back together
The next major step was carving patterns into the patches but first I wanted to clean them up since they still had the saw-cut edges.
I put the vessel back together using tape to ensure I didn't have any nasty gaps, but it looked OK. Except for the tape, of course.
I put the vessel back together using tape to ensure I didn't have any nasty gaps, but it looked OK. Except for the tape, of course.
Cleaning up the edges of the patches
And then it came back apart so I could sand the edges of each piece.
Adding the patch number to the edge
The patch numbers had just been scrawled on the outside with pencil and I needed to make those less obvious and more permanent, so the numbers were written on the edge in the upper-left corner of each piece with a fine liquid-ink pen.
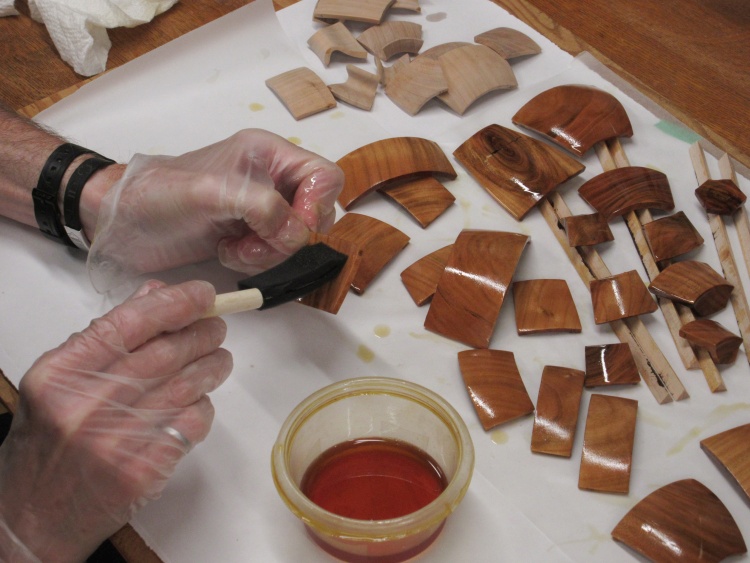
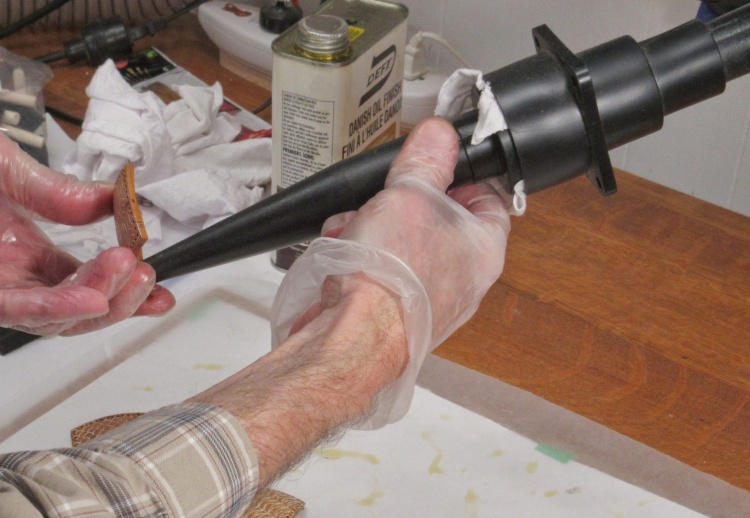
First application of Danish Oil finish under way
The patches were then ready for the pre-carving finishing. That consisted of three coats of Danish Oil (an oil-varnish blend) each of which was applied, left to sit for half an hour...
Wiping off excess finish
...and then wiped off. The finish was allowed to dry overnight before the next coat.
The full set with three coats
That's all the pieces with three coats of finish.

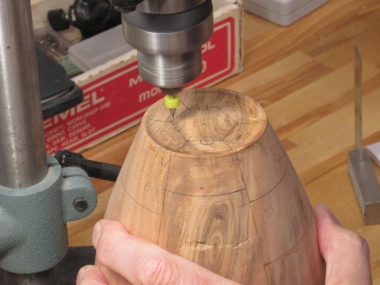
Carving the initial circle on piece #37
Then finally! The carving bit.
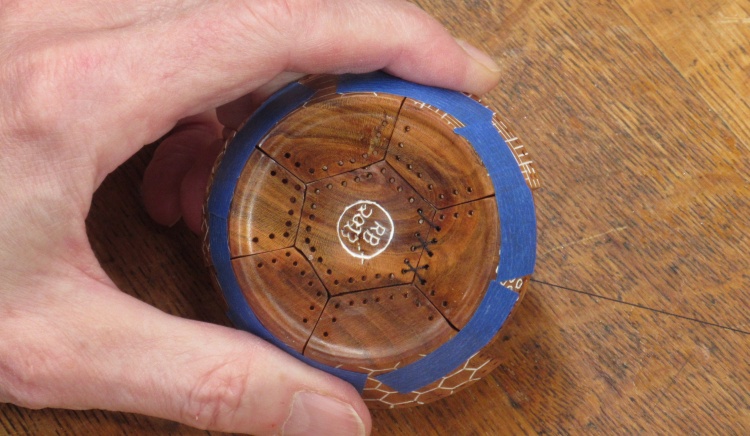
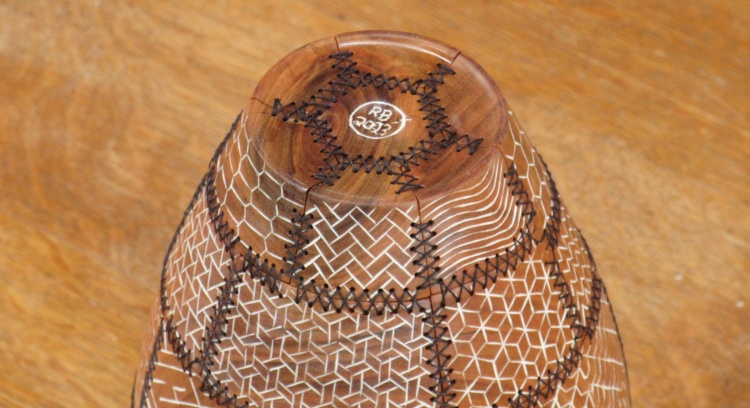
I started the carving with #37 - the hexagonal bottom piece. After that I'd begin at #1 and carve them in numerical order, 'cause that's just how I roll.
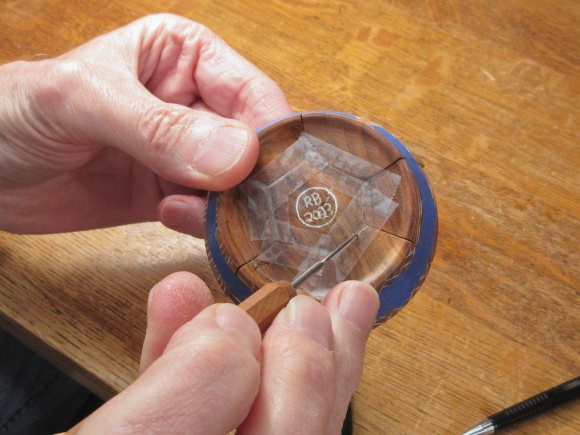
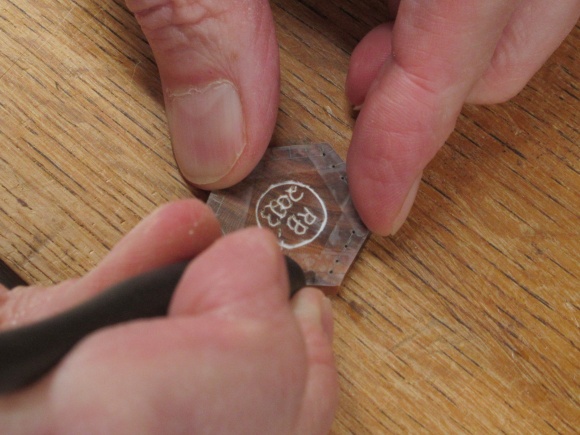
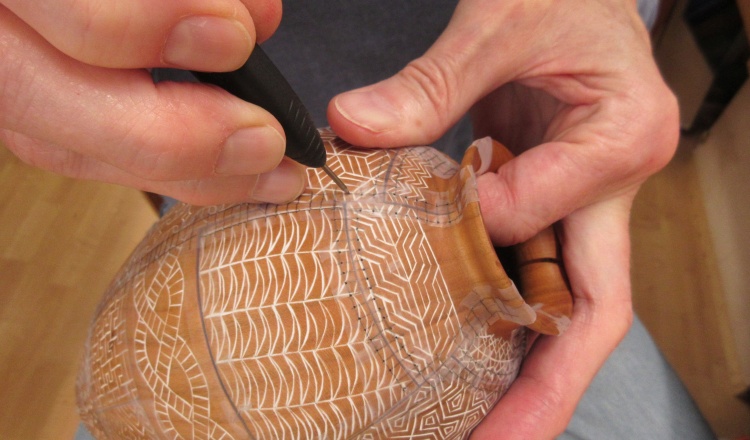
I usually add my initials and the year in a circle so I decided to carve those into the wood rather than using a pen as is my usual practise. I started by carving the circle with the small v-tool seen here.
I started the carving with #37 - the hexagonal bottom piece. After that I'd begin at #1 and carve them in numerical order, 'cause that's just how I roll.
I usually add my initials and the year in a circle so I decided to carve those into the wood rather than using a pen as is my usual practise. I started by carving the circle with the small v-tool seen here.
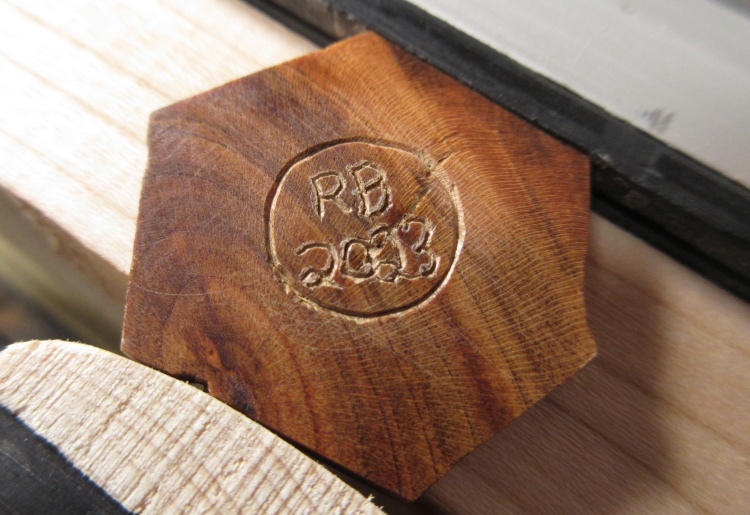
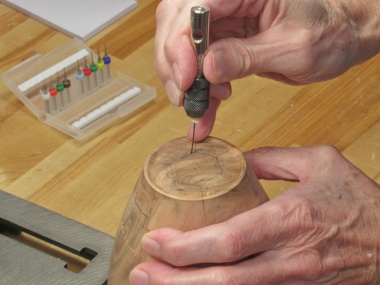
Kinda ugly initials made with engraver
For the characters I thought I'd try an engraving tool. It worked inasmuch as the characters could be recognized, but let's just say I'm glad it's on the bottom of the vessel.
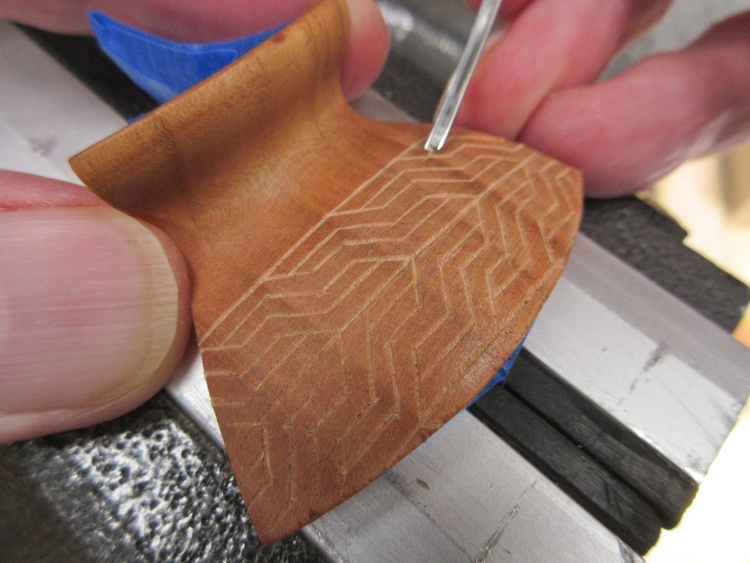
OK then, thirty-six more patches to carve. In most cases I traced a pattern or drew one directly onto the wood using pencil and then it was v-tool time. There were obviously lots of them so I've just included photos of a few of them here.
Marking #4
Carving #4
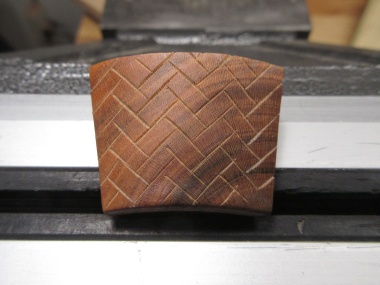
#4 carved in herringbone pattern
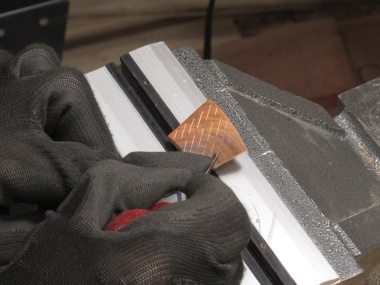
Carving #8
Marking #13
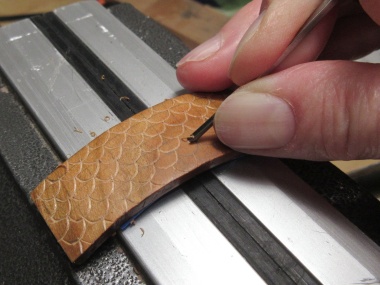
Carving fish scale on #13
About one-third done with the carving
Here there's about a dozen patches carved. I started with the bottom row and worked my way up.
All the designs are geometric and consist of lines made with the v-tool and I averaged a couple patches per day.
I ended up adding a handle formed from folded blue masking tape to the bottom of most pieces. The handle could then be clamped in the vise which usually held it stable enough to carve. Sometimes additional tape was required.
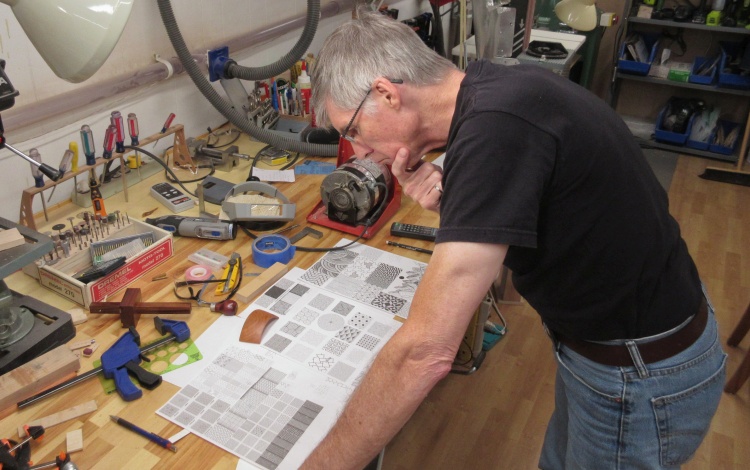
Deciding on a pattern
Of course I needed to choose an appropriate pattern to use for each patch. In this totally candid photograph, you can see me cogitating on this exact subject with piece #16 waiting for my critical decision.
I printed out a selection of potential patterns but I fear it sometimes took as long to decide on a pattern as to carve it in.
I printed out a selection of potential patterns but I fear it sometimes took as long to decide on a pattern as to carve it in.
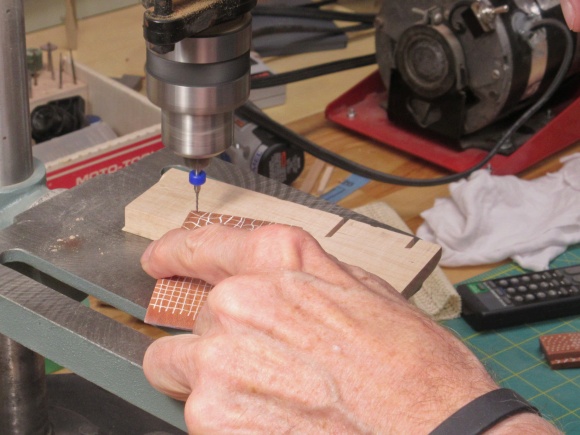
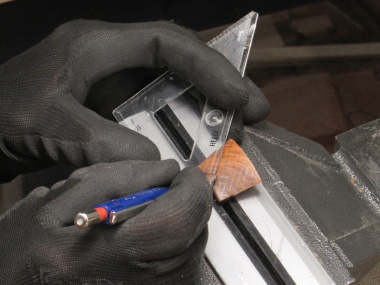
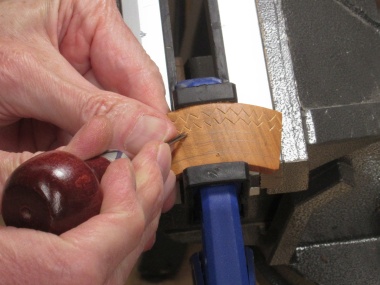
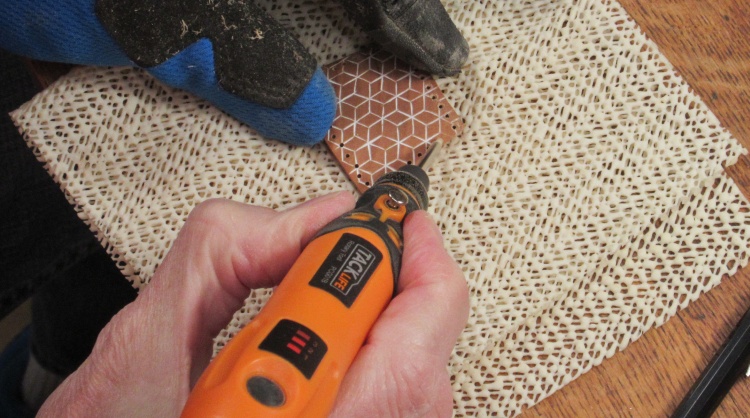
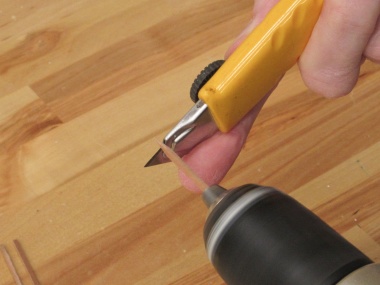
Some of the smaller features were tricky to carve since they were not much larger than the carving tool. To help guide the carving, I sometimes used a knife to make a shallow cut along the line and then followed that with the v-tool.
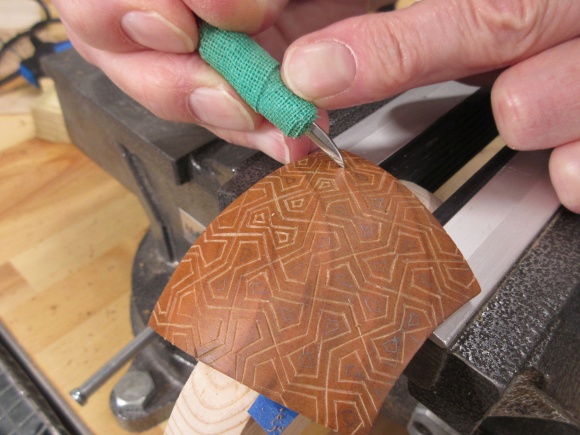
Adding a knife-cut to guide the v-tool

Carving the small features
Patch #36 almost done
And eventually the final patch was done as shown in this "oops, already done but should take a shot like I'm just finishing it" photo.
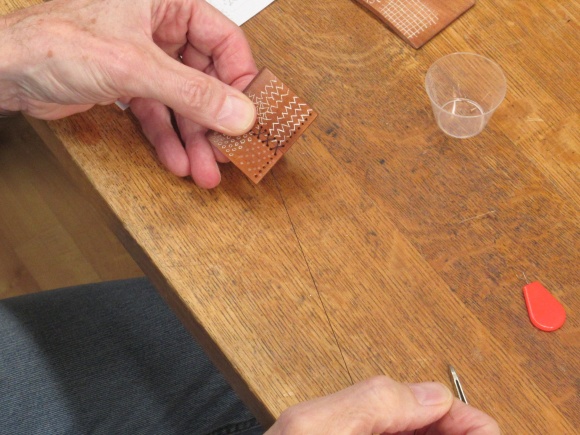
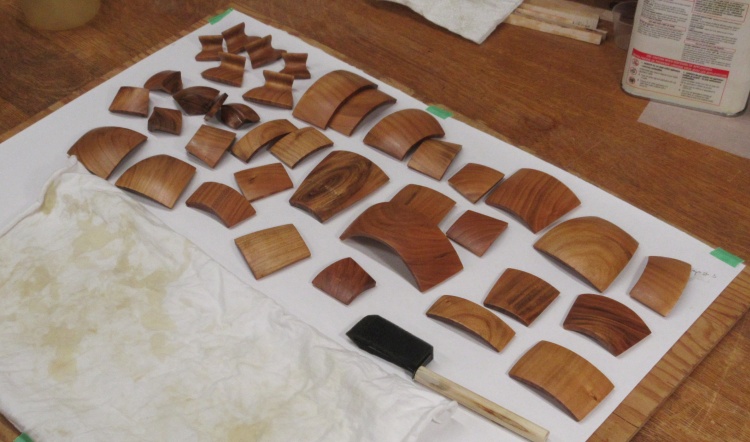
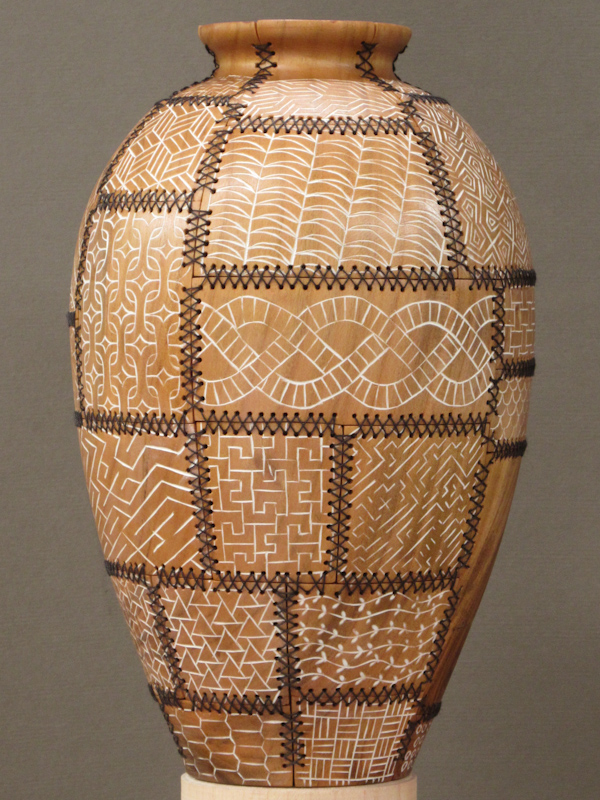
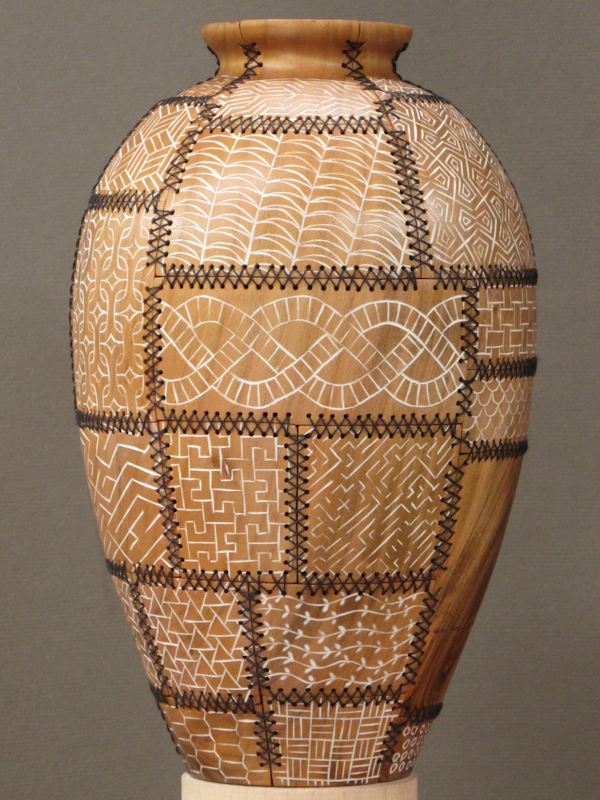
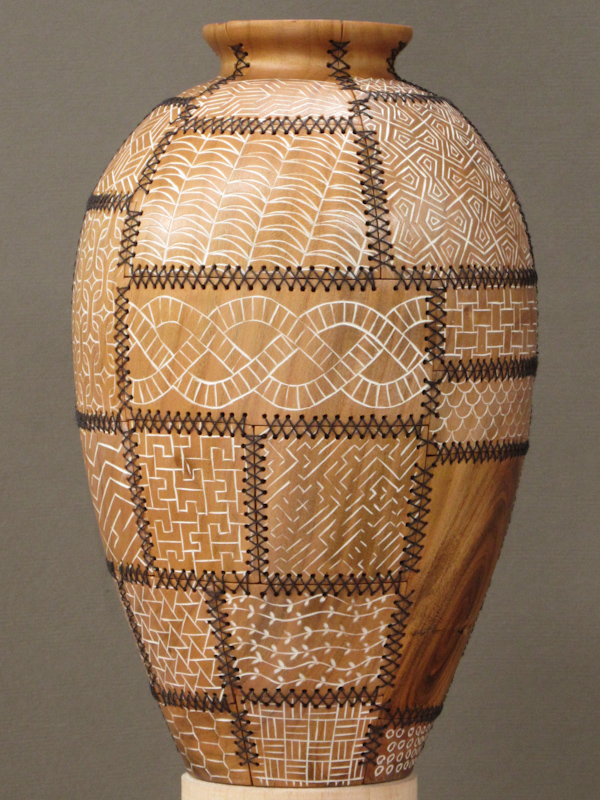
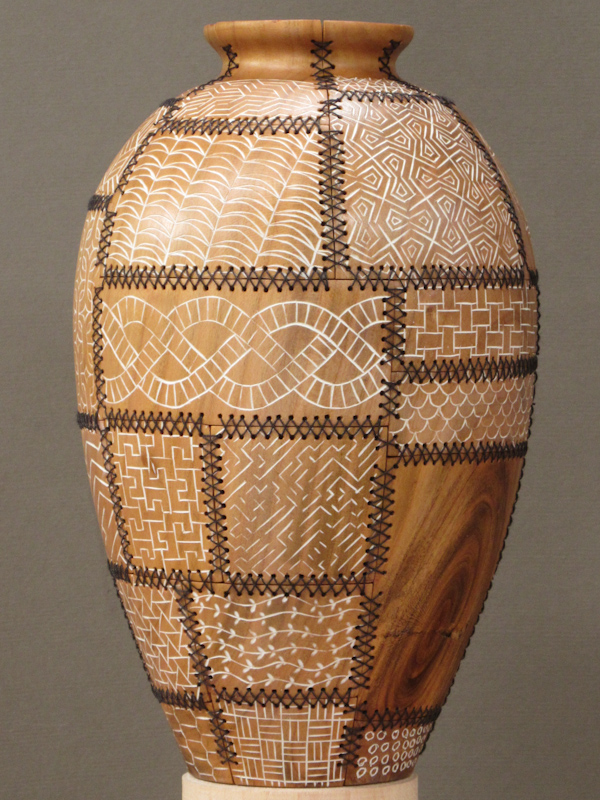
The completed set
That was it for the carving. It took a little under three weeks to finish all the patches at a rather...relaxed pace.
Patch #10 in the lower center already had the paint applied as another test so after the next step they will all have a contrast similar to that one.
Patch #10 in the lower center already had the paint applied as another test so after the next step they will all have a contrast similar to that one.
Finishing the Finishing
Those with a particularly good memory may recall that many photos ago the patches received an initial three coats of Danish Oil to make the surfaces resistant to paint. To complete the finishing I will need to:
1. Apply the paint and wipe the excess off the surface and
2. Apply another two coats of DO.
However, in between steps 1 and 2, the patches will need to be drilled for the thread, a process rather more involved than the actual finishing. Doing it in that order means the insides of the holes get those last two coats of finish on them as well.
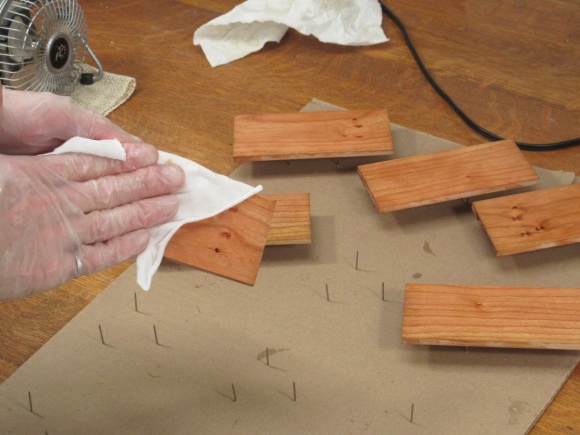
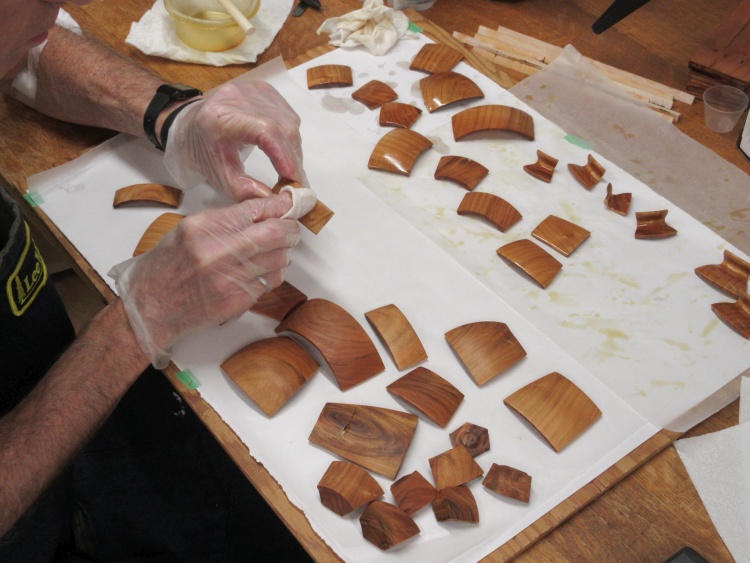
Applying the gesso
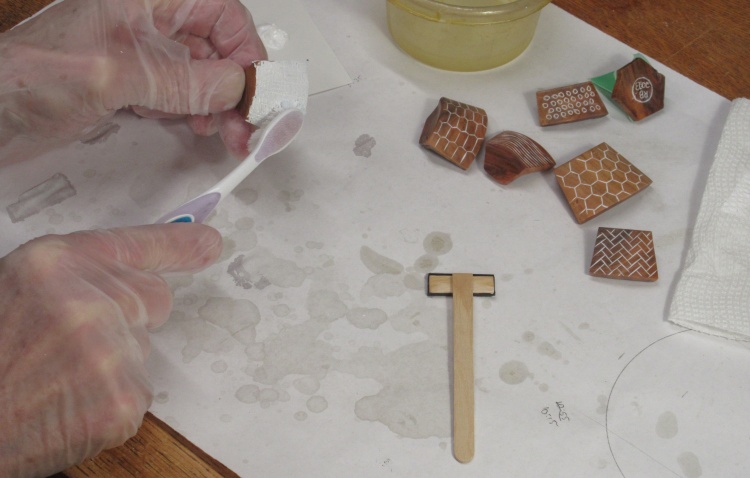
OK, then - paint. I used a white gesso, which is a thinner version of acrylic paint usually used as a background to treat a surface before doing the real painting. It has the consistency (and colour) of sour cream. I can't comment on the taste.
Here I'm spreading it over the surface of one of the patches with an old toothbrush to make sure it gets into the carved lines.
Here I'm spreading it over the surface of one of the patches with an old toothbrush to make sure it gets into the carved lines.
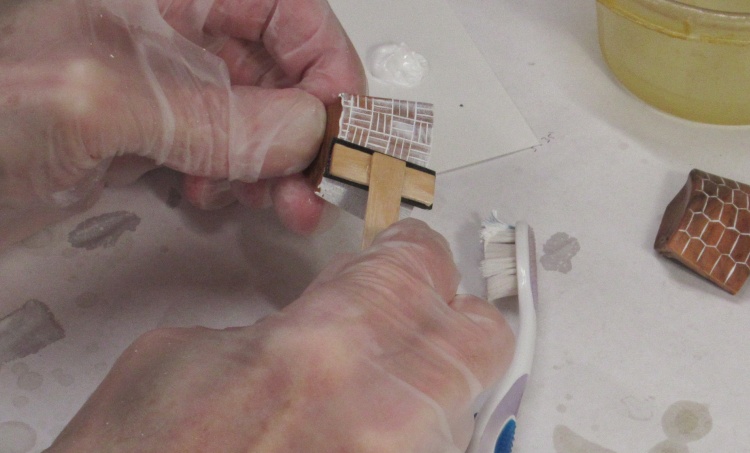
Using a mini squeegee to remove excess paint
Then I used a little squeegee (that I'd whipped up using popsicle sticks and a scrap of rubber) to remove the excess paint.
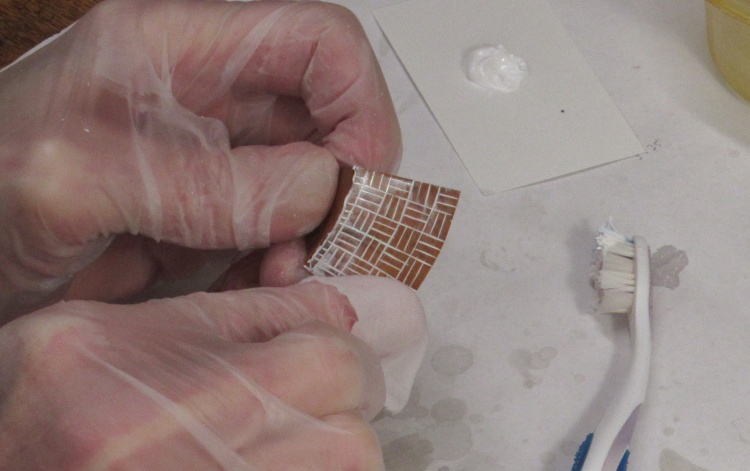
Wiping the surface clean
And finally used a damp cloth to remove any remaining paint from the surface.
Eventually I skipped the squeegee and just used the cloth (or rather a sequence of small clean cloths) to remove the paint since that approach seemed to do a slightly better job of cleaning the surface.
Eventually I skipped the squeegee and just used the cloth (or rather a sequence of small clean cloths) to remove the paint since that approach seemed to do a slightly better job of cleaning the surface.

All patches done
Rinse (the cloths) and repeat; it only took about an hour before all the pieces were done.
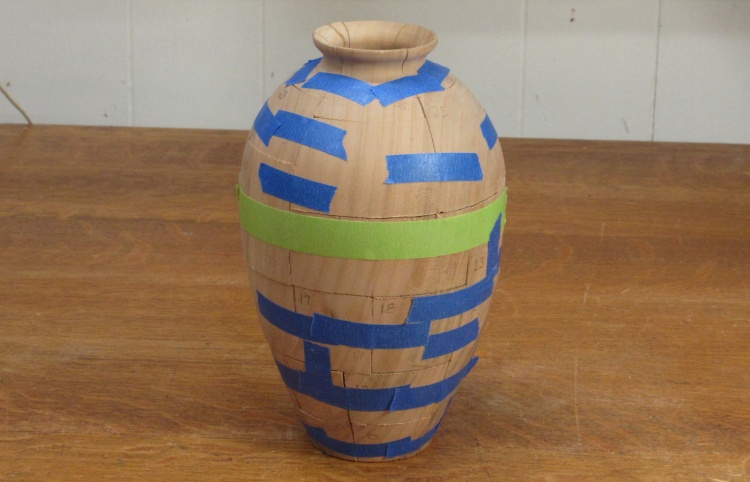
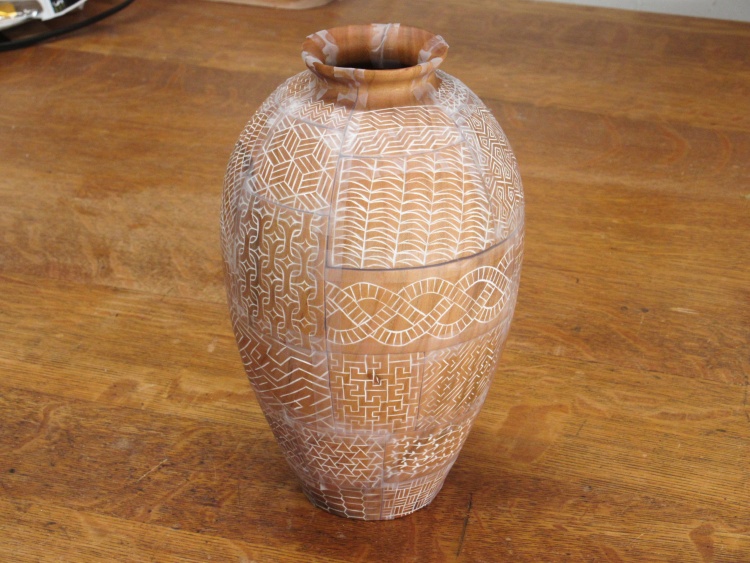
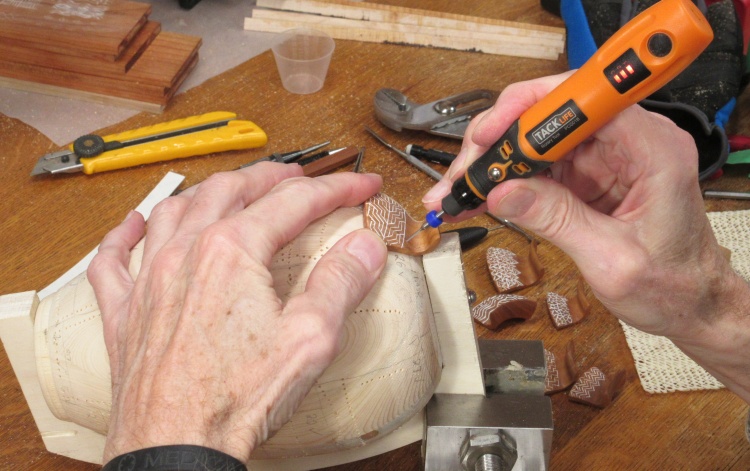
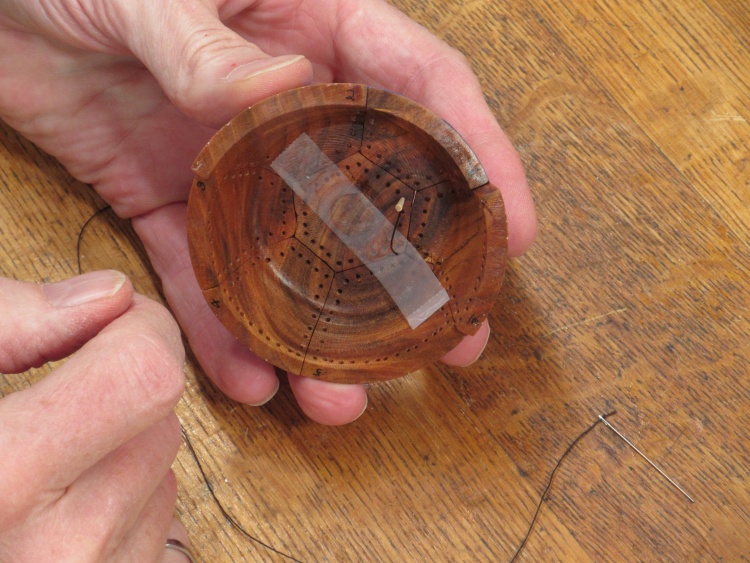
So much for the easy stuff. The next step was figuring out how arrange the hole positions for the eventual sewing operation. In order that holes lined up across joints and there were no spare holes, I decided I needed to mark them. All. I started with the bottom ring of six pieces with the hexagonal patch #37 in the middle.
Rather than mark the surfaces and then try to erase the lines, I applied Magic tape over the joints and did my marking on that.
Rather than mark the surfaces and then try to erase the lines, I applied Magic tape over the joints and did my marking on that.
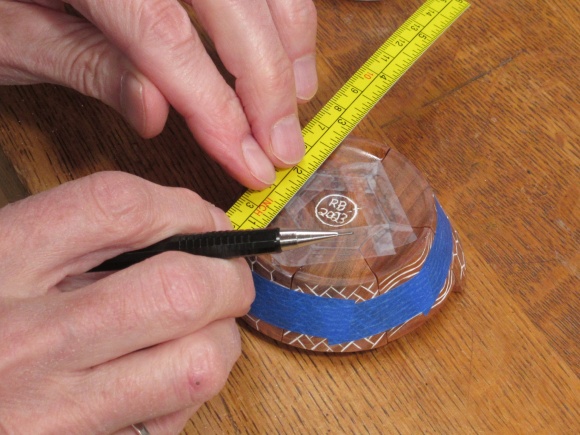
Adding guidelines
A shot of the pencilled-on lines
I used the previously established parameters of holes spaced at 1/8" and 0.1" from the edge and I made sure to pencil on marks for matching holes on both sides of each joint. When the marking was done I cut apart the pieces, used the pin awl to poke location markers and then removed the tape.
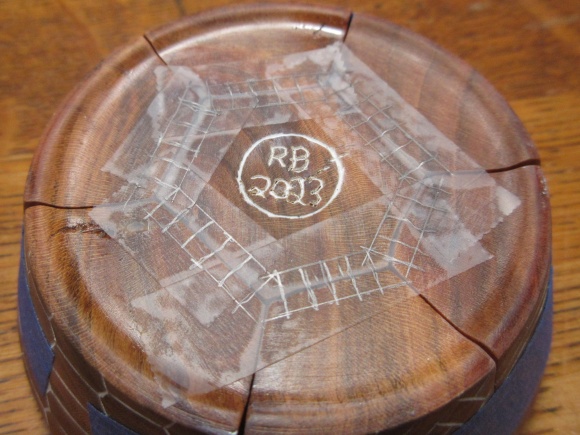
Cutting out the center piece
Using a pin awl to indent hole locations
Taped back together
Well, that technique looked like it was going to be annoyingly tedious but also seemed like it would work. So then I stuck the whole vessel back together to make sure everything was in the proper place.
Switched to Scotch
With the pieces correctly positioned, the blue masking tape was pulled off and the vessel received a layer of Scotch Magic tape over all the seams.
Indenting hole locations
I started at the top and marked hole positions on the way down. In this photo I'm using the pin awl to make divots in the wood at each hole location.
I'll then cut off the completed pieces and pull off the tape - a time consuming process since it turns out that Magic tape with little holes in it tends to tear off in strips.
I'll then cut off the completed pieces and pull off the tape - a time consuming process since it turns out that Magic tape with little holes in it tends to tear off in strips.
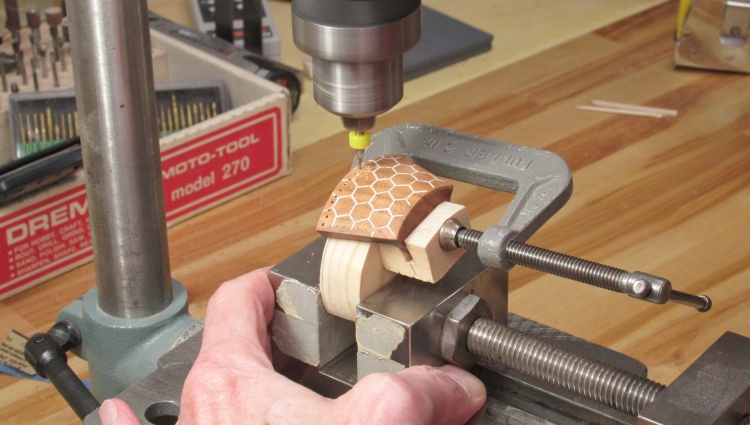
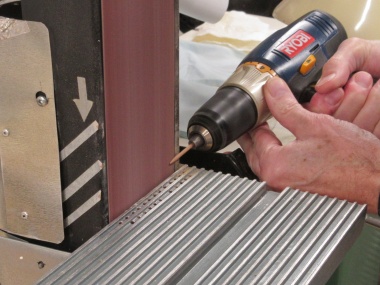
Drilling a bottom corner
Once all the pieces were marked and de-taped, it was time to get into the drilling. I started with the bottom corner pieces, aided by a crude holding jig.
The slightly odd-looking drill bit is the type used for circuit board manufacture. All sizes have a 1/8"-diameter shaft and a colour-coded ring to indicate size. This photo shows a (yellow) 1 mm diameter drill but by the next shot I had switched to a (blue) 1.2 mm diameter (0.047").
The slightly odd-looking drill bit is the type used for circuit board manufacture. All sizes have a 1/8"-diameter shaft and a colour-coded ring to indicate size. This photo shows a (yellow) 1 mm diameter drill but by the next shot I had switched to a (blue) 1.2 mm diameter (0.047").
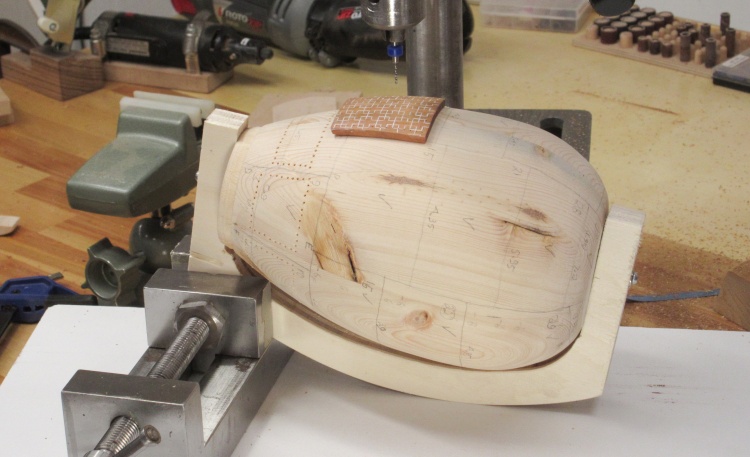
The dummy vessel lives again as a drilling jig
Then it was on to the main-body pieces. To hold them in place I repurposed the dummy vessel by cutting off the neck and mounting it to a plywood frame on which it could rotate.
The rotation combined with clamping the frame at the desired angle allowed a piece taped to any area on the surface to be set at an appropriate angle for drilling.
The rotation combined with clamping the frame at the desired angle allowed a piece taped to any area on the surface to be set at an appropriate angle for drilling.
~Aside~
We'll sometimes order things on-line if they are unavailable locally (like those little drill bits). An annoying trend that I've noticed that occurs more often lately deals with the status updates. You usually get a confirmation email in minutes and then in a day or two or three or eight later another saying the item has shipped. But recently the "Item has shipped" email comes within hours. Wow - efficient warehouse staff!. But no. Clicking through to the actual status with the shipper shows that they have been told about the item (and maybe made a label). This is not shipping. It is still the day or two or three or eight later until the shipper actually gets the package to ship. On more than one occasion I've had this fake "shipped" status sit there for days or weeks and then the order is cancelled since they finally figured out that didn't actually have the item. Grrrrr...
We'll sometimes order things on-line if they are unavailable locally (like those little drill bits). An annoying trend that I've noticed that occurs more often lately deals with the status updates. You usually get a confirmation email in minutes and then in a day or two or three or eight later another saying the item has shipped. But recently the "Item has shipped" email comes within hours. Wow - efficient warehouse staff!. But no. Clicking through to the actual status with the shipper shows that they have been told about the item (and maybe made a label). This is not shipping. It is still the day or two or three or eight later until the shipper actually gets the package to ship. On more than one occasion I've had this fake "shipped" status sit there for days or weeks and then the order is cancelled since they finally figured out that didn't actually have the item. Grrrrr...
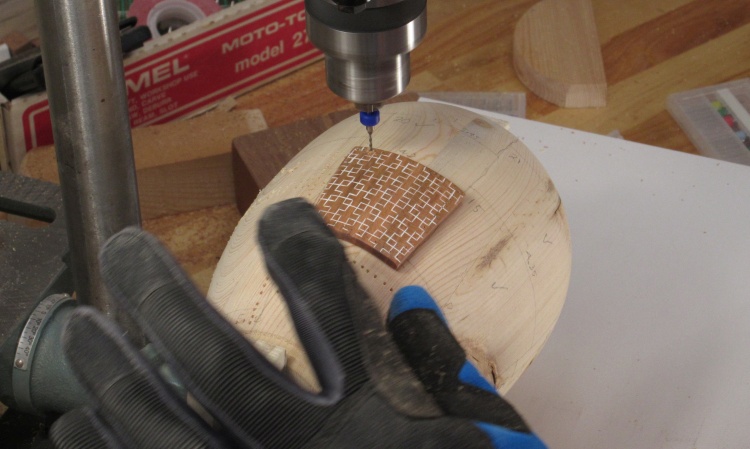
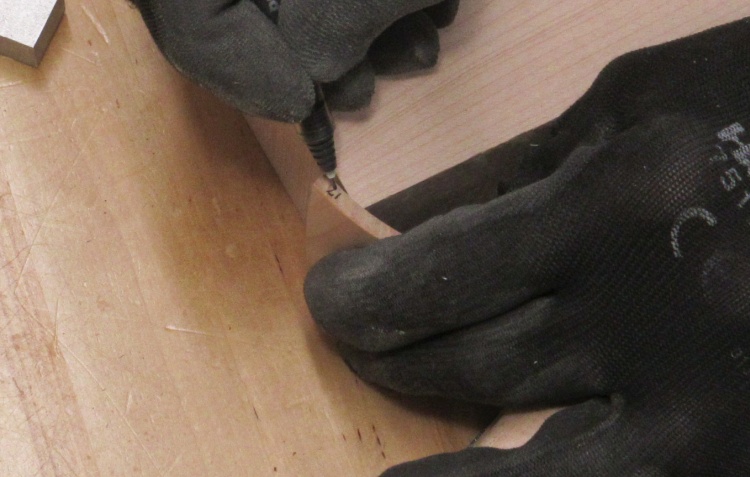
Drilling Patch #14
Each piece was taped down with a loop of masking tape on the bottom and then held more firmly in place with fingers to do the actual drilling.
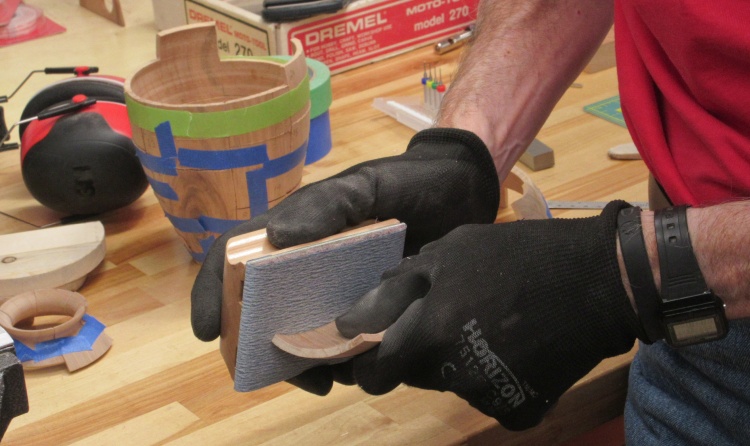
Deburring the holes
The holes were deburred on both sides using a small abrasive sphere. The holes were actually very clean - virtually no splinters - presumably due to the small size of the hole but the process added a bevel to the corner of the holes which I thought might ease thread movement.
The last few holes
The holes nearest the top weren't easy to do with the drill press, so those were drilled with a hand-held tool. This shot shows some of the last of the 1726 holes being drilled.
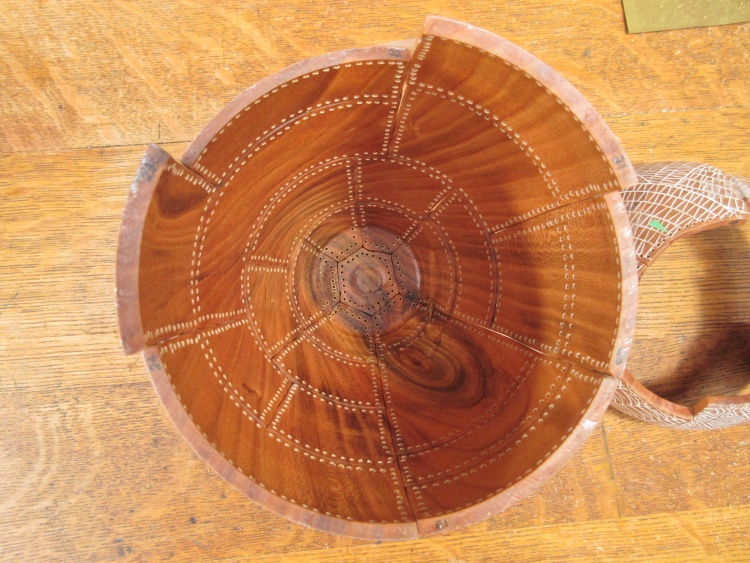
The holey inside when re-assembled
Not all the hole marks were easy to see when I was doing the drilling so I wanted to do a check before starting the sewing. So once again the tape came out and I stuck the vessel together to be able to inspect hole positions. This is a shot inside the vessel before the top couple of layers were added.
For the record my error stats were: two extra holes drilled and two missed holes. I plugged/drilled as required to fix those before moving on.
For the record my error stats were: two extra holes drilled and two missed holes. I plugged/drilled as required to fix those before moving on.
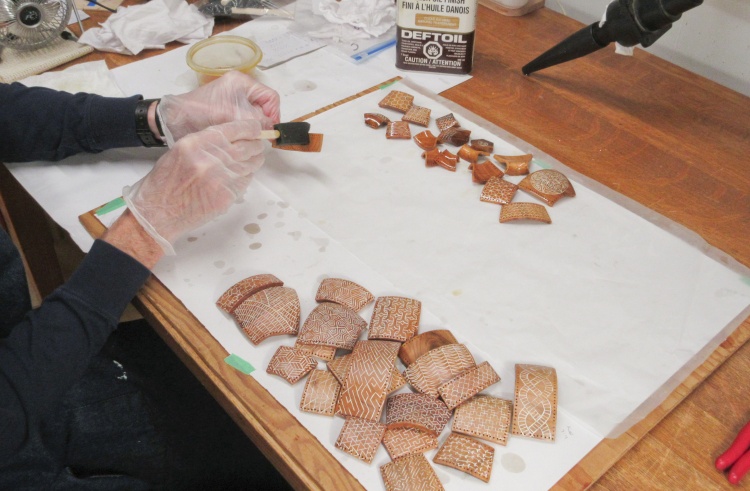
Starting on the last coats
Then finally I could add the last two coats of Danish Oil. This shot shows the finish going on with a foam brush. As before they sat wet for 1/2 hour before the excess was wiped off with a clean cloth.
Sucking extra finish out of the holes
Of course the holes stored little bits of the wet finish so I used the vacuum with a makeshift cloth filter to suck out any liquid before completing the wiping-off process.
While the last couple of coats of finish dried, I thought I'd make some thread anchors. These tiny cherry cone-shaped pieces will be inserted in a hole to wedge against the threads and hold the ends firm. The plan is to insert them from the inside and give them a dab of super-glue to hold them in place to keep the vessel from unravelling.
The larger and lighter ones in the final shot are ends of round toothpicks. They are big enough to grab with fingers and I'll use those to temporarily anchor threads in a hole since usually there will be two or more ends that need to come through before the hole is done.
The larger and lighter ones in the final shot are ends of round toothpicks. They are big enough to grab with fingers and I'll use those to temporarily anchor threads in a hole since usually there will be two or more ends that need to come through before the hole is done.
Sharpening a point
Cutting off the point
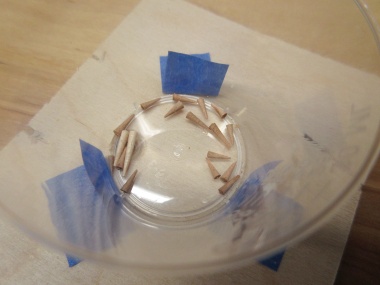
The point collection
Patches ready for assembly
After the two coats of Danish Oil, I left the pieces to harden for a few days and meanwhile arranged them into numerical order again since that was how they were about to go together.
Sewing It Up
Bottom pieces taped together
My plan was to build the vessel starting at the bottom and working my way up.
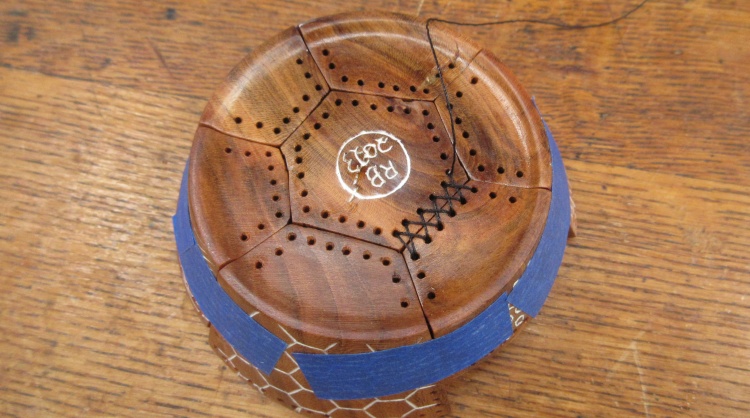
The bottom sewing was going to be a bit involved with seven pieces coming together so I started by taping together those seven and taking a picture so I could do some planning (and to confirm that all the holes properly matched up).
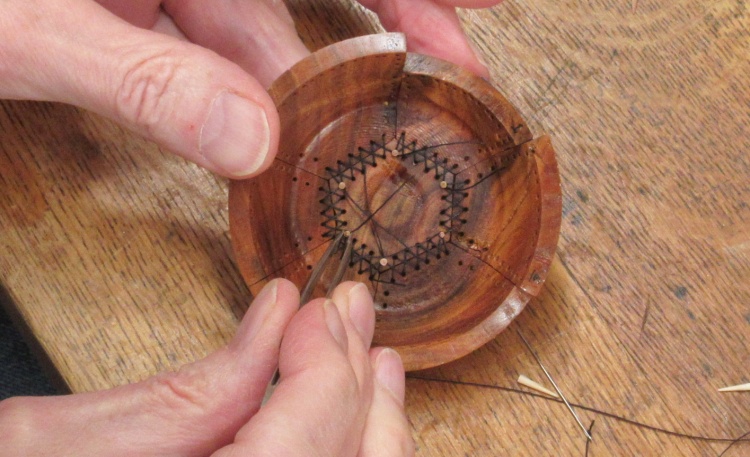
Then I took a deep breath and started on the seam between piece #37 and piece #1. To start, the end was anchored with a toothpick point.
The bottom sewing was going to be a bit involved with seven pieces coming together so I started by taping together those seven and taking a picture so I could do some planning (and to confirm that all the holes properly matched up).
Then I took a deep breath and started on the seam between piece #37 and piece #1. To start, the end was anchored with a toothpick point.
Part way through the first seam
Sewing to the end of the row and back results in Xs between alternating pairs of holes, which is where the seam is at in this shot.
First seam done
Then another back-and-forth worth of sewing fills in the empty spaces with Xs as well. The thread starts and ends in the same hole, so the original toothpick point is sufficient to hold both ends in place until they are anchored with glue.
For every row to be sewn, I measured an appropriate length of thread (one inch per hole plus 4 inches) and then I used a needle threader and finally tied a knot in the end.
Measuring thread (based on hole quantity)
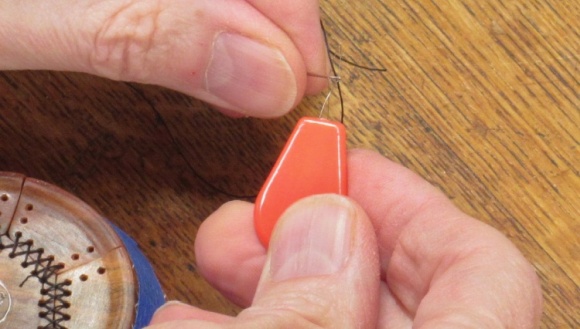
Threading the needle
I already had a stamped metal needle threader but I was enticed by a package of three plastic-handled jobs along with some little trimmer scissors at the fabric store. And let me tell you, those threaders are crap. They actually worked fine to thread the needle but the first one split in half after a dozen or so uses (insufficient glue?). The second lasted a couple dozen uses but then fell apart in the same way. I needed to reassemble/re-crimp the wires and tape the pieces back together. The scissors were pretty lousy as well. That's what happens with impulse buys I suppose.
Adding a cone to hold thread ends
I replaced the toothpick ends with smaller cherry cones to hold the threads in place and then used super glue to hold them in.
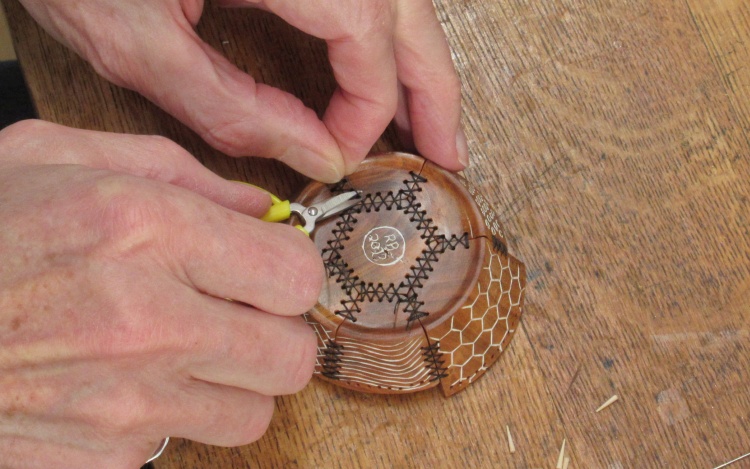
Trimming a thread end with all bottom seams done
I had left tails of about an inch long, and they were trimmed after the glue was dried.
Tightening up the stitches
After the bottom section seams were all sewn, I added the six pieces for the second layer and in this shot I'm working on the third layer.
The polyester thread I was using was supposed to be somewhat stretchy, but perhaps only in comparison to say, carbon fiber. The stitches tended to end up loose so after each half of sewing, I used the tweezers to tighten things up by pulling on each stitch to remove any slack. I then added another toothpick anchor to make sure the thread couldn't loosen again.
The polyester thread I was using was supposed to be somewhat stretchy, but perhaps only in comparison to say, carbon fiber. The stitches tended to end up loose so after each half of sewing, I used the tweezers to tighten things up by pulling on each stitch to remove any slack. I then added another toothpick anchor to make sure the thread couldn't loosen again.
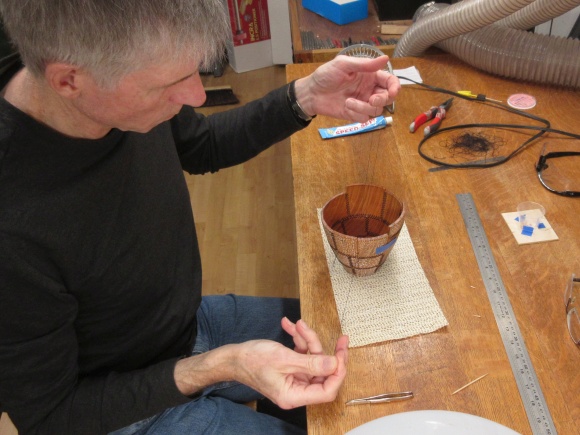
Gluing the ends
I decided that the little cherry-wood conical anchors weren't really needed (partly because I ran out of super-glue to hold them) and instead switched to using a drop of a latex cement that would hold the thread ends in their holes. Here I'm using a toothpick to add the glue to the thread ends after the temporary toothpick anchors are removed.
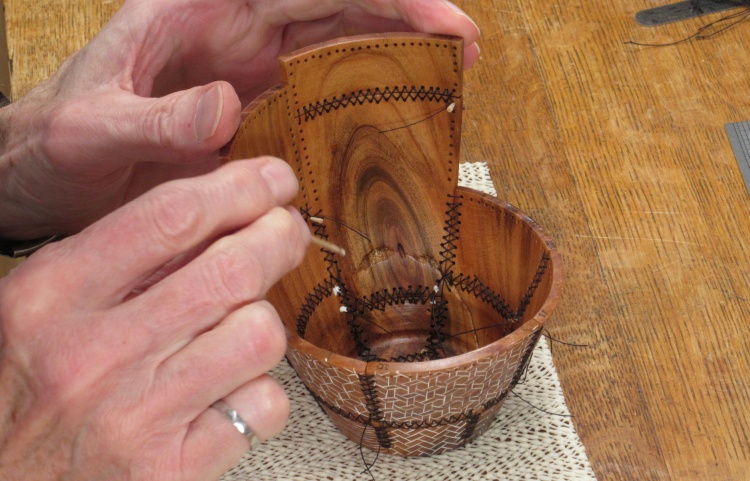
And then it was just a matter of adding the pieces one by one. There were 72 seams in total and they took about 15 minutes on average. Here are a few shots of the progress:
The thread on a longish seam
Around half done
An inside view
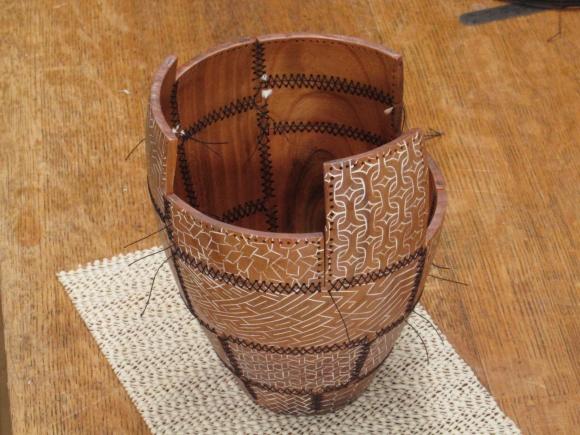
A bit further along

Installing the last piece
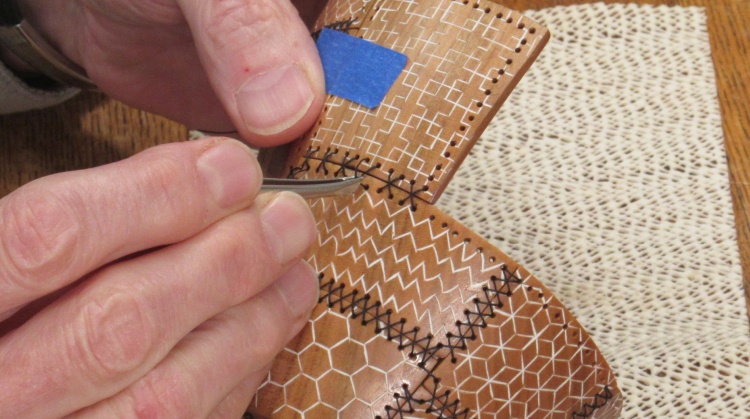
The top row was a bit trickier since some of the holes were tough to see through the vessel opening, and impossible to see if there were fingers holding a needle in the way. So for the last pieces I put a small flashlight into the vessel to provide illumination around the holes and used tweezers to handle the needle.
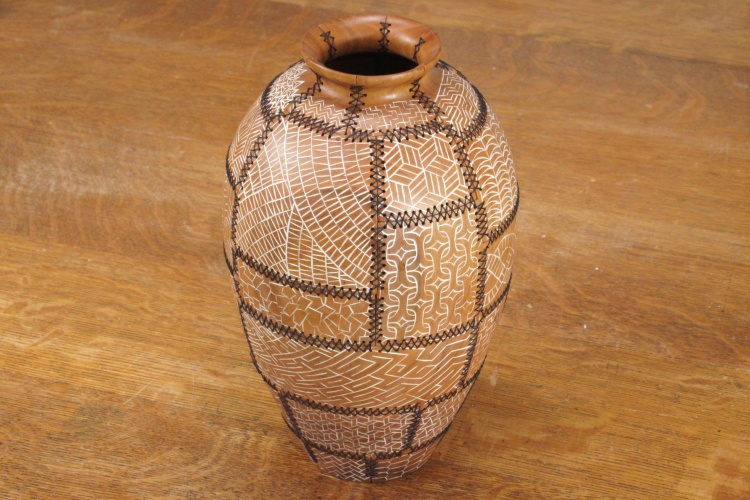
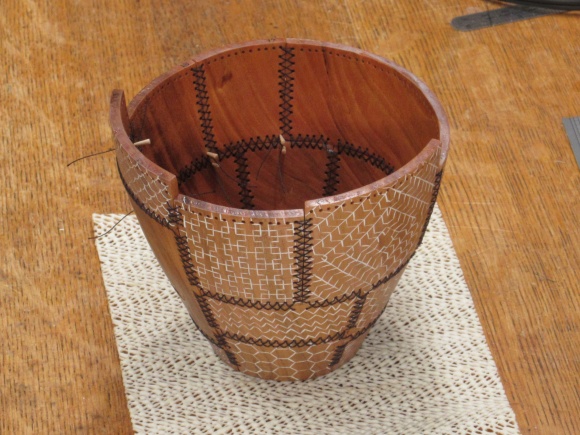
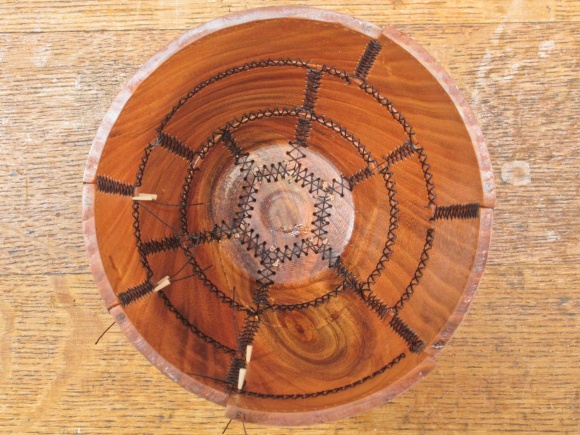
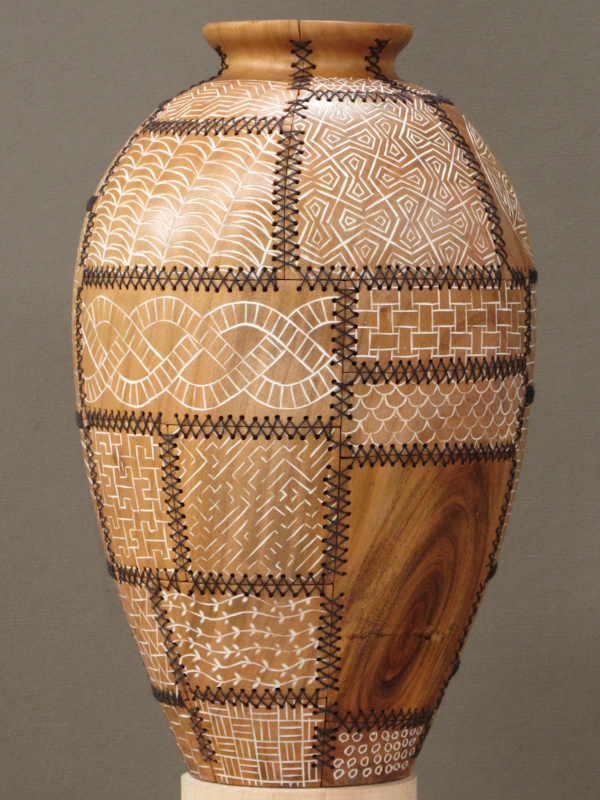
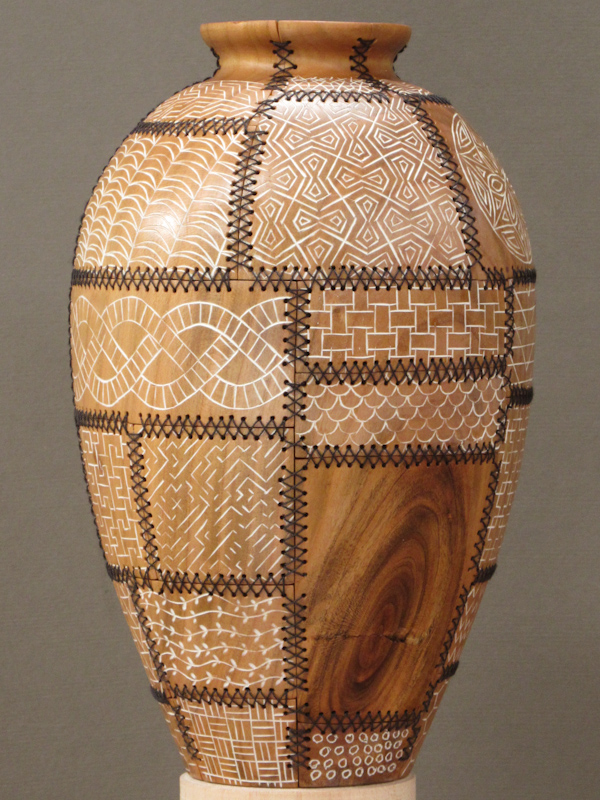
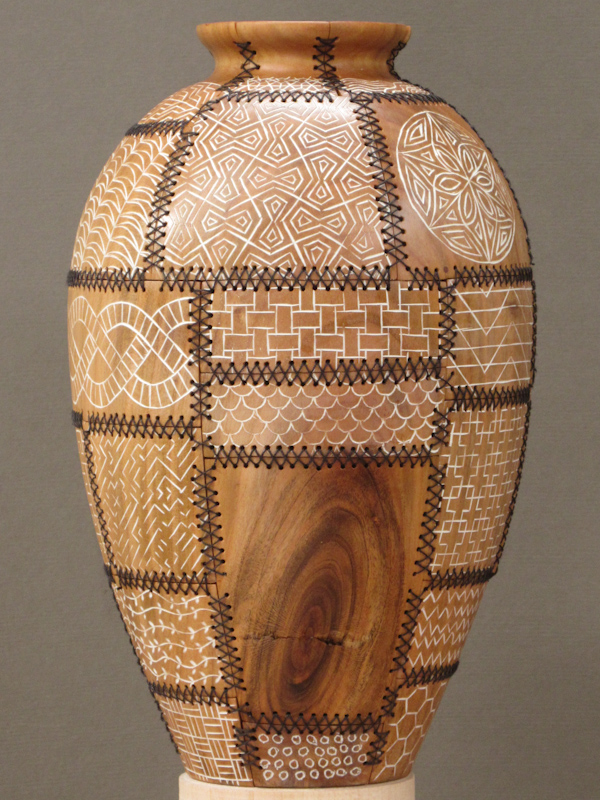
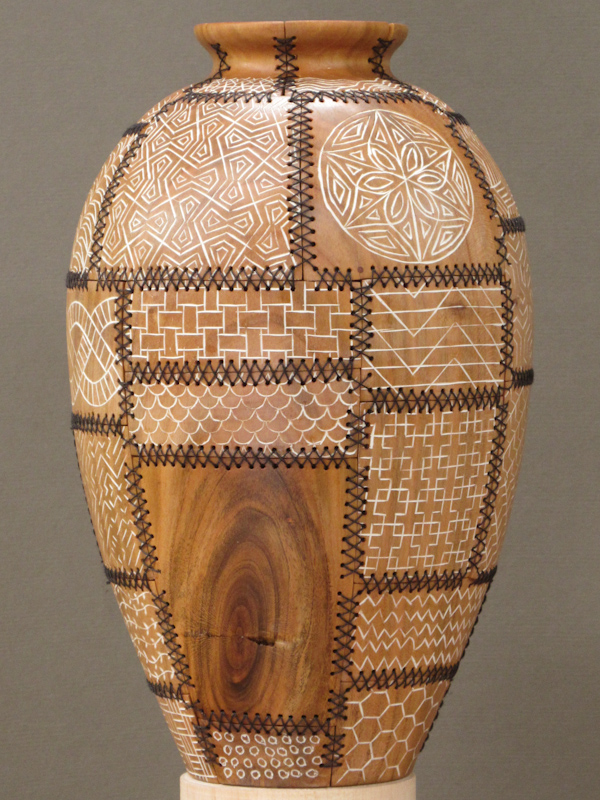
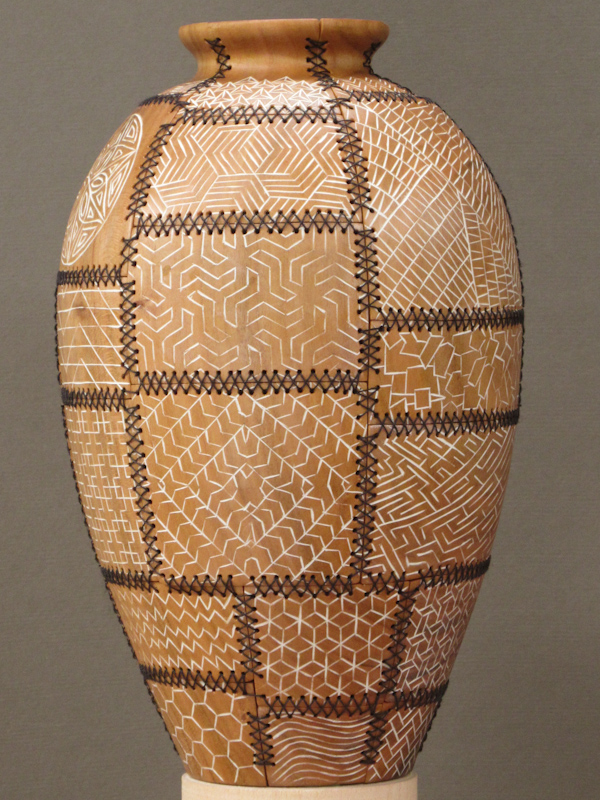
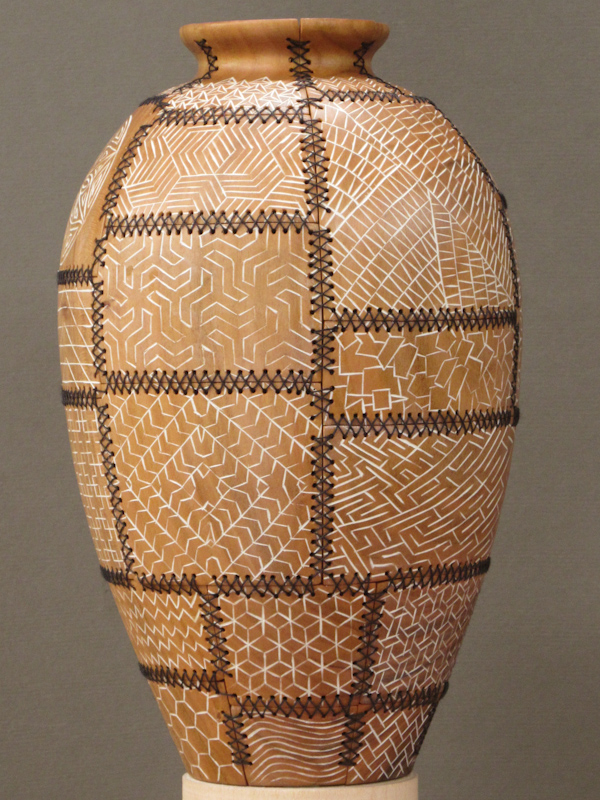
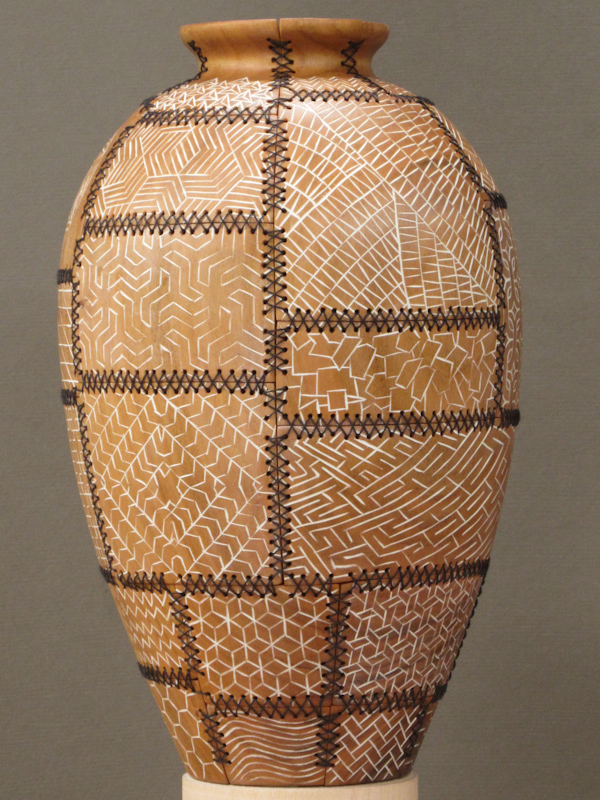
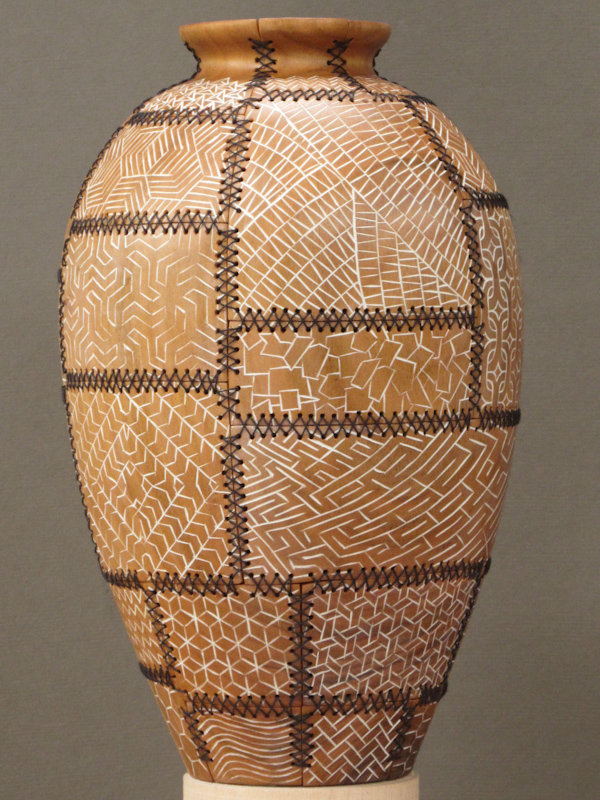
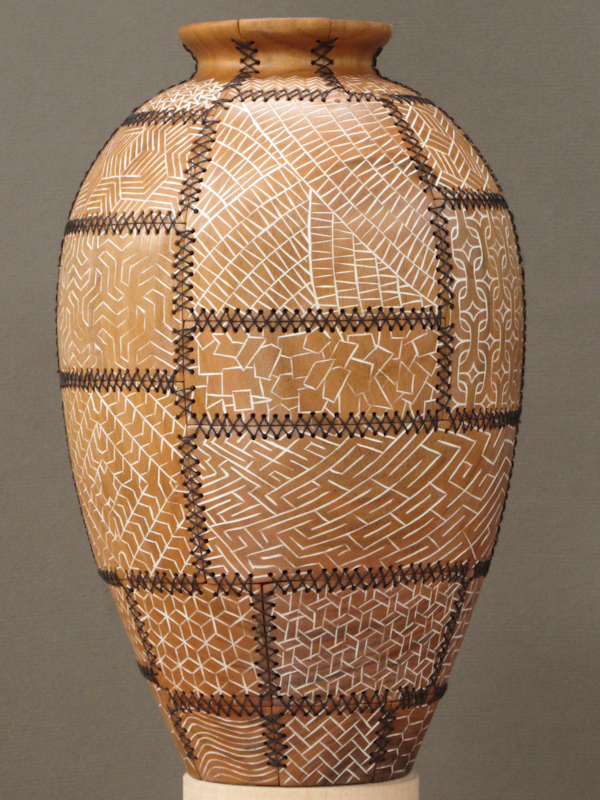
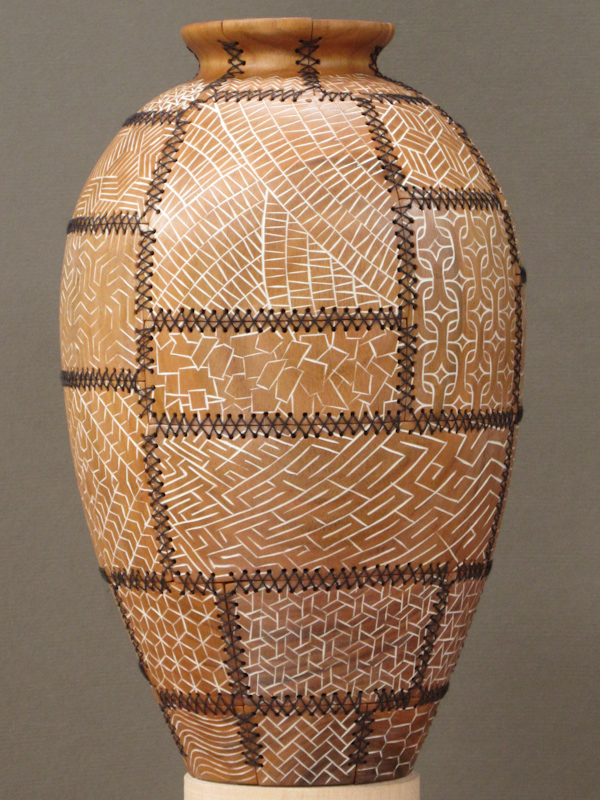
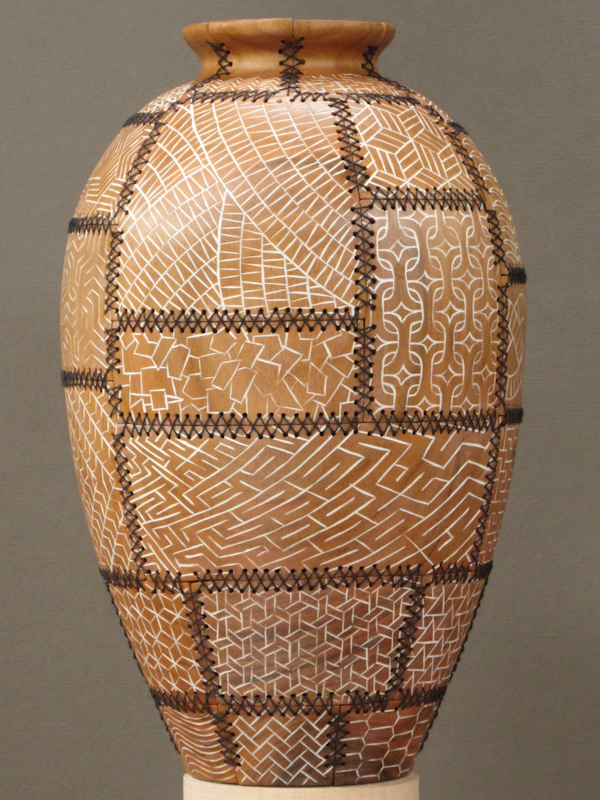
Done
And about a week after I started the sewing, it was all done.
One nice thing was that the finish was already on so it was done after the last thread-end was glued in place and trimmed short.
One nice thing was that the finish was already on so it was done after the last thread-end was glued in place and trimmed short.
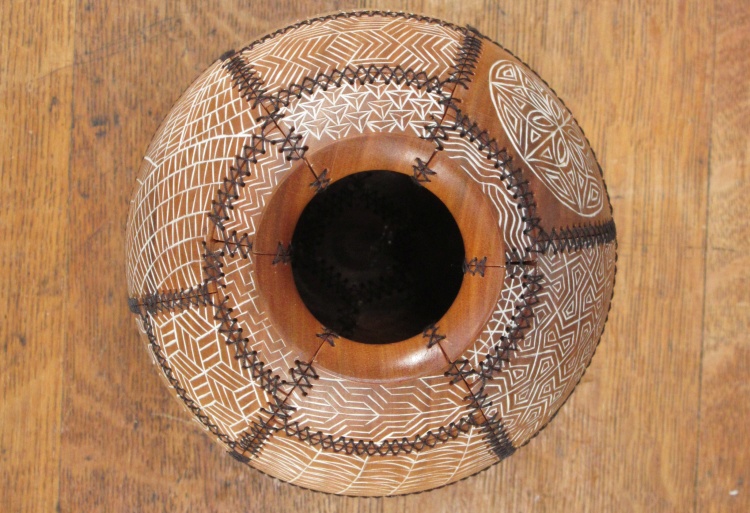
The view from the top
...and the bottom
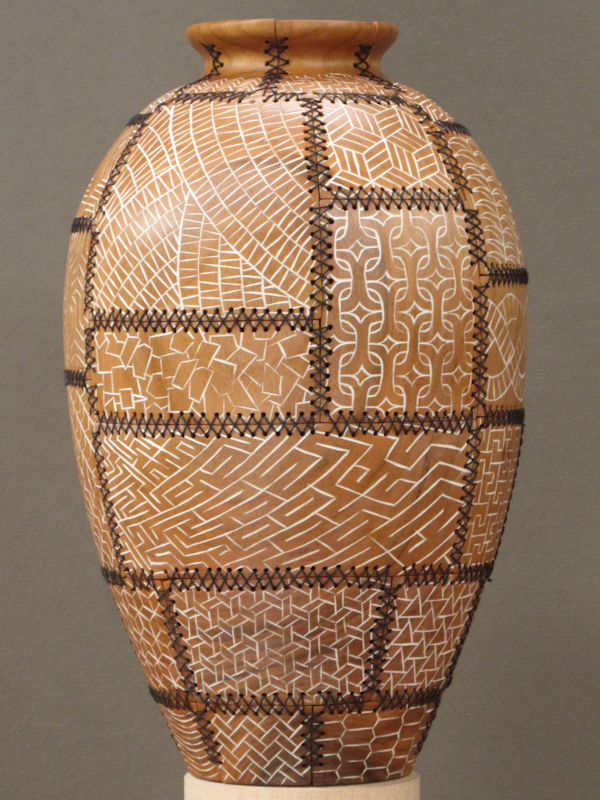
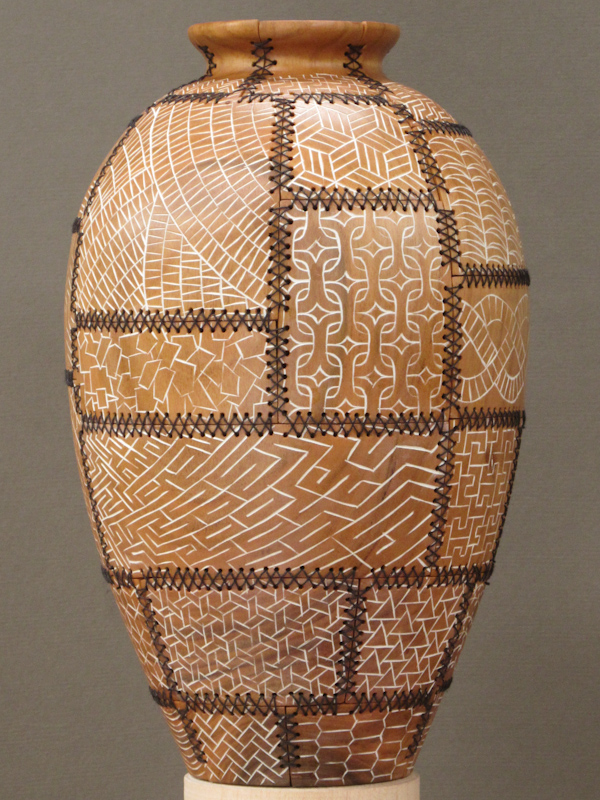
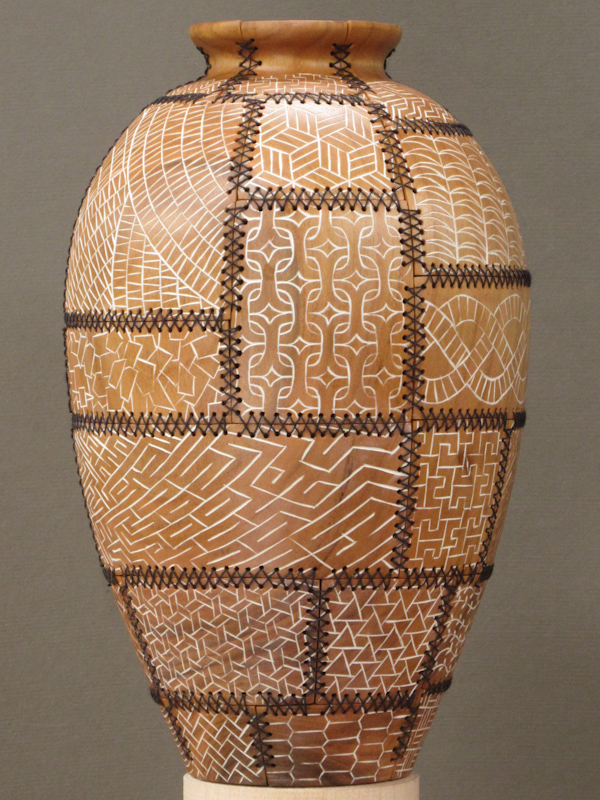


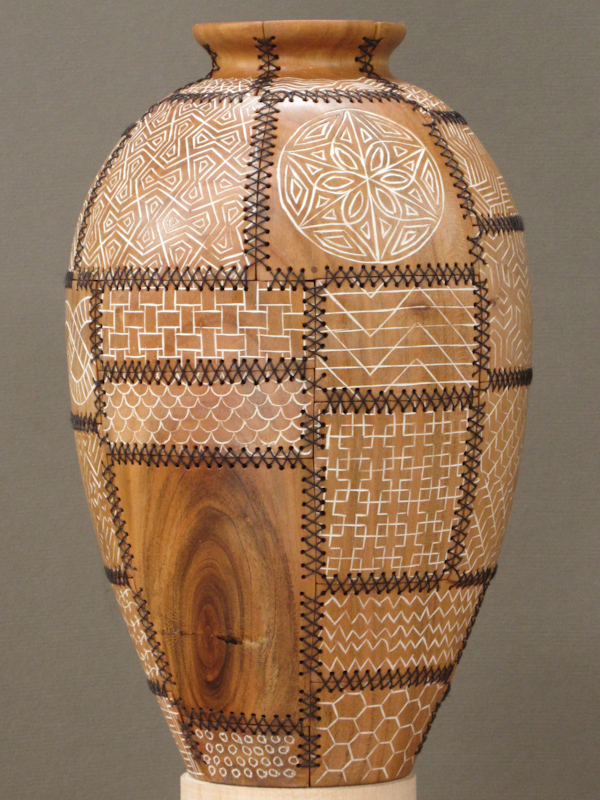
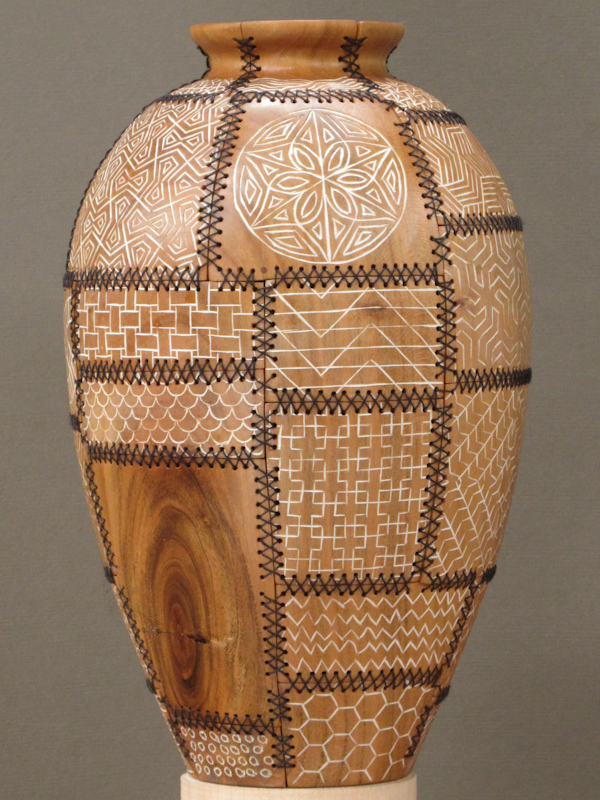
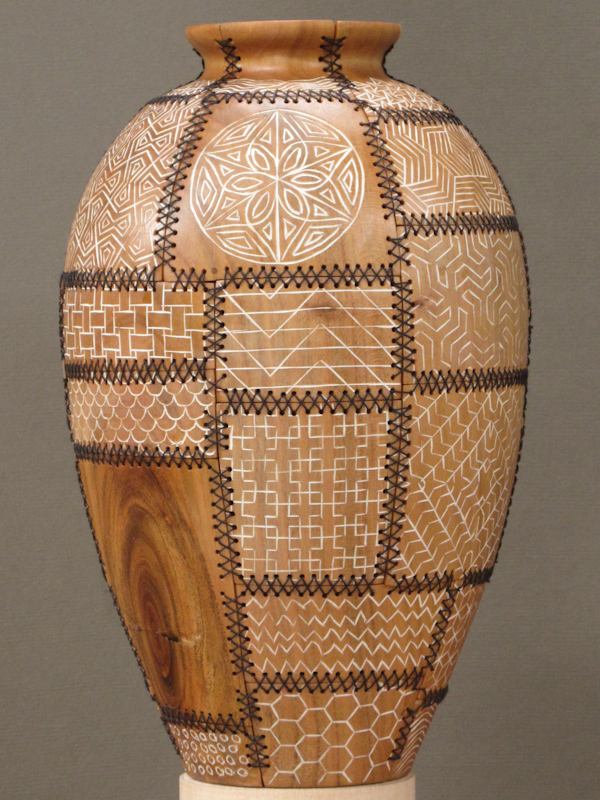
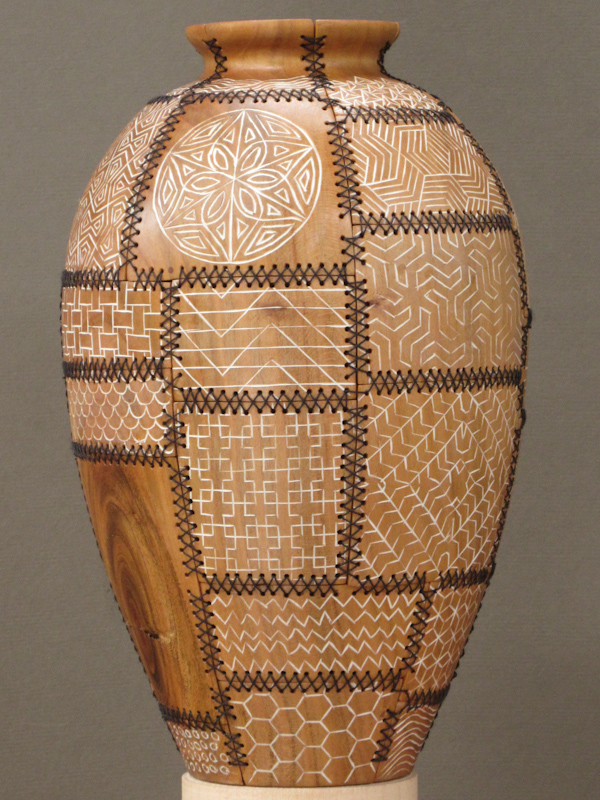
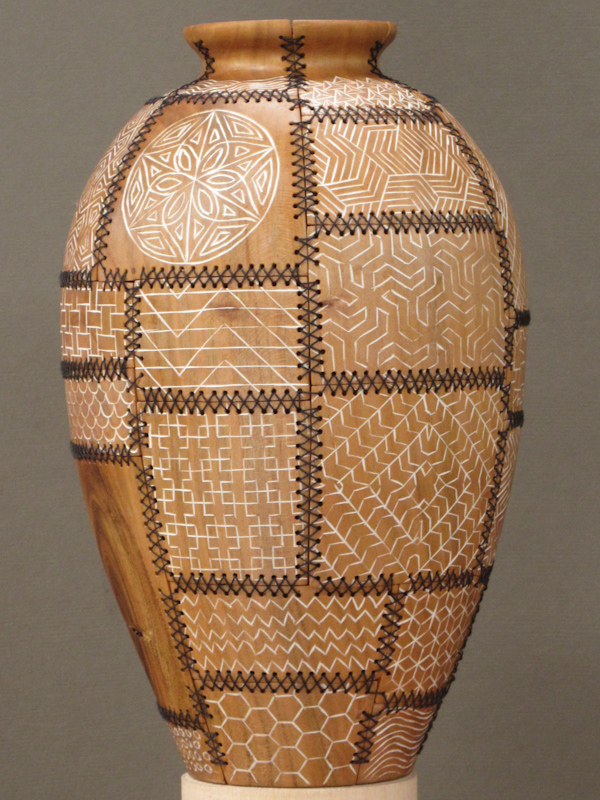
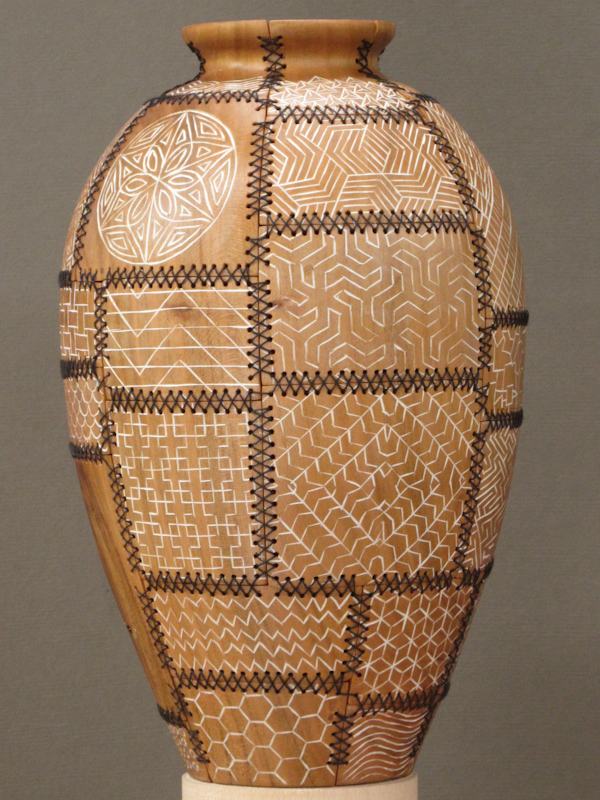
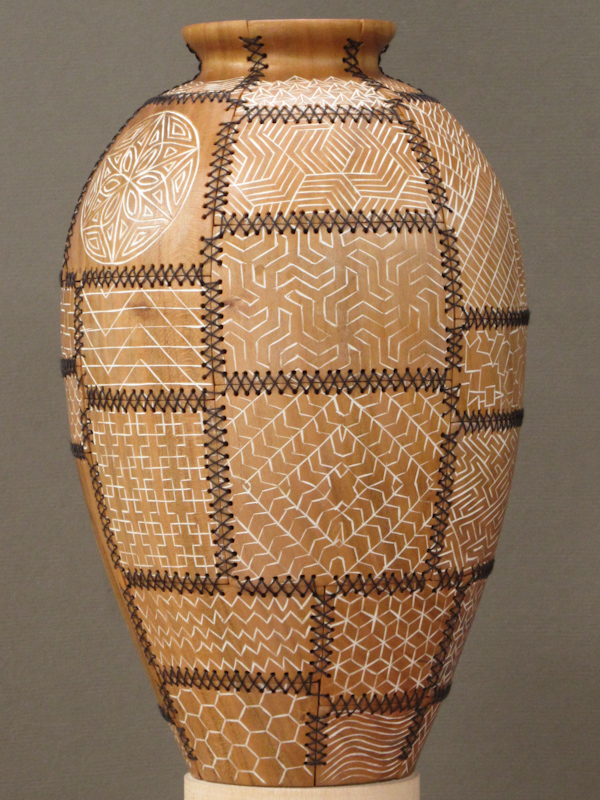
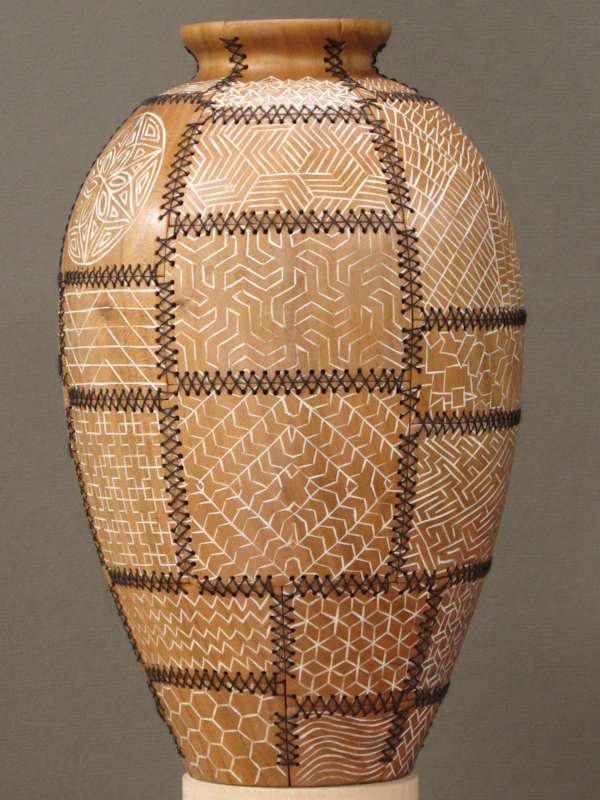
This image will show the vessel from 32 carefully-curated angles.
Click the arrows to rotate.
Click the arrows to rotate.


