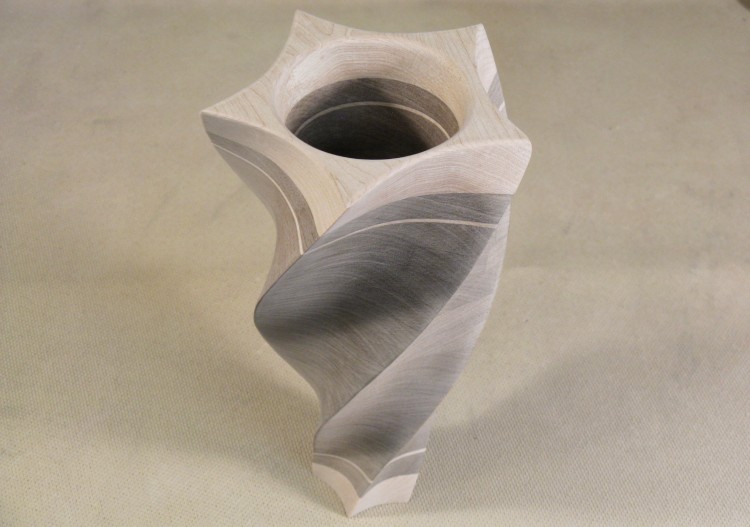
Since this piece started out as a pile of cut-outs from a previous project, it didn't really follow a predefined plan. I had some ideas sketched out for a spiral vessel but the lure of turning a bunch of scraps into something interesting overrode the original make-it-from-scratch thoughts. And since I already used the "Spiral" name for another vessel, this one gets to be "Spiral 2".
This vessel has a lot in common with the one that gave birth to its pieces. Obviously it was going to be the same walnut in the same layer thickness, but I replicated the maple top and bottom and even added a similar thin maple accent line. This could be described as a common design theme to tie diverse shapes into one unifying motif. Or maybe just "stuck in a rut".
This vessel has a lot in common with the one that gave birth to its pieces. Obviously it was going to be the same walnut in the same layer thickness, but I replicated the maple top and bottom and even added a similar thin maple accent line. This could be described as a common design theme to tie diverse shapes into one unifying motif. Or maybe just "stuck in a rut".
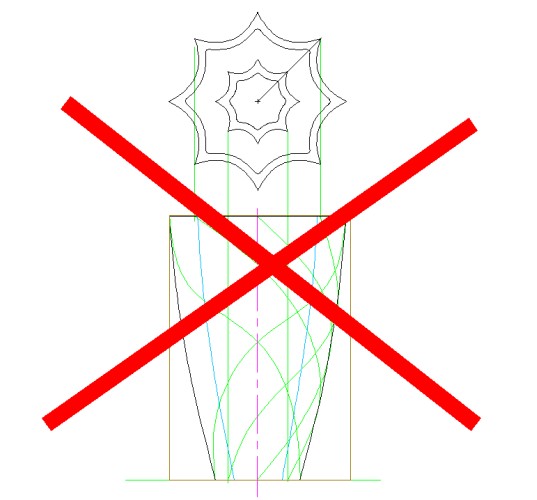
The plan...not
The origin of the (s)pieces (with apologies to C. Darwin)
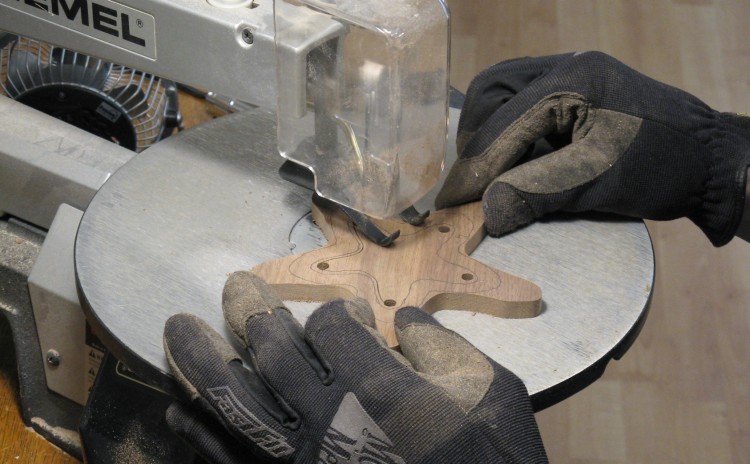
The "donor" project had walnut layers that needed the centers cut out to form a hollow vessel. This is one of the smaller ones being cut out on the jigsaw. I had drilled holes at each point to make the cut-out process easier, which left the resulting center pieces with a peculiar hollow-ended rounded star shape.
Hmmm...I bet a guy could make something out of those...
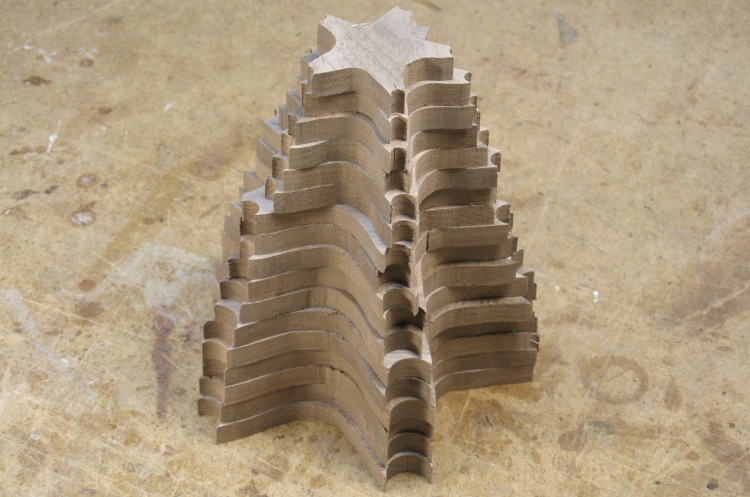
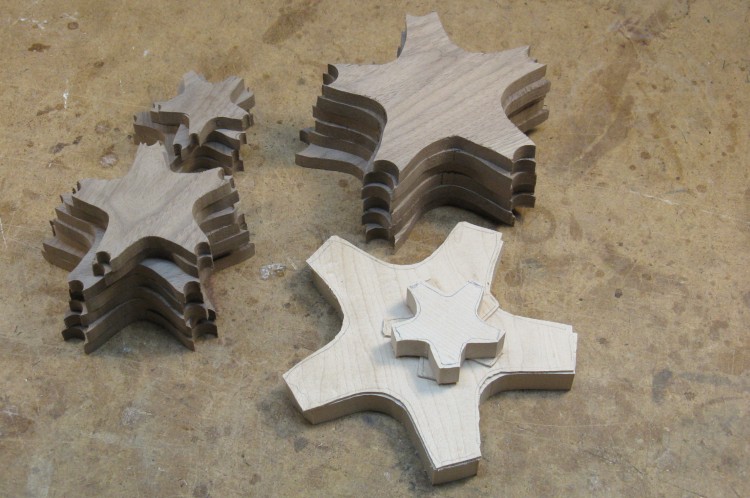
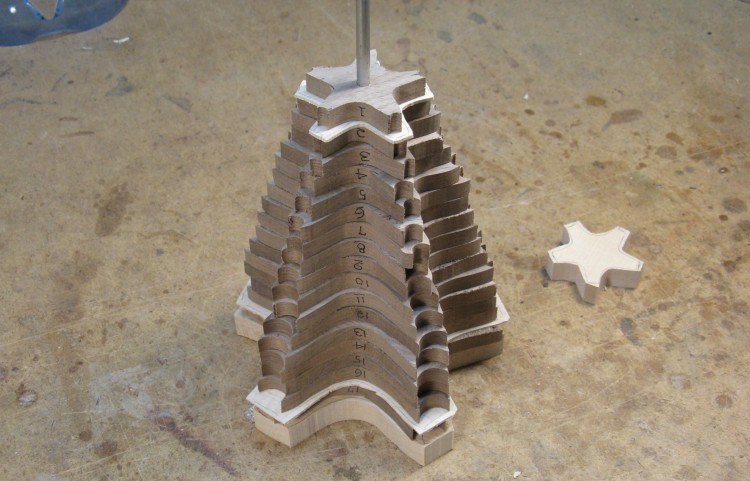
The taper of the donor vessel resulted in proportionally-sized center pieces which I tossed on the bench. Of course I later piled them up in order of decreasing size (and if you have to ask why, then you clearly don't know me).
I had future plans for a spiral vessel and it kind of looked like these pieces - with a bit of twist between layers - might just work for that.
I had future plans for a spiral vessel and it kind of looked like these pieces - with a bit of twist between layers - might just work for that.

Maple for the ends
In keeping with the contrasting-layer motif of the donor vessel, I would needed appropriate pieces of maple for this one as well. Unfortunately those maple pieces didn't exist from the original vessel since I had already used the center of the top-layer maple piece for the bottom layer.
So, instead I marked the thickish piece of maple shown here with a size appropriate for the top of the spiral vessel, and cut another to be used for the bottom. I also used a thin sheet of maple and cut out pieces for the two "accent" lines near top and bottom.
So, instead I marked the thickish piece of maple shown here with a size appropriate for the top of the spiral vessel, and cut another to be used for the bottom. I also used a thin sheet of maple and cut out pieces for the two "accent" lines near top and bottom.
All the pieces together
This is the complete spiral-vessel kit, although it still needs a bit of assembly.
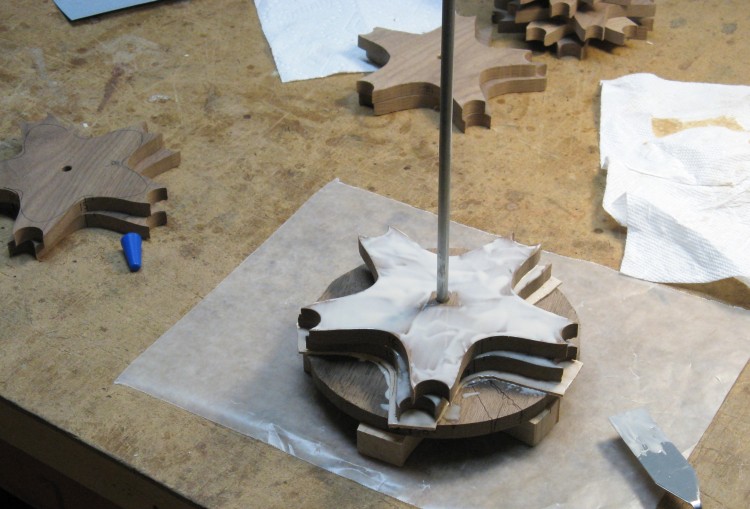
And about that assembly - it's always a challenge to glue multiple layers together and maintain alignment. Since this was to eventually be a hollow vessel, my cunning plan was to drill holes in all but the bottom piece and string them onto a metal rod. Then they would be nicely aligned and I'd just need to worry about the rotation angle between them.
And about that assembly - it's always a challenge to glue multiple layers together and maintain alignment. Since this was to eventually be a hollow vessel, my cunning plan was to drill holes in all but the bottom piece and string them onto a metal rod. Then they would be nicely aligned and I'd just need to worry about the rotation angle between them.

Marking the centers
On each piece I used a center-finding template to mark the middle and then drilled a 1/4" hole.
Strung onto the set-up rod
A 1/4" steel rod was used as a guide onto which the layers were fitted. The pieces were also numbered to make sure I didn't miss a layer when doing the gluing.
That's the non-drilled bottom layer sitting off the the side.
That's the non-drilled bottom layer sitting off the the side.
Thickness planing one extra layer
Now since this vessel was going to need hollowing, it would be mounted to the lathe. Sometimes with a stout vessel it can be held just at the base for hollowing, but the tiny bottom of this one precluded that approach. Normally in that situation I use a steady rest where the top end of the vessel rolls against a set of wheels, but the spiky outline wasn't going to allow that.
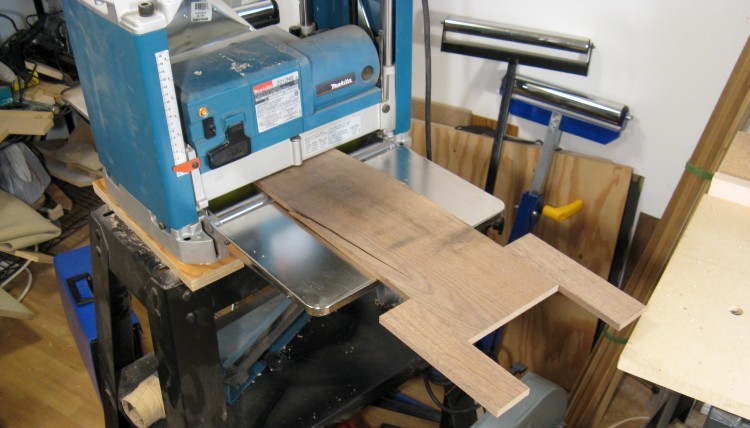
I needed at least one of the layers to be nice and round. This shot shows a walnut plank being planed to the same thickness as the other layers before I cut that nice round piece out of it.
Astute readers of these pages will recognise the funky added-on pieces on the end of the plank as anti-snipe arms.
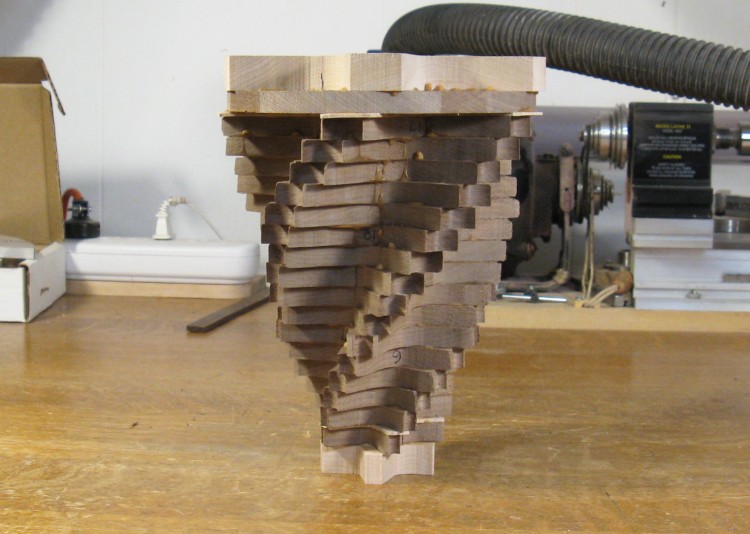
The start of the stack showing the round layer
This photo shows the first few pieces being glued together as it gets assembled upside-down to how it will eventually sit. On the bottom of the pile is the vessel top, then the round layer mentioned above, the thin maple accent layer and then a couple of normal walnut layers.
Clamping the first 8 layers
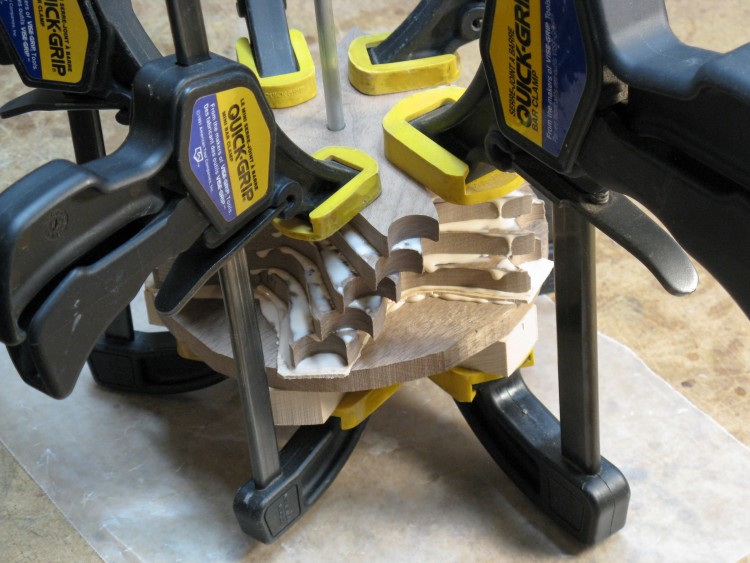
I added a few more layers to the stack started above, made sure the pieces were offset from each other the right amount, and then clamped them all together. I had waxed the metal rod to prevent the glue sticking to it so as to aid in its eventual removal.
Spreading glue for the next layers
Once that first stack was dry, I added another few layers and clamped it again. Here I'm just spreading the glue to make sure it's evenly distributed before adding the next piece.
Like the original vessel, alternate layers were flipped upside-down to give more layer-to-layer contrast.
Like the original vessel, alternate layers were flipped upside-down to give more layer-to-layer contrast.
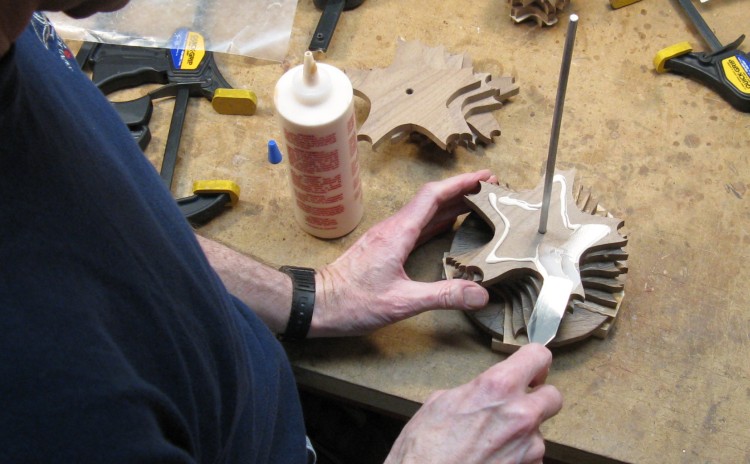
Clamping the final set of layers
Eventually I added the last few layers. Since the pieces were too small to get conventional clamps to hold, I rigged up a large clamp to hold things. I needed to use a large socket plus a piece of round scrap with a hole to fit over the end of the metal rod and apply pressure to the top layers.
And Voilà!
After pulling out the rod (which despite the wax actually involved a hammer, a vise and much "convincing"), the bottom was glued on and the vessel blank was complete.
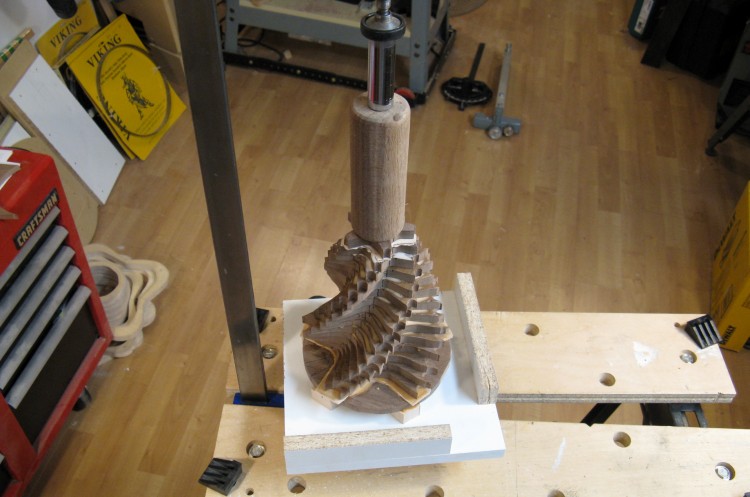
Mounted on lathe with round layer trimmed
Then as mentioned, it went onto the lathe for hollowing. I just used temporary glue to affix the bottom to a wooden disc that was fastened to the headstock. That wouldn't be nearly strong enough to hold up the vessel, but the other end was supported using the live center coming in from the right side of the photo.
The full disc that will be used for end support in the near future (read: next picture) hadn't been cut perfectly so it was rounded off on the lathe. That had already been done when this shot was taken, which explains the sawdust on the tool support.
Also visible here in the "valleys" are the guide lines drawn on to help get a consistent twist between each layer.
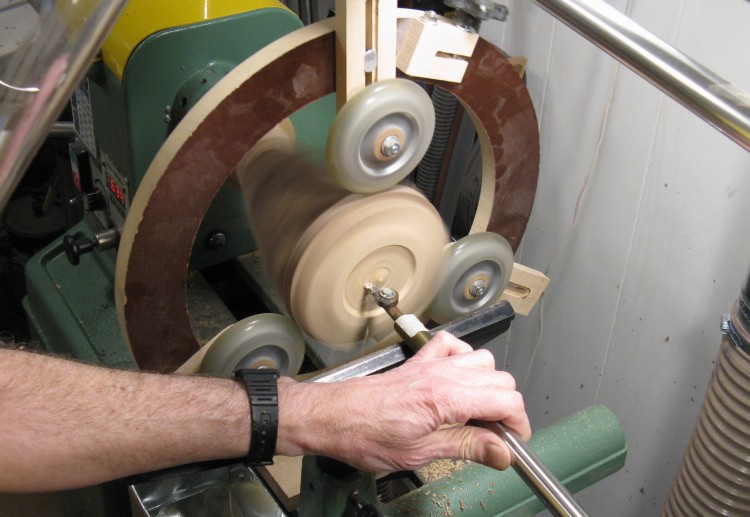
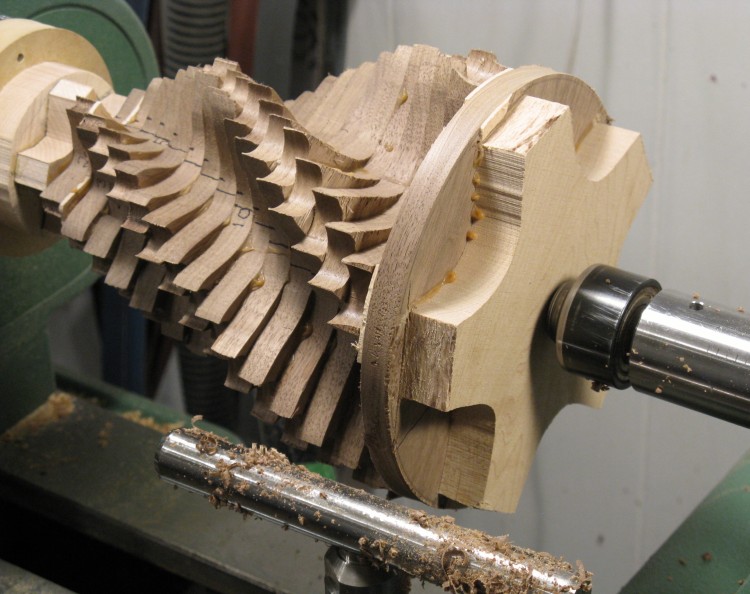
Starting the hollowing
The live center was moved out of the way and the steady rest added, with the scooter wheels bearing on the disc to support the top end of the vessel.
I deployed my hollowing tool and when this shot was taken, the hole was only about 1/4" deep.
I deployed my hollowing tool and when this shot was taken, the hole was only about 1/4" deep.
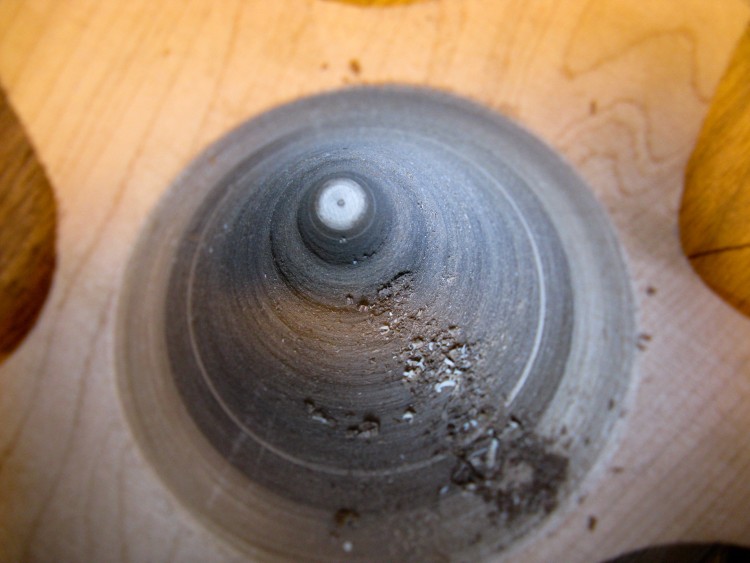
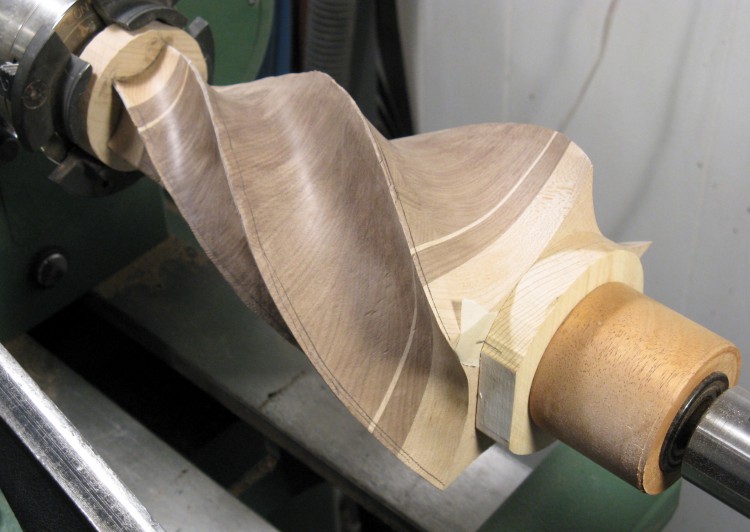
And purty much done the hollowing
The vessel has a pretty severe top-to-bottom taper, so the central hole is rather conical. This view into the hole shows that the hollowing is pretty much done - you can see the bottom accent line and the hole extends past that into the bottom maple layer.
The inside still needs a bit more smoothing and then a whole lotta sanding, which we're just going to skip right over.
The inside still needs a bit more smoothing and then a whole lotta sanding, which we're just going to skip right over.
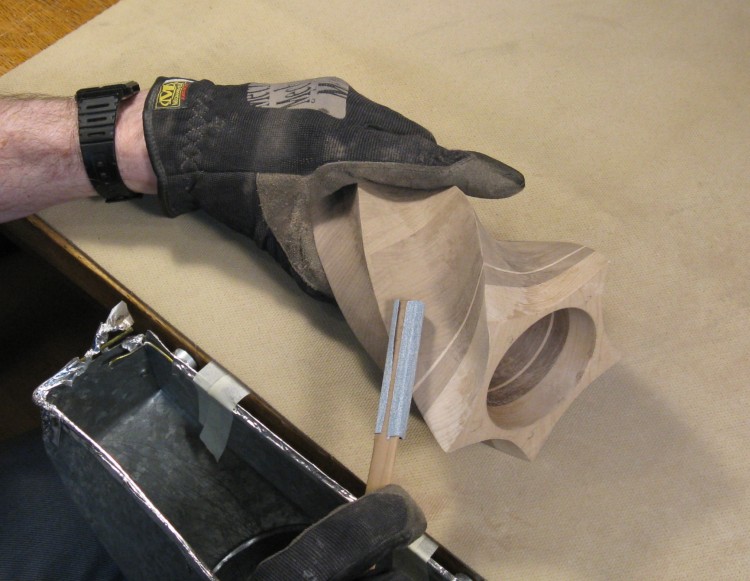
Chopping out the extra on the round layer
With the inside done, it was time to start taming the spikes on the outside. The first step was to make the disc layer look more like the other layer shapes, for which the coping saw was employed.
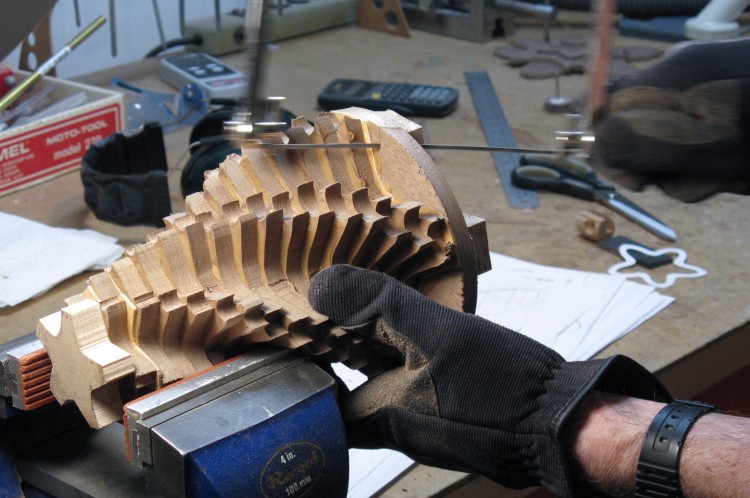
Let the shaping begin!
Then it was on to the grinding. I used a coarse tungsten carbide grinding burr to do the bulk of the material removal. And there was a fair amount to do since each of the wide hollow-ended arms needed to be reduced to a single shorter point.
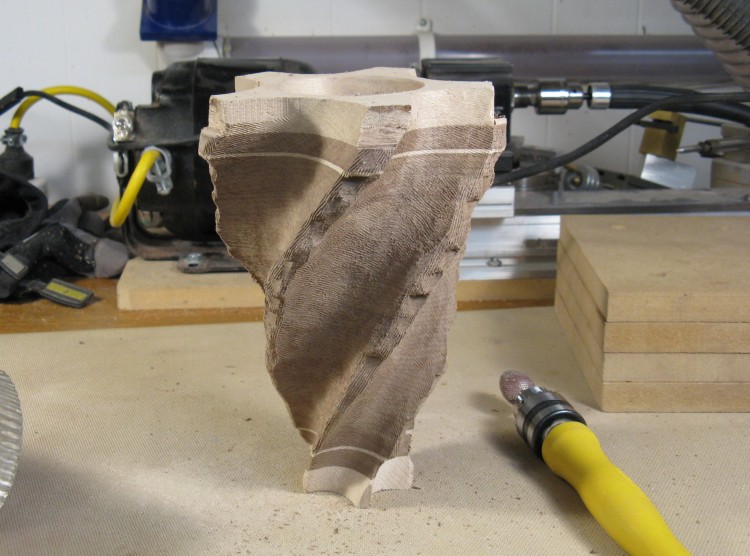
First cut at crude shaping done
Visible in the background is the small lathe that I used to drive the grinding tool. To the left of the vessel is the large black motor while on the other side the shaft connected to the yellow-handled tool is clamped in the Jacobs chuck and goes off to the right.
The first phase was to removed the steps between the layers. That got it this point where the curves were beginning to become more evident, but the edges remained pretty thick and bumpy.
The first phase was to removed the steps between the layers. That got it this point where the curves were beginning to become more evident, but the edges remained pretty thick and bumpy.
Smoothing off the rough edges
To address the "bumpy" part, the edges were smoothed out using the belt sander.

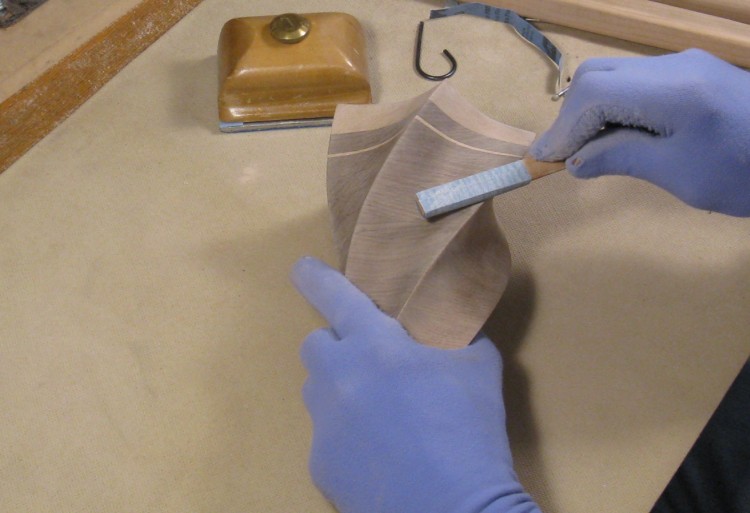
Marking the centers before more shaping
Now I could think about refining the curves a bit. Here the approximate center of each edge is being marked, to provide a target for extending the curved portions.
...and then the more shaping
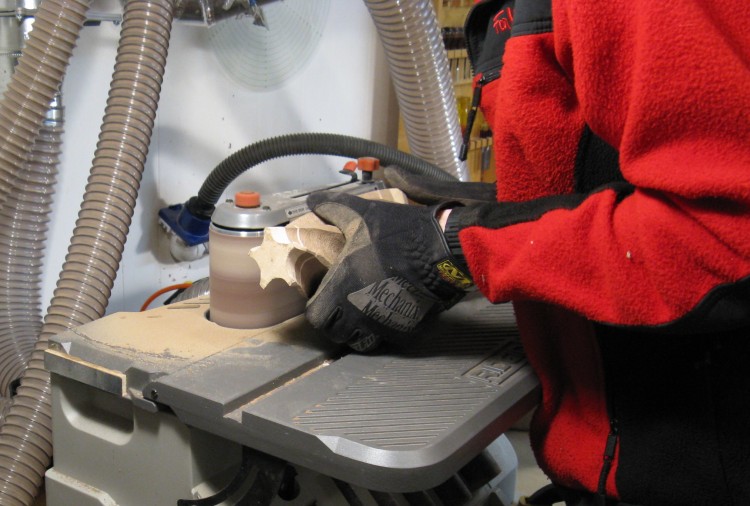
There was still a fair amount of material to remove, so I started again with the coarse burr and took the edges down to maybe 1/16" width.
The slightly awkward-looking hand positioning seen here was adopted so the turning direction of the burr would direct the sawdust to the dust collector hose seen here. This worked well enough that I didn't need to wear a dust mask.
The slightly awkward-looking hand positioning seen here was adopted so the turning direction of the burr would direct the sawdust to the dust collector hose seen here. This worked well enough that I didn't need to wear a dust mask.
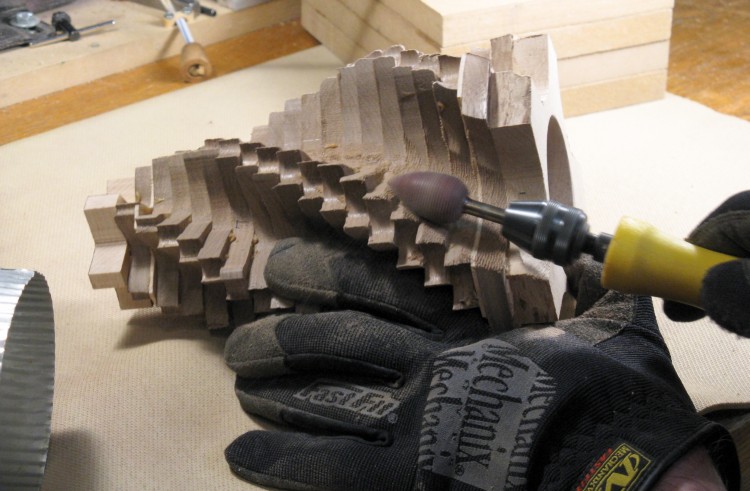
Getting a bit finer on the shaping
I switched over to an 80-grit flap wheel sander both to thin the edges a bit more and to smooth off the rough surface left by the burr.
This did a pretty good job of removing the deep scratches (see shiny finish on next photo) but it tended to leave tiny ripples in the surface which later needed to be manually sanded flat.
This did a pretty good job of removing the deep scratches (see shiny finish on next photo) but it tended to leave tiny ripples in the surface which later needed to be manually sanded flat.
Back onto the lathe to mark the edges to equal lengths
With the edges mostly done, I decided that they were a bit long and should be equalized to make them closer to the same contour. I mounted the piece back on the lathe to mark the edges consistently to give new targets to work towards.
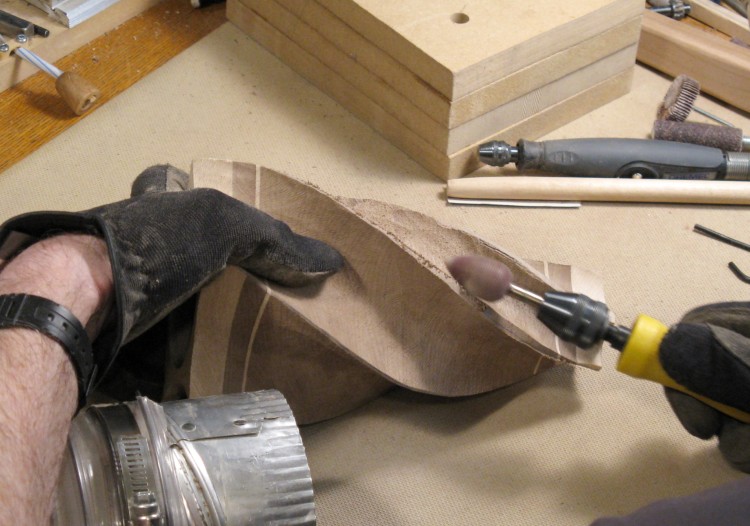
Some finer shaping using a sanding drum
This time I mostly used a small sanding drum to contour the edges, trimming them to the line and ensuring the curves blended well.
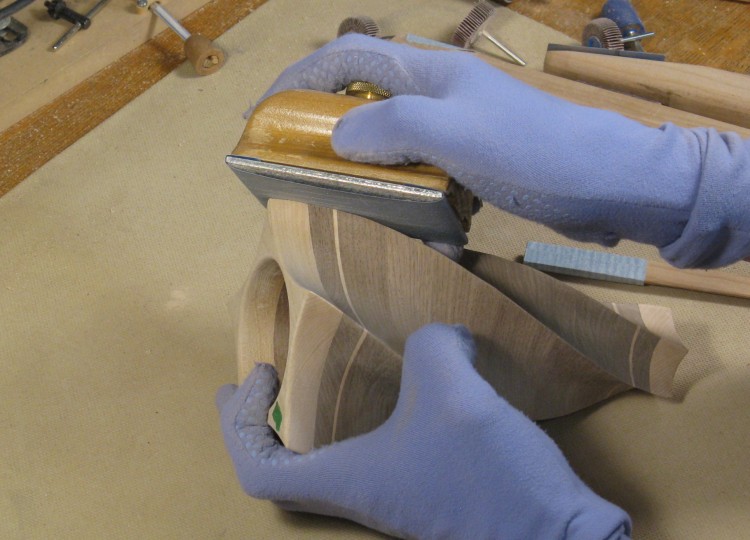
Hand sanding the sides
When I was satisfied with the edges, I started hand-sanding to even out any imperfections and improve the look of the surface.
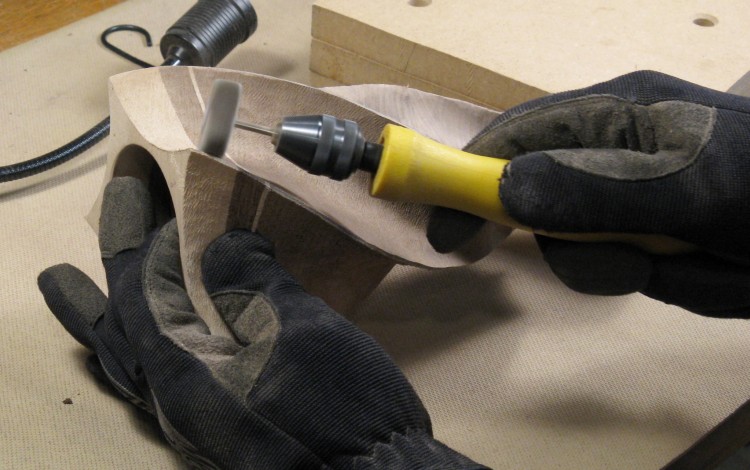
A little more evening of the edges
The edges needed one final shaping cycle. They were pretty thin at this point so I just sanded enough off to get to a curve that was nice and even to the eye all along the edge.
And some final sanding
And a final round of sanding was done to re-bevel and slightly rounded the edges.

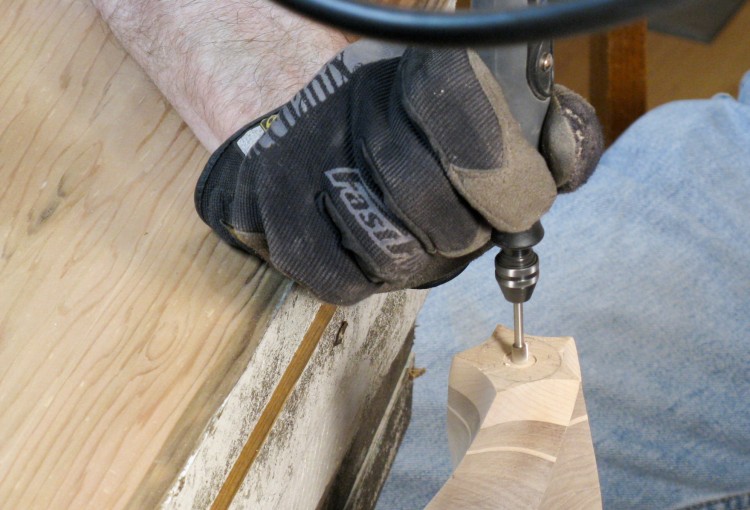
The bottom with cutout started
I hadn't done anything to the bottom yet, but I didn't want to leave the surface just flat.
I decided to make a round depression with a signature surface in the center. I didn't need it to go very deep, so I started with a shallow drill hole using a brad-point bit to define the center surface.
I decided to make a round depression with a signature surface in the center. I didn't need it to go very deep, so I started with a shallow drill hole using a brad-point bit to define the center surface.
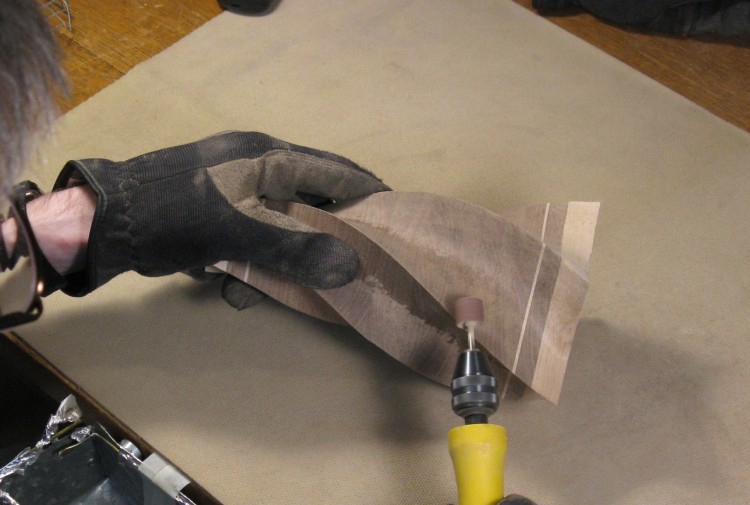
Deepening the cutout
The next step was to manually deepen the hole to get rid of the center dip from the drill bit and provide a flat surface about 1/8" deep.
I used the Dremel with a flat-surfaced cutting bit to deepen the hole. Here I stacked some planks beside the vessel to give me a place to rest my arm at a convenient height for a steadier hand on the Dremel.
I used the Dremel with a flat-surfaced cutting bit to deepen the hole. Here I stacked some planks beside the vessel to give me a place to rest my arm at a convenient height for a steadier hand on the Dremel.
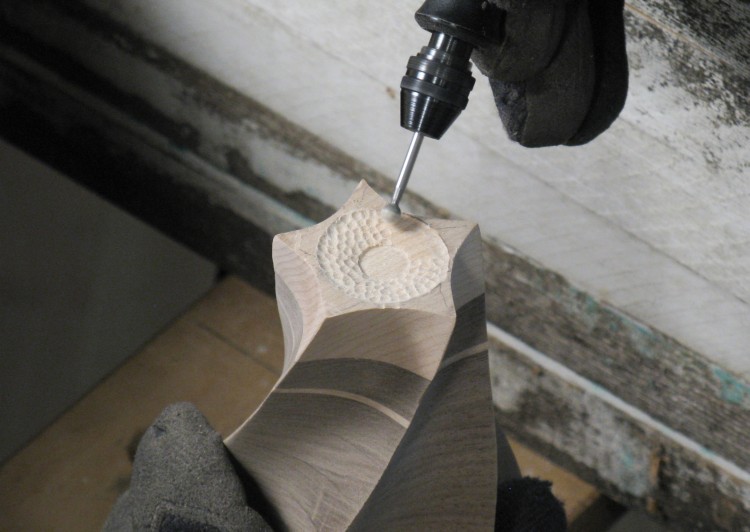
Giving it some texture
Once that was done, the surrounding surface was sloped down to the center with another smaller cutting bit. I then switched to the small abrasive sphere shown here to grind little divots in the surface.
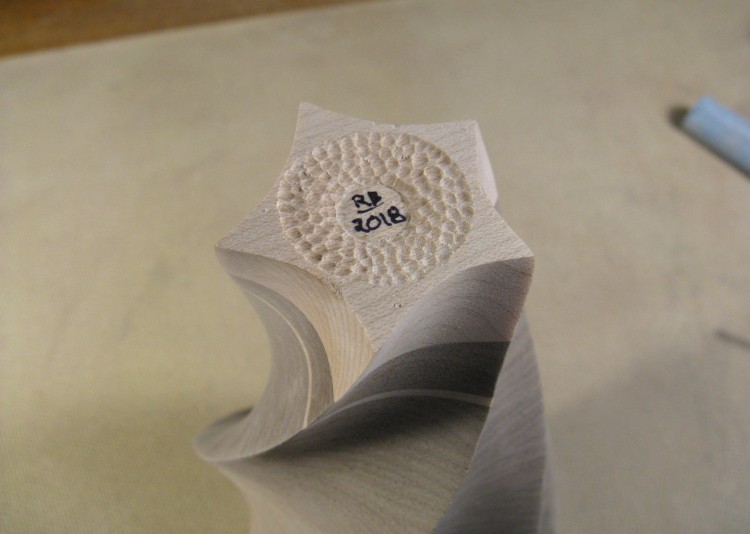
Bottom done and signed off
A bit more grinding to finish off the ring, a bit of felt-penning, and the bottom was done.
Woodworking all done; just needs finish
That completed the woodworking portion.
Early on, I was somewhat concerned about the fragility of the edges, so I tried to keep the angle where adjacent sides meet to about 60 degrees. I think I only achieved about 50 degrees but they turned out to be less delicate that I feared. It helps that the edges are slightly rounded with a diameter of perhaps 1 millimeter.
Early on, I was somewhat concerned about the fragility of the edges, so I tried to keep the angle where adjacent sides meet to about 60 degrees. I think I only achieved about 50 degrees but they turned out to be less delicate that I feared. It helps that the edges are slightly rounded with a diameter of perhaps 1 millimeter.
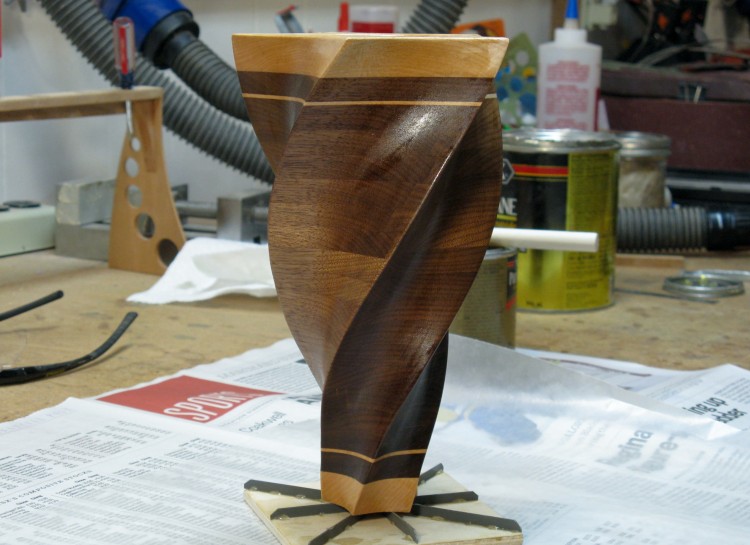
The first coat of finish applied
This photo shows the vessel with the first coat of finish.
I noticed after the finish was dried that it highlighted some imperfections on the sanding on the inside. I ended up resanding the inside fairly heavily to fix that up, so of course had to restart the inside varnishing as well.
My can of varnish was starting to look like it was drying out, and you can see this coat doesn't look very consistent. So I switched to a larger can of the same finish to do the next coat. It still didn't look great (perhaps because that can was several years old). So I switched again, this time to my previous favorite Wipe-On Poly finish. It took two more coats but I was finally able to get a decent-looking finish.
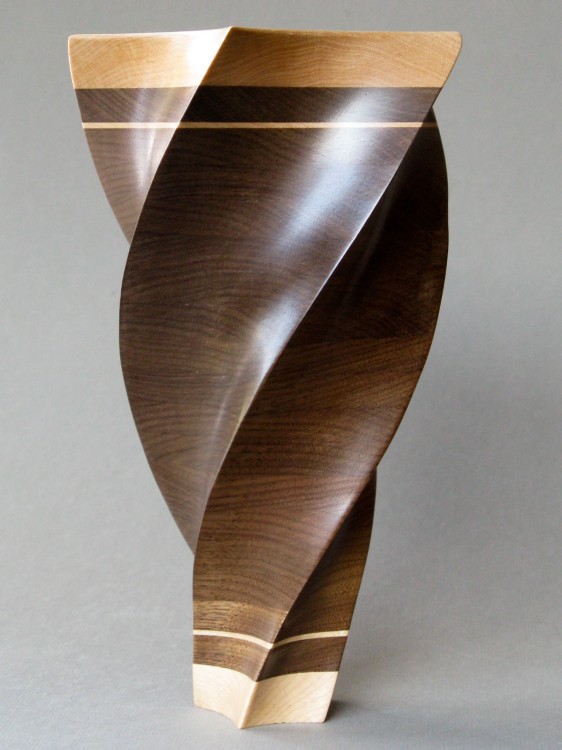
Done
Done.


