The "use up the scraps" impetus for this vessel put some constraints on it including of course the material, the diameter and since it made sense to use most or all of the scraps, the height. I had found the look of the body of the original vessel a bit bland so for this one I added some walnut layers to spice it up a bit, and of course the big wedge. I ended up chosing an odd shape for this vessel, thinking that might make the profile of the insert look a bit more interesting. I'm not sure that quite panned out, but at least it's a bit different looking than most of my other efforts.
And yes, once again I've made a vessel using maple and walnut. But given that the main feature is the big intruding wedge, that became the nomenclature for this vessel.
And yes, once again I've made a vessel using maple and walnut. But given that the main feature is the big intruding wedge, that became the nomenclature for this vessel.
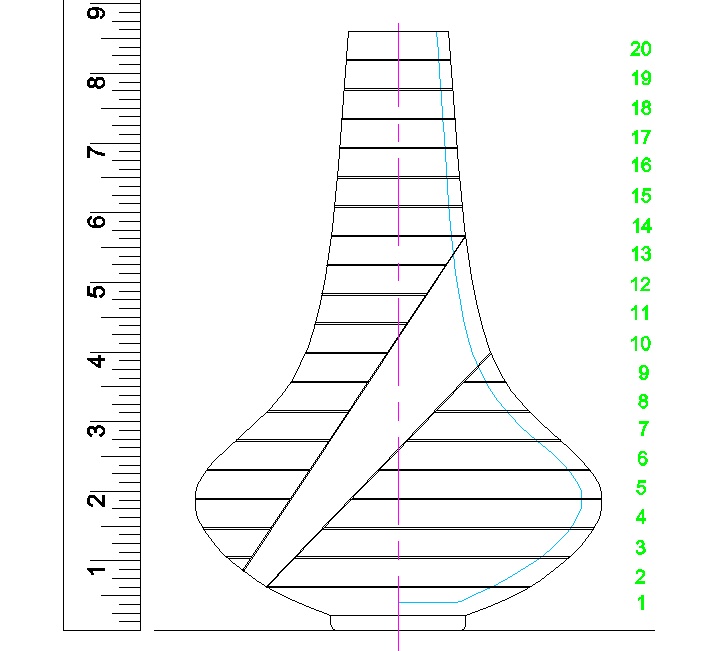
The plan (at the only easy-to-draw angle)
Starting Blank

The raw materials
In making the original maple wastebasket vessel, the centers were cut out of each of the layers which produced the pile of irregular discs seen here.
This was done by drilling a 1/4" hole, inserting a jigsaw blade and cutting in a circle. As a result these are mostly roundish with a little bite on one edge. There were 19 of these, all 0.4" thick.
This was done by drilling a 1/4" hole, inserting a jigsaw blade and cutting in a circle. As a result these are mostly roundish with a little bite on one edge. There were 19 of these, all 0.4" thick.
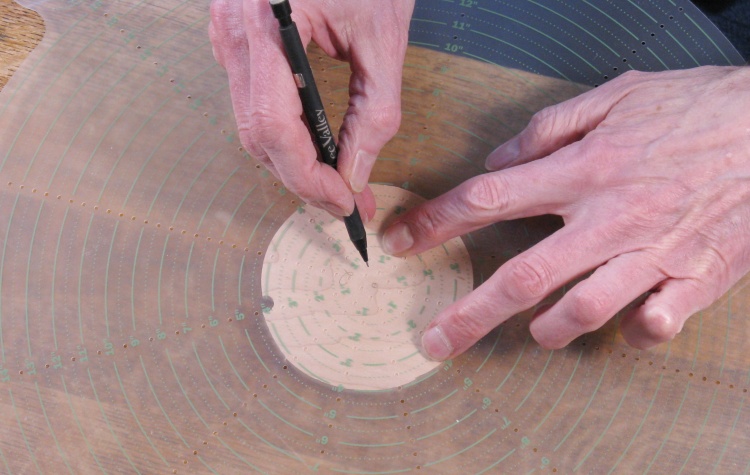
Finding the center of not-quite-round pieces
I figured out the usable diameter of each piece by finding the largest circle that would fit inside the hole on the edge, and marked the center of that circle.
I made a list of the diameters to make sure I had enough of sufficient size. Ultimately, the thin neck of the shape I chose meant that I had no shortage of adequately-sized pieces.
I made a list of the diameters to make sure I had enough of sufficient size. Ultimately, the thin neck of the shape I chose meant that I had no shortage of adequately-sized pieces.
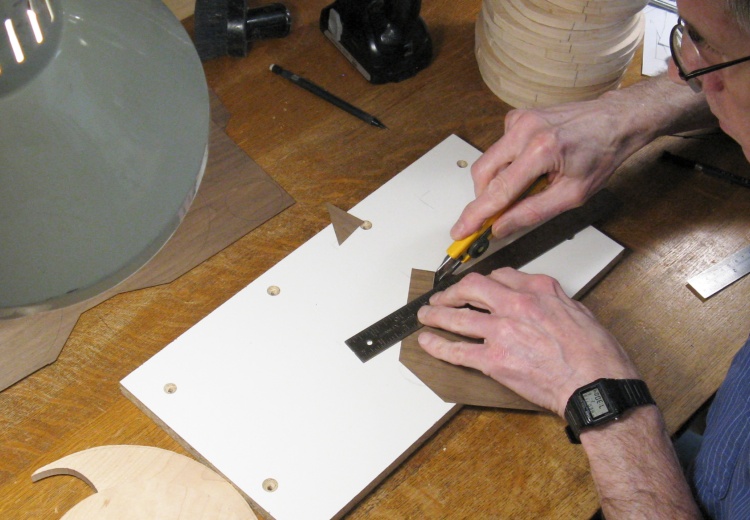
Chopping up veneer (grimly)
For the darker layers, my plan was to use a walnut veneer which was about 0.02" thick.
I failed to think of any clever way to cut variable-sized circles out of veneer sheets, so instead they were just manually cut into octagons using a razor knife, ruler and grim persistence.
I failed to think of any clever way to cut variable-sized circles out of veneer sheets, so instead they were just manually cut into octagons using a razor knife, ruler and grim persistence.
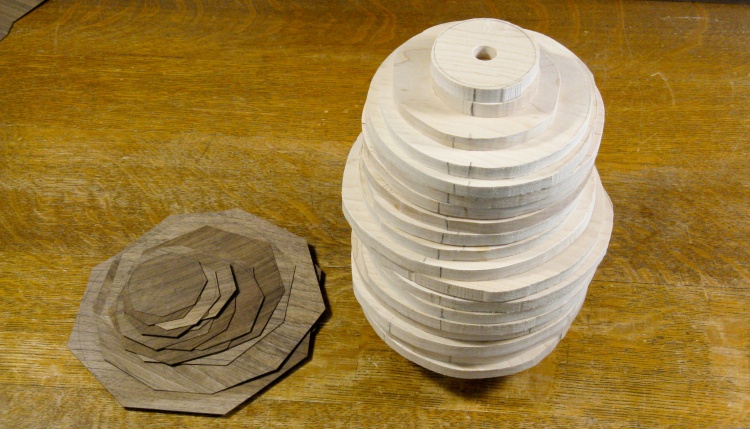
The vessel "kit"
A couple of the discs had imperfect surfaces which may have resulted in an inconsistent-thickness glue joint, so instead of using those I cut out small circles from the good parts of the wood for the top two layers.
This is the pile of walnut layers alongside the maple layers (including a thicker one for the bottom).
This is the pile of walnut layers alongside the maple layers (including a thicker one for the bottom).
The little montage below shows most of the stacking-and-gluing stages. In each case, a metal rod is inserted through the center holes to keep the discs aligned while gluing. The pieces at the top of each pile are just used to distribute the clamping pressure.
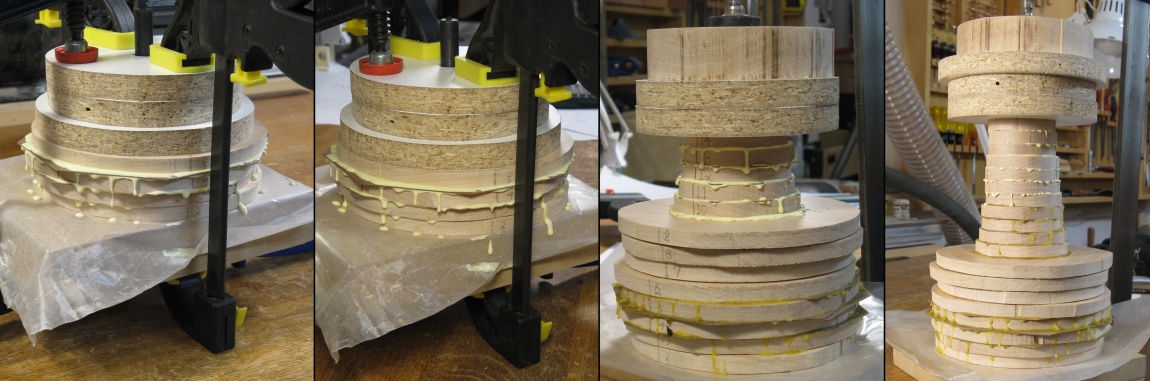
Stackin' and gluin' and clampin'
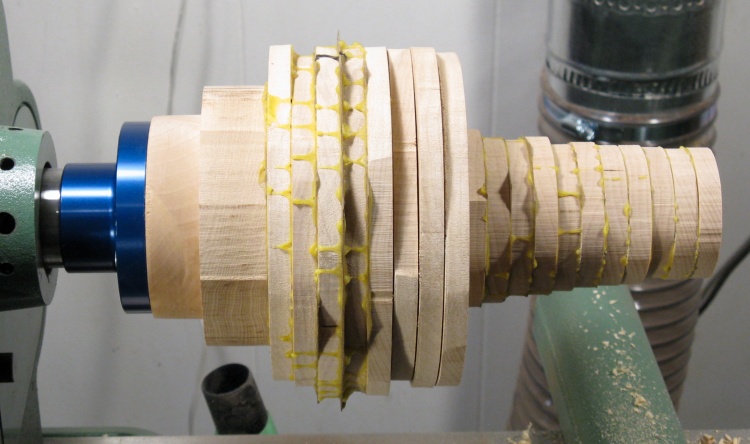
Getting ready to flatten the bottom before adding faceplate
Since perfect symmetry and flatness is hardly to be expected after clamping and gluing 40 or so layers, the blank was mounted on the lathe so the bottom could be flattened.
This created a flat and perpendicular mating surface for the wood screwed to the faceplate and would ensure the vessel was correctly aligned to the turning axis.
This created a flat and perpendicular mating surface for the wood screwed to the faceplate and would ensure the vessel was correctly aligned to the turning axis.
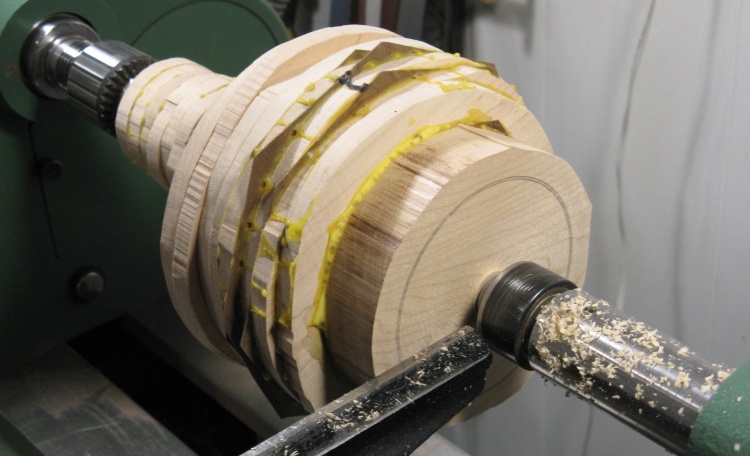
The whole shebang on the lathe
Then after the blank was glued to the disc of maple on the blue faceplate, it was ready to start turning.
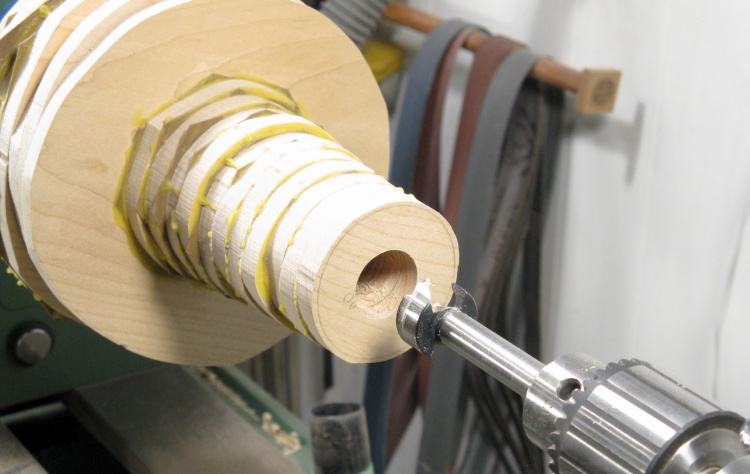
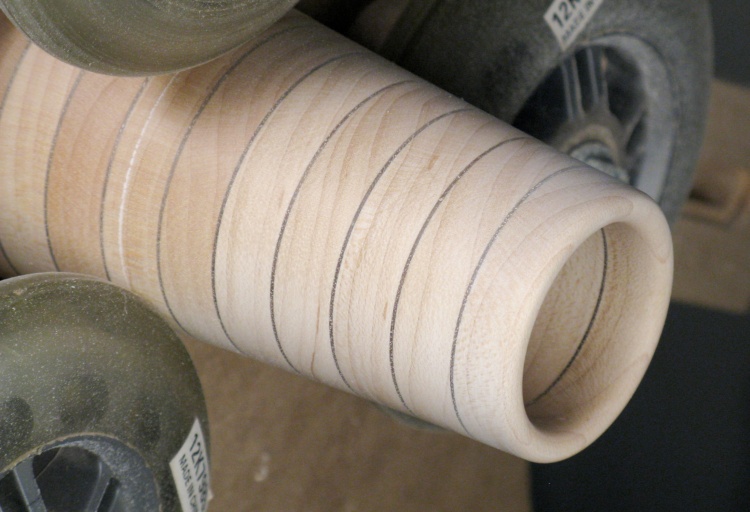
Drilling a 1" guide hole
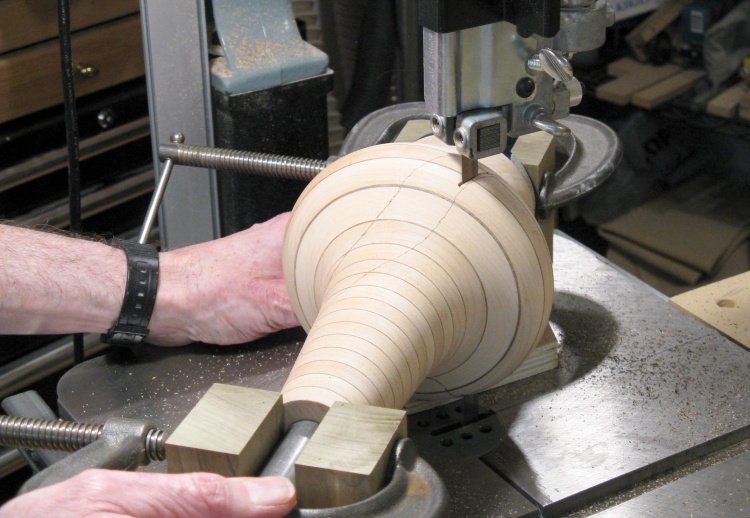
Before starting the outside turning, I redrilled the end to a 1" diameter to have a centered hole to be used when cutting the vessel later on.
Some shaping of the bottom side
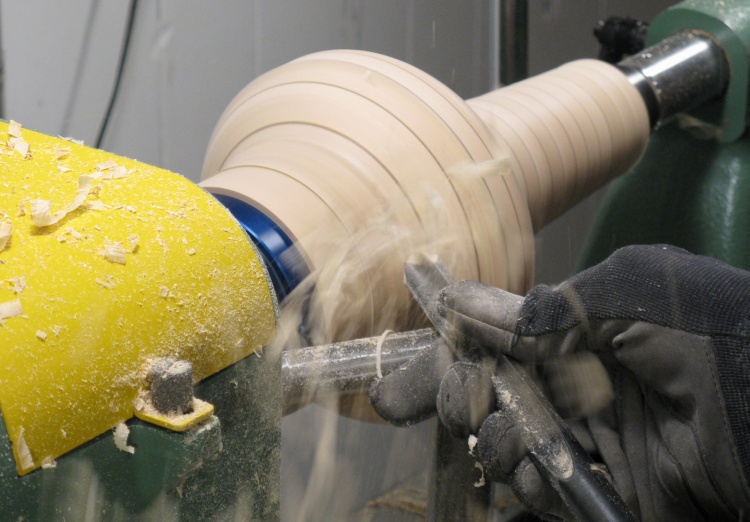
Shaping went pretty quickly using the bowl gouge seen here. In this shot it is already mostly done and the bottom profile is just being adjusted a bit more.
It was shaped a bit oversize to have room to make adjustments when re-turned later. I left the bottom half-inch or so to be done after the vessel was swapped end-for-end because there would be more room to work on it.
It was shaped a bit oversize to have room to make adjustments when re-turned later. I left the bottom half-inch or so to be done after the vessel was swapped end-for-end because there would be more room to work on it.
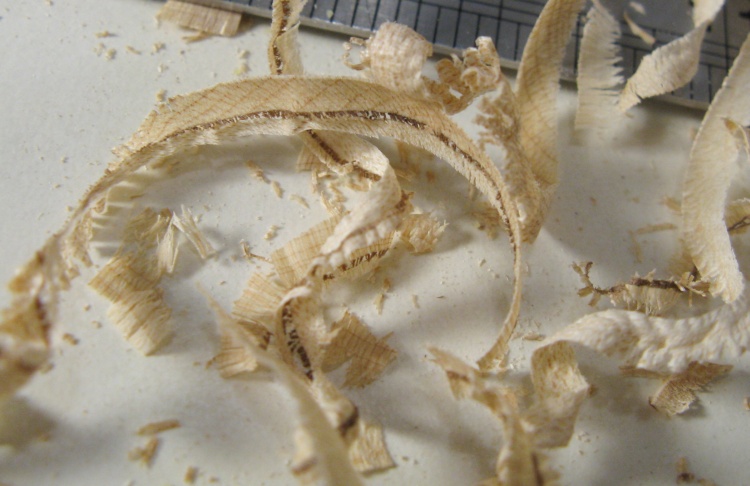
Some nice maple-walnut shavings
These are typical of the shavings coming off when using the bowl gouge. These had shot a couple feet over to land on the drill press table.

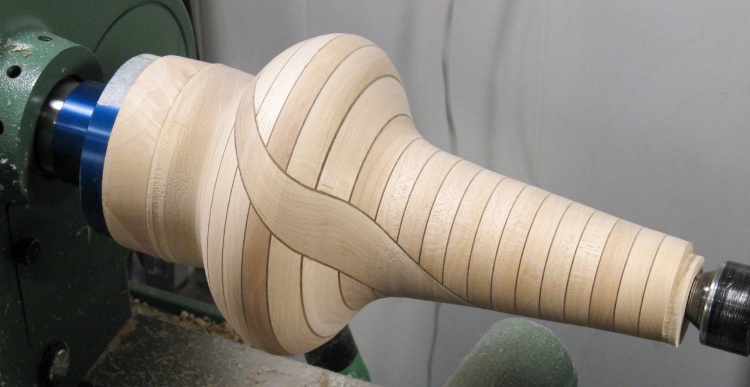
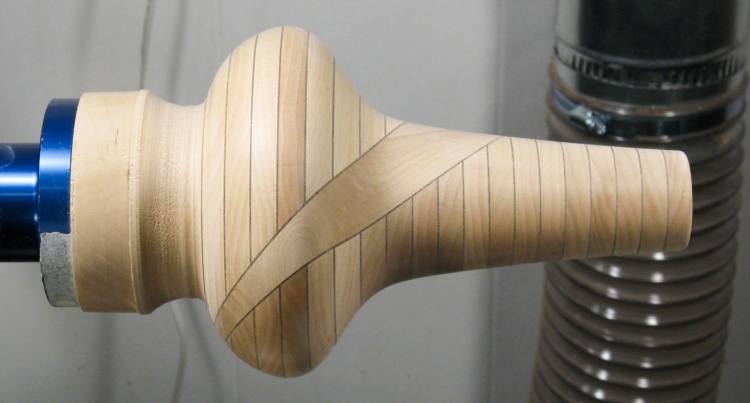
Initial shaping done
This is where I stopped with the shaping.
Slice & Fill
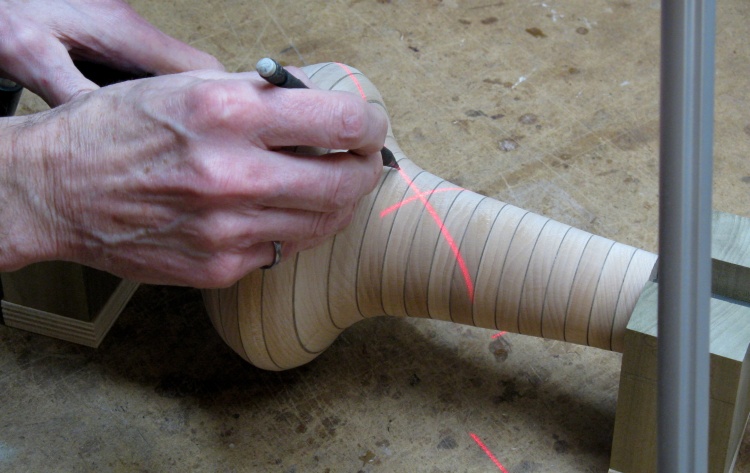
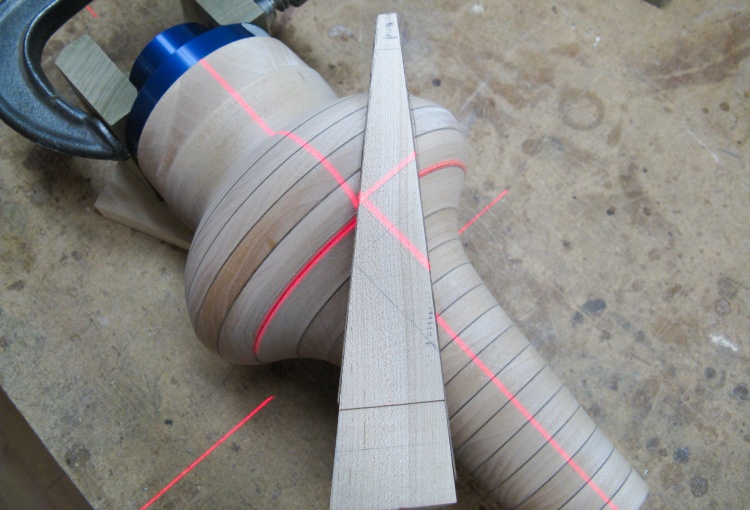
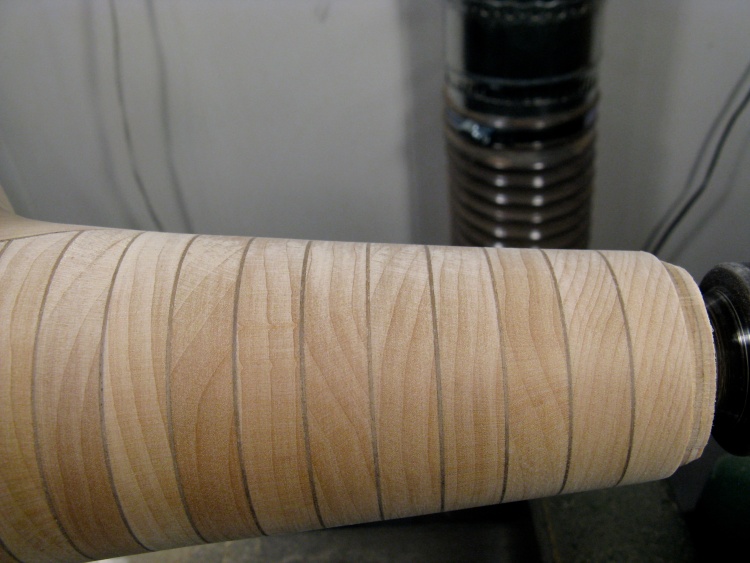
Laser-aided guide line drawing
My plan was to cut a wedge shape out of the vessel using the bandsaw but to ensure that the saw cut close to the desired line, I would need to handhold the vessel to direct it. The cut wouldn't be very clean or accurate, but the belt sander would be used to smooth and straighten the faces.
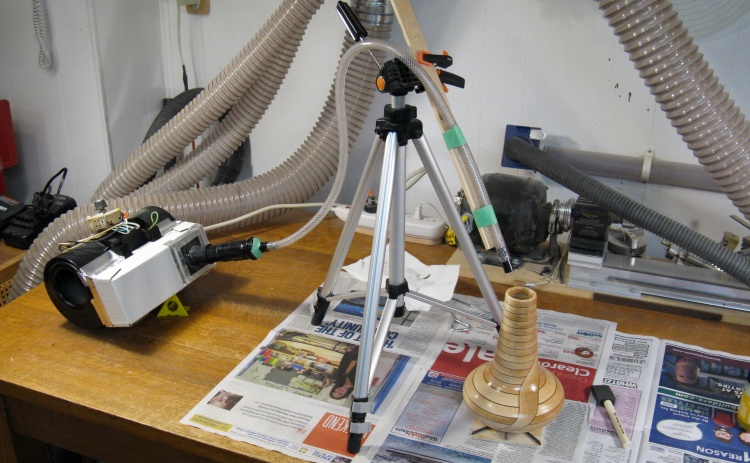
That meant that I needed to mark the cut lines on the vessel. Given the irregular shape, a laser line seemed like the ideal guide. Here a laser has been mounted pointing down on a tripod above the vessel and I'm tracing the laser line with a pencil to mark one of the cut lines.
That meant that I needed to mark the cut lines on the vessel. Given the irregular shape, a laser line seemed like the ideal guide. Here a laser has been mounted pointing down on a tripod above the vessel and I'm tracing the laser line with a pencil to mark one of the cut lines.
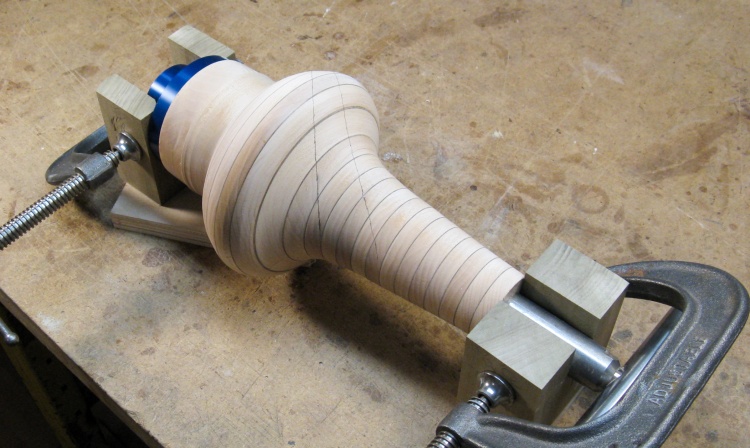
The wedge outlined in wiggly pencil lines
This photo shows the vessel with the wedge to be cut out marked on it. I used some jig pieces from a previous slice & fill project to hold the vessel. The left holder includes plywood extending under the largest part of the vessel to provide a bit more support after the first cut has been made.
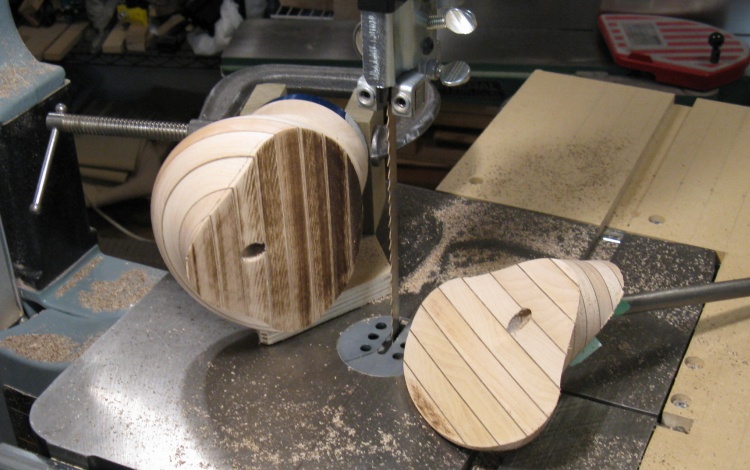
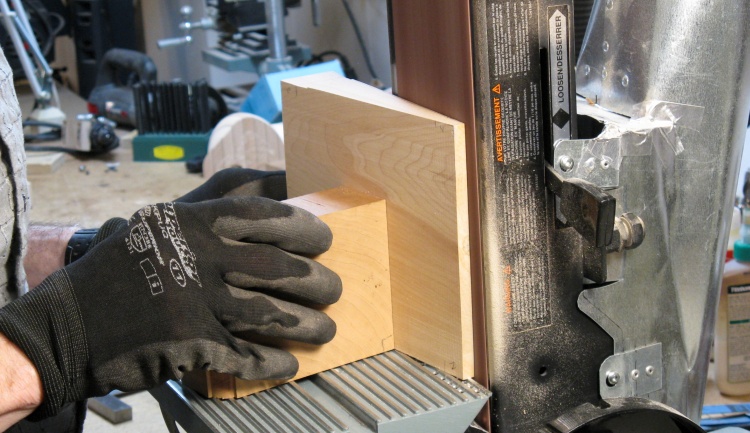
Chopping off the top piece
In this photo the bandsaw blade is partway through the first cut. Handholding the piece gives a wigglier cut, but it lets me compensate for any blade wander. I was aiming to cut about 1mm inside the pencil line.
Top piece removed (only left side of saw blade is dull?)
With the top piece cut off you can see the interesting character of the saw cut with the left side of the cut burned and the right side looking fine. This blade obviously has problems, although I'll sheepishly admit I made both my critical cuts before replacing it.
In my defense I'll note that I left enough extra wood to sand off all the problem areas before getting to the planned size.
In my defense I'll note that I left enough extra wood to sand off all the problem areas before getting to the planned size.
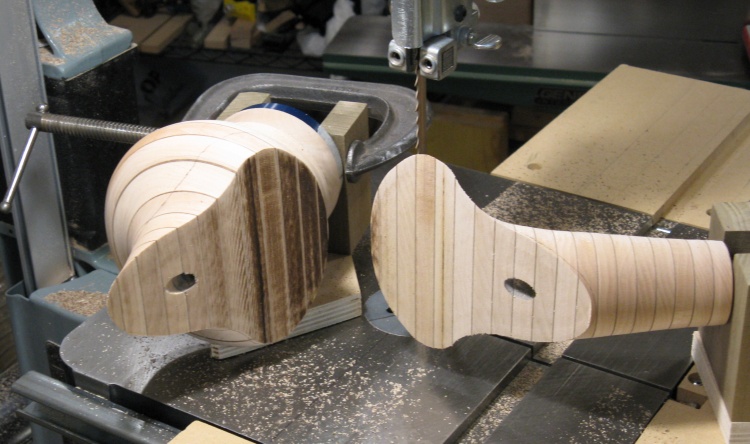
Wedge piece cut off
And then the second cut was made which removed the wedge-shaped section, sitting on the right side in this shot (with the metal rod stuck in it's center hole as a handle of convenience).
Sanding bottom part to the wiggly line
I started cleaning up the two cut faces using the belt sander. Since both pieces were wider than the belt, I kept them moving from side to side to ensure even wood removal across the full face.
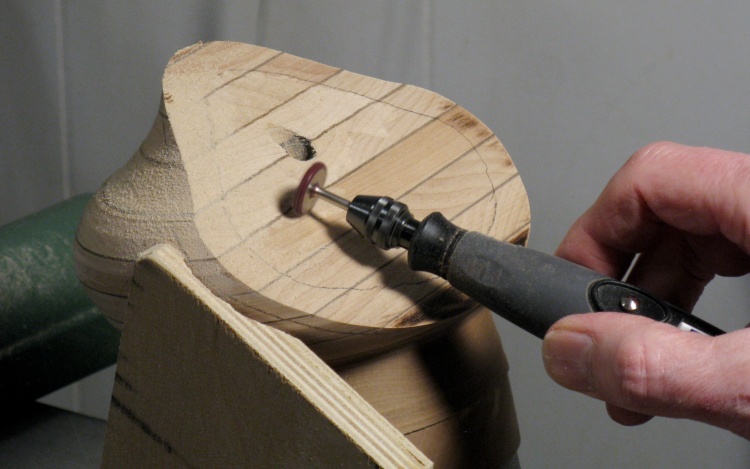
Using Dremel to recess center section
I needed to not only clean up the faces, but to sand them down to the marked lines. Sanding a large area is pretty slow, so I eased the center sections to help things along.
This small carbide cutter was used to grind off a bit of wood in the middle areas of both faces.
This small carbide cutter was used to grind off a bit of wood in the middle areas of both faces.
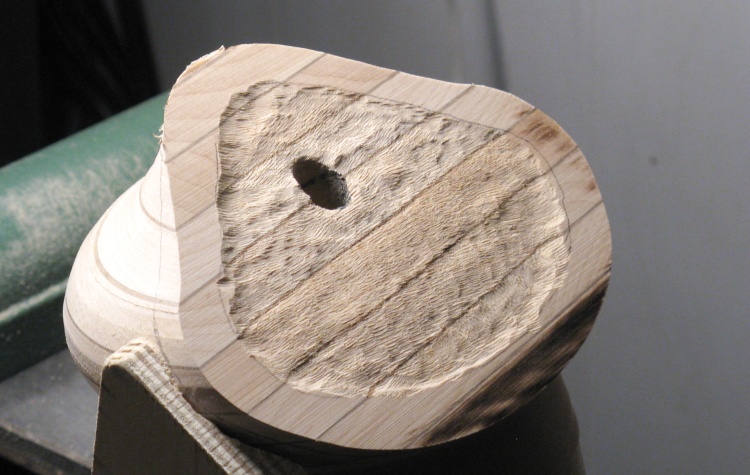
Recessed center section
This is the look of the bottom piece after the center was eased. The face (i.e the important bits around the edge) still needs some sanding, which will also get rid of the burned section at the bottom.
Wedge Fabrication
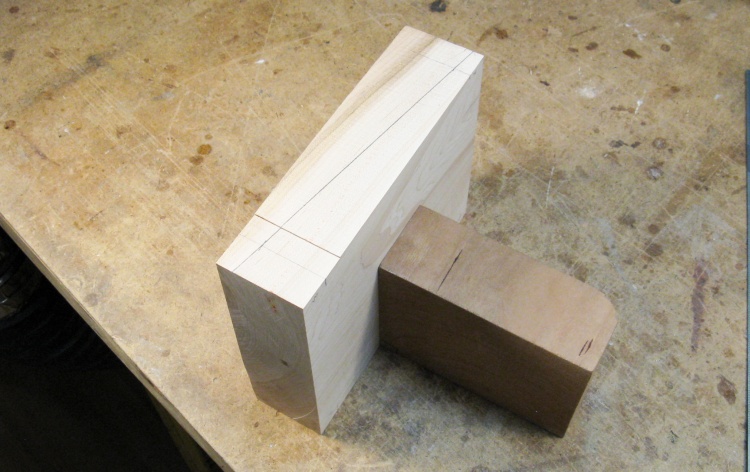
Cutting the blank for the wedge
With the vessel now having a big wedge-shaped gap, it was time to make something to fill the hole.
I grabbed some "eight quarters" maple and cut off a generous chunk on the radial arm saw.
I grabbed some "eight quarters" maple and cut off a generous chunk on the radial arm saw.
Wedge marked and handle taped on
The bottom and one edge were jointed to get them flat and at right angles. This would be cut into a wedge freehand on the bandsaw so I added a square piece of wood that would hold it vertical and also act as a handle.
The handle was held on with window-film tape and was plenty strong - I had trouble getting the handle off when I was done.
The handle was held on with window-film tape and was plenty strong - I had trouble getting the handle off when I was done.
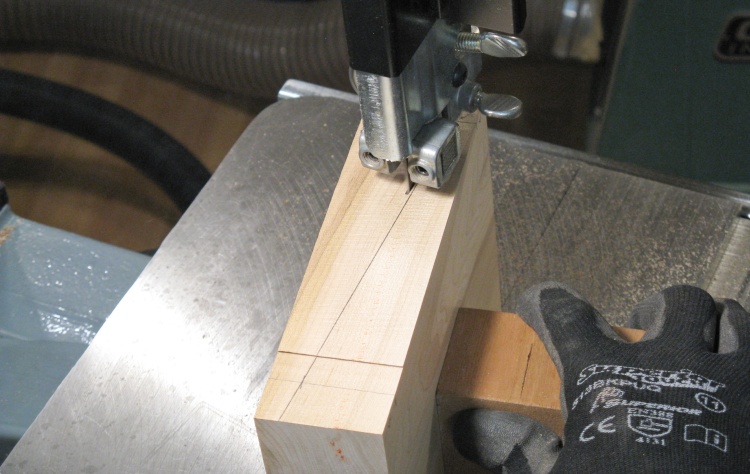
Cutting along the line
And then like the cuts on the vessel proper, it was sawn just a bit away from the line.
Evening out the imperfect cut on the belt sander
And also like the vessel, the face was evened up and sanded to the marked line on the belt sander.
On the back of the sander is a duct for the 600 CFM dust collection system removing sawdust from the bottom and back of the belt, so the sanding is mostly dust-free despite a fair amount of wood being removed.
On the back of the sander is a duct for the 600 CFM dust collection system removing sawdust from the bottom and back of the belt, so the sanding is mostly dust-free despite a fair amount of wood being removed.
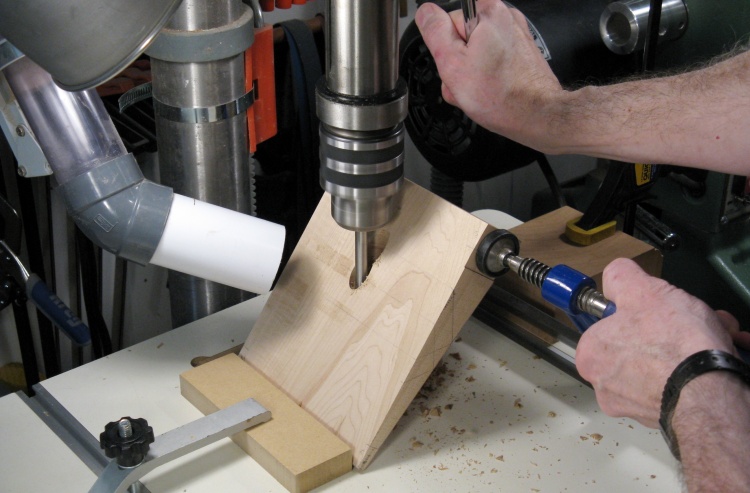
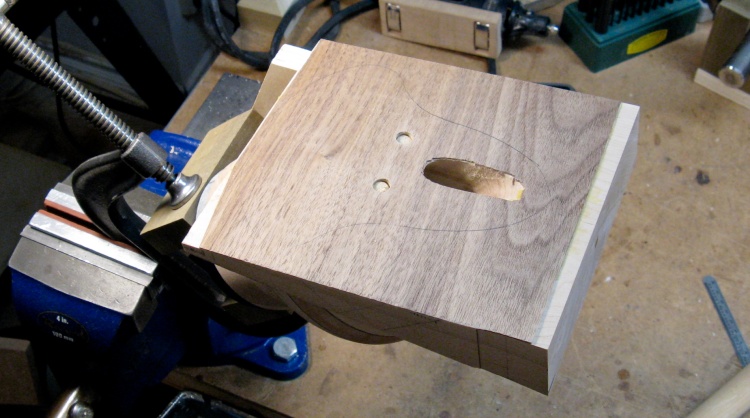
Drilling a hole for the guide rod
After the handle was removed, the location of the center hole for the guide rod was marked and the drilled out. I wanted some adjustability so I made a slot rather than just a round hole.
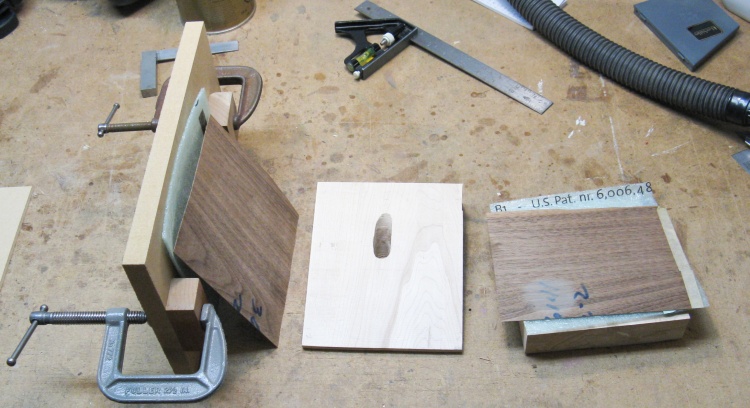
Wedge with its veneer ready to assemble
Next up was to add the veneer to the wedge. I made a temporary gluing jig out of some scraps including the cut-off part of the wedge.
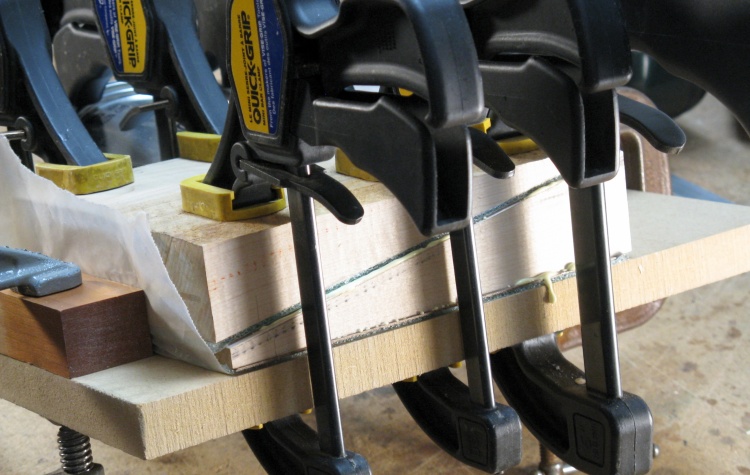
Sandwich of: opposite wedge-foam-veneer-glue-wedge-glue-veneer-foam-flat plate
The photo caption pretty much says it all.
So who decided to screw with the "from-to" thing? It used to be: "pedestrian accidents increased from 3 in 2017 to 5 in 2018". But for the last few years, it's the wrong way around; "pedestrian accidents increased to 5 in 2018 from 3 in 2017". That's like saying "the river flows to East from West": Wrong wrong wrong. And it seems to be everywhere in any kind of professional writing like newspapers, journals etc. Maybe there was an international agreement signed by all the english speaking world to mess with our minds. The world is obviously going to pot...
So who decided to screw with the "from-to" thing? It used to be: "pedestrian accidents increased from 3 in 2017 to 5 in 2018". But for the last few years, it's the wrong way around; "pedestrian accidents increased to 5 in 2018 from 3 in 2017". That's like saying "the river flows to East from West": Wrong wrong wrong. And it seems to be everywhere in any kind of professional writing like newspapers, journals etc. Maybe there was an international agreement signed by all the english speaking world to mess with our minds. The world is obviously going to pot...
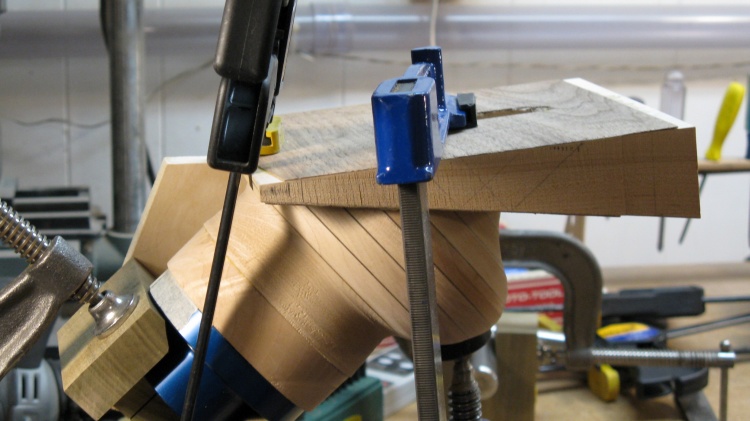
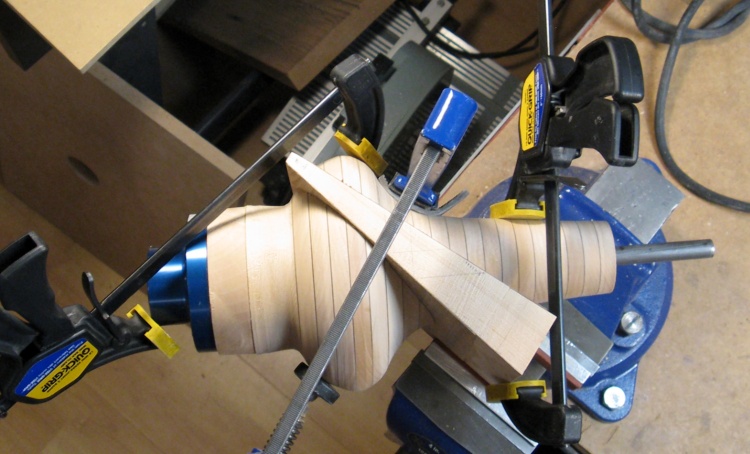
Checking for top/bottom alignment with wedge set in place
Then it was time to look at putting it all together.
Once again the laser was deployed, this time using it to align matching layers in the top and bottom pieces while just sitting on the bench. I fine-tuned the wedge position and did some touch-up sanding on the top until things aligned correctly.
Once again the laser was deployed, this time using it to align matching layers in the top and bottom pieces while just sitting on the bench. I fine-tuned the wedge position and did some touch-up sanding on the top until things aligned correctly.
Wedge with two guide dowels on bottom piece
I started by adding the wedge to the bottom piece. Positioning was critical so to make sure it would stay in place when glued, I drilled a couple 1/4" holes and added dowels to lock it in place.
Those will disappear along with the rest of the interior wood when the vessel is hollowed.
Those will disappear along with the rest of the interior wood when the vessel is hollowed.
Gluing wedge onto bottom piece
Then it was: glue and clamp.
Gluing top piece on
To add the top, the metal guide rod went in to align the centerlines of the two pieces. With a layer of glue, the top was set in place and a few clamps applied. The slope of the wedge made the rotation of the top automatically align with the bottom.
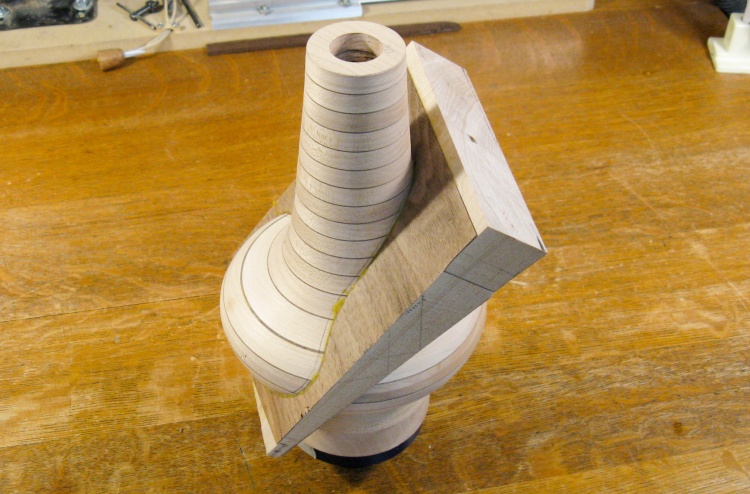
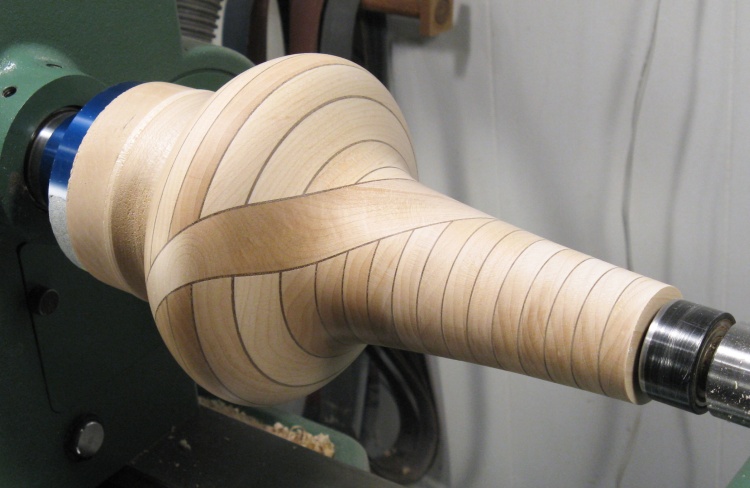
Wedge thoroughly embedded
And here is the slightly-odd looking result of the assembly.
Turning
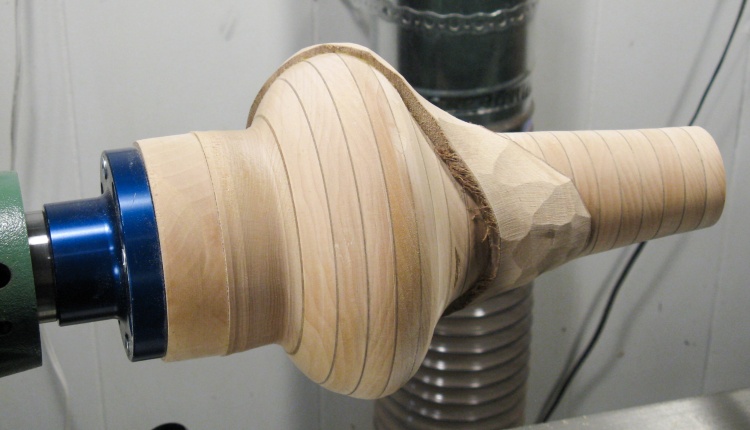
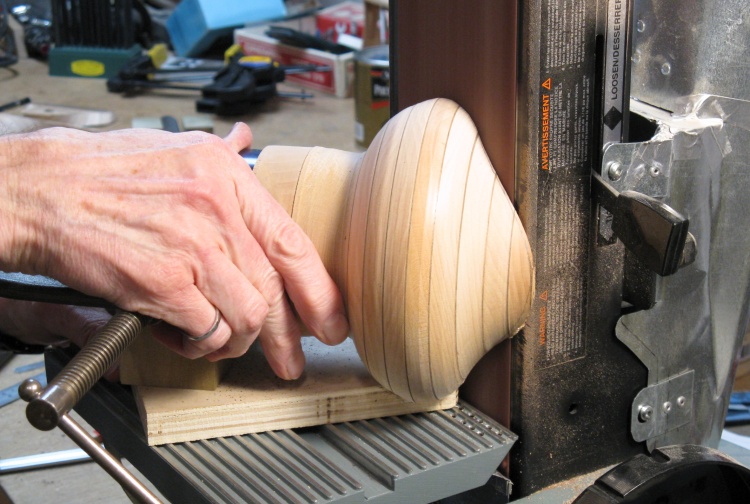
Reduced wedge ready to be smoothed off
I didn't want to try to put the horribly unbalanced thing directly on the lathe, so the bulk of the wedge protrusions were trimmed off with bandsaw and belt sander, leaving this shape, vaguely reminiscent of a fungus on a tree trunk.
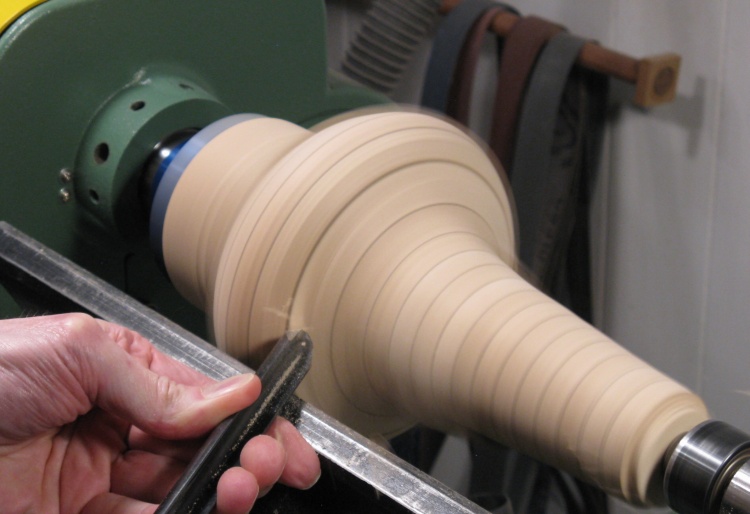
Bowl gouge cutting away protruding wedge bits
I used the bowl gouge to trim off the protruding bits. It was kept very sharp and I took only light cuts to try to prevent tear-out of end-grain portions of the wedge.
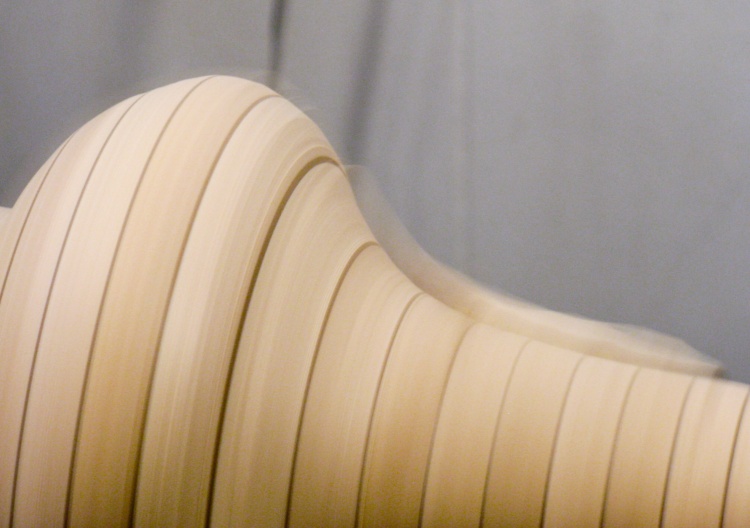
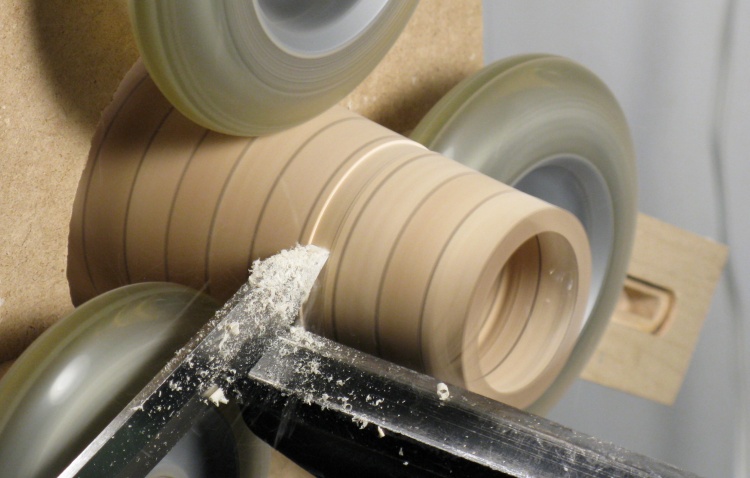
Ghostly outline shows progress of bowl gouge down curve
With only small parts of the wood protruding on the spinning vessel, it created sort of a ghost image when seen from the side. This is sometimes handy in that the profile of the ghost shows the cutting progress.
In this case, I'm cutting down the slope and the you can see where the cutter is lowering the height of the wood.
In this case, I'm cutting down the slope and the you can see where the cutter is lowering the height of the wood.
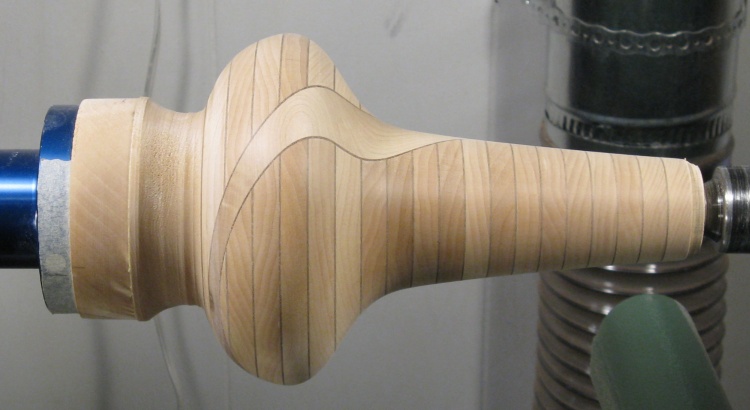
Flushness achieved
This shows the vessel with the wedge cut flush with the rest of the wood. The top and bottom pieces were of course not quite perfectly aligned, so the top has been recut to recenter everything.
Imperfect end grain
One characteristic of a vessel made with stacked slices of wood is that as you go around the vessel the wood grain changes from side to end grain. Side grain usually cuts neatly but end grain often has tear-out where little chunks can break off since the ends of the wood fibers are being cut and at some angles they have little side support.
This vessel worked out pretty well, but there are visible patches like the lighter-toned section along the top edge that are imperfectly cut end grain. These are rough to the touch and usually need to be sanded out so they don't create a visible patch of different wood texture.
This vessel worked out pretty well, but there are visible patches like the lighter-toned section along the top edge that are imperfectly cut end grain. These are rough to the touch and usually need to be sanded out so they don't create a visible patch of different wood texture.
A shinier post-sanding picture
It usually takes a lot of sanding before the last end-grain patch disappears and by then most other scratches are sanded out.
I started with 120 grit and when the end-grain patches were no longer visible, went through 150, 180, 220 and 320 grit to produce the finish seen in this shot.
I started with 120 grit and when the end-grain patches were no longer visible, went through 150, 180, 220 and 320 grit to produce the finish seen in this shot.
Hollowing
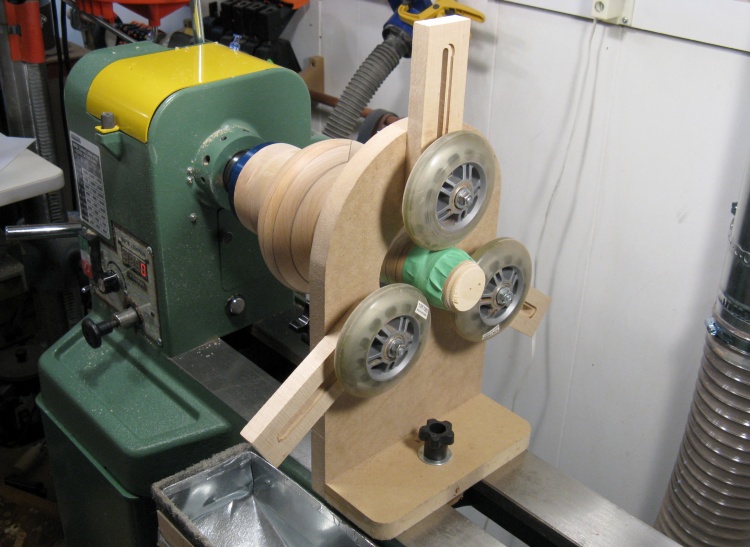
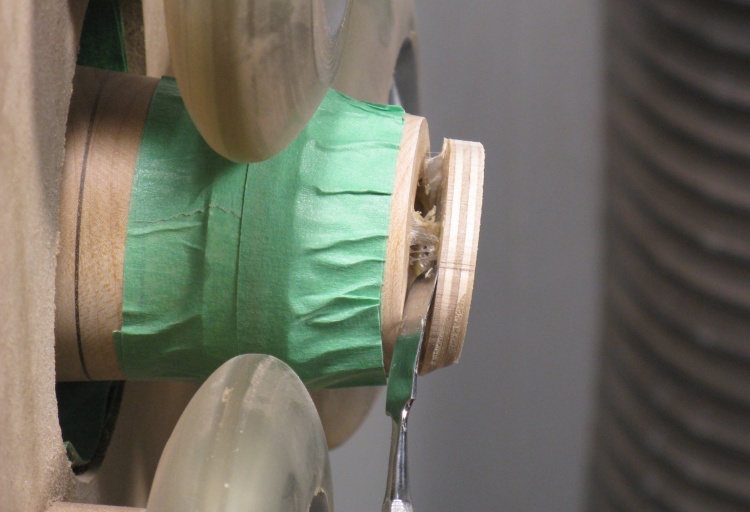
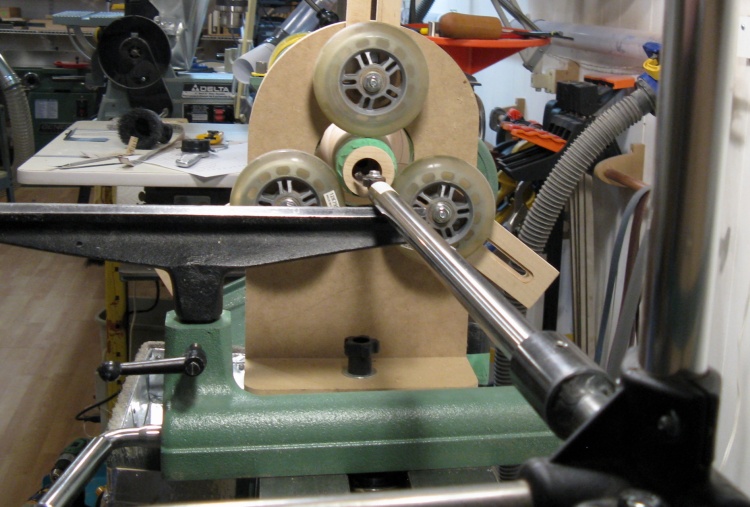
Steady rest in position
To set up for hollowing I moved away the tailstock and installed the steady rest. I used a small plastic ring (cut from a central-vac pipe) as a shield for the wood, taped on with liberal amounts of green masking tape.
Prying off the temporary cap
On the end covering the hole was still the little piece of 1/4" plwoood that had been stuck on with a latex adhesive I use as a temporary glue. This shot shows it being pried off with a little dental spatula so the hollowing can start. Any glue left on the surface can just be rubbed off with a finger.
Hollowing-tool's-eye view
The captured hollowing jig was set up and this is a shot along its main shaft, holding the tiny cutter right next to the hole in the vessel.

Oops!
Hollowing went a bit slowly due to the wide section of the vessel, but that was eventually done, let's say, well enough. I didn't worry much about consistent wall thickness since the inside of the vessel couldn't be seen without an endoscope.
Unfortunately, I had a couple problems with tool control causing some cracks near the mouth of the vessel, and then the cutting head spun and trashed the interior and the first couple layers. This shot shows the aftermath.
The tool has a set screw holding the cutter shaft on a flat section, but the flat section was not in the correct spot. Not sure why this was never a problem before. At any rate, a minute with a file and the problem was corrected. Which just left the vessel to deal with.
Fixing

A piece of fresh new wood
The only real way to solve the problem was to replace layers. I wanted to fix the inside gouges as well so I decided to replace the top five layers.
This shot shows a new piece of maple, already planed to the appropriate thickness with the five layer circles marked.
This shot shows a new piece of maple, already planed to the appropriate thickness with the five layer circles marked.
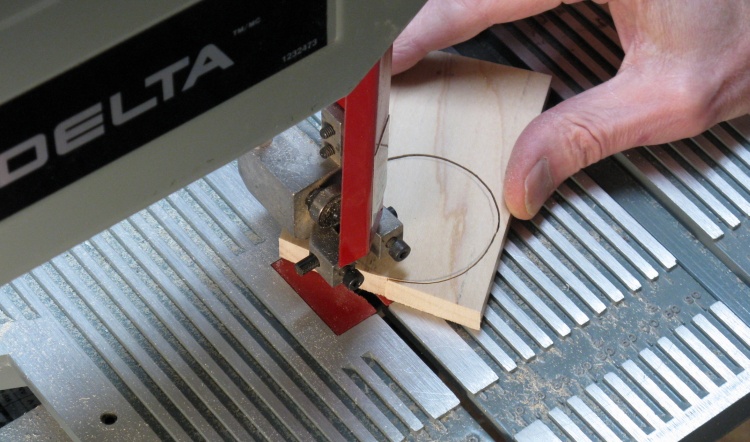
Cutting out the new layers
The circles were cut out on a small bandsaw.

New parts ready to stack 'n squish
And like before, the walnut veneer was marked and cut with a ruler and knife into octagons. Those and the maple discs were drilled with 1/2" holes.
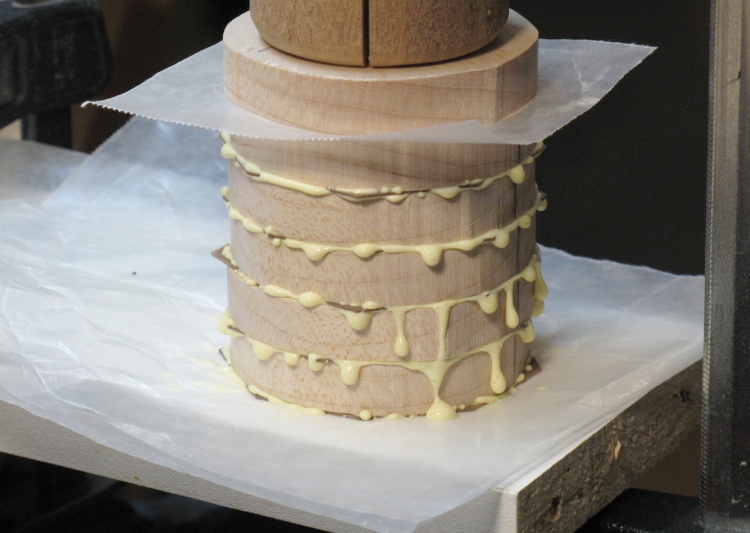
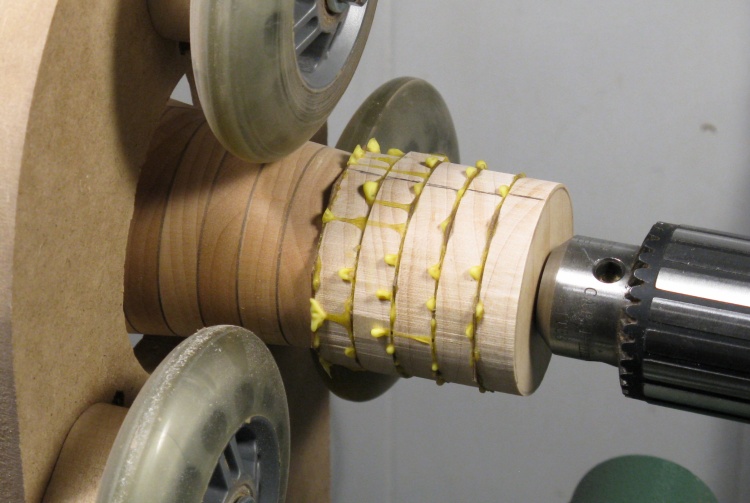
Stack 'n squish!
Then they were all stacked with a guide rod in the center, glued and clamped to make the new end for the vessel.
Amputating of the injured layers
The end layers were cut off (only four here since the first already crumbled away).
The stump before cleanup
This is the shortened vessel. I removed the last layer of walnut as well before adding the new piece.
Grafting on the new layers
The new piece was clamped on by using the tailstock to push it against the vessel.
A little bit of turning will work wonders on the profile
Then a bit more work with the bowl gouge and the outside profile was restored.
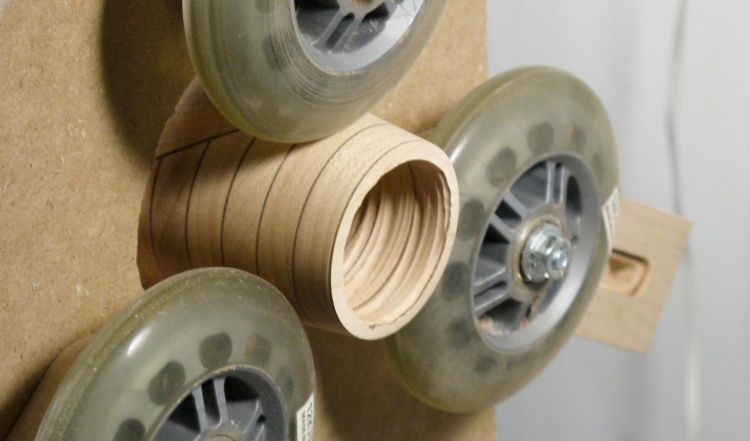
And the inside, done right this time
Next was to hollow the new section which was done with care to prevent a reoccurrence of my earlier issues.

The inside-sanding jig papered up
The interior was sanded, primarily in the neck where the wood was visible. I used a small curved sanding head on this rather long turning tool.
All except the bottom now done
This shows the completed top section. Now it needs to be flipped around to address the bottom shaping.
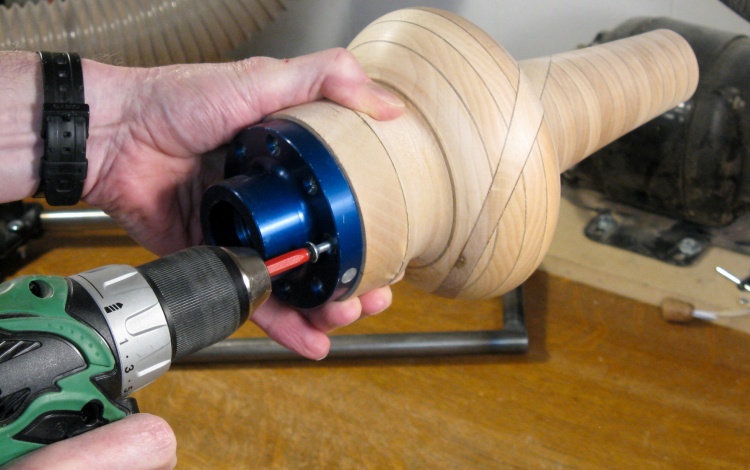
Pulling off the faceplate
The faceplate was pulled off in preparation for removing the extra bottom wood.
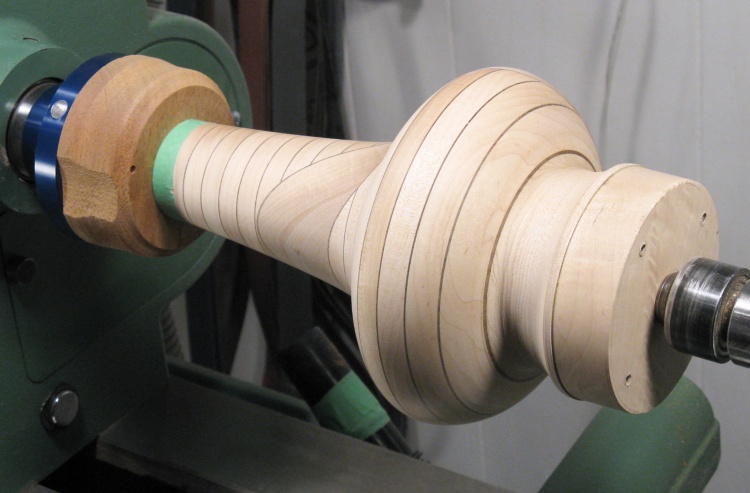
Mounted in jam chuck to work on bottom
I made a small jam chuck to hold the top, which simply consists of a piece of wood with a hole into which the top fits tightly.
I actually failed in the "tightly" part; the procedure is to expand the hole diameter until it is just right but I expanded it a bit too much on the last go and then it was too large. But no big deal, that's what they make masking tape for.
So the vessel was mounted on the lathe as shown, making the bottom end easier to access for turning.
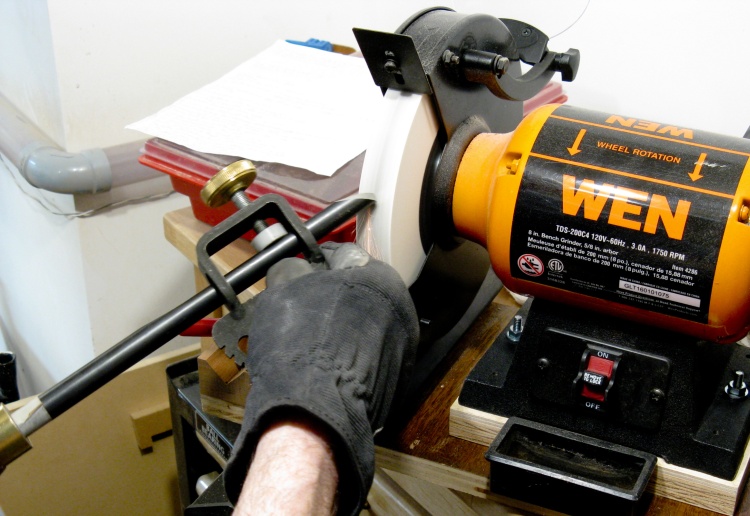
Sharpening the bowl goug
Turning tools cut a large volume of wood so they need to be sharpened frequently. Here I'm sharpening my favorite bowl gouge on the abrasive wheel, using a jig that controls the grinding angle.
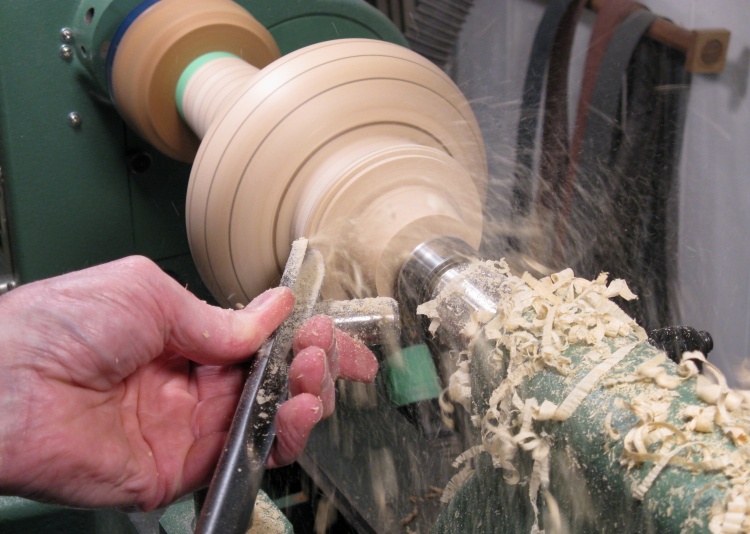
Getting rid of excess wood on bottom
Here the large-diameter sections on the bottom are being removed. After that, the bottom foot will be cut, the underside profile blended in, and then small scrapers will be used to shape the section right on the bottom.
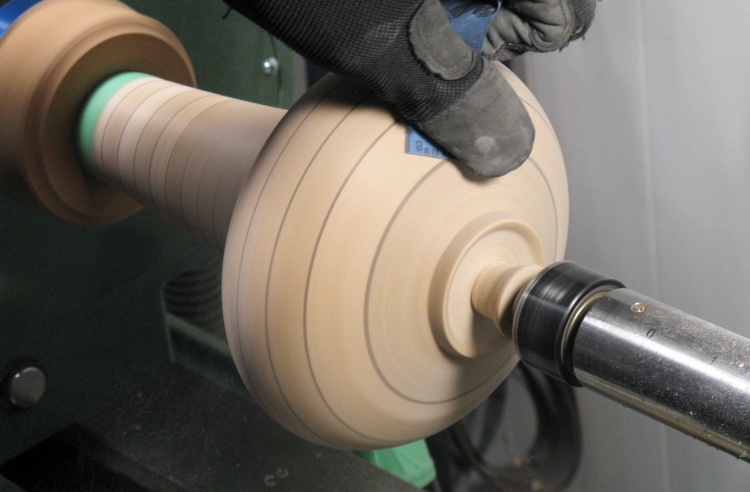
A bit of final sanding for the body
The bottom shaping is done and here I'm doing some final sanding on areas that had been altered.
The next step after removing from the lathe will be to cut off the center wood section, and then grind and sand that area smooth to complete the vessel.
The next step after removing from the lathe will be to cut off the center wood section, and then grind and sand that area smooth to complete the vessel.
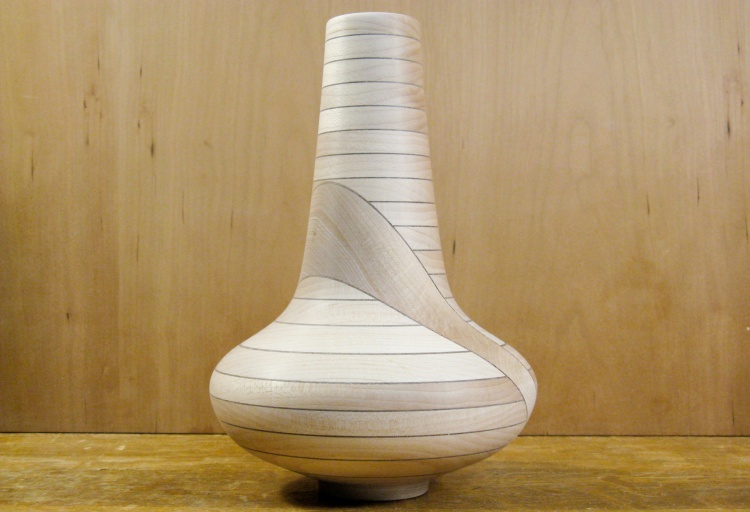
The "woodworking done" stage
That was it for the woodworking. This photo shows the finished vessel.
Varnished and with air flow for inside drying
Varnishing was a bit of a challenge. Instead of trying to "paint" the varnish on the largely invisible interior, I poured enough varnish in, slooshed it around, poured it out, then stuffed in a cloth to sop up any excess. The outside coat was applied with a rather more conventional brush-based approach.
Since the finish on my last vessel (much more open than this one) had some trouble drying inside, I rigged up a little hose-based blower to get some air flow inside to help things along a bit.
Since the finish on my last vessel (much more open than this one) had some trouble drying inside, I rigged up a little hose-based blower to get some air flow inside to help things along a bit.
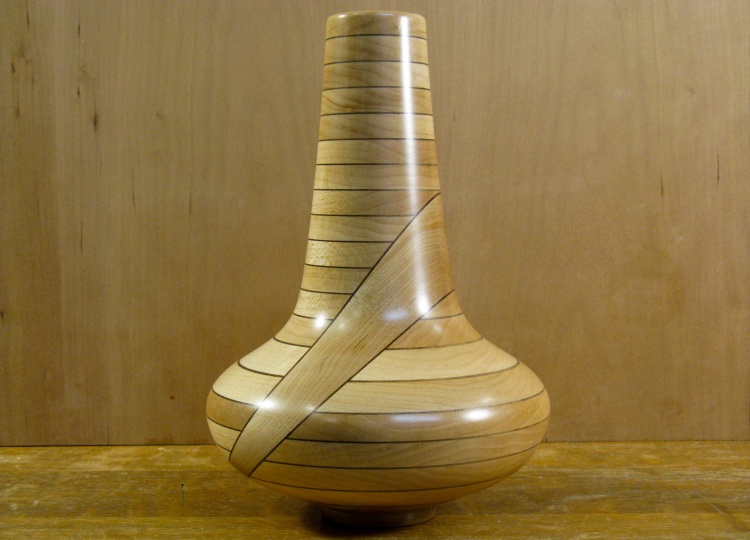
Done
A shot of the completed wedge vessel.
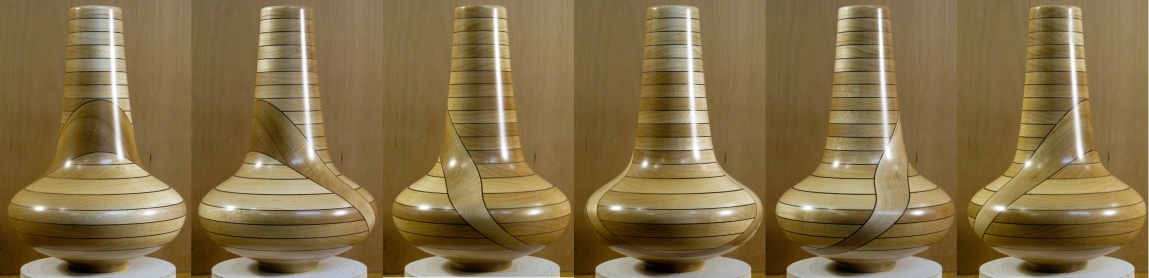
The six-stop orbit photo


