The original rose design was a bit abstract due to being derived from a perspective line drawing. This one needed to be a bit more realistic so the diameter was reduced by the simple expedient of leaving off a couple of the outer layers of petals and then it received a deeper and more-botanically-plausible bottom.
The stem was largely copied from the example photo provided, albeit with slightly more-realistic-looking thorns. The stem and blossom mounted into a simple round base.
The stem was largely copied from the example photo provided, albeit with slightly more-realistic-looking thorns. The stem and blossom mounted into a simple round base.
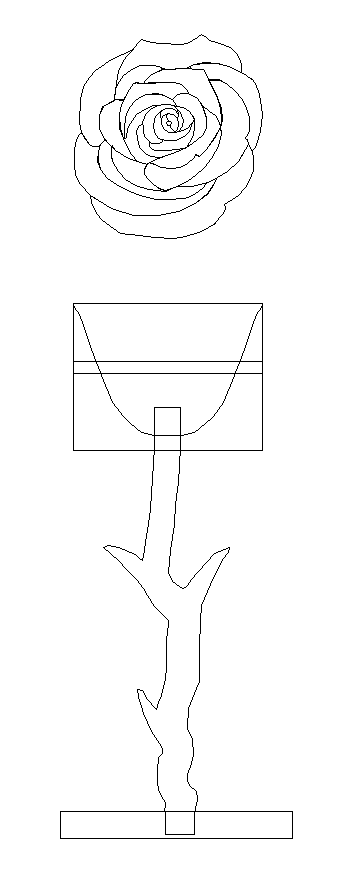
The basic shape
Blossom
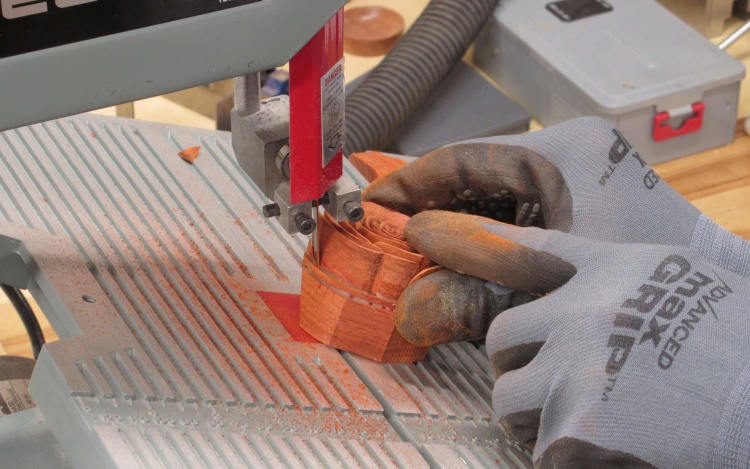
I started off with the blossom. After selecting a suitable piece of Padauk and cutting off a thin slice to eventually be glued back onto the bottom, a pattern was stuck to the top, a starting hole drilled and cutting began.
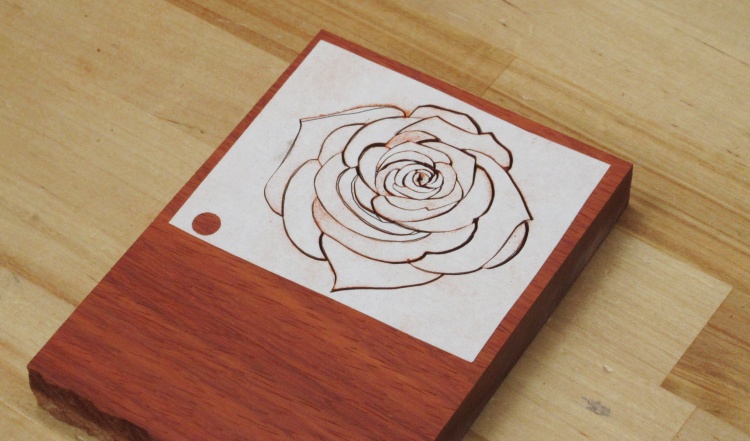
Already cut out from a piece of Padauk
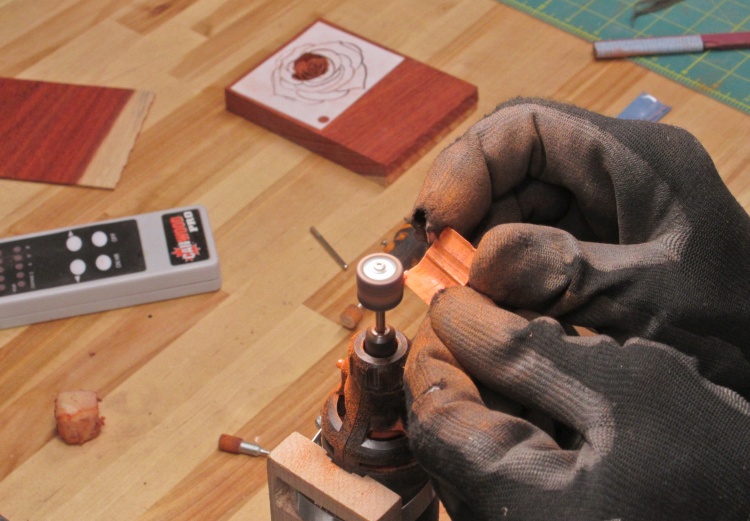
Cutting was pretty straightforward, especially since I was now accustomed to the painfully slow cutting rate of the tiny blade in thick hardwood (maybe 30 seconds to cut an inch).
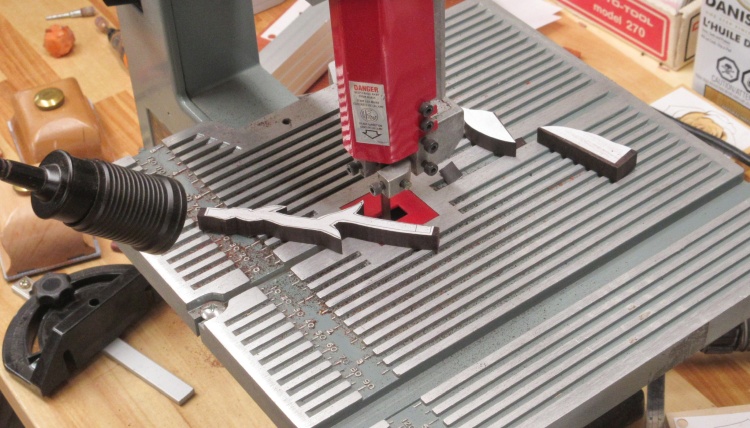
The petals were cut out starting at the center and working outwards. The cut pieces were set into the proper arrangement on a pattern to keep them organized. When done, I returned the pieces to the resulting hole in the blank to keep them together - which is the point this photo was taken.
The petals were cut out starting at the center and working outwards. The cut pieces were set into the proper arrangement on a pattern to keep them organized. When done, I returned the pieces to the resulting hole in the blank to keep them together - which is the point this photo was taken.
Shaping one of the petals
Using rotary tools equipped with sanding drums, the petals were shaped to have curved corners and rounded-over top surfaces.
In the background can be blurrily seen the partially-shaped rose and the thin slice to eventually be glued back onto the bottom.
In the background can be blurrily seen the partially-shaped rose and the thin slice to eventually be glued back onto the bottom.
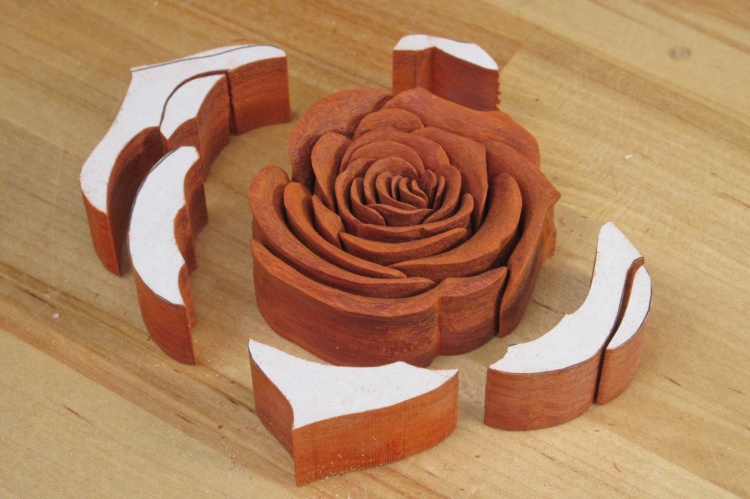
This inner section is enough for the rose
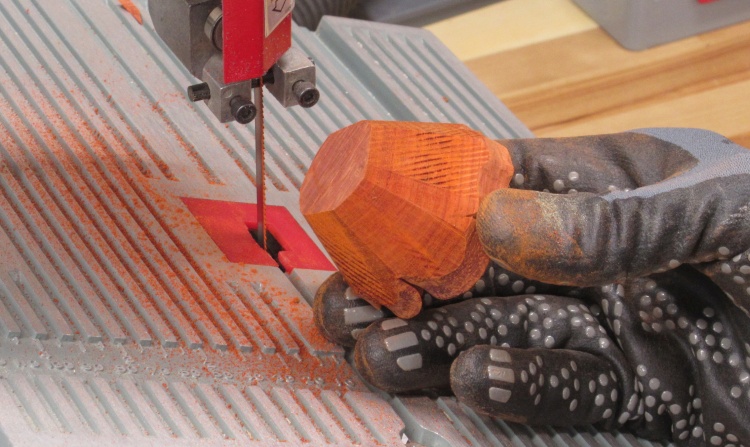
At this point I thought the blossom diameter was about right so I didn't bother to shape the remaining outer petals (well, at least until later when I needed them to check finishes).
Applying glue to the bottom of a petal
With everything shaped and sanded, the blossom was ready to go back together.
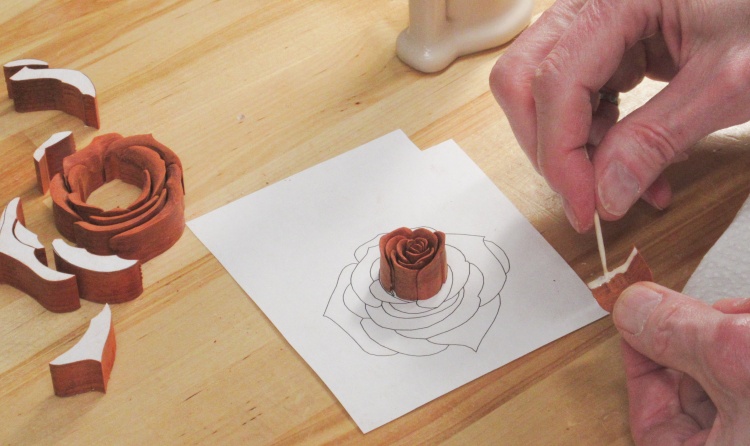
Once again I started at the center and worked my way outwards. A bit of glue went onto the bottom of each piece (low and thin enough so it wouldn't goosh up and be visible), and then it was set into the proper place using a paper pattern for reference.
Once again I started at the center and worked my way outwards. A bit of glue went onto the bottom of each piece (low and thin enough so it wouldn't goosh up and be visible), and then it was set into the proper place using a paper pattern for reference.
Positioning a glued petal guided by the pattern
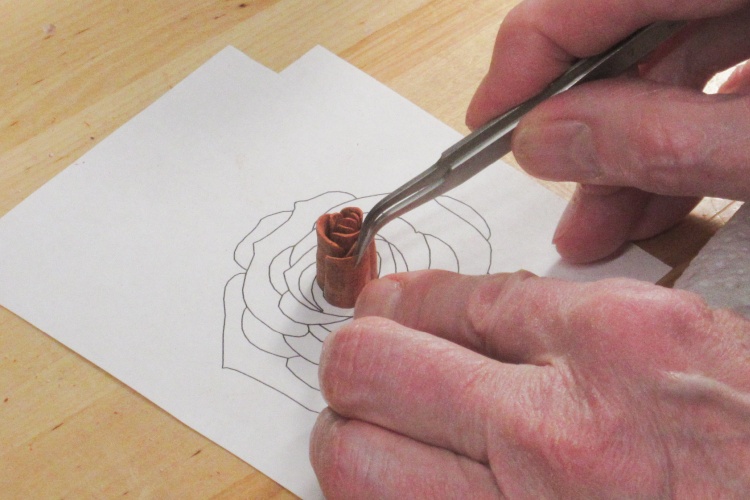
I mostly used tweezers to position the pieces.
All the petals glued in
That's all 25 petals together.
Adding on a thicker bottom section
When the glue was dry I sanded the bottom to even it out and remove any paper remnants.
I then glued on the thin section of wood I had reserved. This turned out to be kind of redundant since I also needed to glue on a thicker piece to form the lower shape of the blossom.
I then glued on the thin section of wood I had reserved. This turned out to be kind of redundant since I also needed to glue on a thicker piece to form the lower shape of the blossom.
Trimming into a more blossomy shape
That bottom section needed to be fairly heavily tapered so I used the small band saw to remove most of the excess wood.
Ready for some shaping
That's closer to what is going to be needed. It's still a bit deep so the bottom 1/4" or so was cut off before further shaping.
Shaping the bottom of the blossom
The spindle sander was used to round and taper the bottom section. That was followed by some hand sanding to remove sanding marks with lots of Cayenne-Pepper-like sawdust.
Stem
With the blossom largely complete, I turned my attention to the stem. I wanted it dark to contrast with the blossom and eventually decided on African Blackwood which is the king of dark woods.
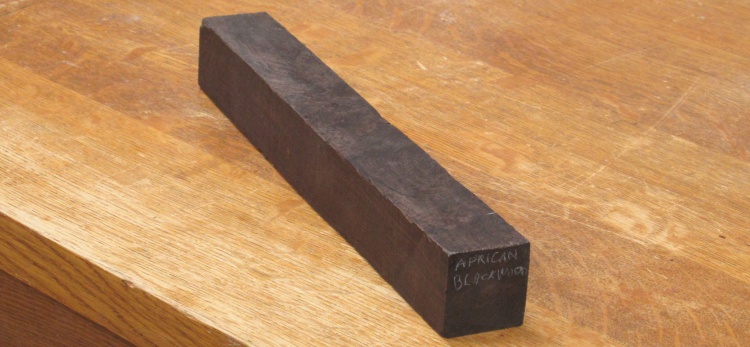
A foot-long piece of African Blackwood
The Dalbergia melanoxylon tree (AKA Mpingo) which is the source of African Blackwood is only a medium-sized tree and grows very slowly, usually into twisted and gnarled shapes. The resulting timber pieces are of limited sizes with this foot-long piece being pretty typical of what is commercially available.
It is also reputed to be one of the most expensive woods and in comparison to say $20/board-foot for something like Walnut, my piece was about $150/board-foot. Of course that sounds rather more dramatic than saying the piece cost me $20.
It is also reputed to be one of the most expensive woods and in comparison to say $20/board-foot for something like Walnut, my piece was about $150/board-foot. Of course that sounds rather more dramatic than saying the piece cost me $20.
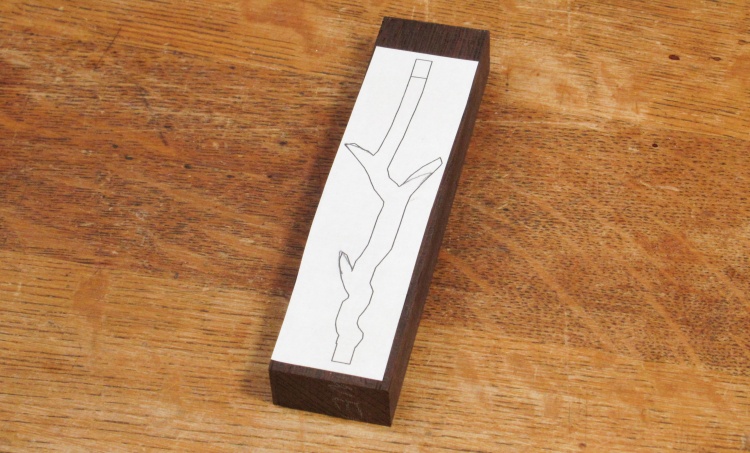
A stem-sized piece with the outline stuck on
One corner of that piece was enough for the stem and in this shot it has been cut off and the pattern adhered through the aid of a glue stick.
Some pencil marks revise the original plan to something more-realistic.
Some pencil marks revise the original plan to something more-realistic.
Trimmed to the outline
The small band saw was used to cut out the stem outline.
Minor Side Project - Cord Clip
I need one of these
Drilling a spare puck piece
The finely-crafted clip
Clip in action!
I seemed to be using my small band saw more these days. It normally sits on the floor and I just need to lift it onto the bench and unfurl the cord to get it ready. But then when I'm done and re-furling the cord, there's nothing to keep it from unfurling by itself so I decided I needed an anti-unfurling cord clip. Checking around, I was a bit surprised that I couldn't see any commercially available clips so I thought I should just make one.
I need one of these
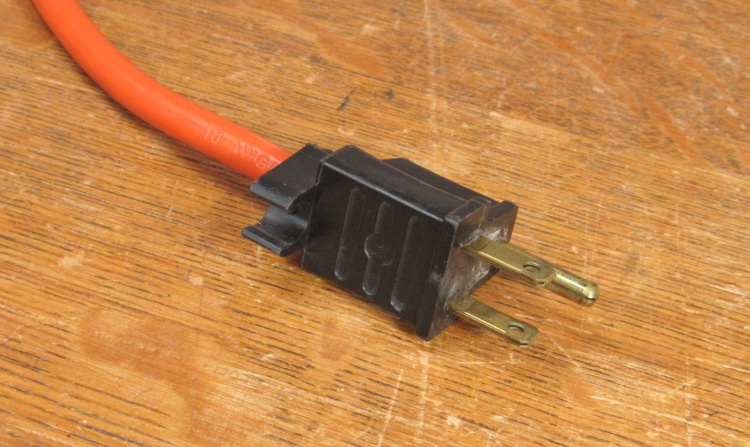
My spindle sander has an integral clip on the plug so wrapping and securing the cord is really easy.
It's not too practical to replace the plug or cord on the band saw but a snap-on clip should be easy enough to make.
It's not too practical to replace the plug or cord on the band saw but a snap-on clip should be easy enough to make.
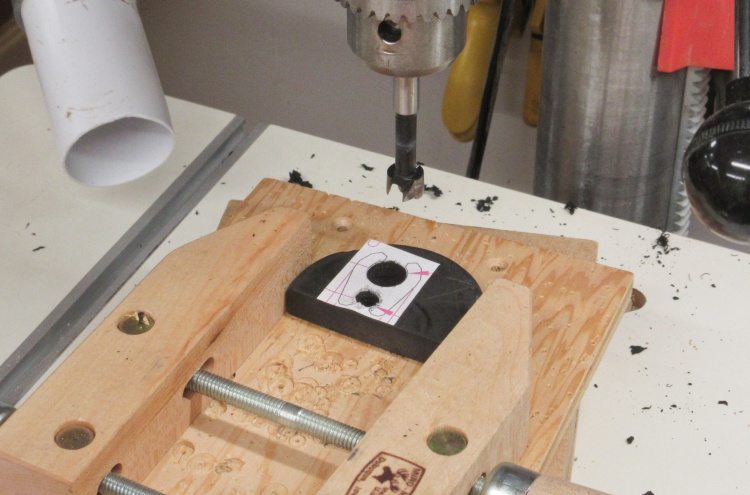
Drilling a spare puck piece
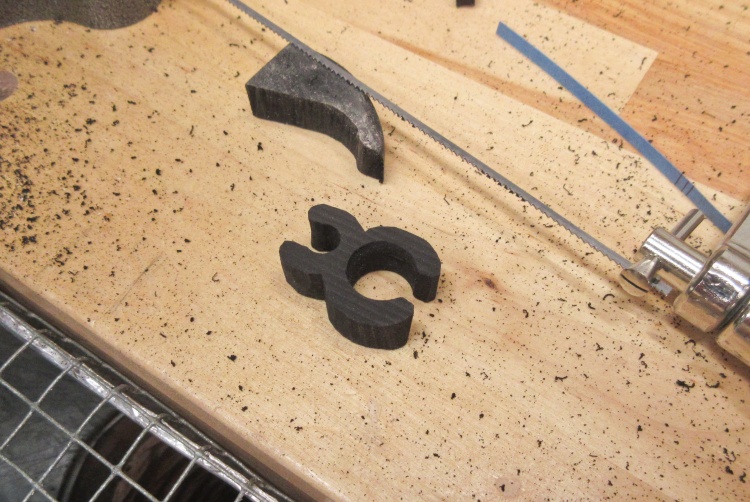
I wanted a flexible material for the clip and settled on using an old hockey puck. I happened to have a slice left over from the last time I needed some firm rubber, although I have no clue to what that might have been.
I stuck on a little pattern and then drilled a couple holes to start the shaping.
I stuck on a little pattern and then drilled a couple holes to start the shaping.
The finely-crafted clip
The rest of it was cut out with a coping saw and trimmed with a knife. It's rather crude-looking but it should do the trick.
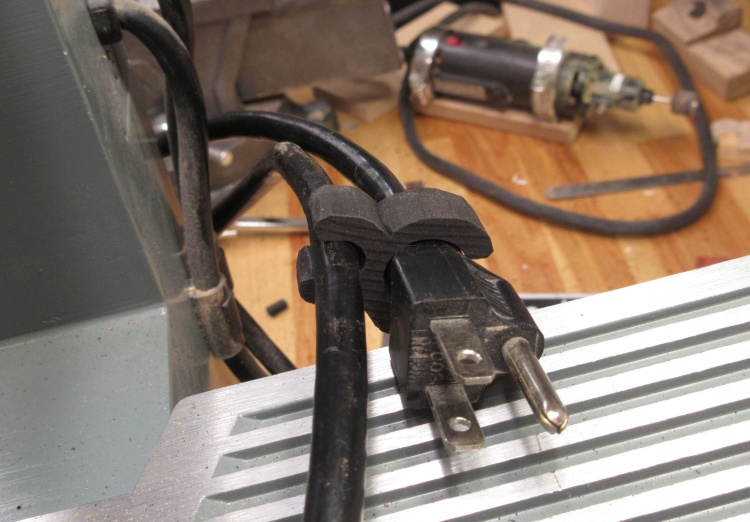
Clip in action!
And sure enough. The large end clipped over the shaft of the plug and the small end was left free to clip onto the cord. Success!
Starting on some stem shaping
Meanwhile, back at the rose stem...
I started shaping the stem on the spindle sander. I had cut it out thick enough to allow for a slightly curved profile to be cut so it wasn't ruler-straight in the one dimension. Here I'm sanding towards a pencilled-on profile.
I started shaping the stem on the spindle sander. I had cut it out thick enough to allow for a slightly curved profile to be cut so it wasn't ruler-straight in the one dimension. Here I'm sanding towards a pencilled-on profile.
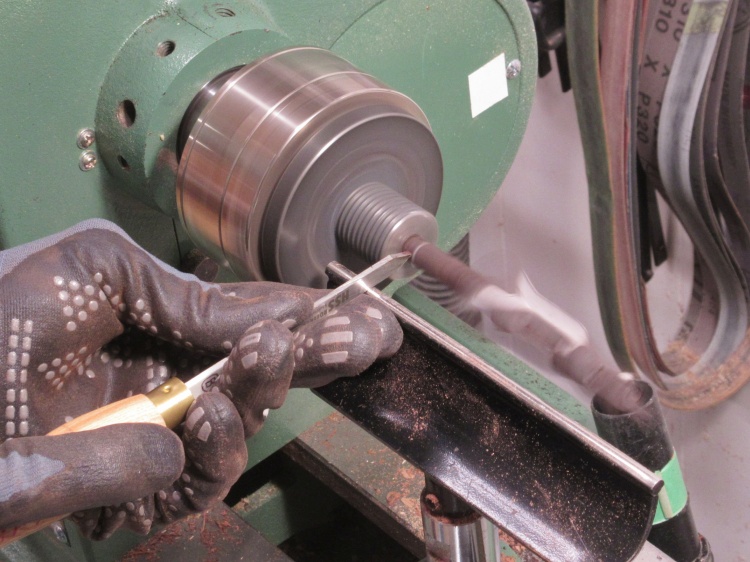
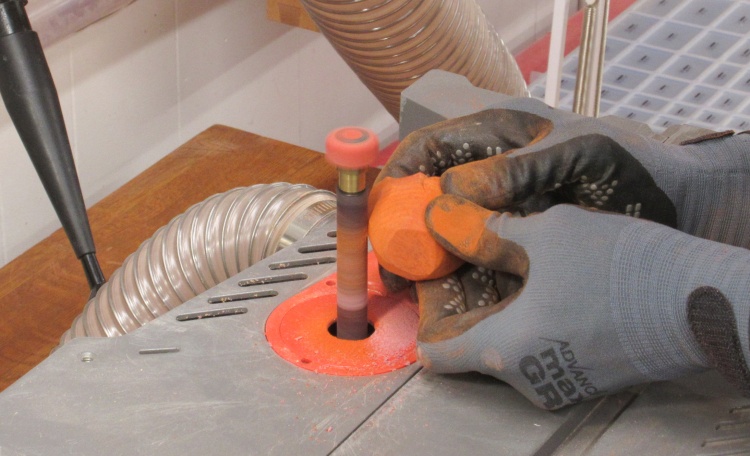
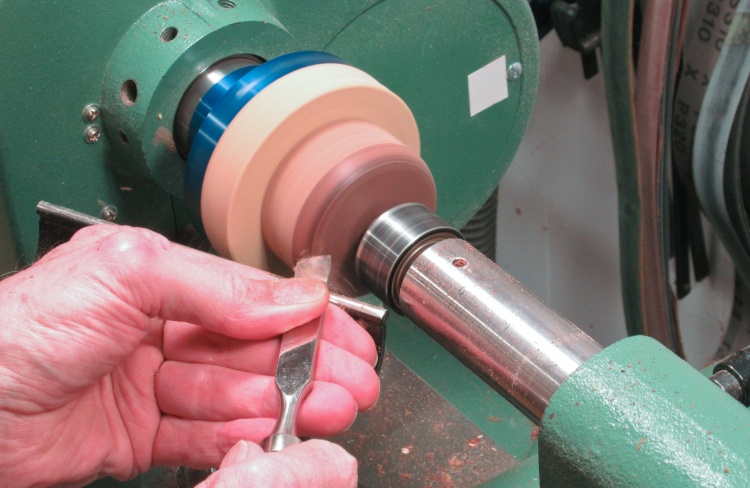
The lathe was used to round the ends
The blossom and base will have holes to receive the ends of the stem, so it would help the fit to have those ends nicely rounded.
I used the lathe to do the rounding, just holding the very end of the stem - it's super-hard wood so it was clamped by the jaws securely. Then I turned the end to something close to an Imperial drill-bit size. The still-square ends held by the lathe jaws were subsequently trimmed manually to be flush with the round parts.
I used the lathe to do the rounding, just holding the very end of the stem - it's super-hard wood so it was clamped by the jaws securely. Then I turned the end to something close to an Imperial drill-bit size. The still-square ends held by the lathe jaws were subsequently trimmed manually to be flush with the round parts.
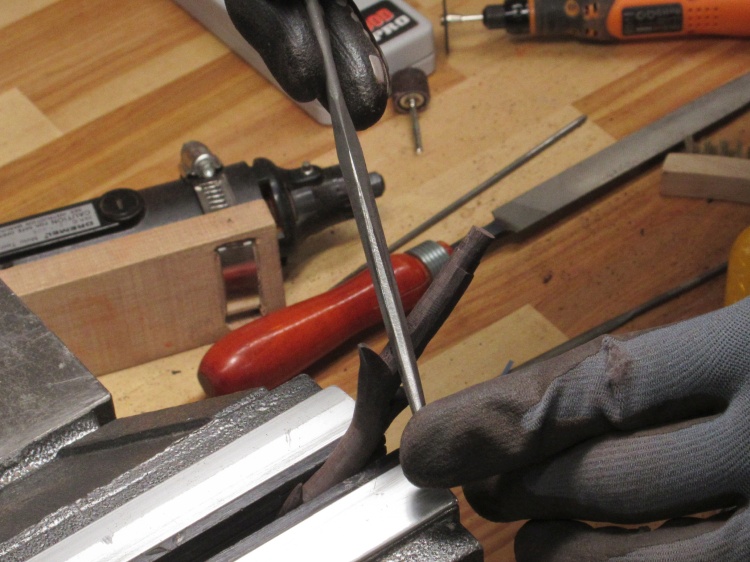
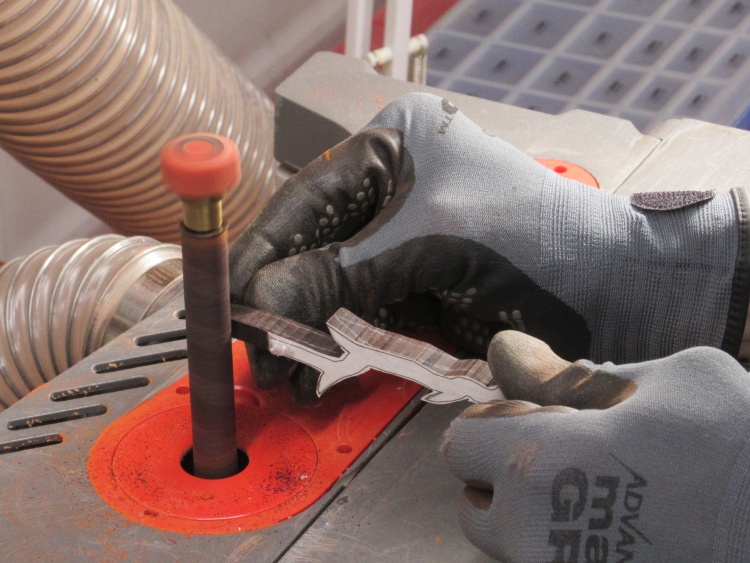
Rounding the stem using files
Shaping ensued. A variety of files and sandpaper strips were used to round and shape the stem.
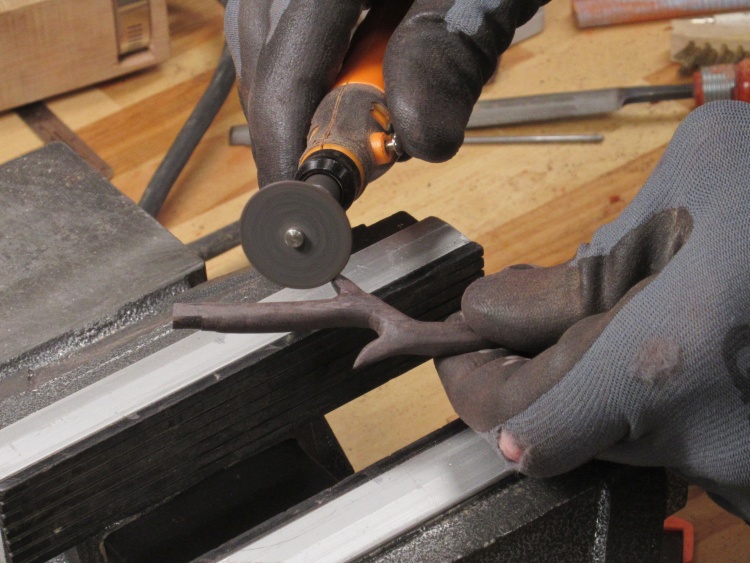
Some final shaping
A final bit of thorn shaping.
Base
The last outstanding piece was the base. I decided on simplicity - round in shape with rounded corners - and chose Rosewood.
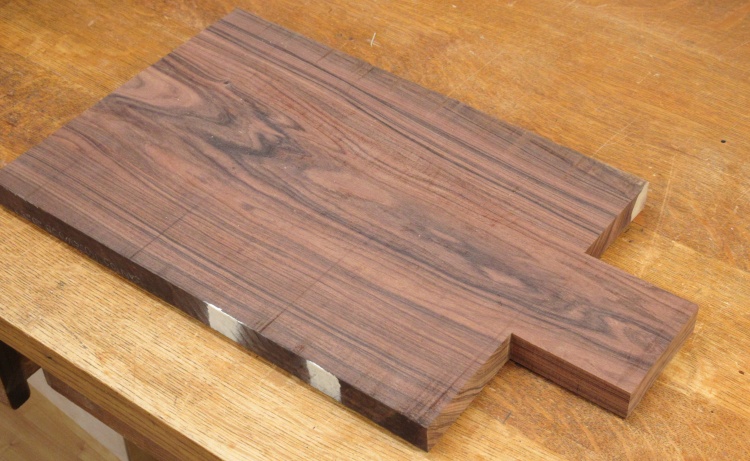
A nice piece of Santos Rosewood
I had some smaller pieces of Rosewood from previous projects (from like, 30 years ago) but they turned out to be a bit undersized, so I chose this more modern piece with a convenient "use me" bit sticking out.
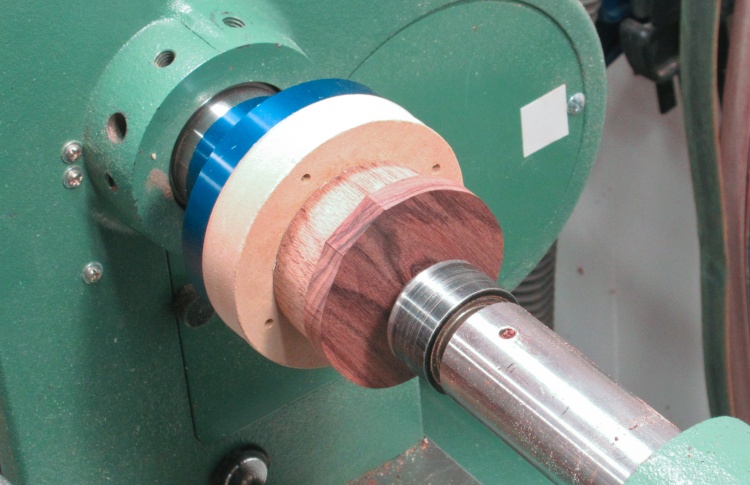
Roughly cut out and ready for turning
I cut out a suitable thickness, roughly rounded it and taped it to a disc attached to a metal faceplate.
Rounding off the corner with a scraper
A bit of rounding with a roughing gouge and then some smoothing and rounding over the corner with this small scraper, and it was mostly done.
I also drilled a hole for the stem while it was mounted to the lathe.
I also drilled a hole for the stem while it was mounted to the lathe.
Completion
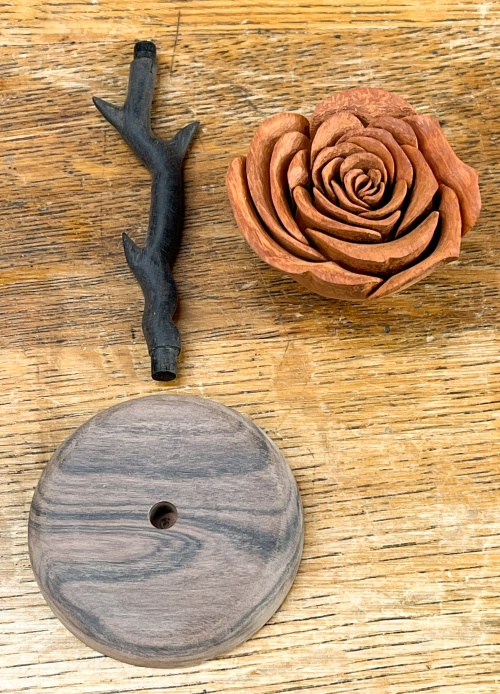
The pieces ready to go
That was it for the three components of the rose.
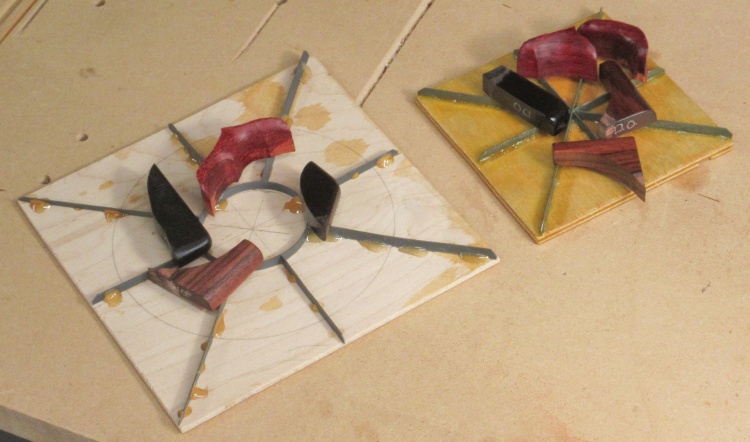
Some finish samples drying
Meanwhile I had been doing some finish tests with three candidates on the three different species of wood. I settled on Watco Danish Oil for the finish.
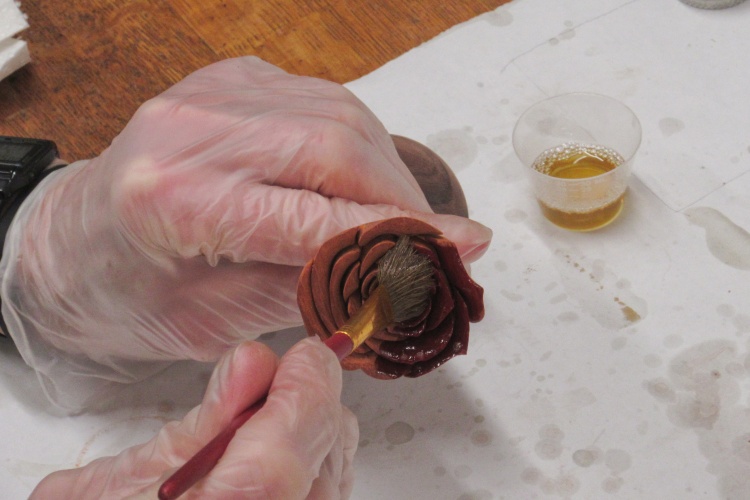
Starting with the Danish Oil
The rose blossom looked like it was going to be a bit tricky to cover with finish but a fine brush seemed to work well at getting the finish into the small gaps.
The rose received two coats of the Danish Oil.
The rose received two coats of the Danish Oil.

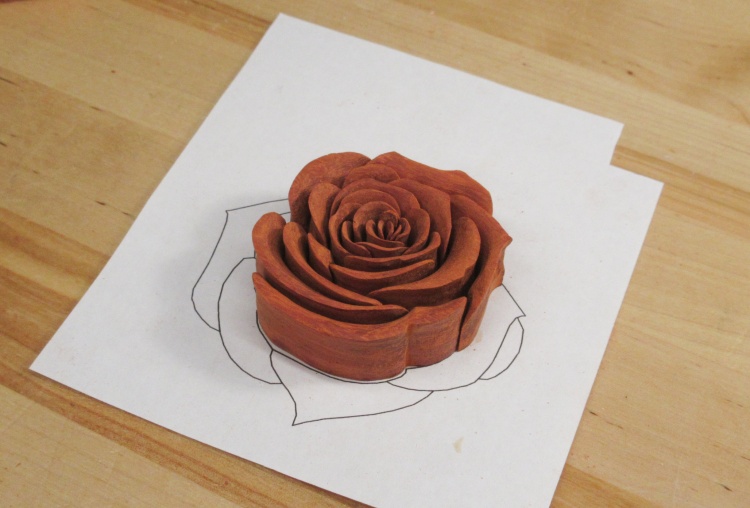
The completed rose
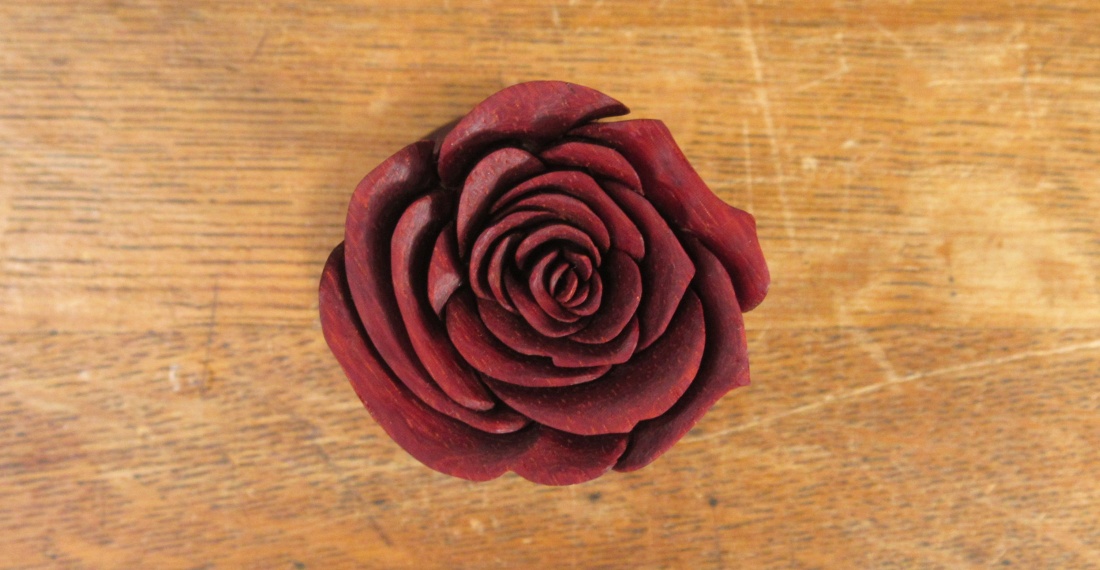
Top view
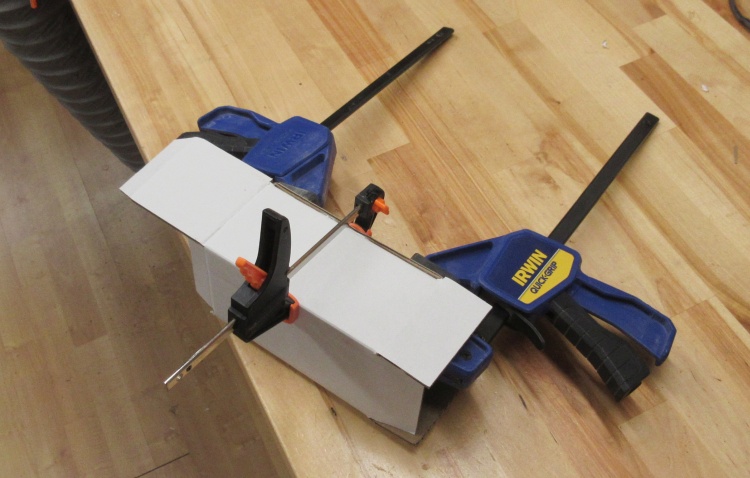
Assembling a cardboard box
I thought it would be a good idea to have an appropriate-sized container for the rose, so I bent up a little box from white cardboard. In this shot the main seam has been glued and then lightly clamped.
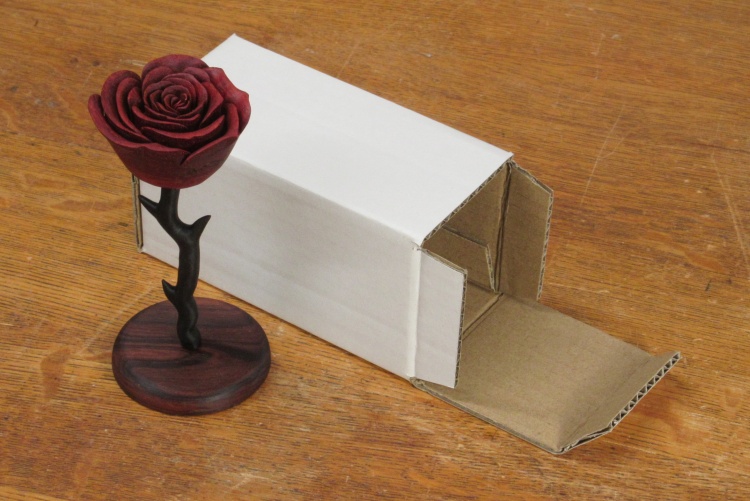
Rose and box
Ready to go.


