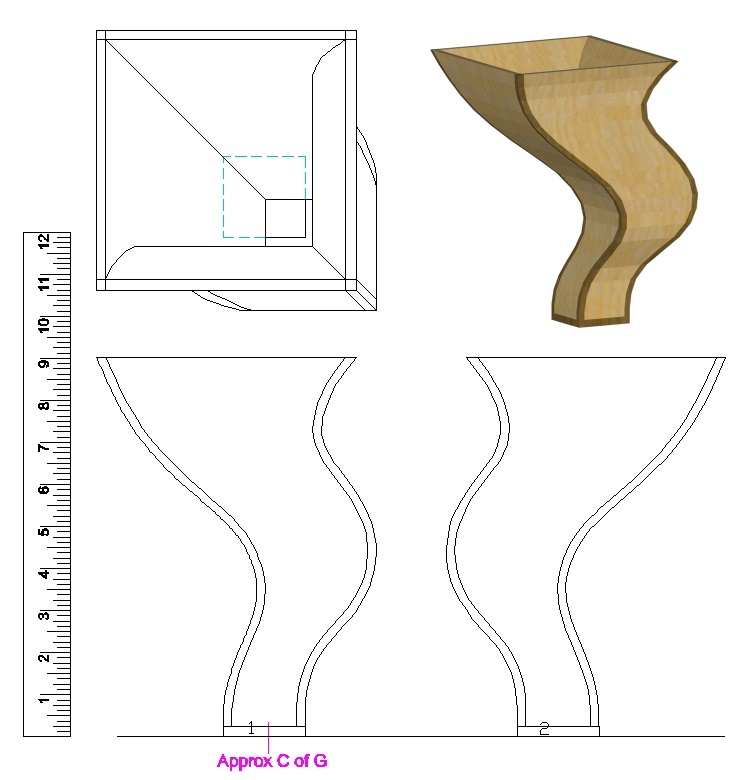
With a multi-piece vessel like this one, there are lots of degrees of freedom for the actual shape. In addition to standard ones like height and, well, actual shape there are aspects like number of sides, straight or curved sides etc. I decided on a "conventional" four sides but since the sides didn't have to be the same, I made two different profiles and used each on two adjacent sides, giving it a symmetrical assymetry, as it were.
Now theoretically a multi-piece vessel with straight sides could be made from only a small amount of material, making it more efficient of wood use than a turned piece. This is not that vessel. Due to the curved profiles and a desire to have each side as a single piece, it used a huge amount of wood relative to it's size. And the separate corners only made the situation worse. Good thing wood does grow on trees.
Now theoretically a multi-piece vessel with straight sides could be made from only a small amount of material, making it more efficient of wood use than a turned piece. This is not that vessel. Due to the curved profiles and a desire to have each side as a single piece, it used a huge amount of wood relative to it's size. And the separate corners only made the situation worse. Good thing wood does grow on trees.
The plan
A couple of nice Curly Maple turning blanks
Due to the curvature in the sides, two of them would need to come from boards thicker than 2". This is significant since usually 2" is the thickest available locally.
However one less-conventional local source for thicker wood is turning blocks (or blanks), which while round can be 3" or even thicker. As the name suggests, they would usually be used for turning bowls or plates on the lathe, but hey - it's just wood. Fortunately I was able to find a couple thick-enough and large-enough-diameter curly maple turning blocks at Windsor Plywood that would give me enough wood for the four sides.
However one less-conventional local source for thicker wood is turning blocks (or blanks), which while round can be 3" or even thicker. As the name suggests, they would usually be used for turning bowls or plates on the lathe, but hey - it's just wood. Fortunately I was able to find a couple thick-enough and large-enough-diameter curly maple turning blocks at Windsor Plywood that would give me enough wood for the four sides.
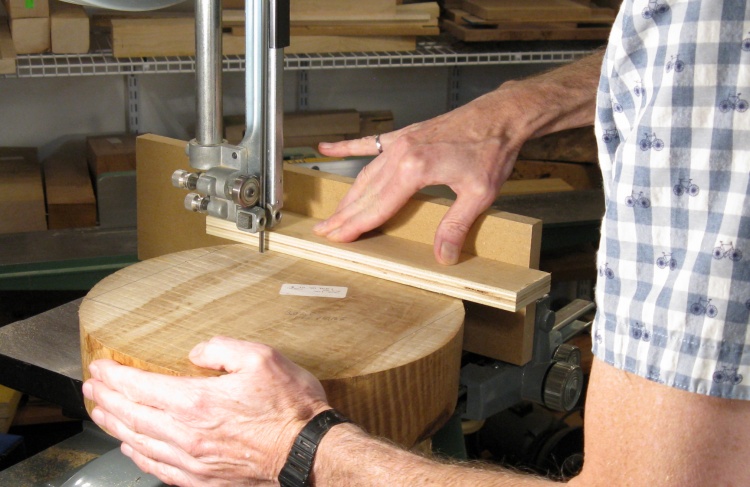
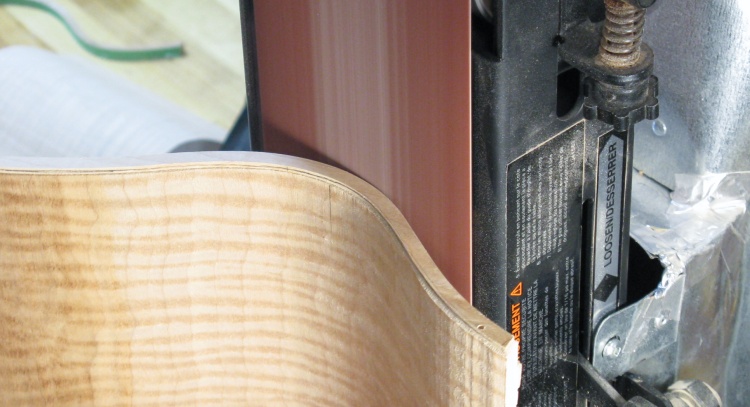
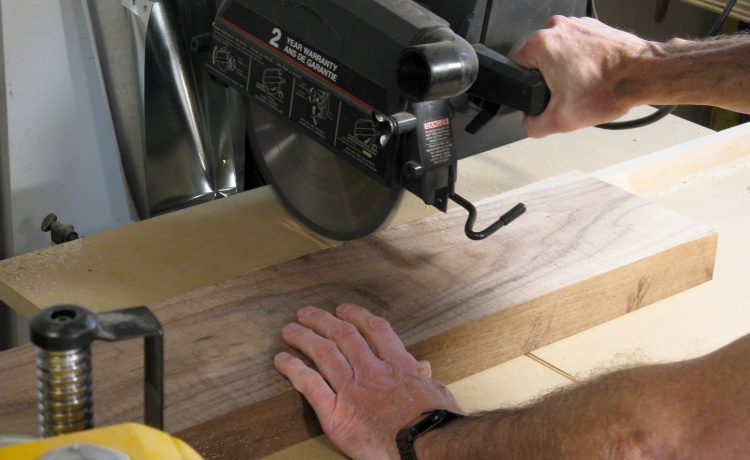
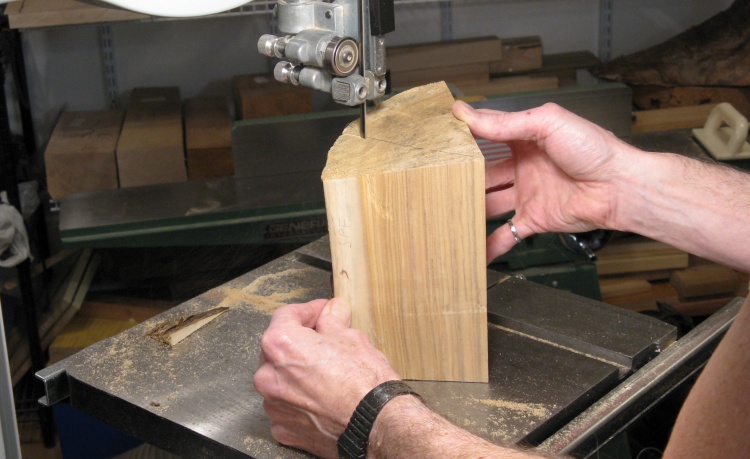
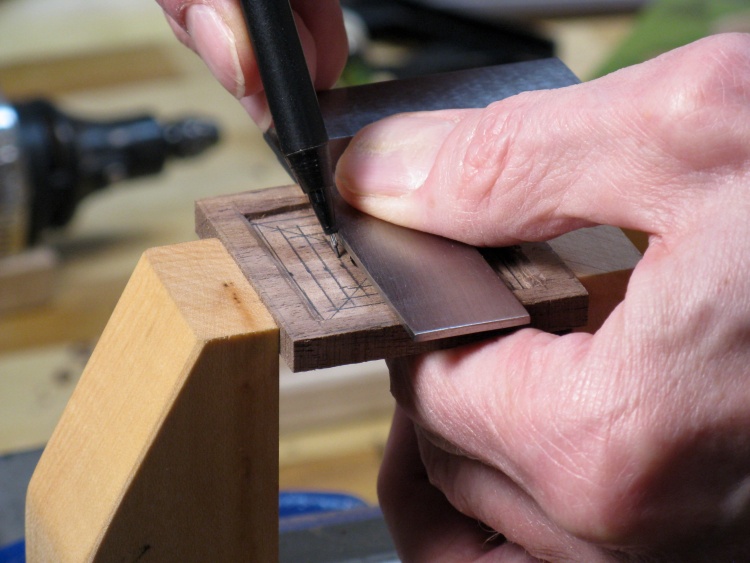
Establishing a straight edge
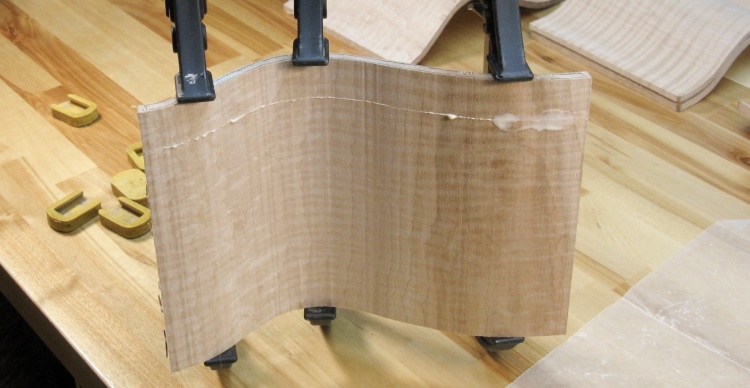
I was going to need flat faces onto which I could trace patterns and cut out the vessel sides.
I started by cutting one section of the turning blank flat using a taped-on plank against the fence as shown here, then used that edge as a reference to cut the other three edges.
I started by cutting one section of the turning blank flat using a taped-on plank against the fence as shown here, then used that edge as a reference to cut the other three edges.
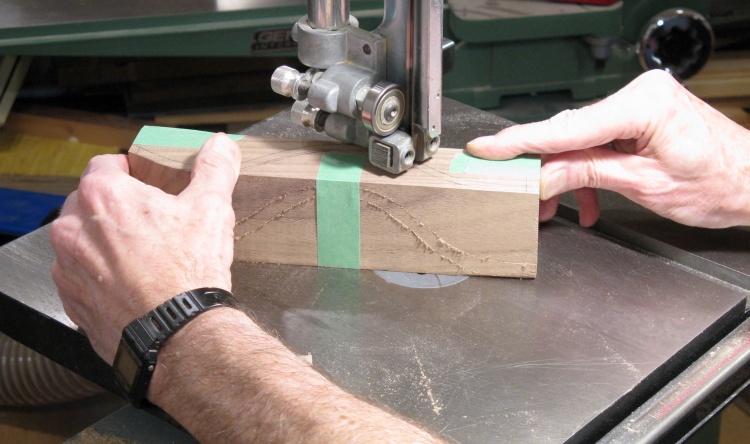
Turning block "steaks" ready for next stage
That gave me two nice rectangular blocks.
The four sides needed
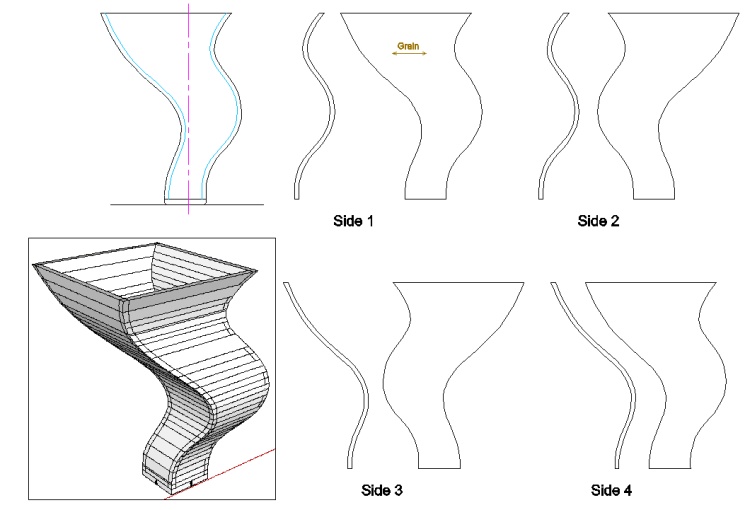
This shows the shapes and profiles I needed for the four sides. I was pretty careful (in the measure twice, cut once sense) to make sure I correctly associated the profile with the shape before making any cut.
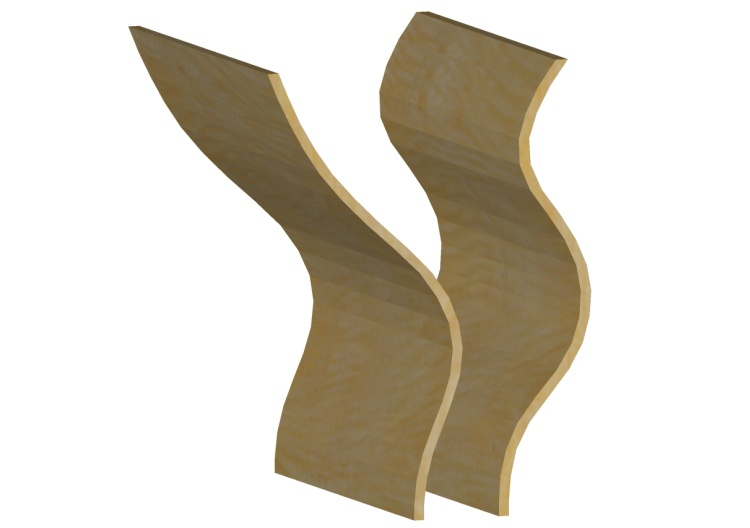
The blanks needed for the two flavours of sides
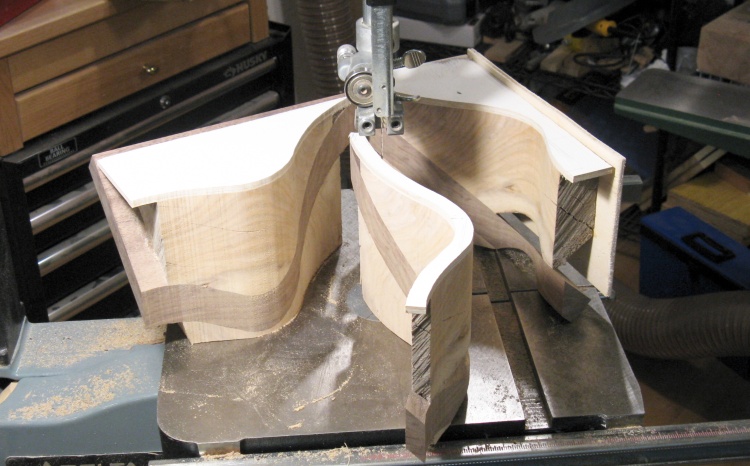
I would start by cutting out the proper wall profiles and end up with two each of the pieces shown here - I was calling them U and W-shaped to differentiate them. Later they would be cut to the right shapes.
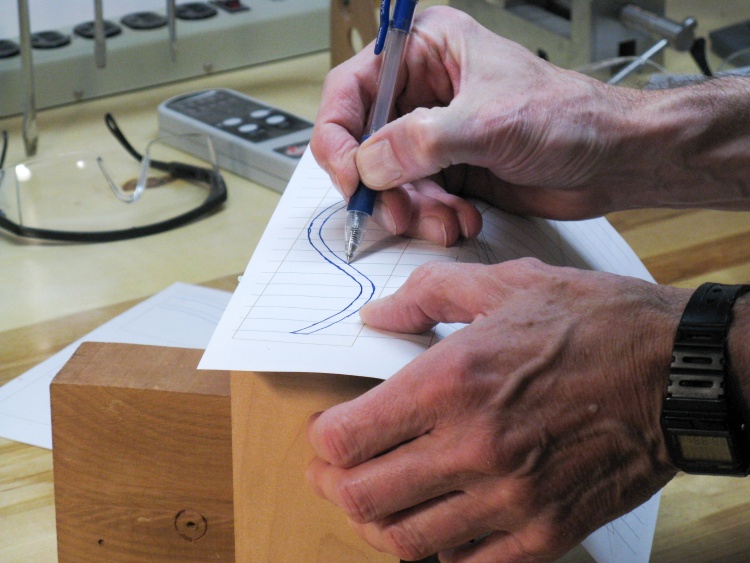
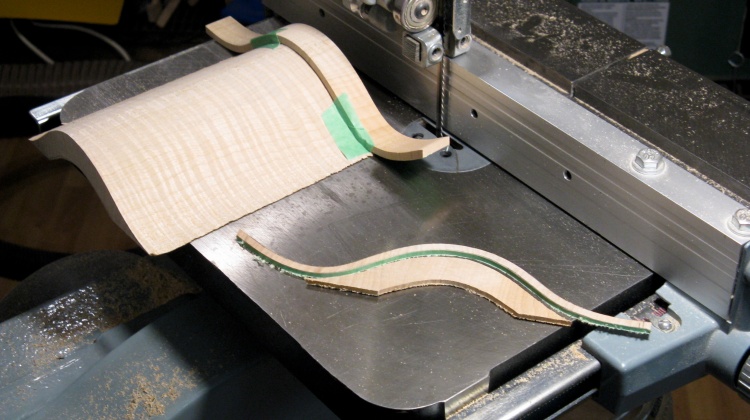
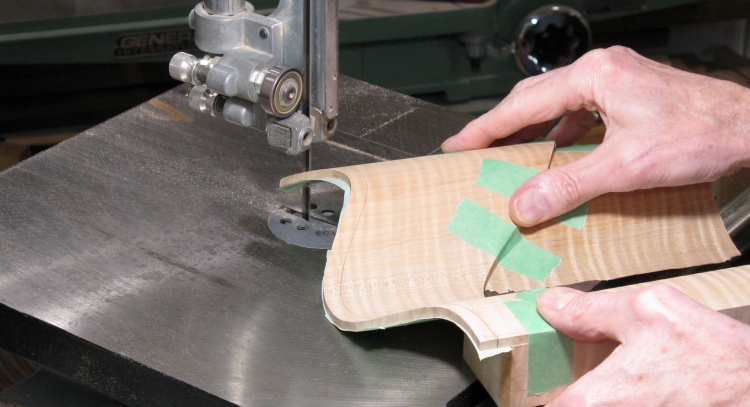
Tracing on the first of the wall profiles
I used my standard technique of a full-sized paper pattern traced onto the wood using carbon paper. Here I'm tracing the profile of the W-shaped side.
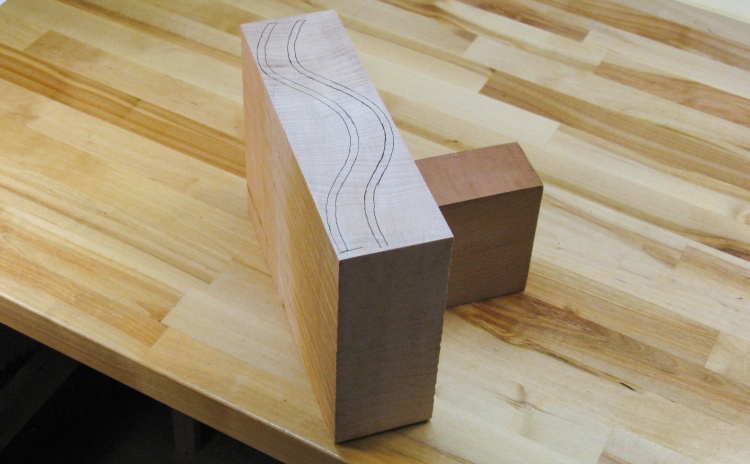
First block marked and with a handle added
This shows the first block with two identical profiles marked on the top. I've also taped on a smaller block acting as a handle to have a safe place to hold and guide it through the bandsaw.
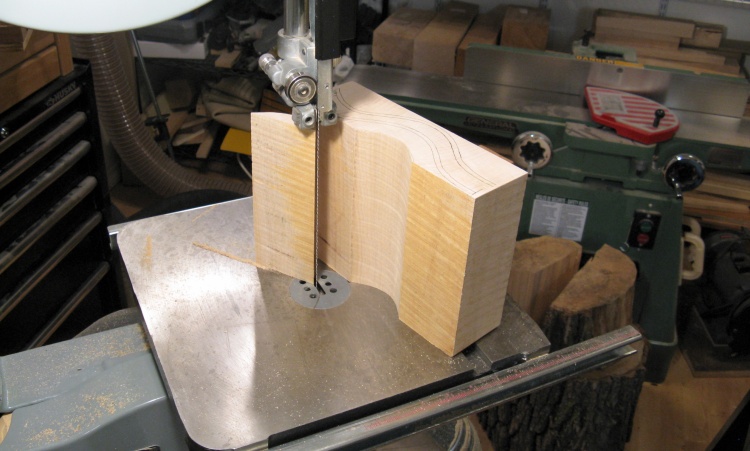
Trying a test cut on bandsaw - looks good
The bandsaw had a relatively small 1/4" blade in place and I wasn't sure how accurately it would cut the tall block so I did a test cut to check. It seemed to work very well - a nice straight cut with virtually no blade wander.
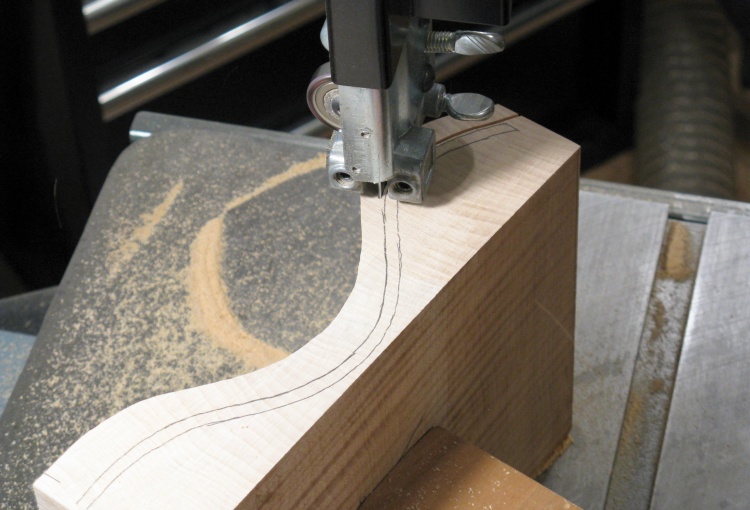
Cutting out the second wall from the first block
In this photo the first side has already been cut out and I'm part-way through the second.
The cuts were made about 1 mm outside the lines to give some margin for error.
The cuts were made about 1 mm outside the lines to give some margin for error.
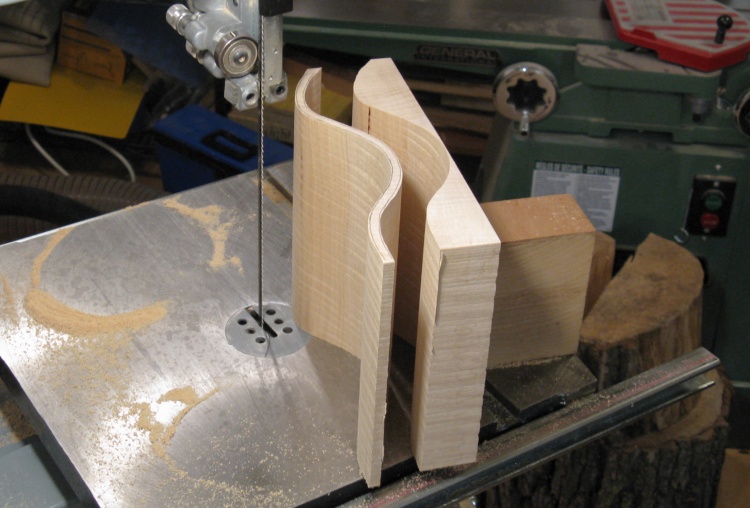
Bandsaw did a nice job with a straight cut
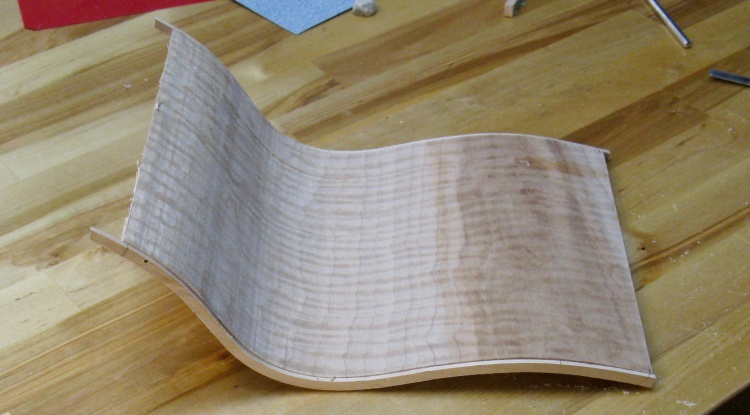
There's the second side cut out.
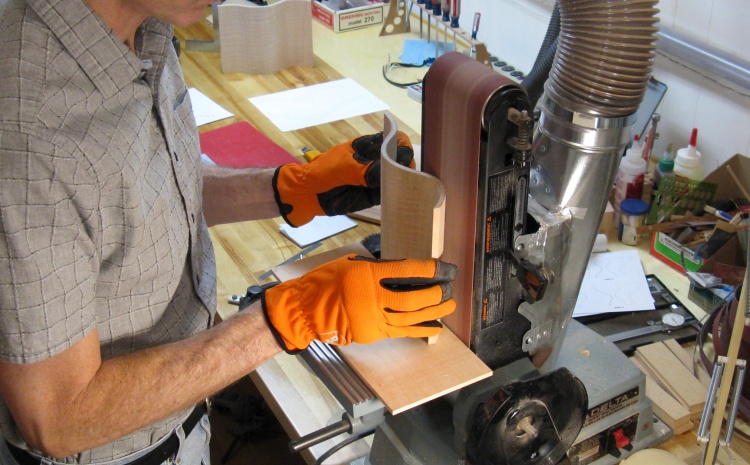
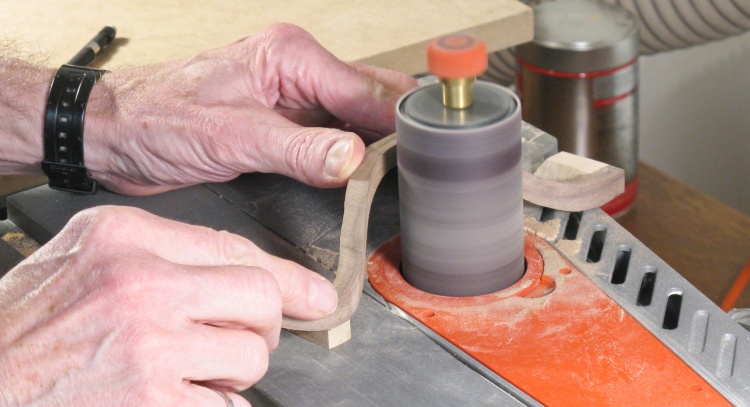
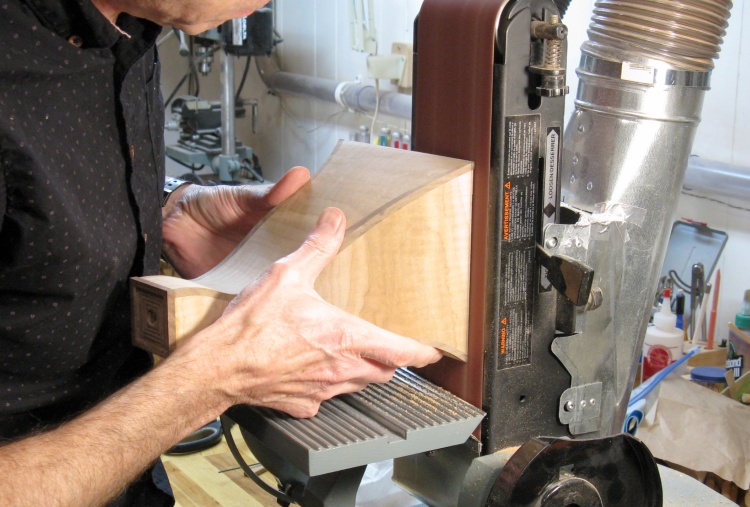
Outside curves were sanded with belt sander
I started shaping the sides by using the belt sander on the convex portions of the curves.
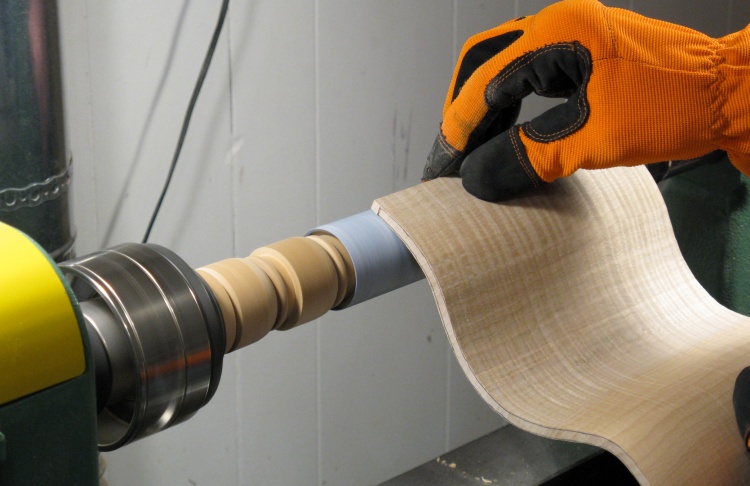
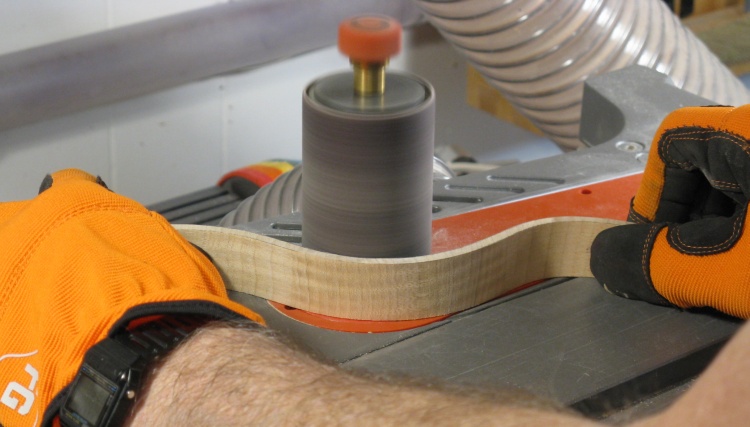
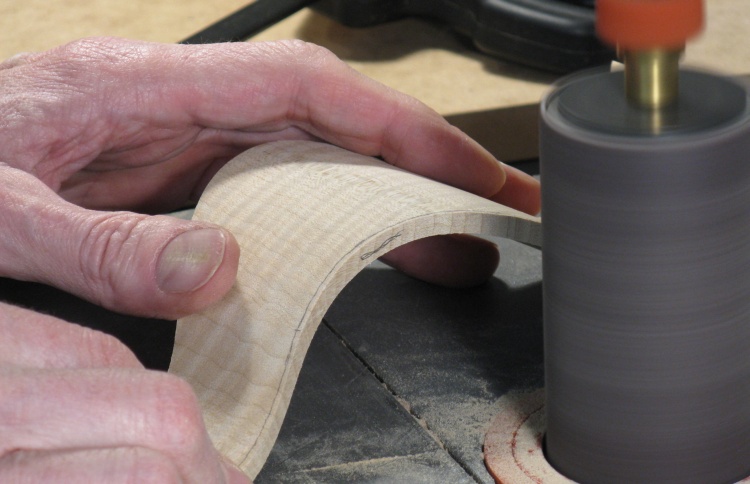
Sanding inside curves using a lathe setup
And then to shape the concave curves, I set up the lathe to turn a 1-1/4"-diameter dowel with taped-on sandpaper.
I wanted to see how consistent I could do the shaping across the face of the side just hand-holding it and applying even pressure. Unfortunately, the answer was "not very"; the thickness side-to-side varied more than I wanted.
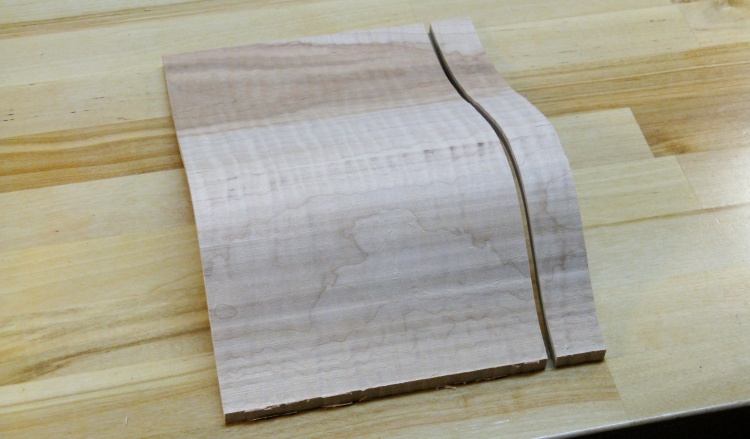
To improve that I decided I'd better make patterns for both edges of the sides so the shaping would be more consistent. Fortunately, I had a scrap that was about the right shape for the two "W" walls, so I cut a piece off that.
I wanted to see how consistent I could do the shaping across the face of the side just hand-holding it and applying even pressure. Unfortunately, the answer was "not very"; the thickness side-to-side varied more than I wanted.
To improve that I decided I'd better make patterns for both edges of the sides so the shaping would be more consistent. Fortunately, I had a scrap that was about the right shape for the two "W" walls, so I cut a piece off that.
Disaster strikes!
And then disaster strikes!
And in this case, disaster is spelled r-u-s-s; After setting up the bandsaw I grabbed the wrong piece of curvey wood - one of my sides - and cut a piece off that - AIEEE!
Well, better than a finger I suppose.
And in this case, disaster is spelled r-u-s-s; After setting up the bandsaw I grabbed the wrong piece of curvey wood - one of my sides - and cut a piece off that - AIEEE!
Well, better than a finger I suppose.
Maybe no one will notice...
I really didn't want to make another side, so I thought I'd try just gluing it together again. Maybe it won't be too obvious?
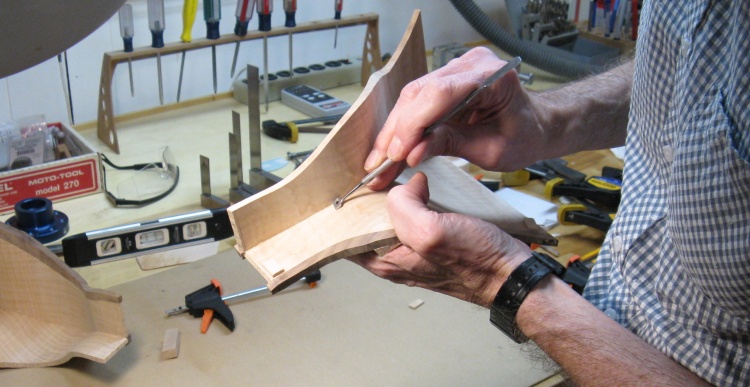
Shaping a pattern for the sides
Once I was finished kicking my self around the shop a few times (great aerobic activity by the way), I found the right scrap of wood and cut the piece I needed off that.
In this shot I'm shaping that piece to the profile traced onto the edge.
In this shot I'm shaping that piece to the profile traced onto the edge.
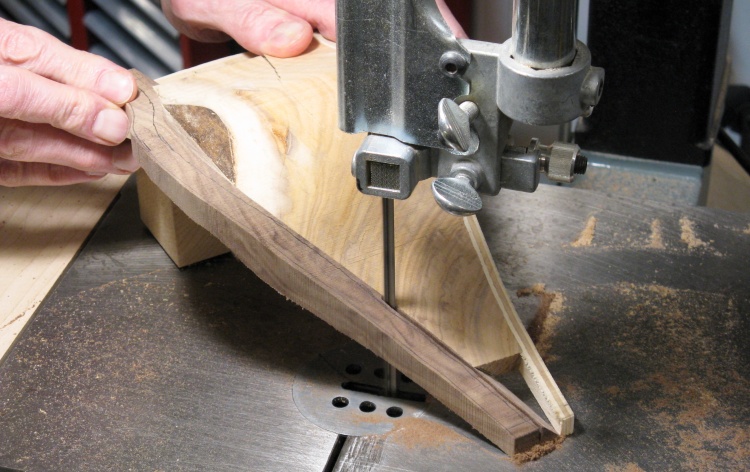
Chopping off a thin section for a pattern
Then I made a thin pattern by slicing off about a tenth of an inch of the profile.
That wider piece of wood on the bottom is just there for support when sawing.
That wider piece of wood on the bottom is just there for support when sawing.

Wood patterns done - one for each edge of the four sides
I sliced off another three patterns and then replicated that process to produce the other profile. I ended up with four of each pattern - they will go on both edges of each of the four sides.
And while it doesn't look like it in this composite photo, the patterns are all the same width of 0.2".
And while it doesn't look like it in this composite photo, the patterns are all the same width of 0.2".
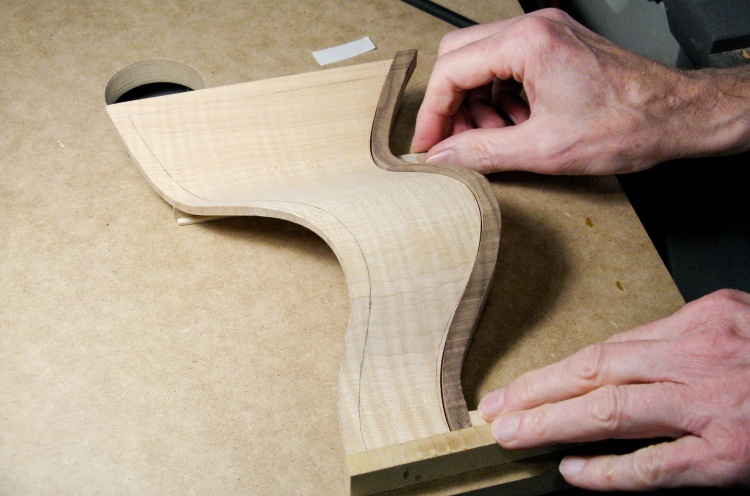
Side #3 with patterns glued on to the edges
This shows one of the vessel sides with the patterns glued to the edges.
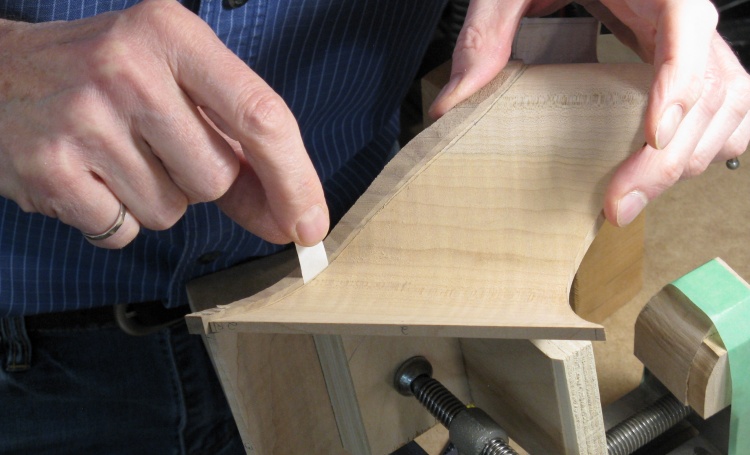
I marked the narrow edges of the pattern with pencil so I could see when the sanding started to contact them.
I marked the narrow edges of the pattern with pencil so I could see when the sanding started to contact them.
Back to sanding the sides, this time using the pattern as a guide
Then it was back to the shaping with the belt sander for the convex curves and the lathe for the concave curves. I just sanded down to the pattern on both sides. I'd do a bit and check how close I was to the patterns on both edges and adjust angle or pressure to keep the material removal even.
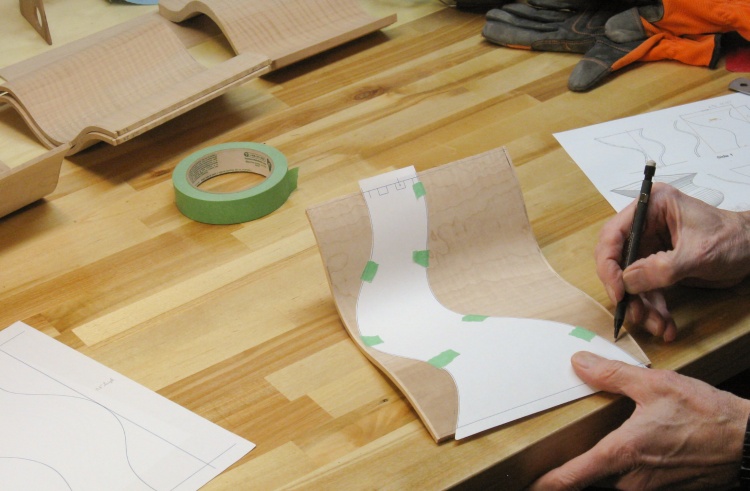
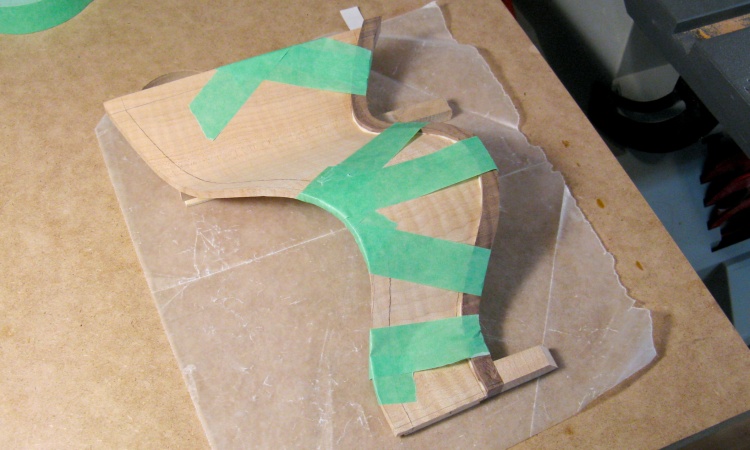
Tracing the outside shape of a paper pattern
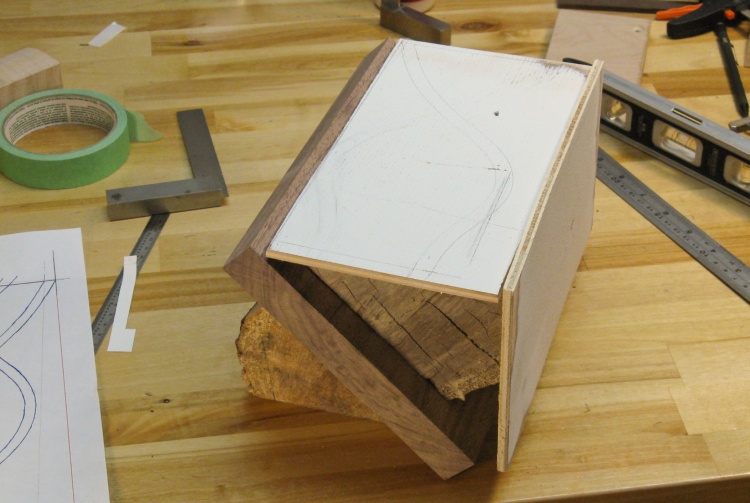
I also needed patterns to trace the shape onto each side. Since the distance along the curvey wall was longer than just the bottom-to-top distance when looking at the side view (like in my plans), I needed to stretch the patterns so they were the right length when taped down to the curved sides. The 9"-tall vessel needed patterns that were 9.8" tall for the "W" sides and 10.5" tall for the "U" sides.
Here after cutting out a 10.5"-tall pattern, I'm using it to trace the shape on to the outside of one of the walls.
Here after cutting out a 10.5"-tall pattern, I'm using it to trace the shape on to the outside of one of the walls.
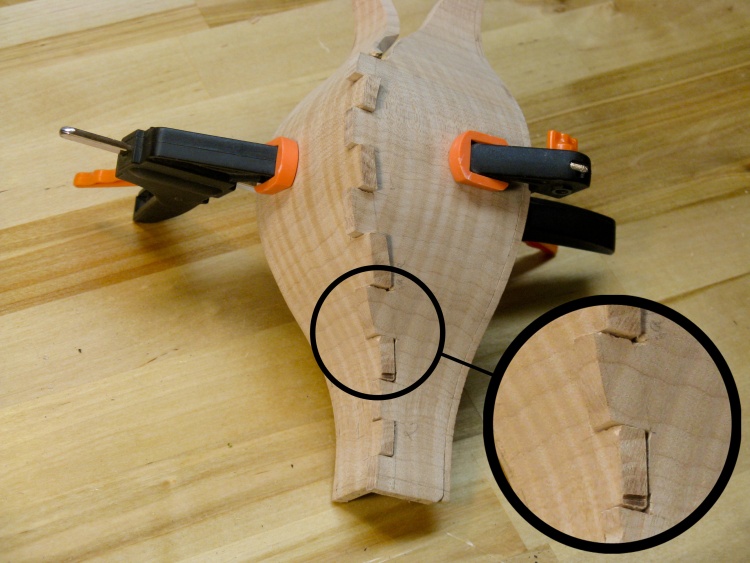
Some very crappy box joints on a test piece
My original plan was to use box joints to join the walls at the corners. I thought I'd better do a test piece to see how accurately I could make the joints so I used a couple scrap pieces with curves similar one of the vessel's.
In the absence of something like a numerically-controlled 3D routing machine (couldn't find one in my shop), the joints would need to be made by hand. And due to the curves they couldn't be put together or even checked for fit until most other joints were also engaged. This led to a rather slow iterative process (which was OK) but the end result was way poorer than I could accept (which was not OK).
I was going to have to forget about the box joints and find a "Plan B" to deal with the corners.

Marking a scrap to do a test corner
What I thought I'd try was to fabricate square corners to fit between adjacent sides. Given my experience with the box joints I thought I just might make a test piece for that one too.
Here I'm marking a curvey scrap of wood to cut out and try fitting to one of the sides.
Here I'm marking a curvey scrap of wood to cut out and try fitting to one of the sides.
Test corner successfully shaped
That corner piece was mounted to some scraps to hold it at the correct height and angle and then I sanded away at the face that contacted the vessel side until it fit decently. It took a while but I was able to have it fit with only small gaps. That seemed to suggest that this technique was workable.
In this photo the test corner is sitting beside the vessel side I cut it to match.
In this photo the test corner is sitting beside the vessel side I cut it to match.
Chopping up some walnut for the real corners
So the solid corner Plan B was declared a go. I decided to go with contrasting corners and selected walnut for that purpose.
The corners curve in two dimensions so a fair amount of wood is needed to make what is actually a pretty small part. Hence the huge plank of walnut.
The corners curve in two dimensions so a fair amount of wood is needed to make what is actually a pretty small part. Hence the huge plank of walnut.
Cutting out the first corner
The profile needed to be cut out from both sides. I started with one that had W-shapes both ways and here I've already cut one side, taped the wood back together and the other side is being cut.
Reducing the width of the sides to acommodate the corners
The sides had been cut to a width adequate to form the no-longer-used box joints so they needed to be narrowed. Here I'm cutting one side narrower.
Each side also needed to match as exactly as possible the adjacent sides, so I marked each side using those adjacent sides to get their exact profile. The side was then cut and shaped by sanding to that line.
In all cases the sides and corners must be cut and sanded at the correct angle. This "W" side is easiest as it only needed to tilt up about half an inch. The "U" side was more involved as later photos show.
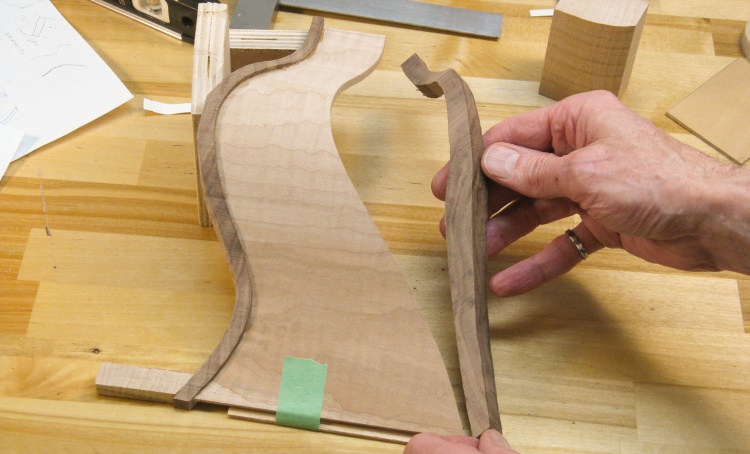
Shaping the first corner
This first real corner would fit in the same place as did the test piece, so the process was familiar.
I glued some scraps in a couple places to hold it at the correct angle to the sanding drum and the correct height for the side it was to mate to.
I glued some scraps in a couple places to hold it at the correct angle to the sanding drum and the correct height for the side it was to mate to.
Checking fit
Then it was a matter of sliding the corner next to the side and marking and then sanding down any high spots.
This was an iterative process and it took an hour or two and many dozens of small sanding efforts to get it to where any gaps were smaller than a few thousandths of an inch.
This was an iterative process and it took an hour or two and many dozens of small sanding efforts to get it to where any gaps were smaller than a few thousandths of an inch.
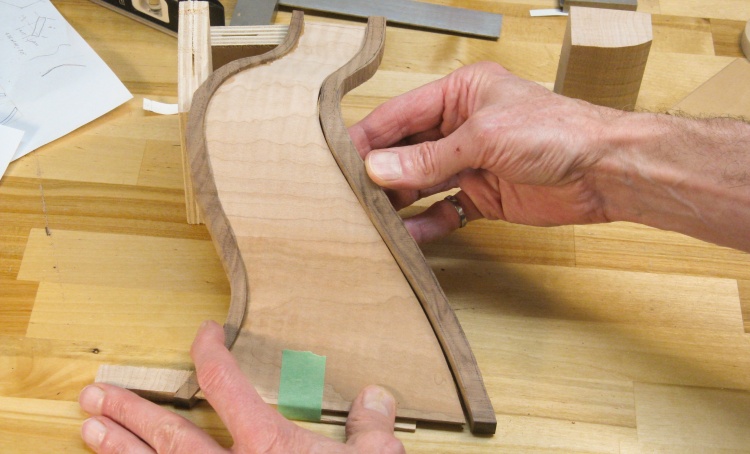
Gluing on the new corner
Once I was happy with the fit, I glued the corner on and taped it in lieu of clamping (since the angled edges make clamping tricky).
The next corner beside its mating side
The next corner goes between W and U-shaped sides. As compared to the "W" sides, these "U" sides and corners needed to be at a greater angle for cutting and sanding so the support was a bit more elaborate.
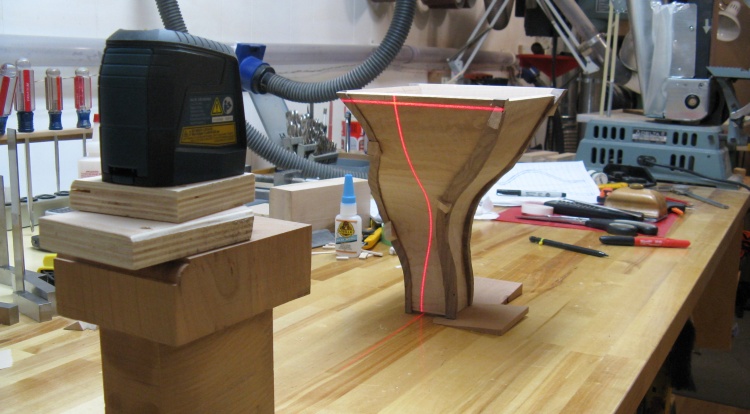
Profile of the last corner
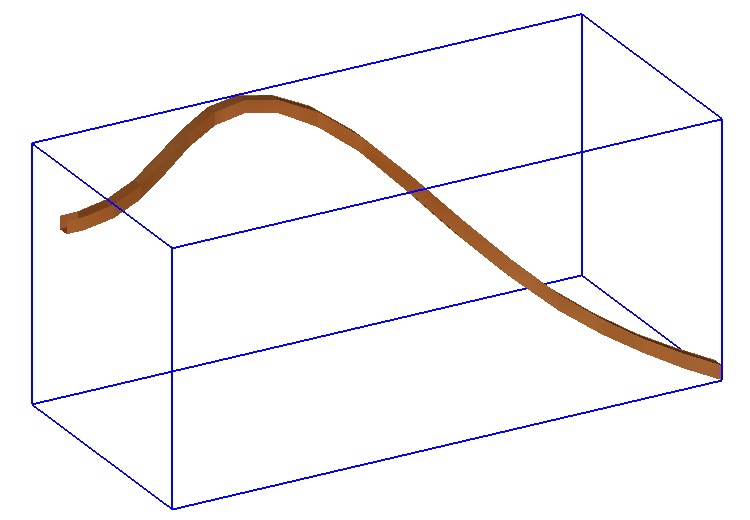
The last corner to be done was one that fit between two of the U-shaped sides and extends quite far in both directions. If that was to be cut from a block of wood in the conventional manner it would require a piece more than 4" on the short sides and over 99% of it would have to be discarded.
That seemed pretty wasteful (and besides I didn't have a large-enough piece of wood) but since the profile of the two sides is similar that implied that the piece actually spans the volume diagonally. That meant I could get away with using a much narrower plank as long as it was oriented diagonally to the blue rectangular outline seen here.
That seemed pretty wasteful (and besides I didn't have a large-enough piece of wood) but since the profile of the two sides is similar that implied that the piece actually spans the volume diagonally. That meant I could get away with using a much narrower plank as long as it was oriented diagonally to the blue rectangular outline seen here.
Chopping up a scrap for a corner-cutting jig
Rather than say, create a properly distorted plan to go on the face of a narrower diagonal plank, I decided to just use scraps to make the over-4"-square block I needed, but with the good wood inserted diagonally.
Here I'm cutting a scrap of an SPF* log at a nice 45° angle to make half of the block.
*Spruce, Pine or Fir 'cause I don't know.
Here I'm cutting a scrap of an SPF* log at a nice 45° angle to make half of the block.
*Spruce, Pine or Fir 'cause I don't know.
A finely-crafted jig to cut the last corner
After cutting a couple 45° wedges, they were glued to a 1"-thick piece of walnut with a couple scraps of white-painted plywood stuck on to give a nice surface on which to draw the patterns.
Just barely visible in this photo is the outline of the pattern drawn on the top piece of plywood.
Just barely visible in this photo is the outline of the pattern drawn on the top piece of plywood.
First cut
First a curvey wall was cut out using the traced-on pattern.
Second cut
Then after marking the wall using the profile of the actual vessel side, the wall was arranged at the correct angle and the corner cut out in the other dimension.
And voilà - the final corner
This shows the vessel side to which the corner is to attach, alongside the corner. The "90°" angle of the corner below my thumb looks wide but actually fits correctly when aligned with the vessel sides.
Yes, it fits (at least approximately)
...like that.
Last corner shaped and glued on
And then after shaping the edge of the corner that mates with the side, it was glued on as shown here.
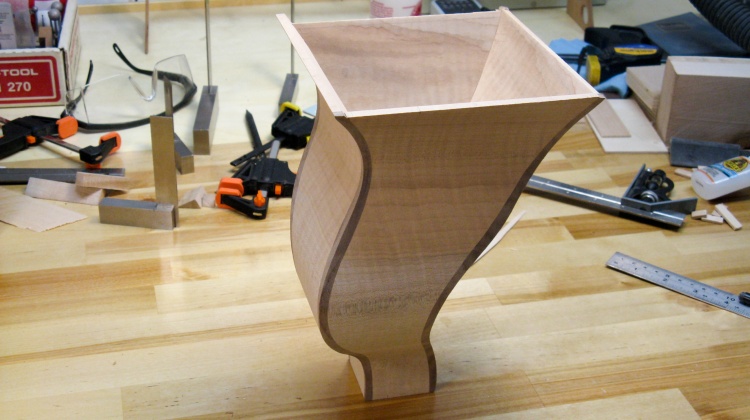
Sanding the oversized corners flush with the inside of the wall
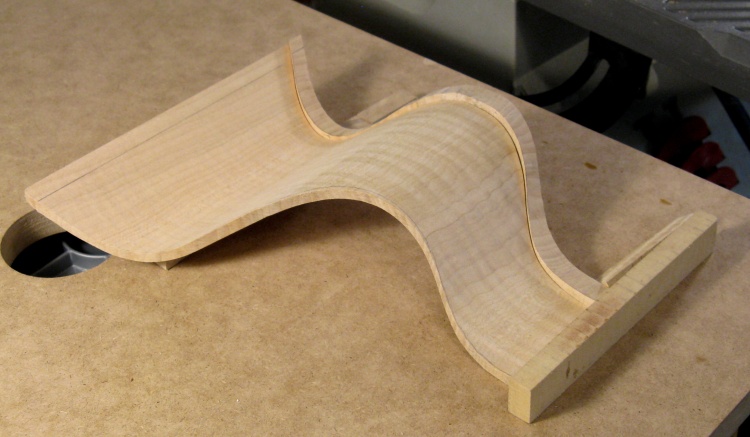
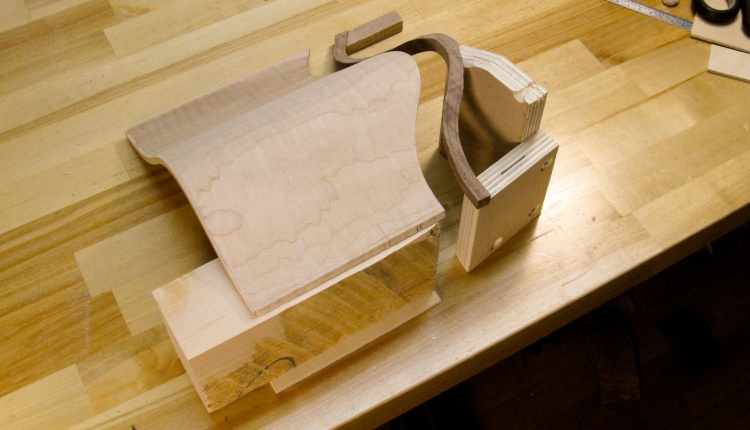
So now I have two sides each with two corners attached (one of them shown here) and two blank sides.
The next stage involved fitting the blank sides to the appropriate corners. The corners were made oversized so here they are being sanded flush with the interior of the side so they are exactly the same inside profile.
The next stage involved fitting the blank sides to the appropriate corners. The corners were made oversized so here they are being sanded flush with the interior of the side so they are exactly the same inside profile.
Checking the gap while shaping a side
Then it's back to shaping. But now instead of shaping a corner to fit the profile of a side, I'm shaping a side to fit the profile of the adjacent side and corner.
I made a temporary jig with vises, clamps, squares and scraps of wood to let me set the side I'm shaping down so it would be in the exact position and at a right-angle to the side with the corner. This let me consistently check the fit after each short bout of sanding.
Here I'm checking a gap using a piece of paper to help tell where the points of contact are. I would mark the high points with pencil and then sand them down and check again.
High spot marked with pencil
The pencil line on the edge of this piece shows where to sand. For a small section like this, the sanding would take off maybe one or 2 thousandths of an inch.
The other profile of side needed a different jig to sand at the correct angle
The sides are straight across at any specific height and meet the adjacent side at 90°, so at any point the edges should be straight across horizontally. I sanded the sides in the orientation as if the vessel was on its side so the vertical plane of the sanding would produce the correct horizontal edge when the side was stood back up. I just needed to ensure the side was oriented correctly.
The W-shaped side is almost vertical in the vessel so it needed only a small tilt. However this U-shaped side (which leans out from the center line of the vessel) needs a higher-angle jig as shown here.
The W-shaped side is almost vertical in the vessel so it needed only a small tilt. However this U-shaped side (which leans out from the center line of the vessel) needs a higher-angle jig as shown here.
And finally fitting the last side
And then it was down to the last edge of the final side. This one needed the edge to fit the profile of the mating wall, but the orientation needed to be correct on both sides when the vessel was assembled too.
So for this one I assembled the other three sides using clamps with stiff foam to provide some flexibility, and slowly iterated the shape of the last edge until it fit exactly without flexing the sides.
So for this one I assembled the other three sides using clamps with stiff foam to provide some flexibility, and slowly iterated the shape of the last edge until it fit exactly without flexing the sides.
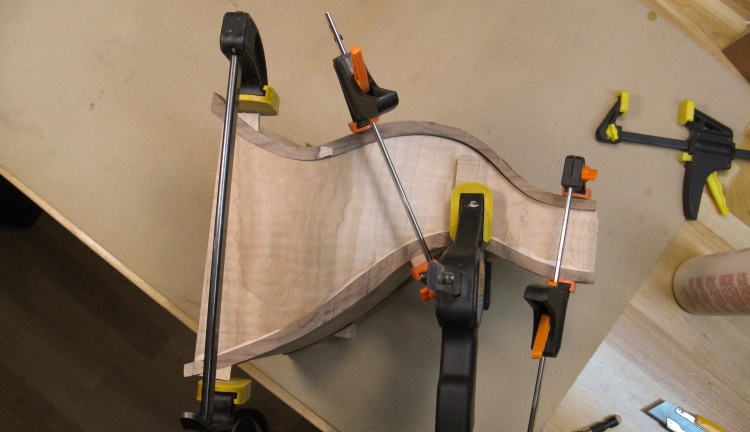
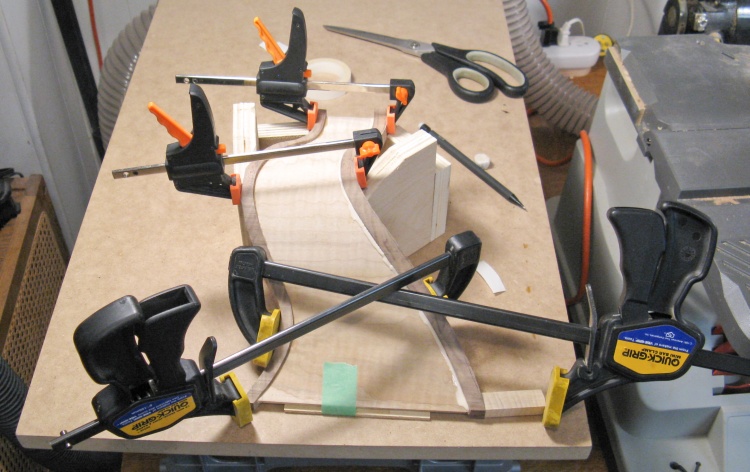
Clamping for one of the glued-up walls
Then with the four sides fitting properly, I assembled the whole thing but glued only two of the seams so I would have a couple open pieces and I could easily access the interior.
I ended up cyanoacrylating (AKA Crazy-Glue-ing) some small wedges to the corners so I could get clamps to hold the curved edges in strategic spots.
I ended up cyanoacrylating (AKA Crazy-Glue-ing) some small wedges to the corners so I could get clamps to hold the curved edges in strategic spots.
Scraping the dried glue off the inside corner
After the glue was set but not dried completely, I pulled apart the two halves and scraped off any glue squeeze-out on the interior.
Then I assembled and glued the two halves. Any excess glue had to be scraped from the top or bottom, but since there wasn't too much that worked out fine.
Then I assembled and glued the two halves. Any excess glue had to be scraped from the top or bottom, but since there wasn't too much that worked out fine.
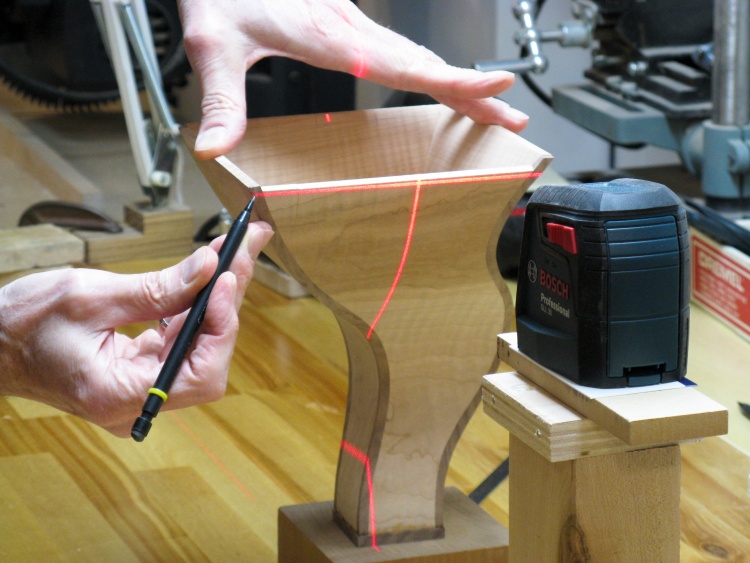
All glued up and checking level with LASERS!
Once the vessel was together I marked a vertical line on a couple sides and adjusted the standing angle using wedges under the bottom until my marks aligned with the laser-leveller's vertical beam. I then marked horizontal lines at top and bottom. This photo shows the horizontal laser line at the top, but I actually only used the bottom lines.
I drew lines around the bottom and used the belt sander to sand to those lines so the bottom was flat and the vessel stood level on it.
For this rather wonky vessel, "level" is defined as being at the same vertical orientation as in the plan I drew.
I drew lines around the bottom and used the belt sander to sand to those lines so the bottom was flat and the vessel stood level on it.
For this rather wonky vessel, "level" is defined as being at the same vertical orientation as in the plan I drew.
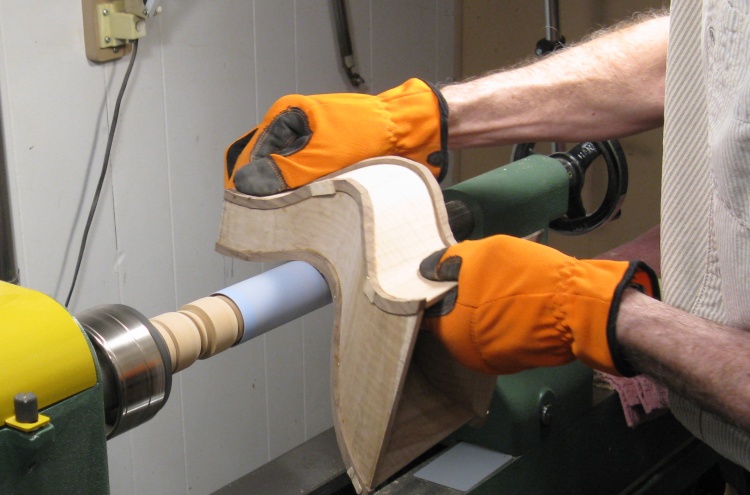
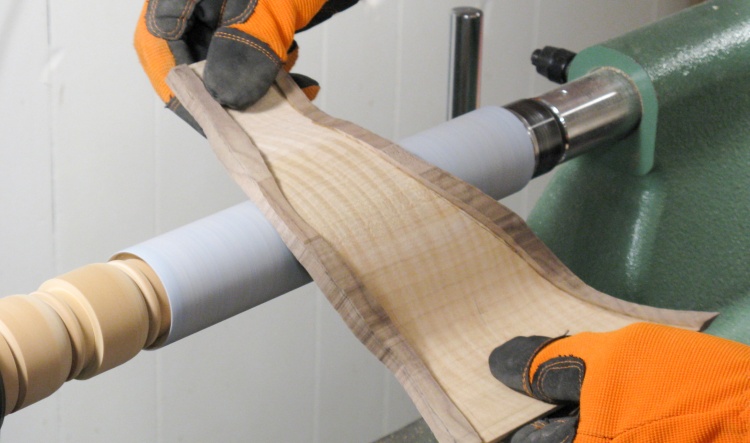
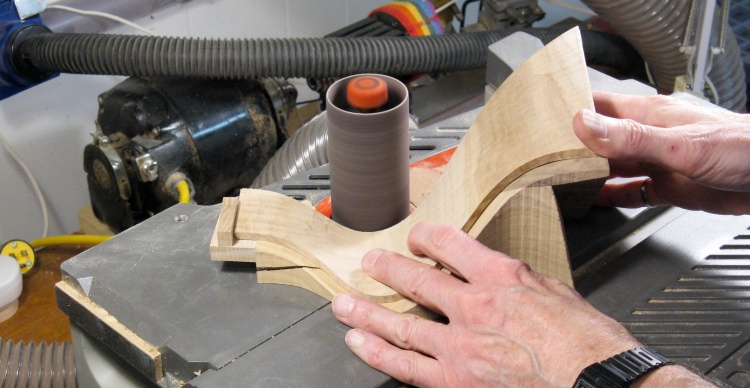
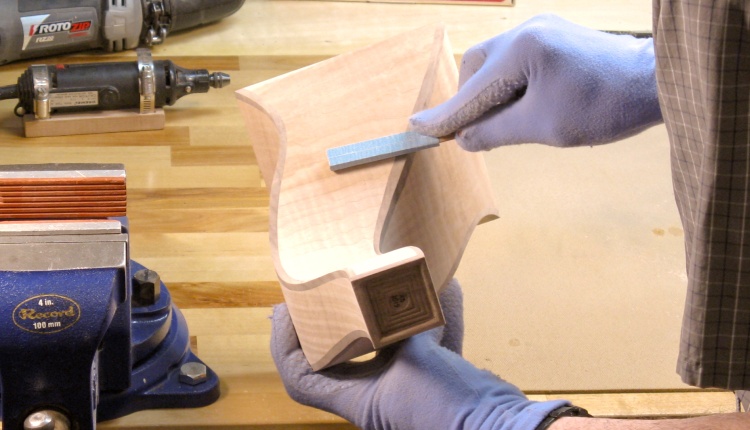
Sanding off the protruding corners
Then it was time to get rid of the extra material on the corners. I had already cut off the small wedges I had added for clamping and here I'm using the lathe-mounted drum sander to sand off the excess materials on the corners until they are flush with the exterior contour of the sides.
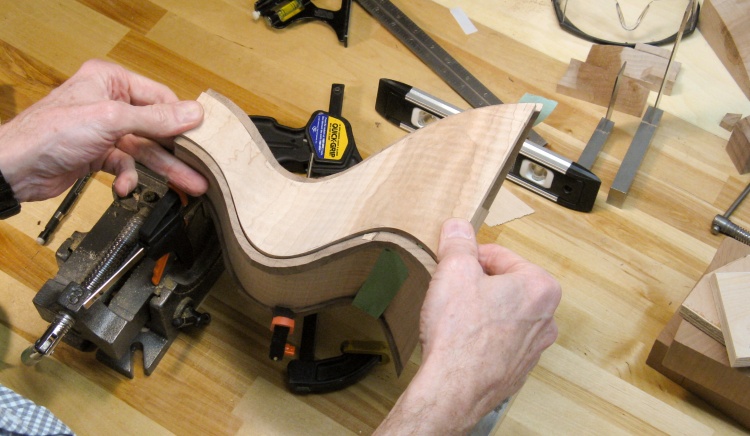
Corners all nice and flush
This photo shows the vessel with the corners sanded flush. It looks a bit less chunky than before.
Working on the bottom
The next step was to make a bottom for the vessel. I used a slightly oversided piece of walnut and decided to incise a pattern to make it a bit more interesting.
This photo shows me marking guide lines for carving on the bottom. The piece already has the "initial circle" cut 3mm deep in the center and the rest of it except for the outline cut away to a 2mm depth.
This photo shows me marking guide lines for carving on the bottom. The piece already has the "initial circle" cut 3mm deep in the center and the rest of it except for the outline cut away to a 2mm depth.
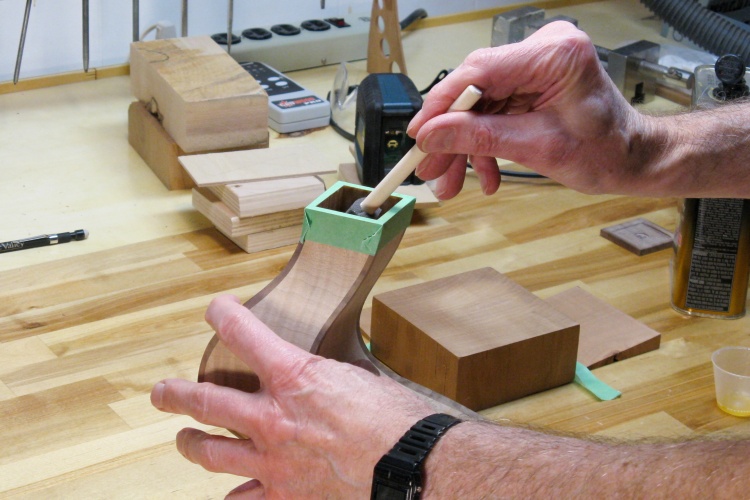
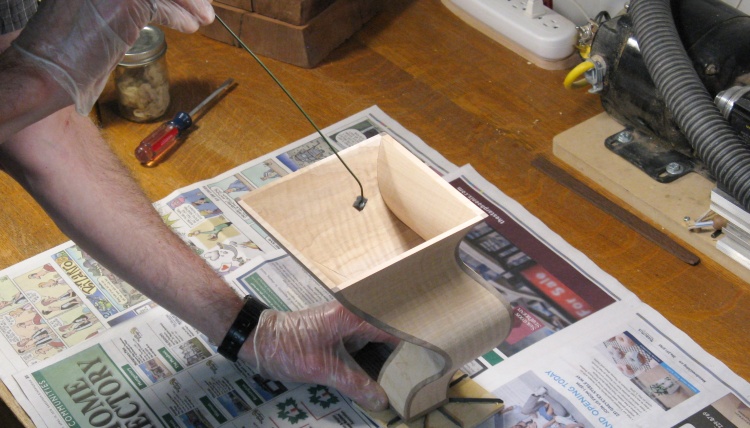
Varnishing the inside before the bottom goes on
However, before adding the bottom I thought I'd varnish the insides in the lower part because that would be difficult to do from the top. I added three coats of varnish to match what will go on the rest of the vessel.
Bottom done and glued in place
Once the inside varnishing was done, I glued on the bottom piece. The edges will later be sanded flush with the outside of the vessel.
I'm still going to need to reach in and varnish the bottom piece, but it is small enough that it shouldn't be too hard.
I'm still going to need to reach in and varnish the bottom piece, but it is small enough that it shouldn't be too hard.
Marking a level line around the top using LASERS! (again)
Of course I had sanded off the level marks I had around the top so the laser level came out again to redo them.
I set the level near the top of the vessel and marked the corners as shown here, then later drew lines around the top to provide a target to sand to.
I set the level near the top of the vessel and marked the corners as shown here, then later drew lines around the top to provide a target to sand to.
Sanding the top down to the level line
I used the belt sander to remove excess top material since it seemed less risky (to the vessel) than using the bandsaw. This photo shows the top getting sanded, and was followed by sanding the bottom flush with the sides.
Doing final sanding on the outside
The last operation was a final sanding. I did both the interior (down to the varnished areas) and the exterior with 320 grit using this sponge-backed sanding jig.
Special long-reach "brush" for bottom
And that was it for the woodworking. Next up: varnishing.
I made the custom brush shown here using a small piece of sponge glued on to a slightly curved wire. This was used to apply the finish to the bottom.
I made the custom brush shown here using a small piece of sponge glued on to a slightly curved wire. This was used to apply the finish to the bottom.

Adding varnish to the outside
A more-conventional sponge brush (minus the corner used for the custom brush) was used for the rest of the vessel.
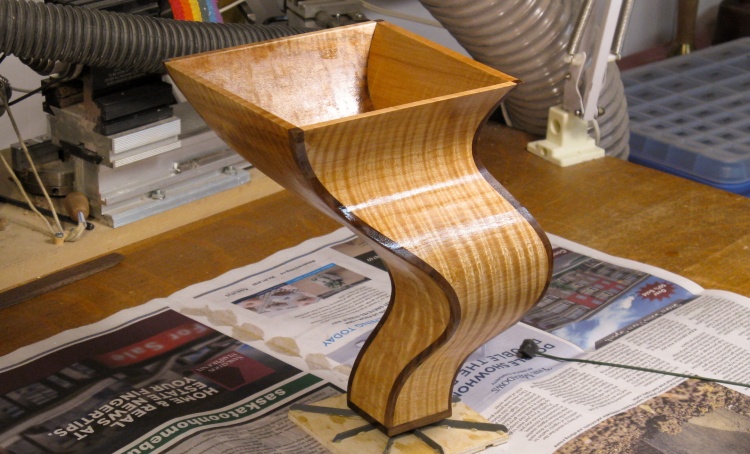
First coat of varnish glistens in the glow of Luxo lamps
This is my traditional first-coat-of-varnish shot. That figure in the figured maple really "pops" (as they say in the woodworking magazines) with the application of the varnish.
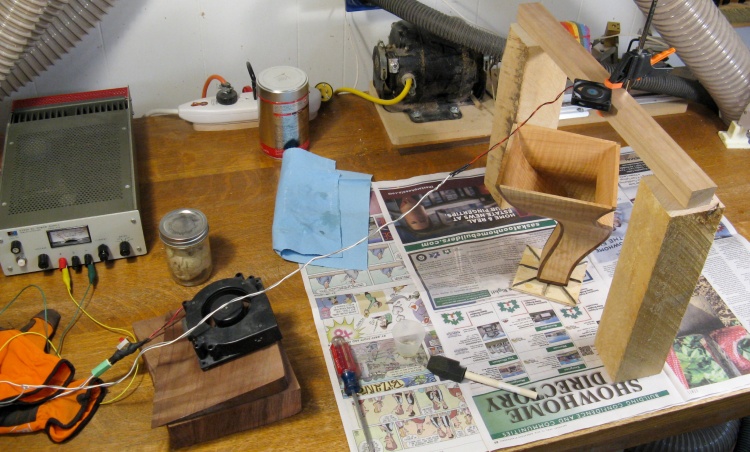
A couple fans help dry the vessel inside and out
I added a couple fans (OK, technically a blower and a fan) running at low speed to keep the air moving and help dry the varnish.
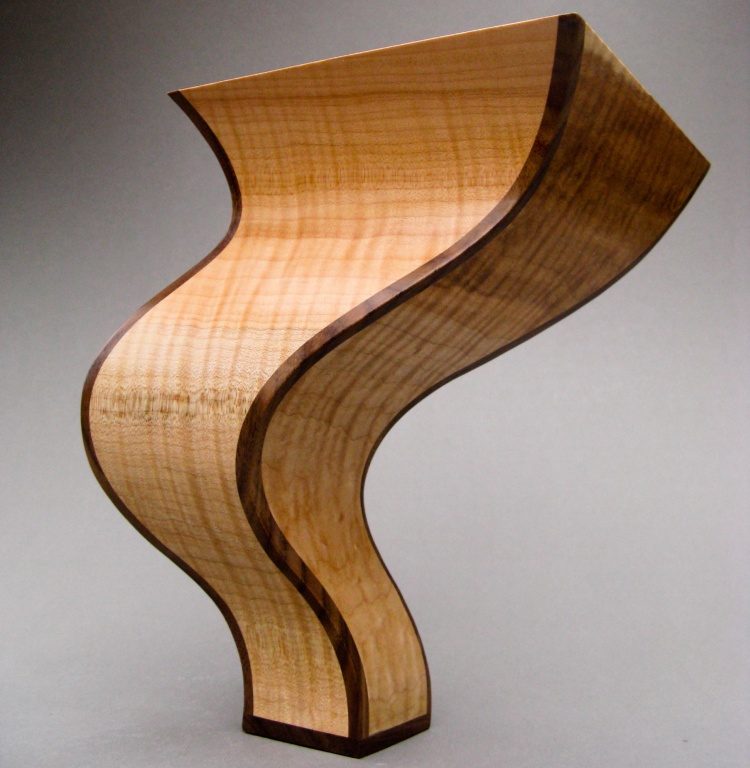
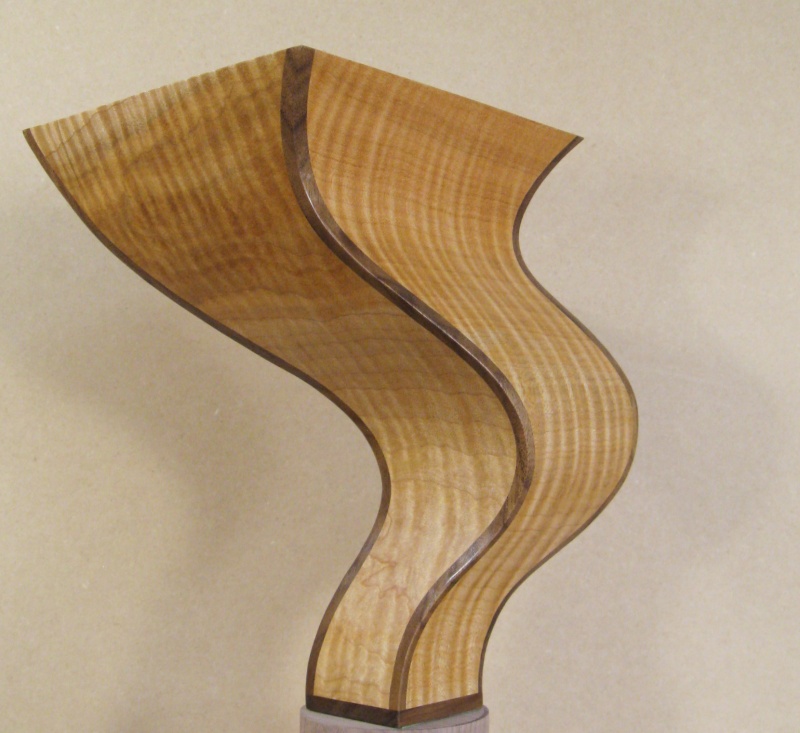
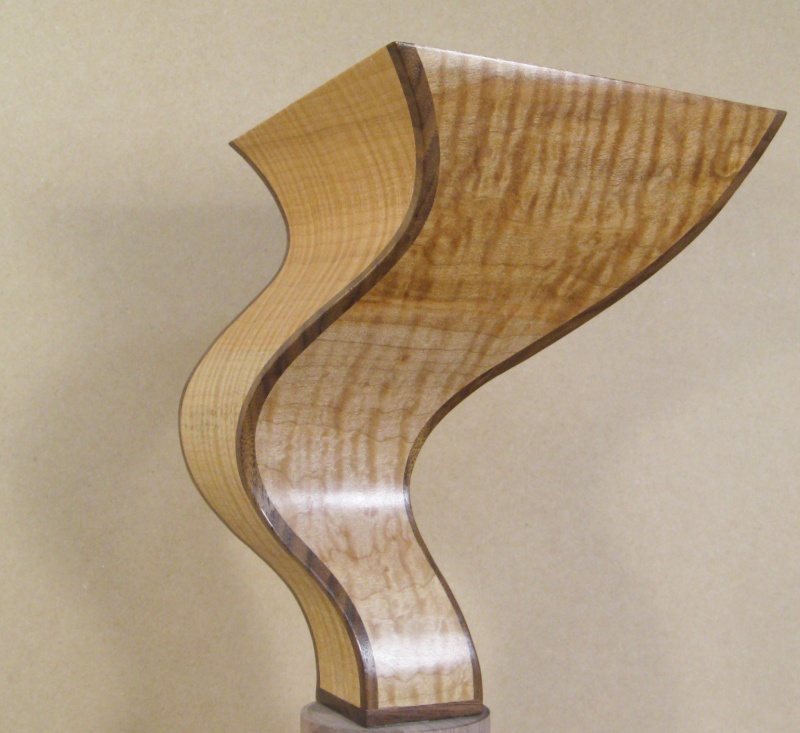
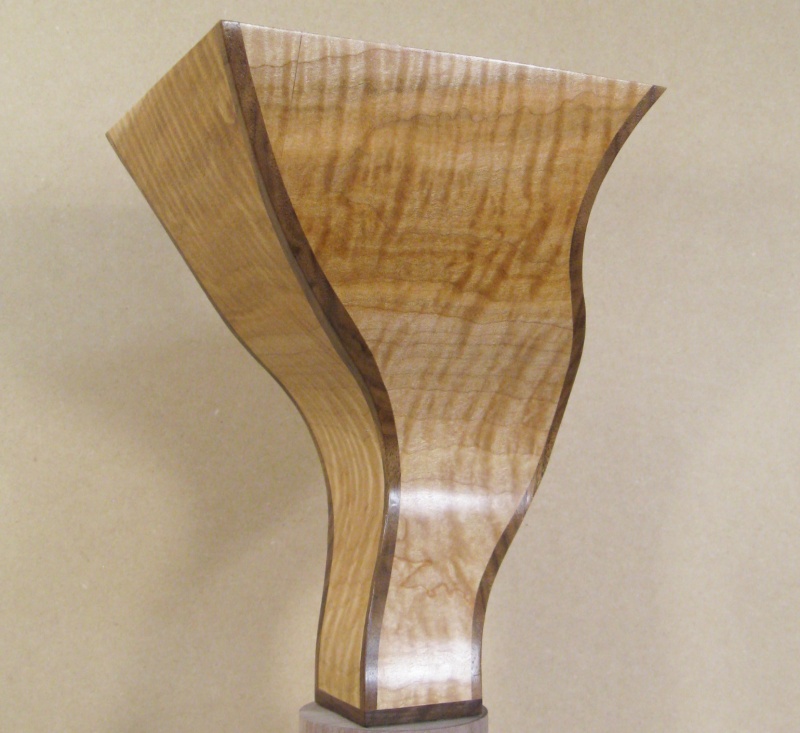
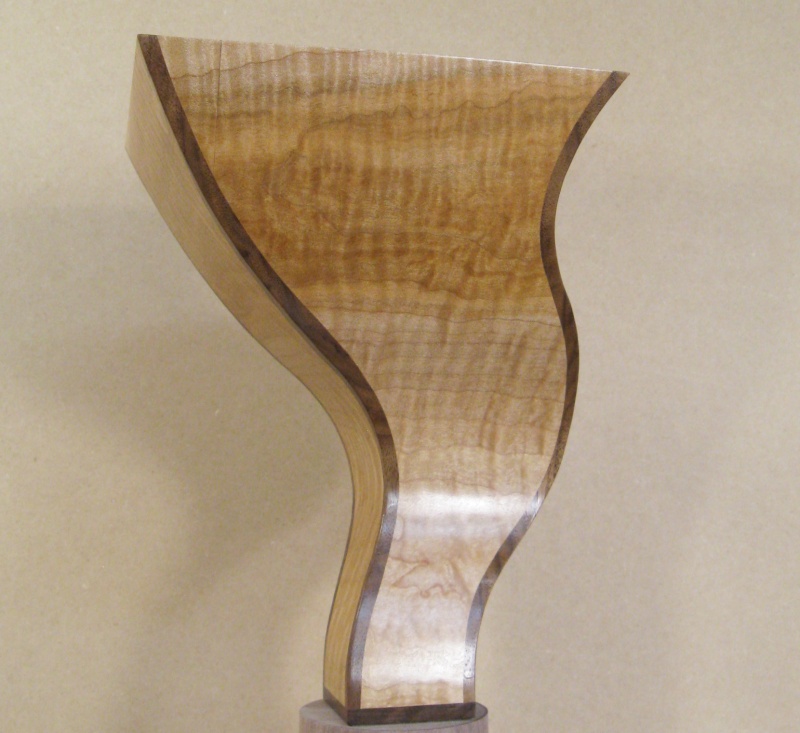
Done
Done.
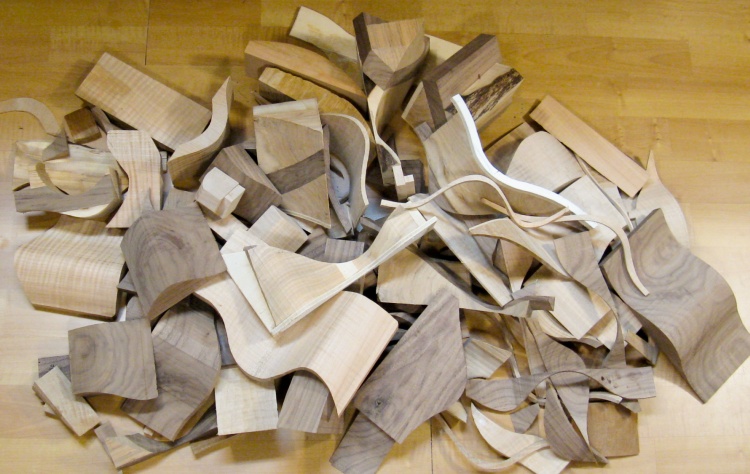
Leftovers
This is the pile of everything-except-the-vessel left over from the two blocks of curly maple and the plank of walnut. There'd be a bucket of sawdust too of course, but that is safely stored in the dust collector bin.
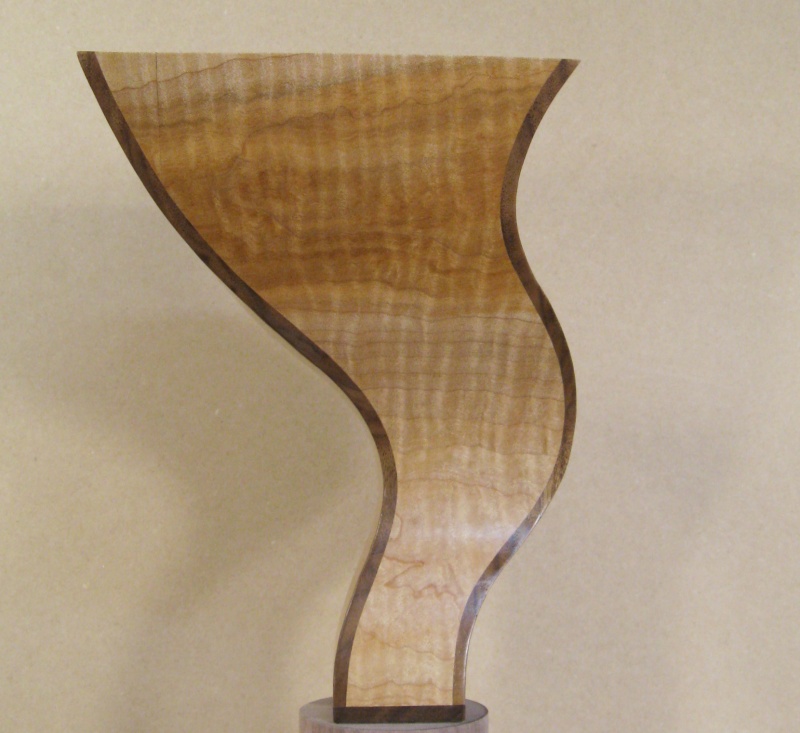
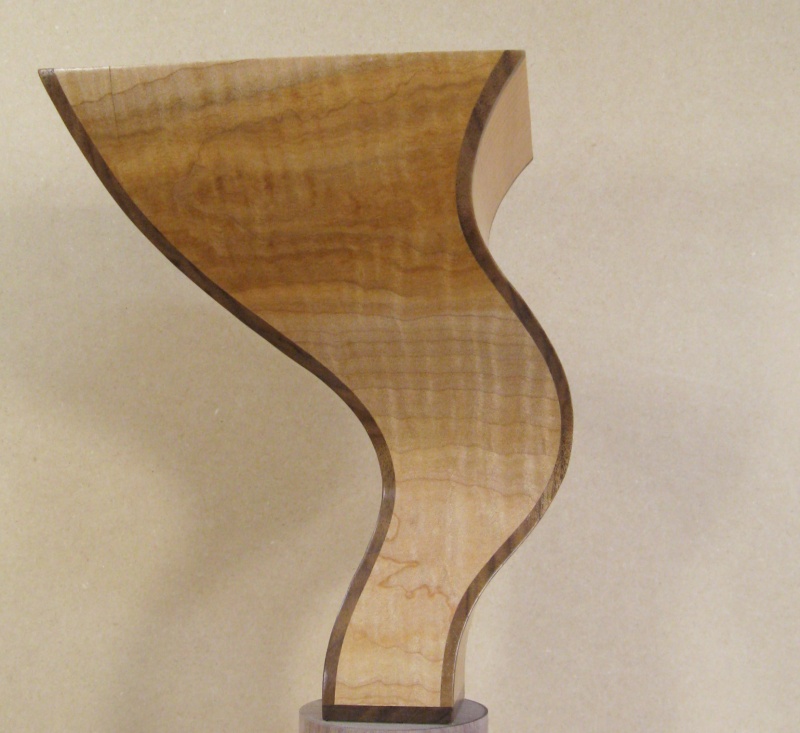
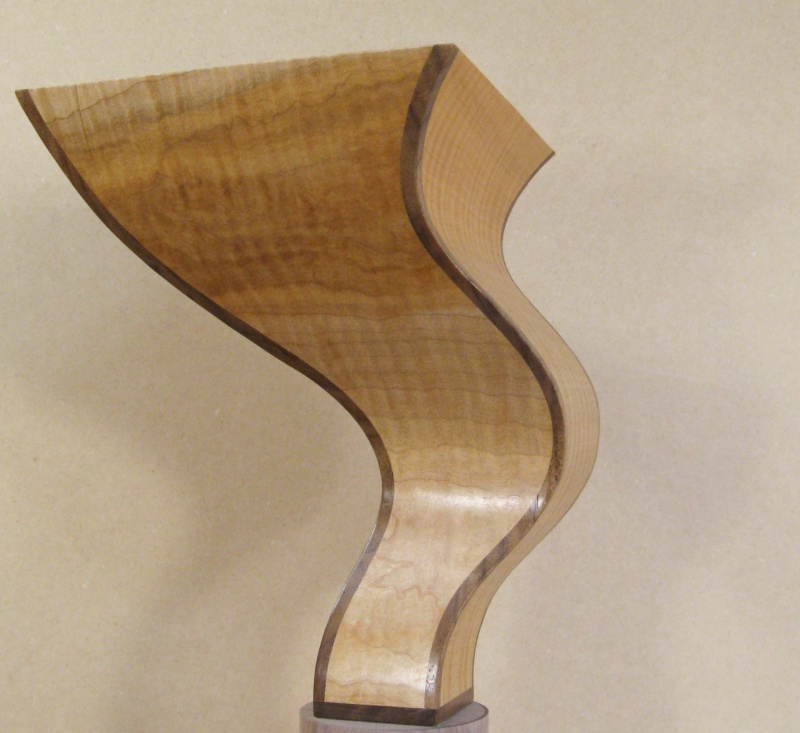
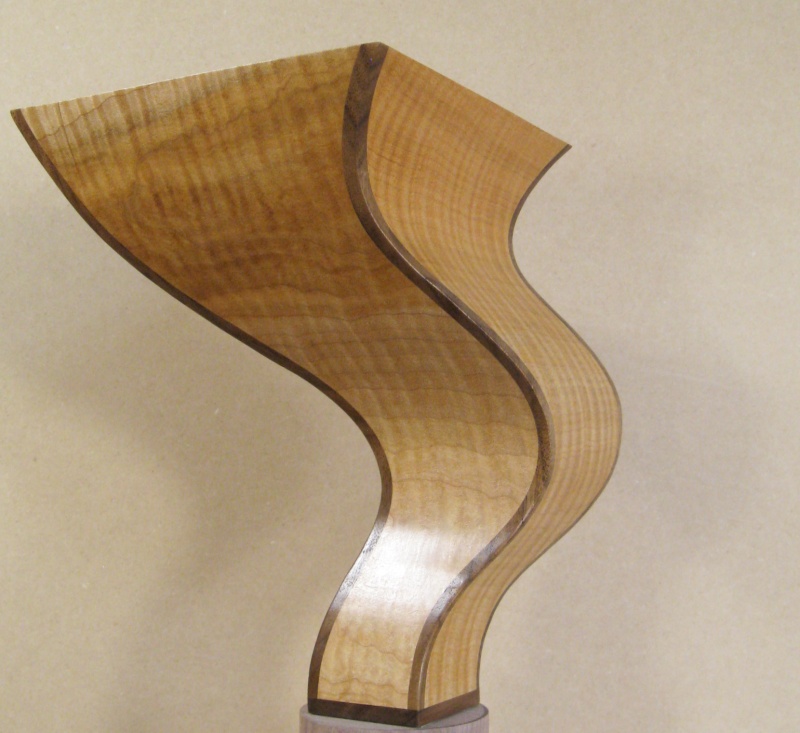

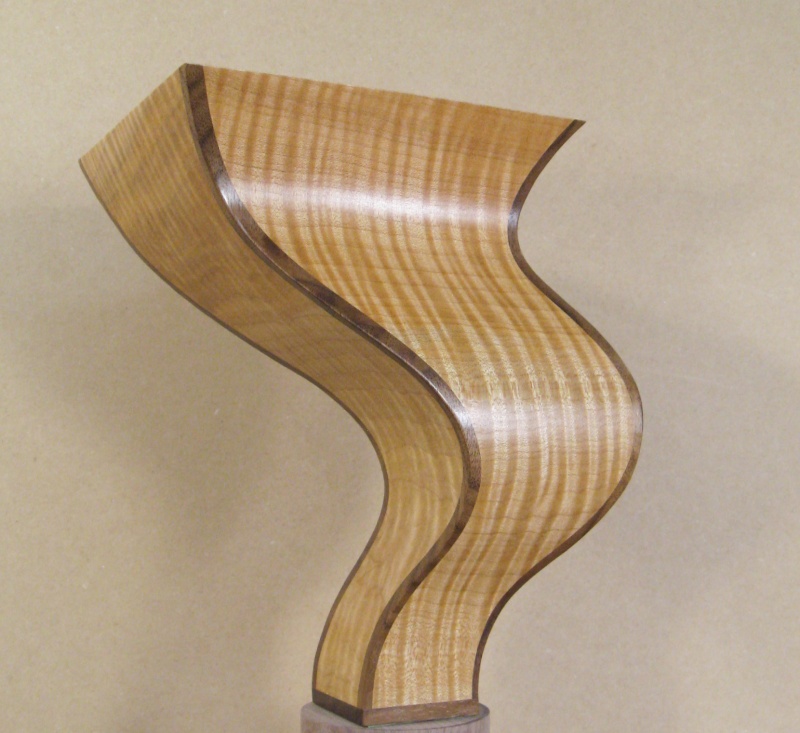
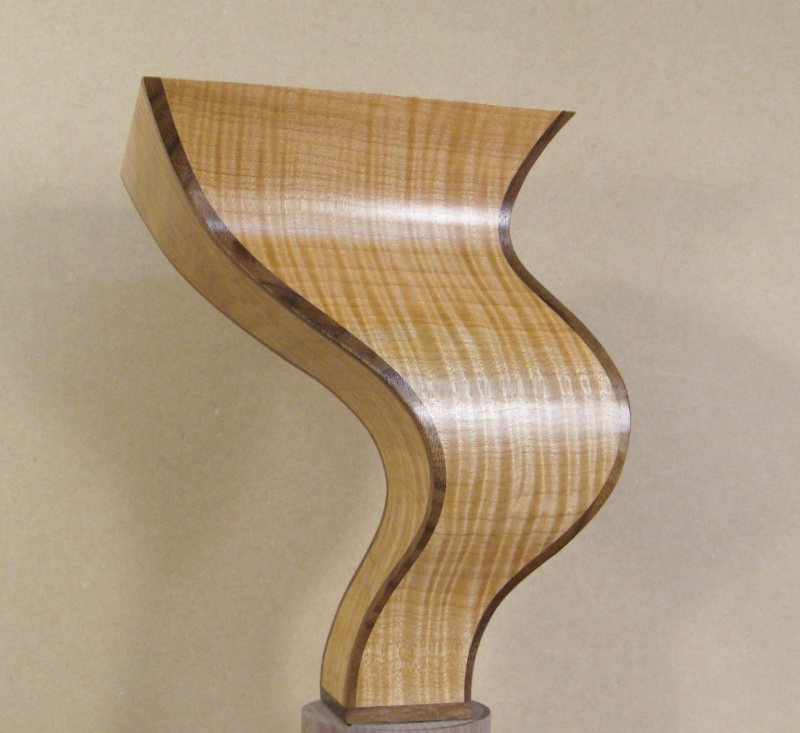
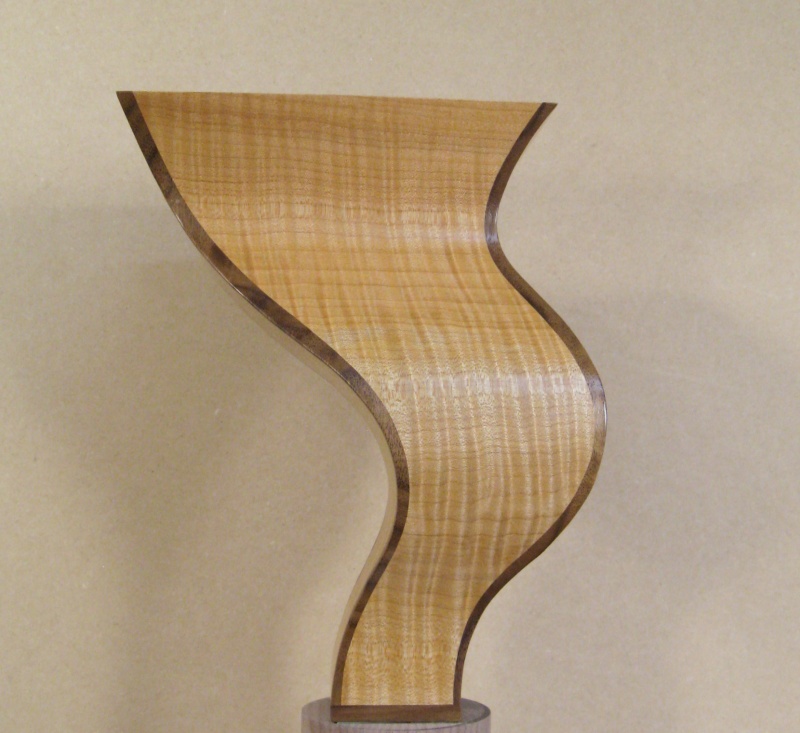
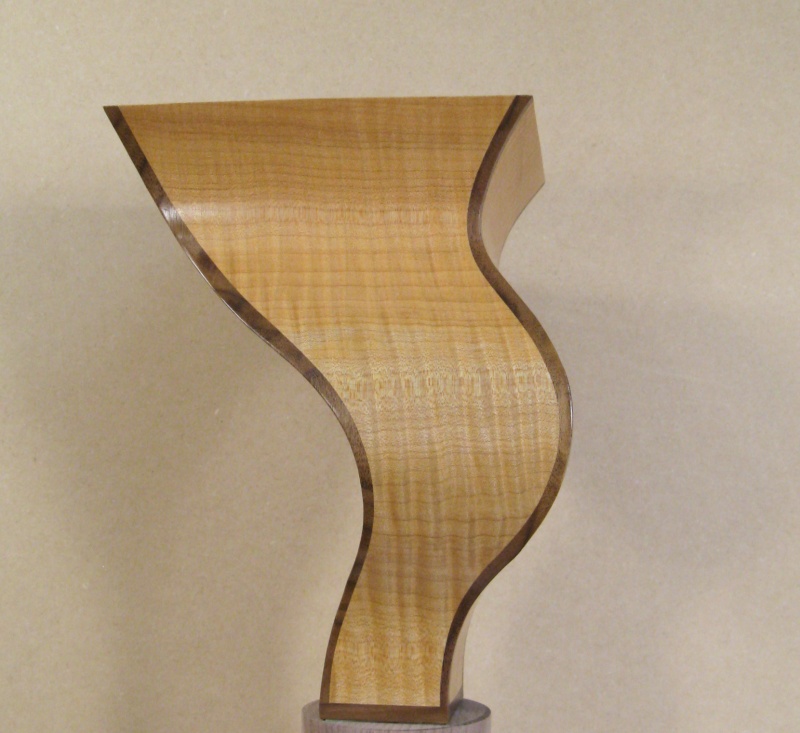
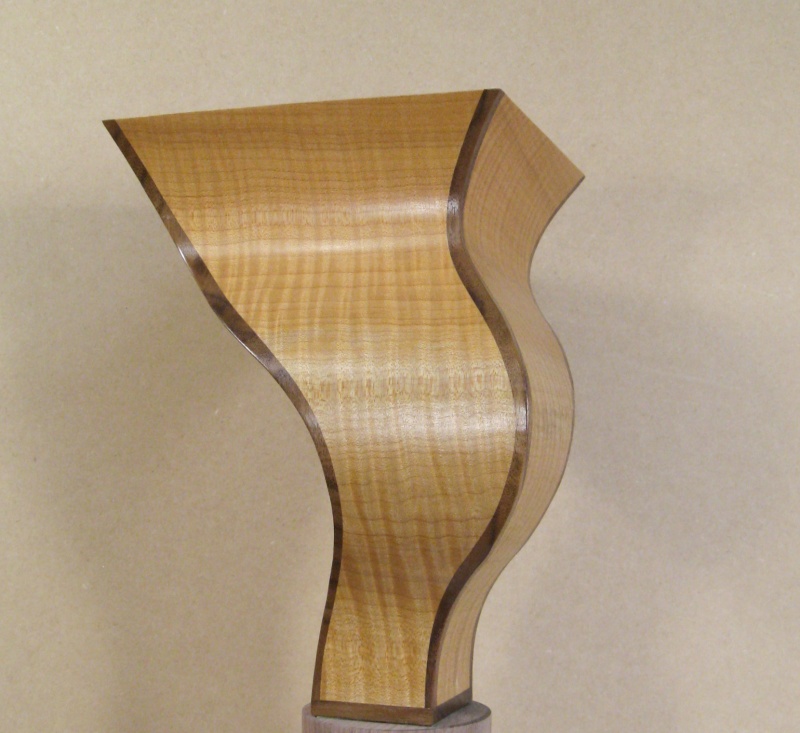
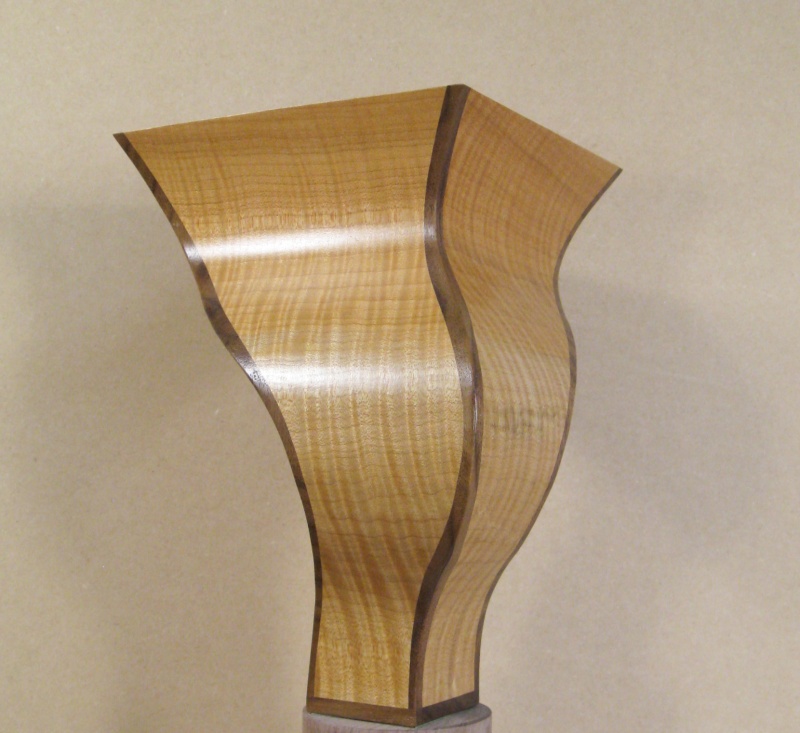

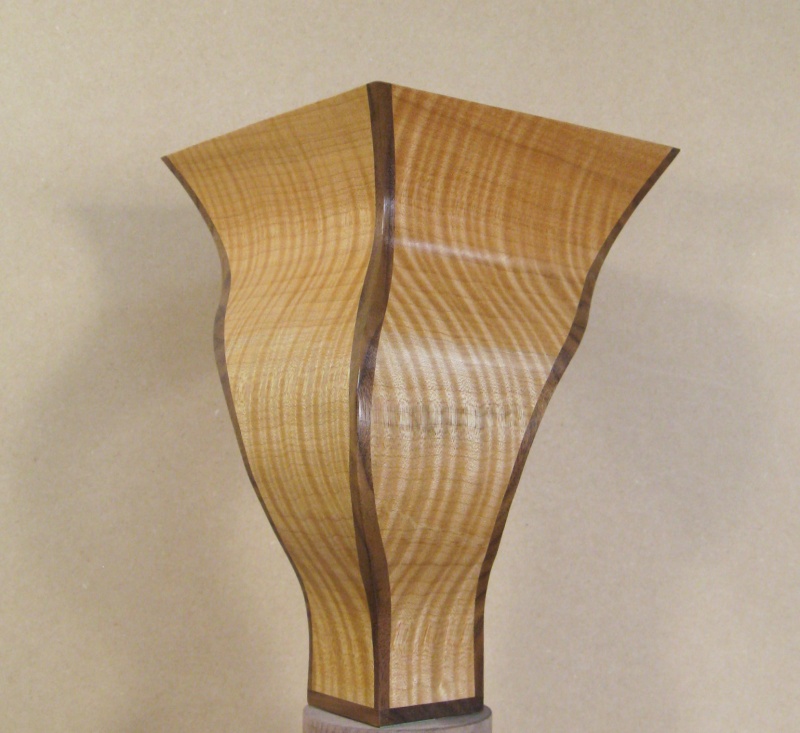
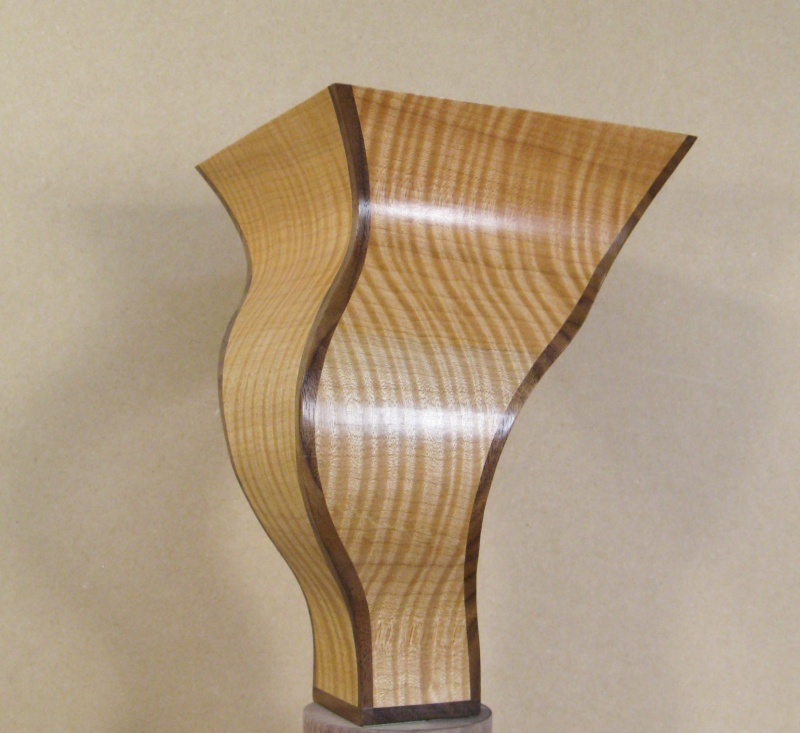
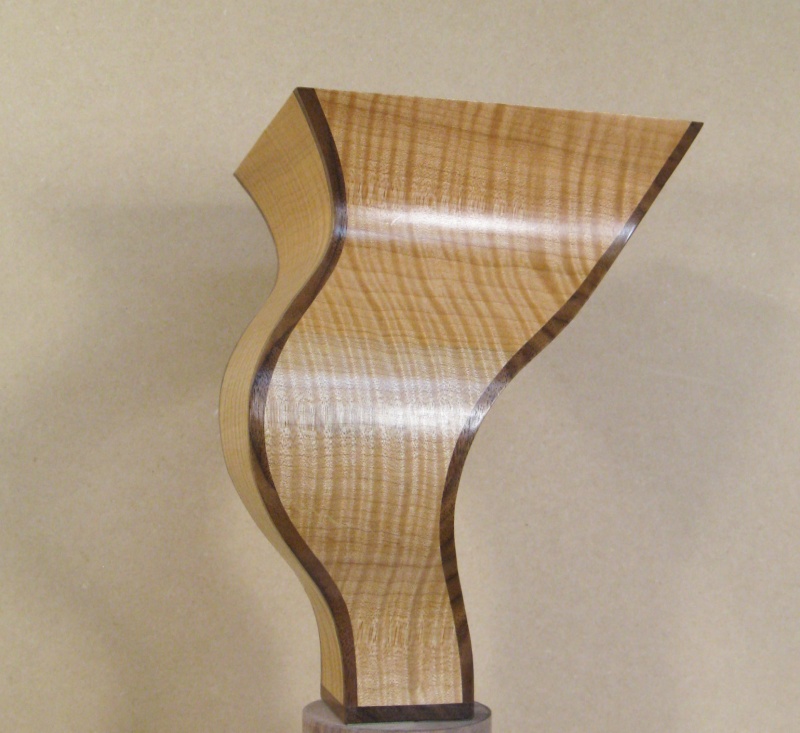
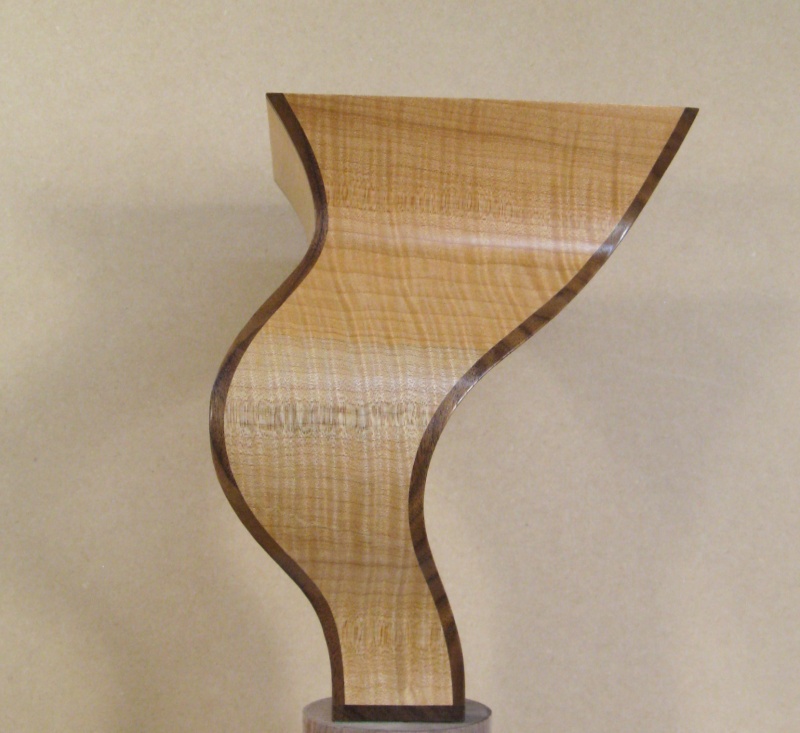
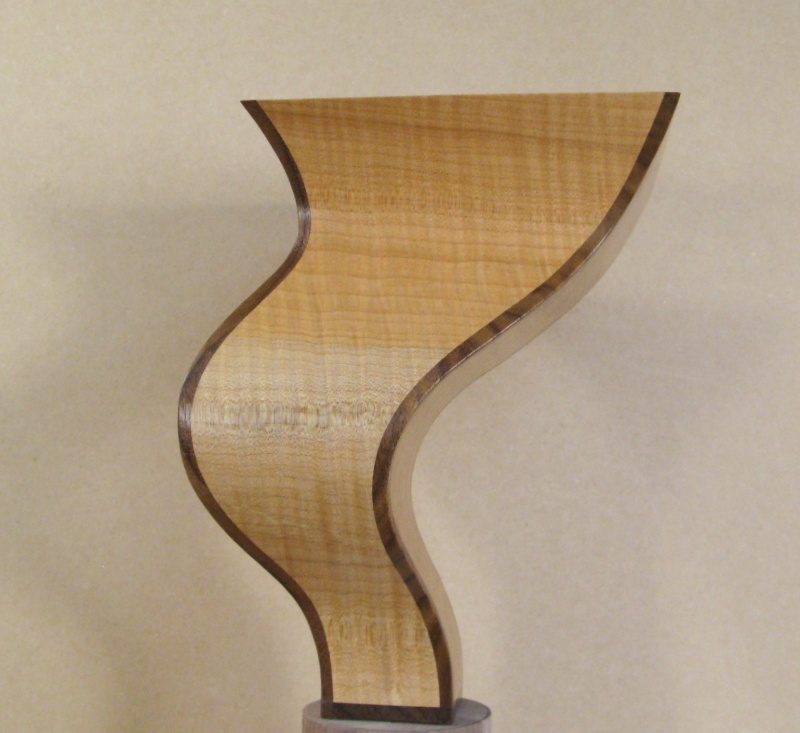
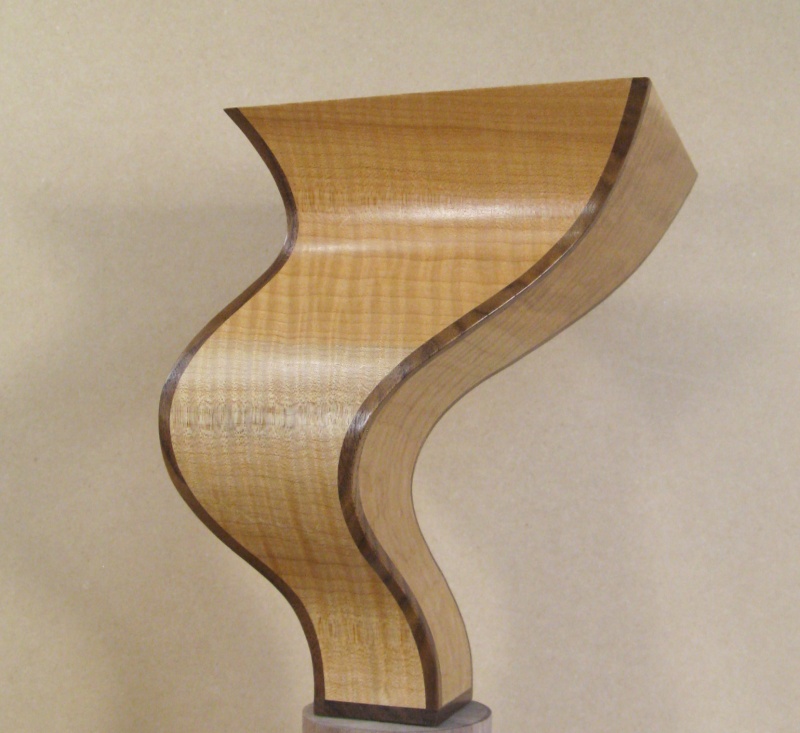
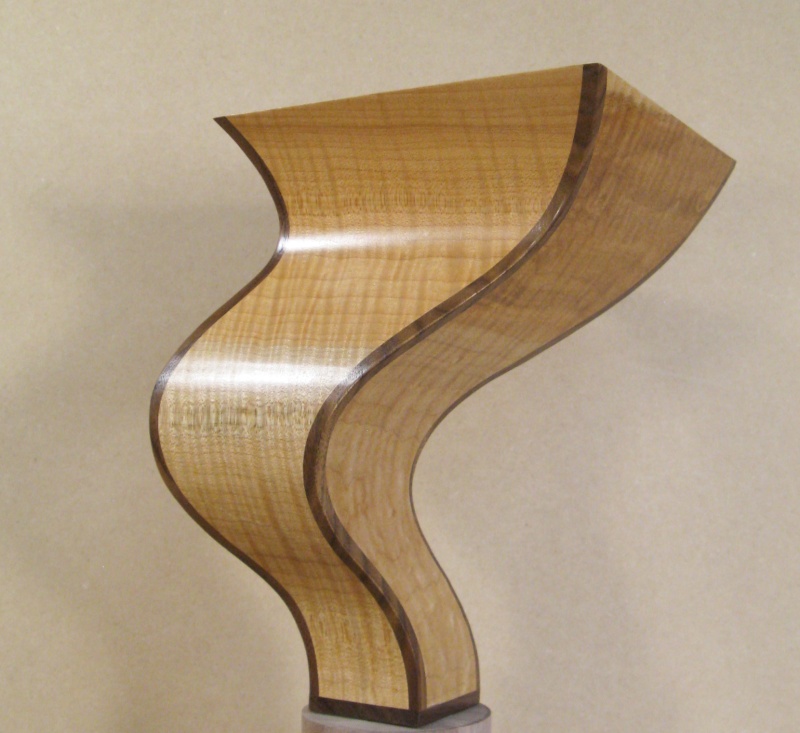
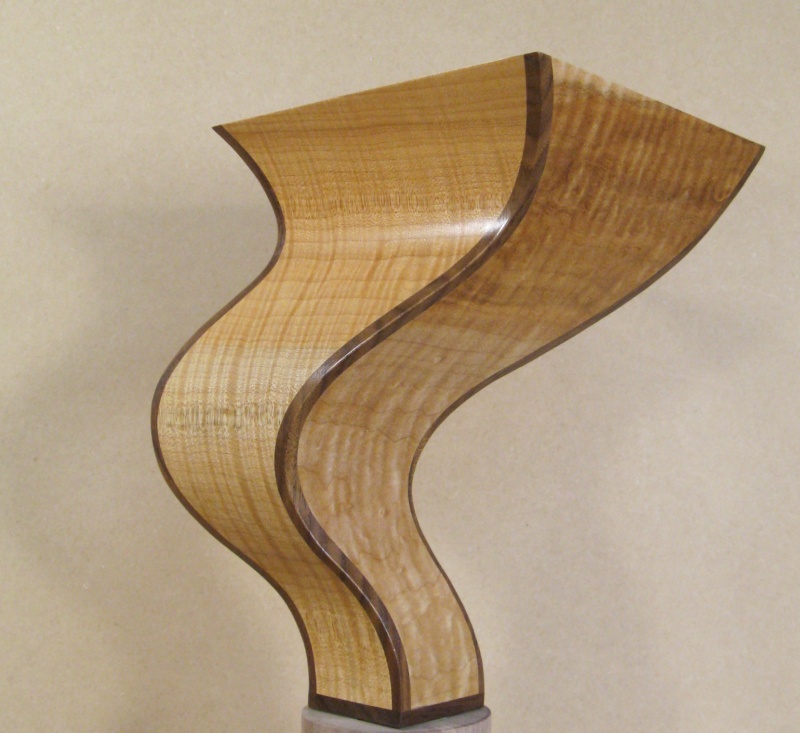
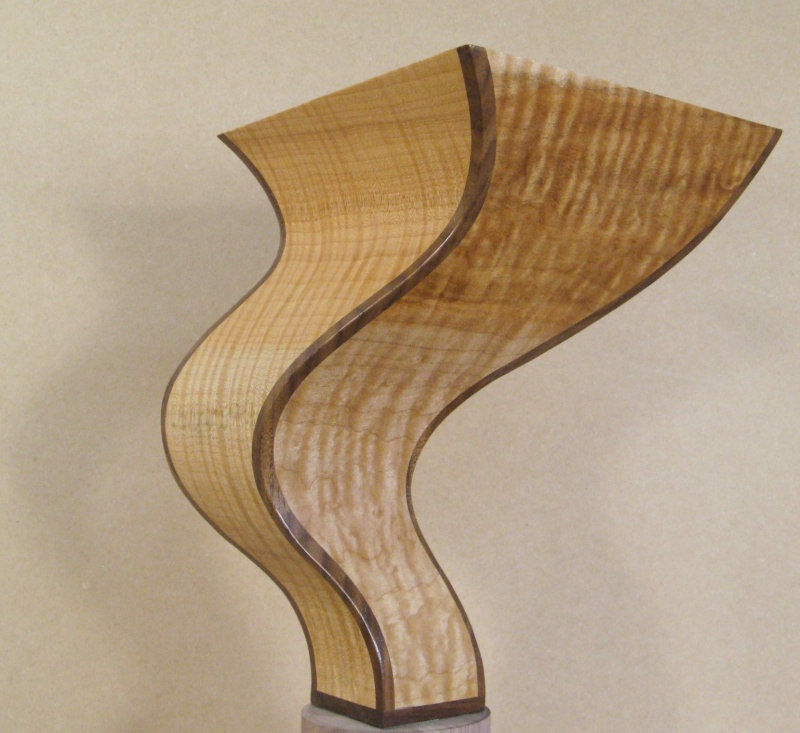
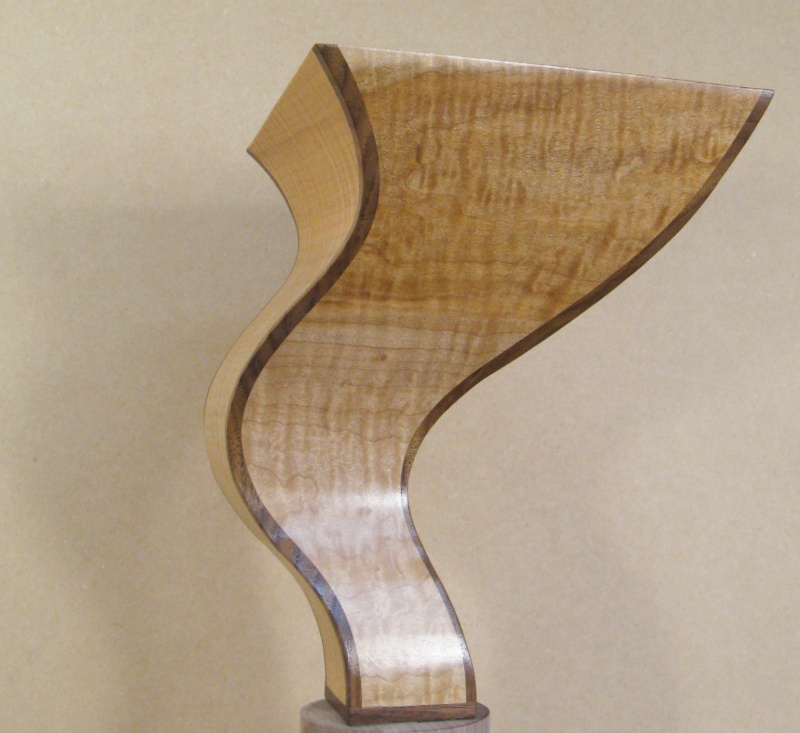
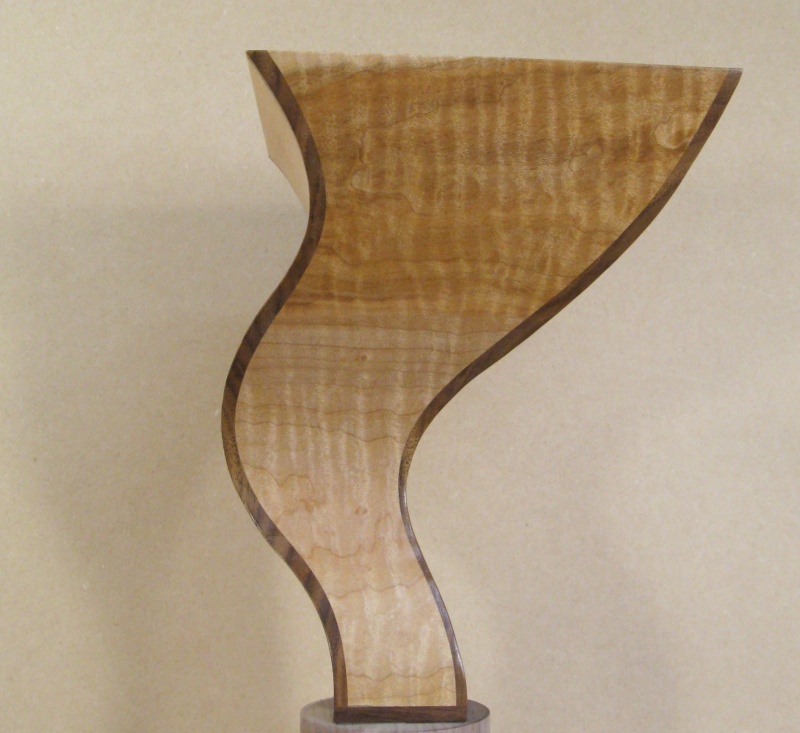
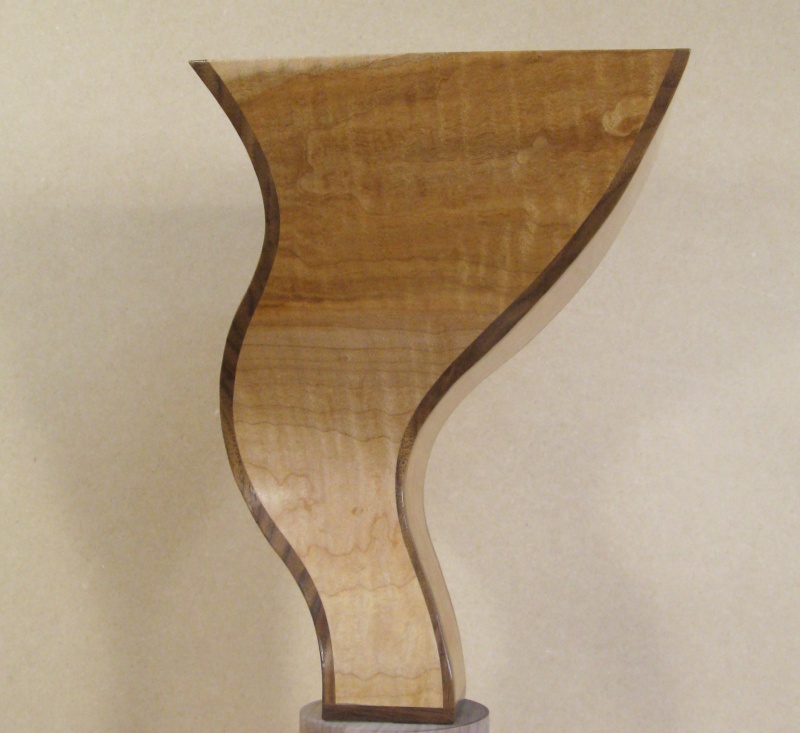
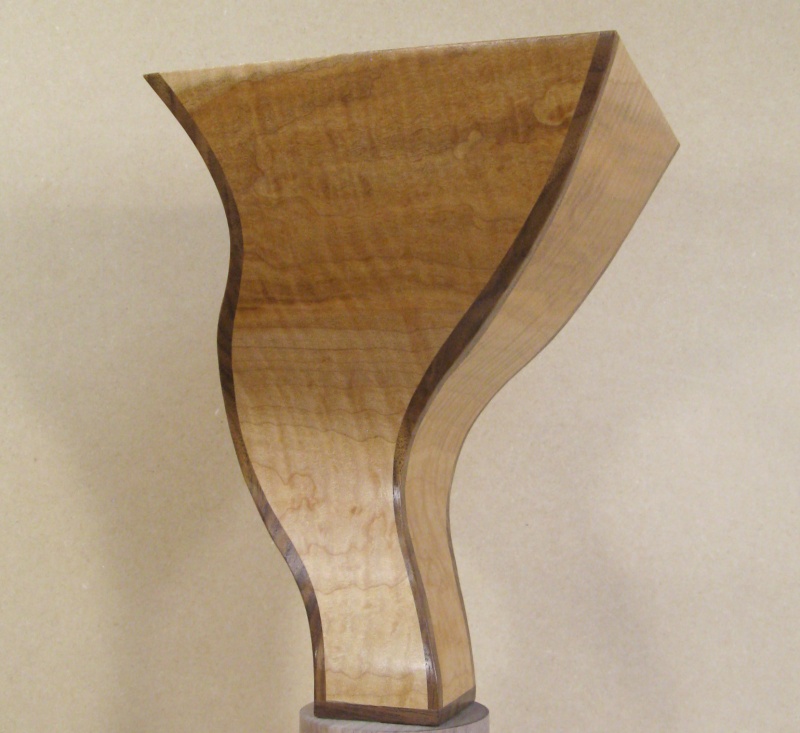
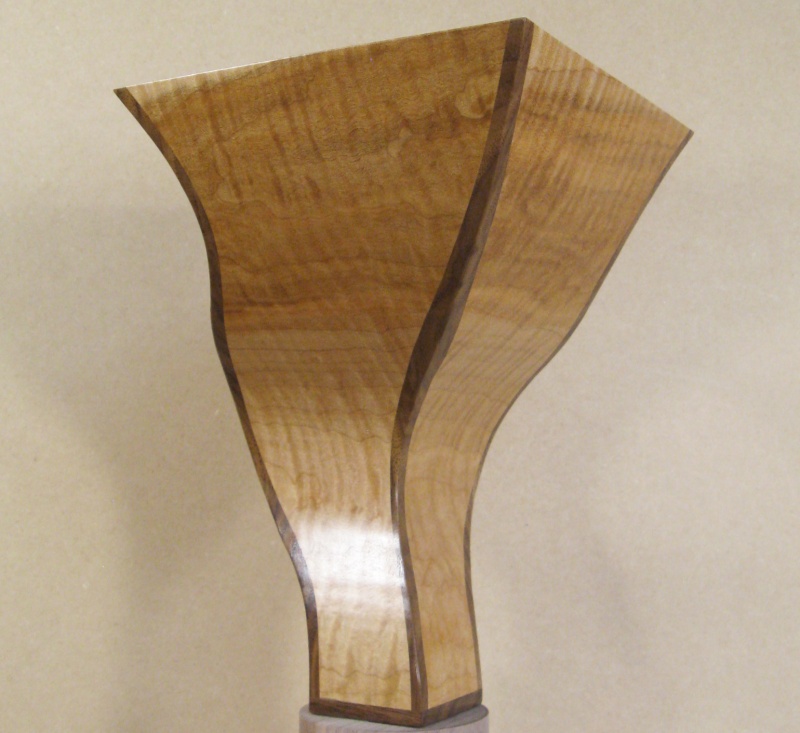
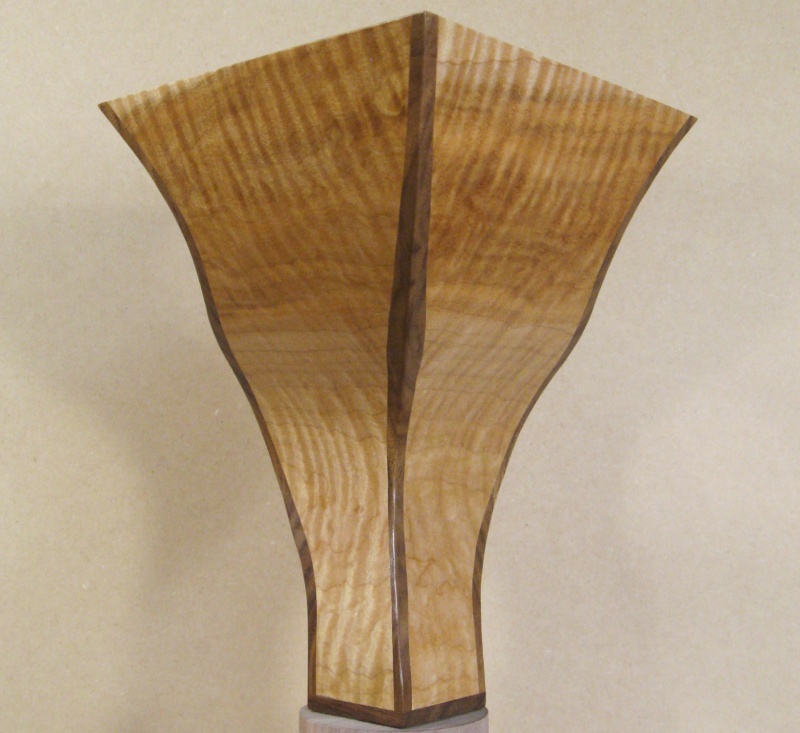
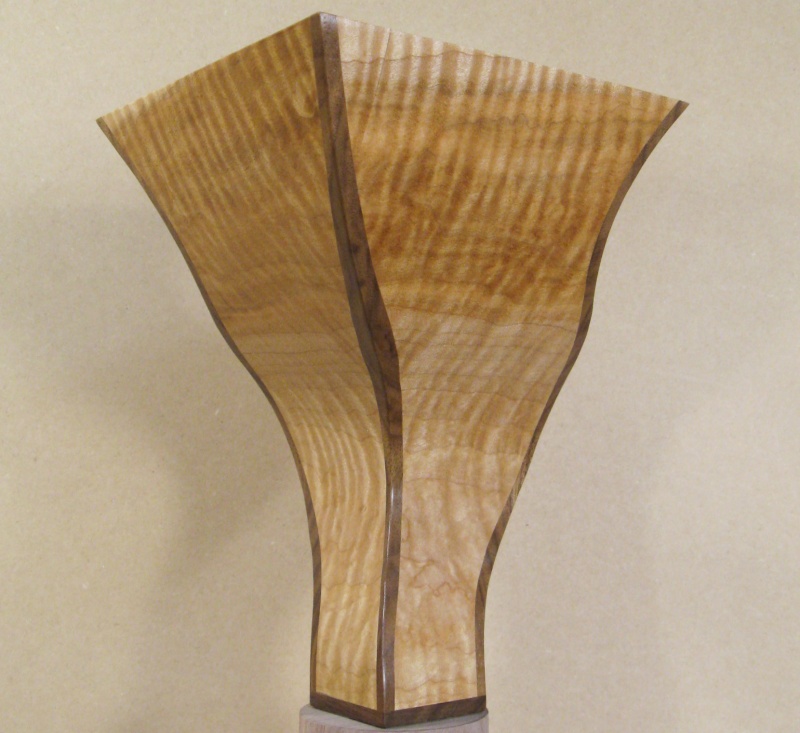
This image will give a 360° view of the vessel.
Click the side arrows to rotate.
Click the side arrows to rotate.


