There's obviously an endless number of possibilities for laminating wood to produce an interesting pattern for a coaster but I opted for a relatively simple approach of stacking rows. I chose purpleheart and maple as the contrasting woods and kept to that combination through the different designs to tie the set together.
I ended up making six variations of laminated coaster, most in positive and negative colour versions. Ultimately that produced two sets of six coasters, each with their own holder. As usual, the sections on this long page can be serially scrolled through or the handy links below can be used for instant access.
I ended up making six variations of laminated coaster, most in positive and negative colour versions. Ultimately that produced two sets of six coasters, each with their own holder. As usual, the sections on this long page can be serially scrolled through or the handy links below can be used for instant access.

A

B

C

D

E

F

Holder 1

Holder 2
Type A Coasters
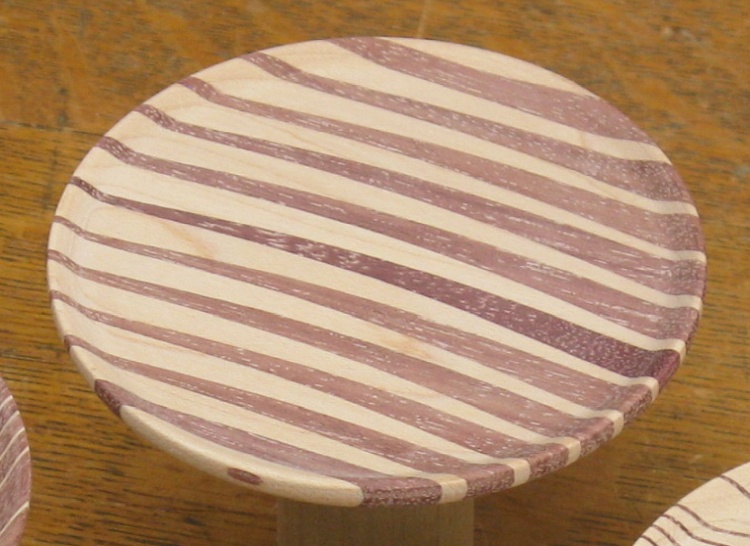
This is the first of the coasters I made. The style is named "A" due to my rational self being bright-eyed-and-bushy-tailed while my creative side was sleeping in, and which is based on the plan below.
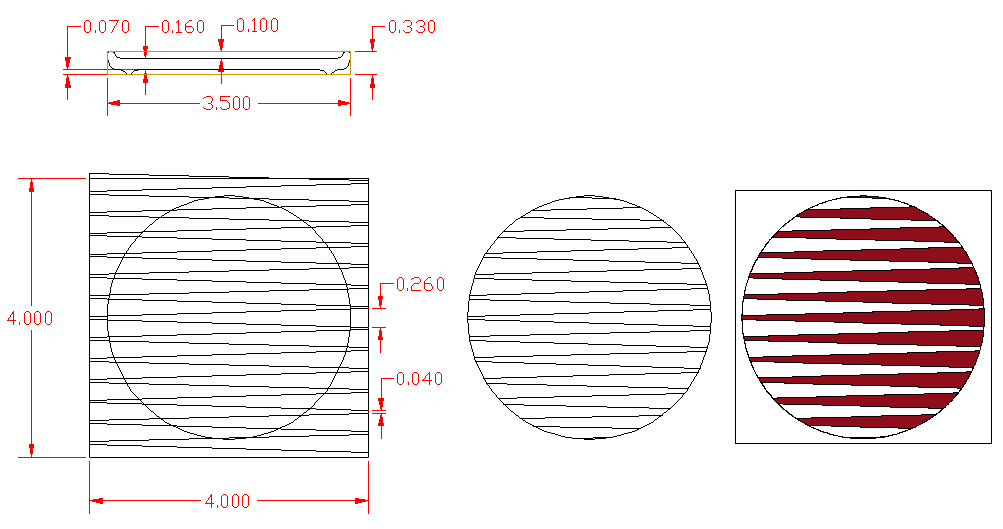
The plan for the first of the coasters
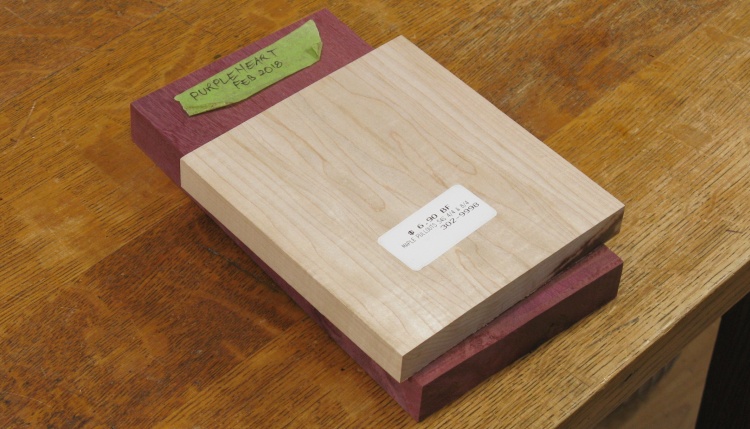
A couple of pieces of contrasting wood
I decided on purpleheart and maple for the contrasting-color woods and here I've chosen a couple pieces to start with.
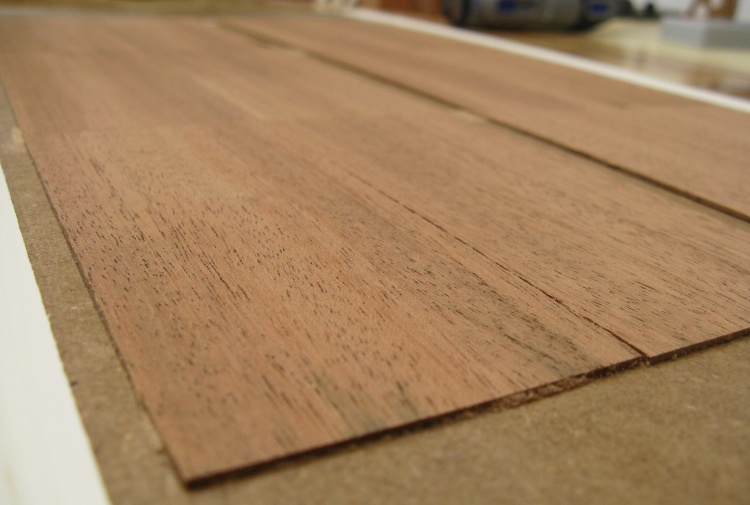
Now a suitable thickness, and with finger-saving handles
Those planks were cut thinner and planed down to a suitable thickness.
I glued extra pieces of plywood to one end of each to use as handles to keep my fingers further from the radial arm saw blade.
I glued extra pieces of plywood to one end of each to use as handles to keep my fingers further from the radial arm saw blade.

Starting to cut up the purpleheart
The saw was set to a small angle (1.6°) past square and I made the wedges by cutting one side and then flipping the wood to cut the other side. I added a stop to get consistent wedge thicknesses.
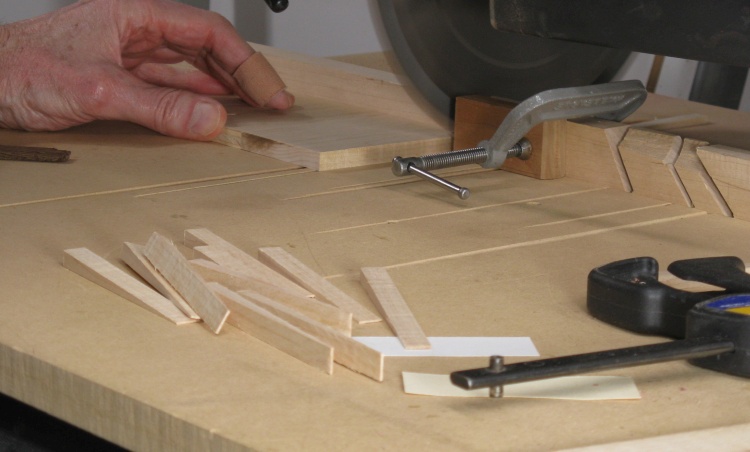
A pile of maple wedges forming
After the purpleheart it was the maple's turn, with the growing pile of wedges in the foreground.

One coaster's worth of pieces
A few minutes work produced these two piles of wedges.
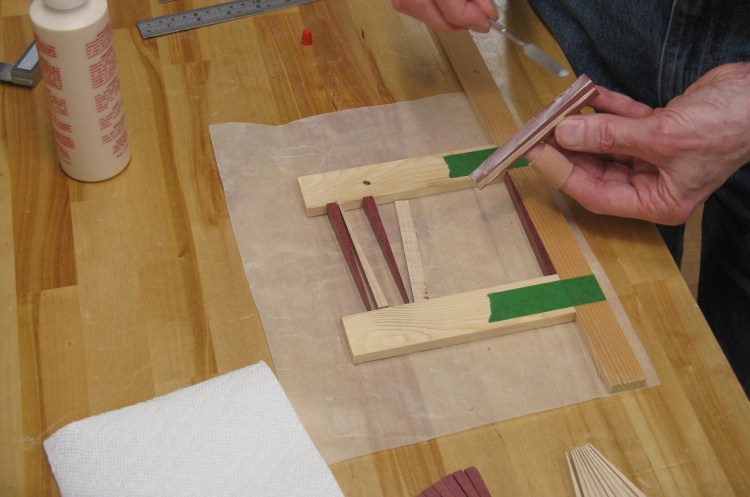
Starting to glue the first few pieces
I made up a little frame to guide the assembly of the coaster blank and started gluing alternating types of wood together 8 or ten pieces at a time.
Clamped
The glued assembly was clamped both to squeeze the joints (black/orange mini clamps) and to hold the assembly flat (big blue clamp).
A pair of coaster blanks
I did the glue/clamp cha-cha a few times which produced this glue-encrusted pair of blanks.
These coasters were essentially identical since the alternating wood colours make the "negative" look the same as the "positive".
These coasters were essentially identical since the alternating wood colours make the "negative" look the same as the "positive".
Equipped with axles for turning
The next stop for these in Workshop Tour '23 was the lathe, so I glued on some axles turned from birch.
Below I've included a few on-the-lathe photos. In general the procedure was:
• Round the diameter and reduce to correct size
• Inset the top about 0.12", leaving a lip at the edge
• Flip around and narrow the axle for easier removal
• Form circular foot on the bottom
• Round the diameter and reduce to correct size
• Inset the top about 0.12", leaving a lip at the edge
• Flip around and narrow the axle for easier removal
• Form circular foot on the bottom

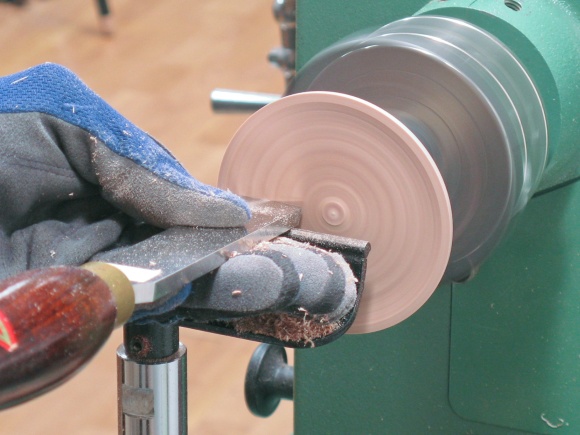
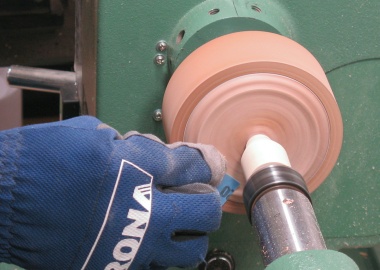
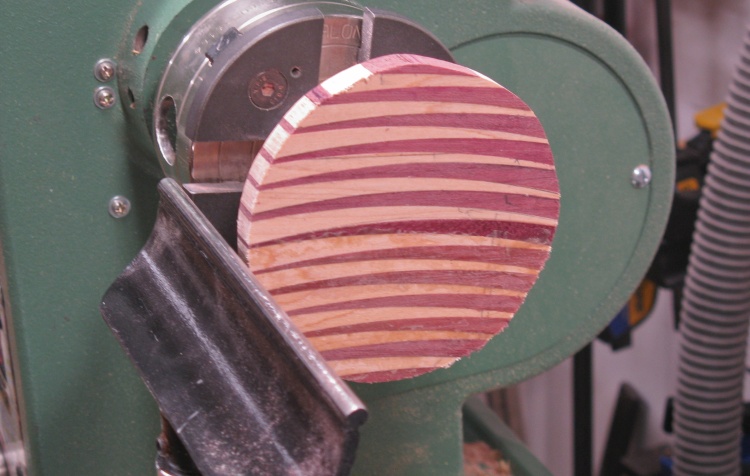
Cut roundish and mounted to the lathe
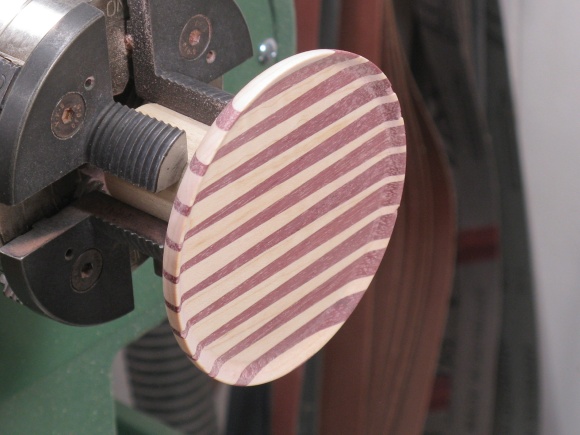
Edge and top side shaped
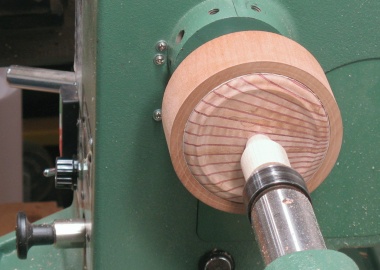
Flipped around to do the bottom
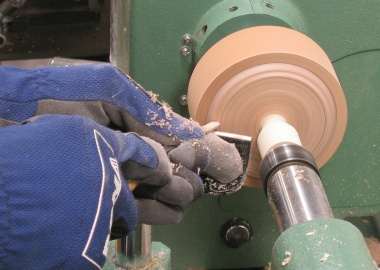
Bottom shaping done
After turning, the birch axle was cut off (as shown later for coaster B) and the residual bottom nub was sanded off (as shown later for coaster C).
Type B Coasters
This design uses thin slices of purpleheart veneer between maple wedges for bit more of a radial-looking design.
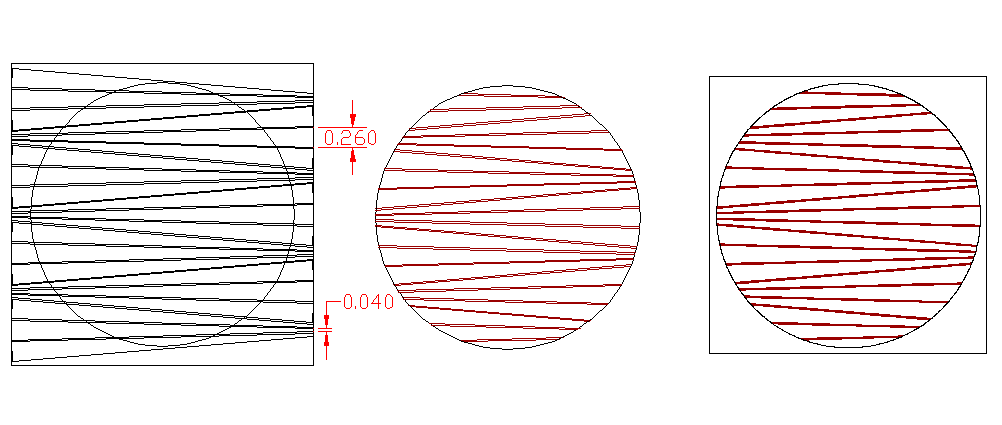
Type B coaster concept
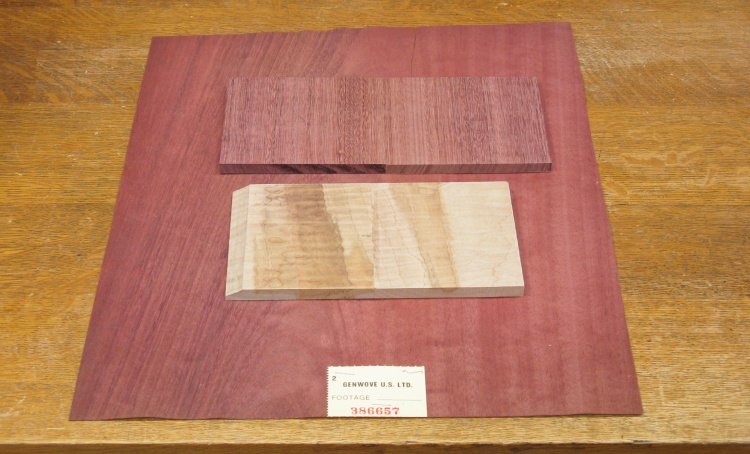
The wood selection
From my Big Pizza-Box of Exotic Veneers I pulled out a piece of purpleheart veneer (or some wood quite like it - there was no species indicated on the stapled-on label).
I also rounded up some more solid purpleheart and maple (a nice figured maple this time) for this next couple of coasters.
I also rounded up some more solid purpleheart and maple (a nice figured maple this time) for this next couple of coasters.
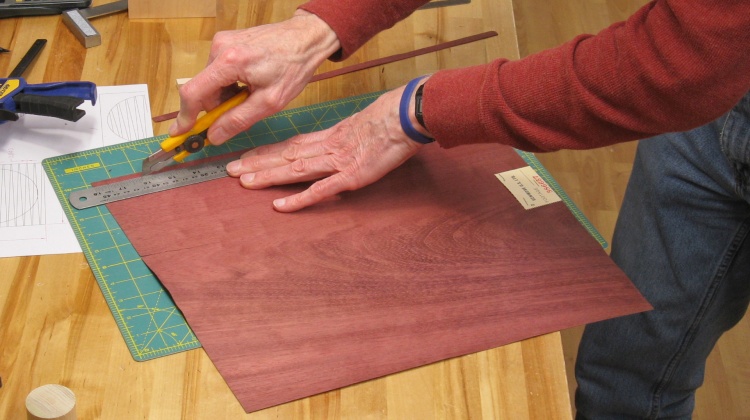
Chopping up the veneer
Strips were sliced off the veneer using a utility knife and then they were sawn into shorter pieces.
The maple was cut into wedges with the radial arm saw the same as last time, then both the veneer pieces and the wedges were touched up with the sanding block to get rid of any rough corners.
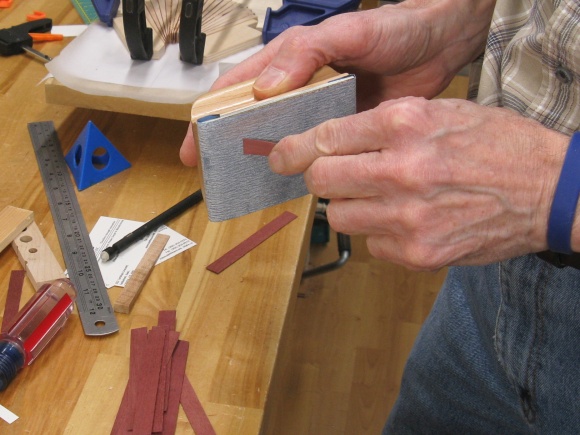
Touching up veneer pieces
...and maple pieces
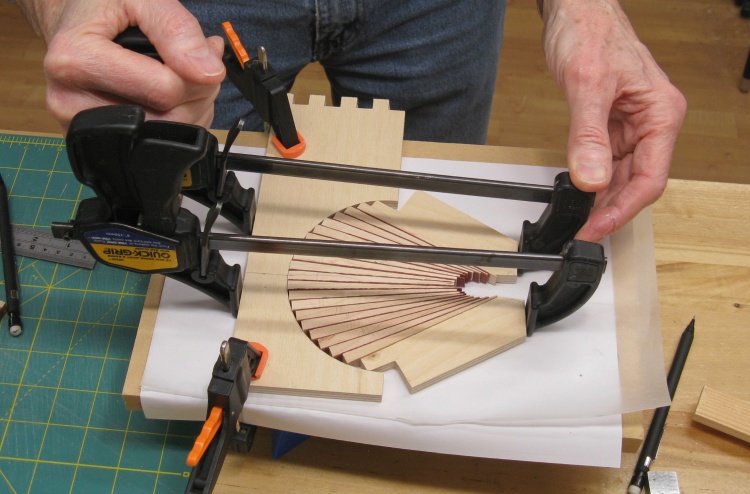
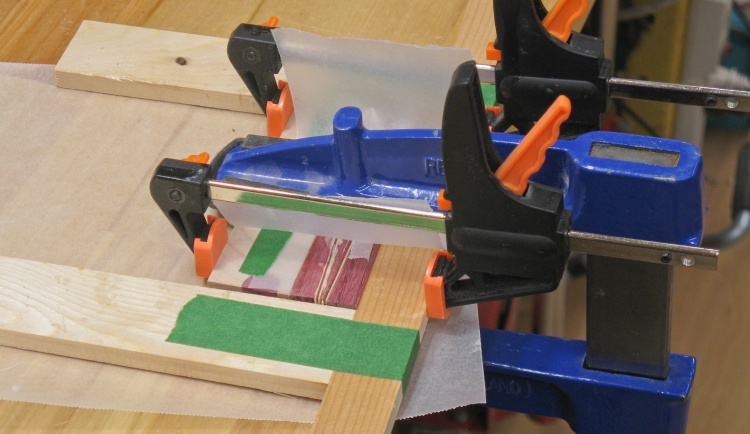
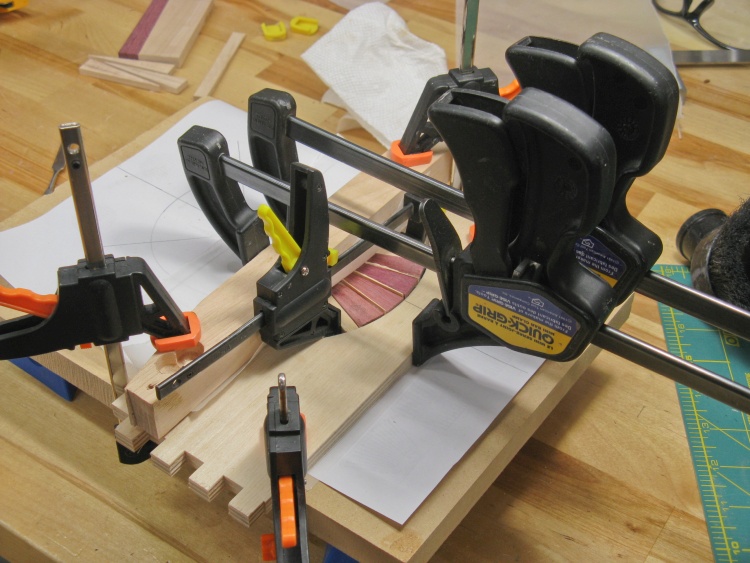
The odd shape necessitated a special clamping setup
The radial pattern was formed by alternating the maple wedges and purpleheart veneer slices (the solid purpleheart piece is used later).
That pattern formed an unclampable wedge so I made up the plywood clamping fixture seen here to squeeze the joints together while the glue dried.
That pattern formed an unclampable wedge so I made up the plywood clamping fixture seen here to squeeze the joints together while the glue dried.
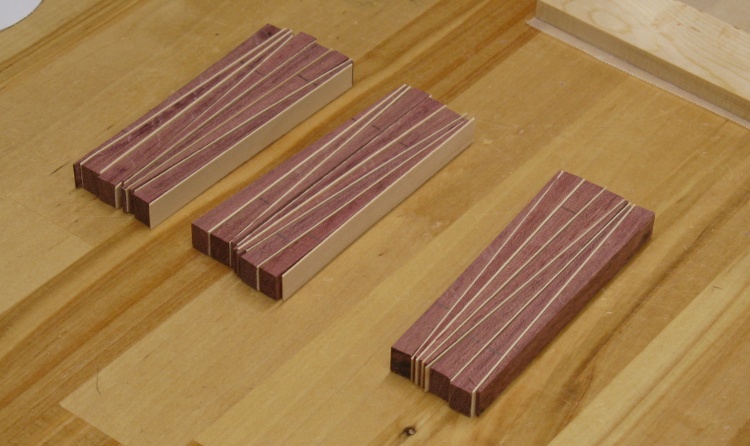
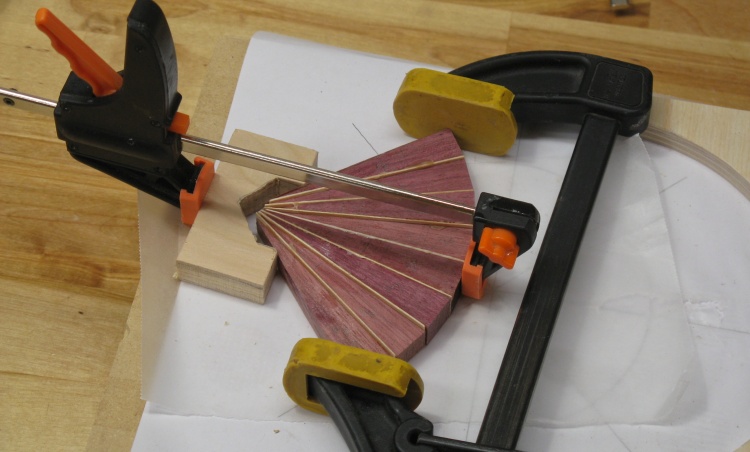
A pair of vaguely Millennium Falcon-shaped coaster blanks
The blanks were built up by gluing on a few pieces at at time.
After doing the first (on the left in the photo) I thought the purpleheart strips were a bit thin so the next one got wider versions (0.04") instead of the 0.02" veneer. I cut the strips out of the solid piece of purpleheart using the radial arm saw.
After doing the first (on the left in the photo) I thought the purpleheart strips were a bit thin so the next one got wider versions (0.04") instead of the 0.02" veneer. I cut the strips out of the solid piece of purpleheart using the radial arm saw.
Ready for the lathe
After gluing on birch axles as before, the coaster blanks were cut out on the bandsaw.
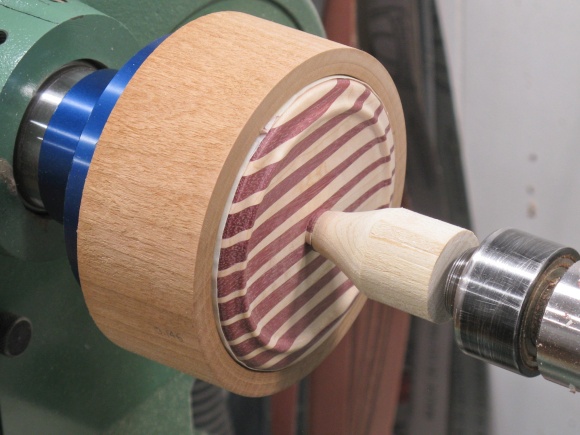
Turning was the same procedure as the Type As although here I've provided a bit more detail on the turning process.

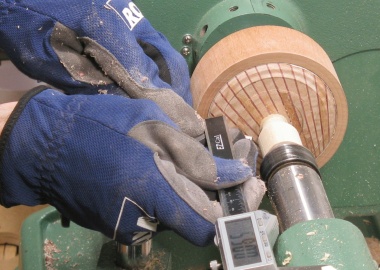
Hollowing top
Checking depth
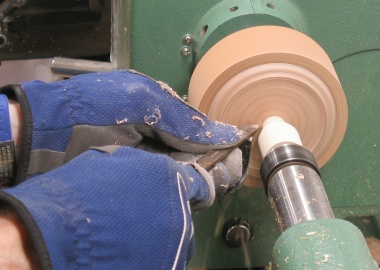
Smoothing top

Sanding
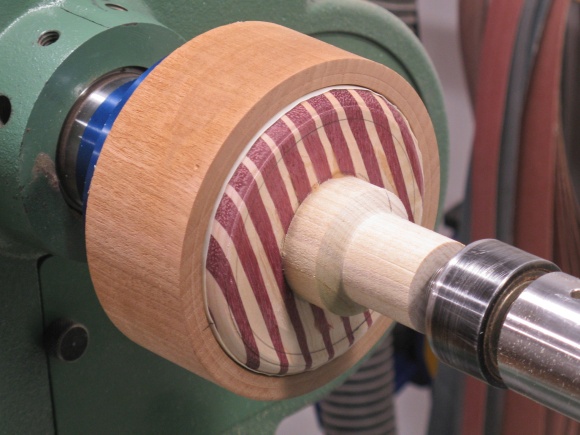
Once the top side was shaped, the coaster was pulled off the lathe and the same mahogany jam chuck as last time was used to work on the bottom. The tailstock was moved into position to contact the axle and hold the coaster in the chuck, then out came the tools.
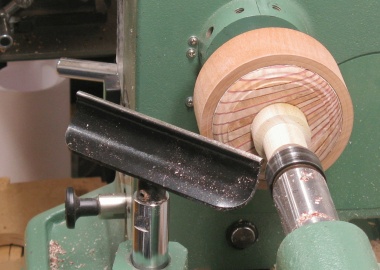
Ready to do the bottom
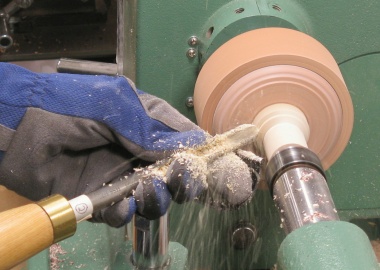
Tapering the axle down
Forming the outside of the foot
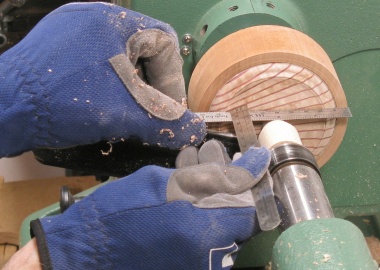
Checking the foot height
Thinning near the center
Checking center depth
Checking center flatness
Sanding the bottom
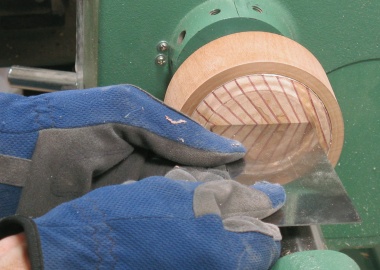
Bottom done
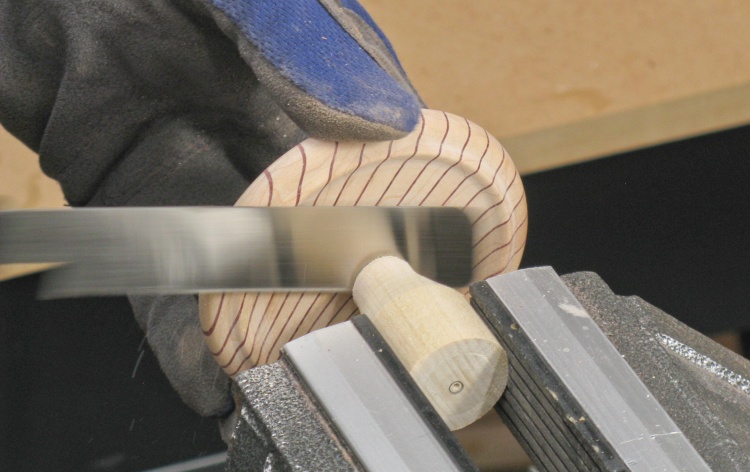
Cutting off the axle
Once pulled off the lathe, the axle was cut off close to the bottom.
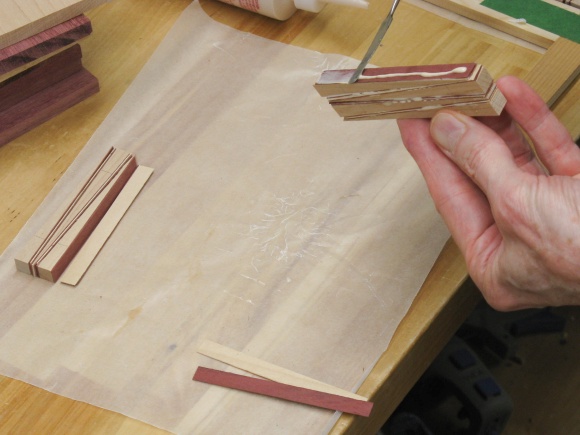
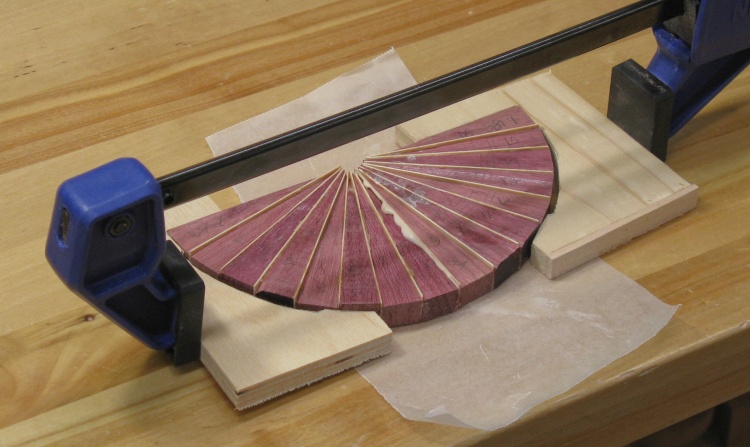
The "negative" version getting ready for glue-up
I also made the negative version with purpleheart wedges and maple veneer. Here I'm numbering the wedges prior to gluing.
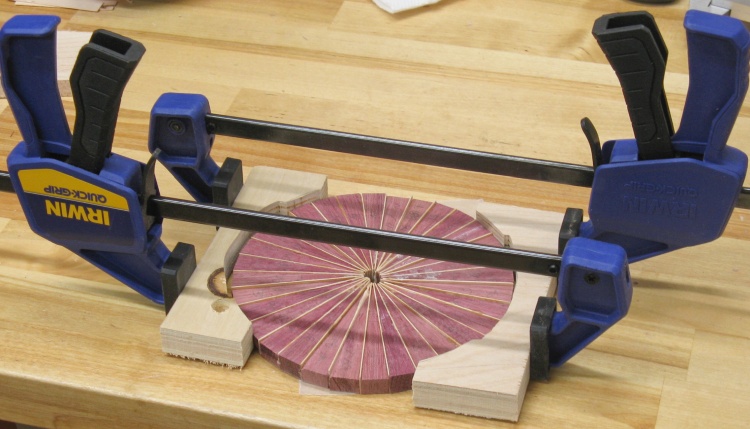
The top of the turned purpleheart version
The darker version was turned exactly like the lighter version and here the dark version is off the lathe and just needs the axle removed.
Type C Coaster
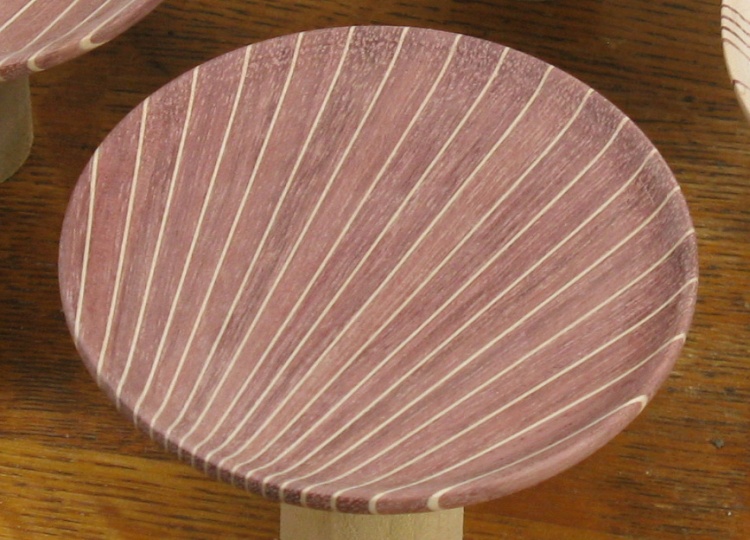
These next-in-sequence coasters again used veneer but with three layers between wedges to get a pin-striping effect.
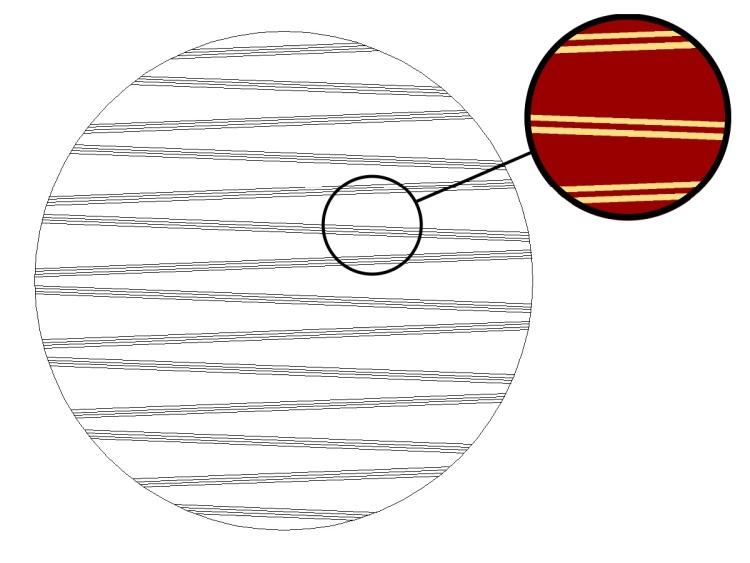
Type "C" coaster; With 57 - count 'em - 57 layers
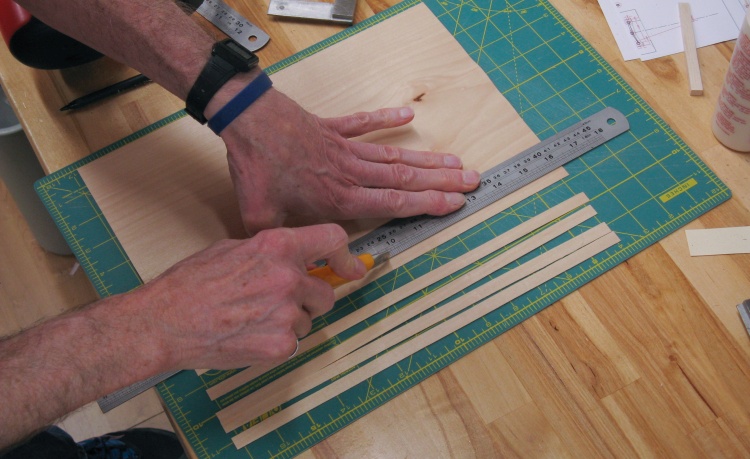
Cutting maple veneer into strips
I pulled out some maple veneer and gave it the same utility-knife treatment as the purpleheart enjoyed in the previous coasters.
I cut some additional purpleheart strips as well.
I cut some additional purpleheart strips as well.
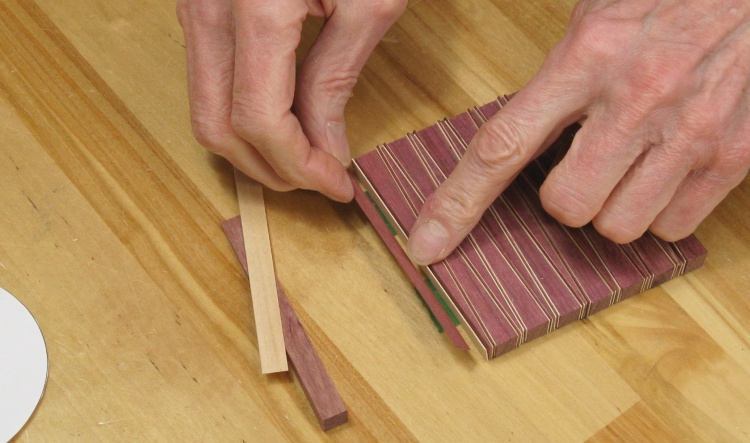
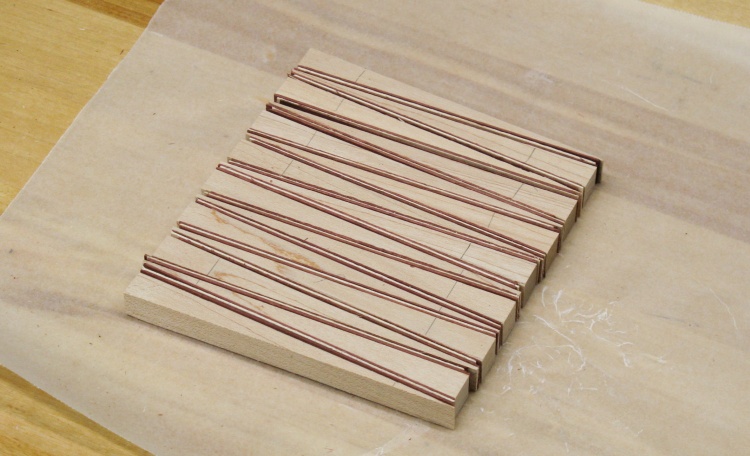
Test stacking the first Type C
This photo shows a dry assembly of the coaster to ensure I had all the pieces and there wouldn't be any surprises when the glue bottle came out.
The first batch of layers being glued together
Like the previous coasters, this one was built up by gluing small sections at a time. This photo shows the first gluing with maybe 9 layers stacked together.
I also made an opposite-species version
And to maintain an even light/dark balance in the universe, I made another with the wood species swapped.
Below are a couple gluing-up photos of the mostly-maple version, which here is around three-quarters of the way through the process.
Applying glue to the top of a stack of layers
Clamping the wet stack to the dried layers

Some interesting lathe shavings
These coasters got the same glued-on axle and were turned in a similar manner to the others.
The only noteworthy thing was the interesting shavings left on the lathe.
The only noteworthy thing was the interesting shavings left on the lathe.
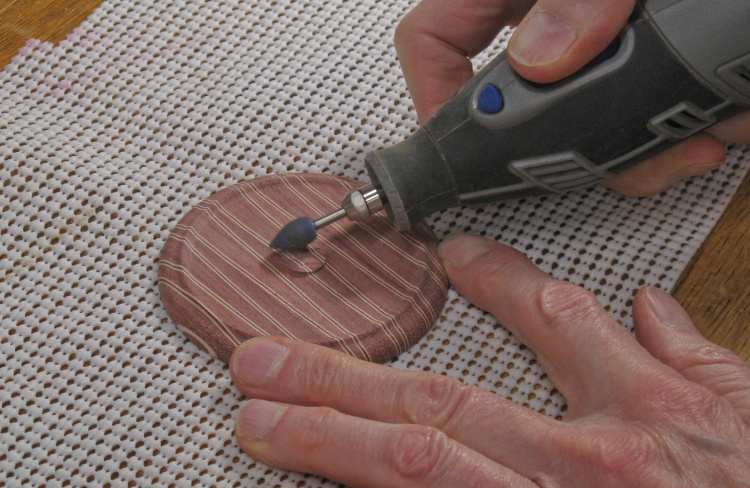
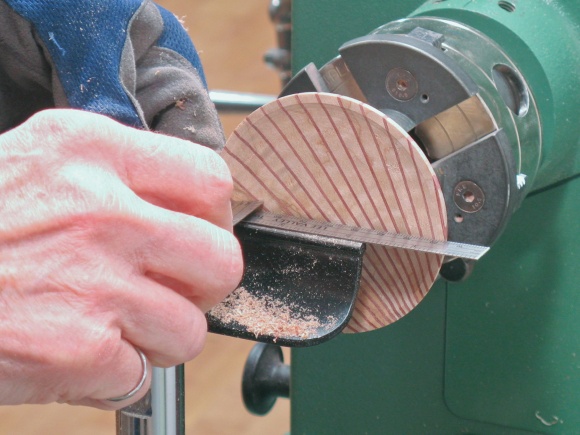
Starting to grind off the axle nub
Once the axle was cut off, the bulk of the remaining nub was ground off using a fine grinding bit in the Dremel rotary tool.
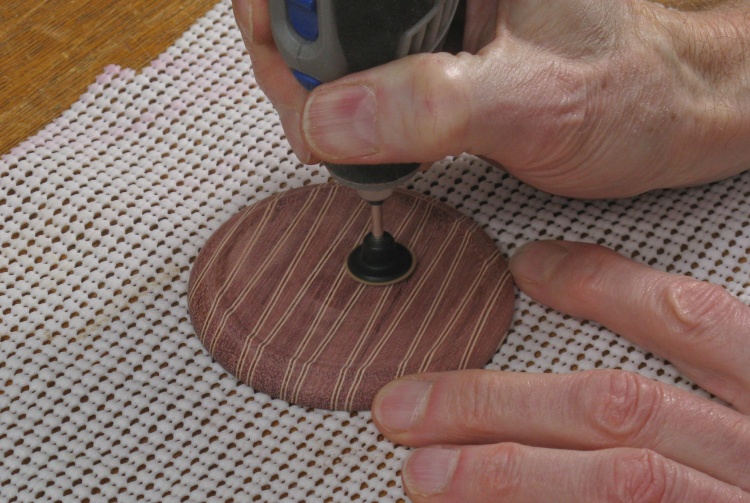
Sanding smooth the last of the nub
A sanding disc smoothed off the last bit of the nub and further blended it with the rest of the bottom and then a bit of hand sanding finished the job.
Type D Coasters
The type D coasters are a variation in the theme of A, using the familiar narrow wedges but which have been given a nice circular arc.
Type D coaster; Narrow wedges again, but bendy ones
The wedges of the previous coasters are simple to make - they can just be cut with the radial arm saw set to a small angle. These curved ones, however must be routed using a pattern. The mating edges of each two adjacent pieces must be routed with the same curve so they fit together exactly. For that I needed a pattern and some means to hold the wood in place while routing.
A jig with the required pattern (just an arc with around 10" radius) was made from 3/8" MDF - it was actually an old cupboard door panel so it had maple veneer on both sides. It was fashioned to be able to hold the pieces both for concave and convex routing. Below are a couple photos of the pattern coming together.
A jig with the required pattern (just an arc with around 10" radius) was made from 3/8" MDF - it was actually an old cupboard door panel so it had maple veneer on both sides. It was fashioned to be able to hold the pieces both for concave and convex routing. Below are a couple photos of the pattern coming together.
Routing the proper curve in the pattern
Tapping holes for hold-downs
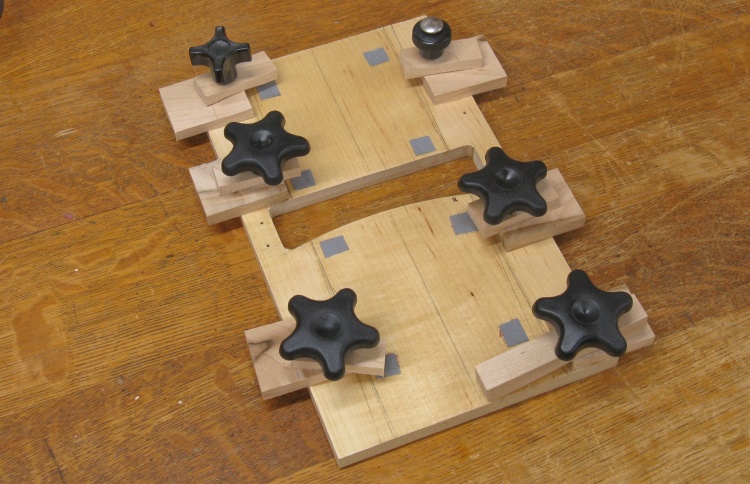
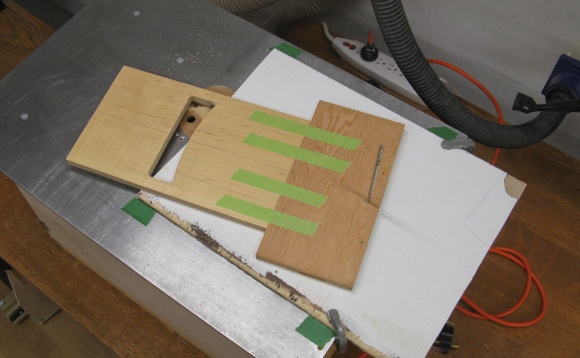
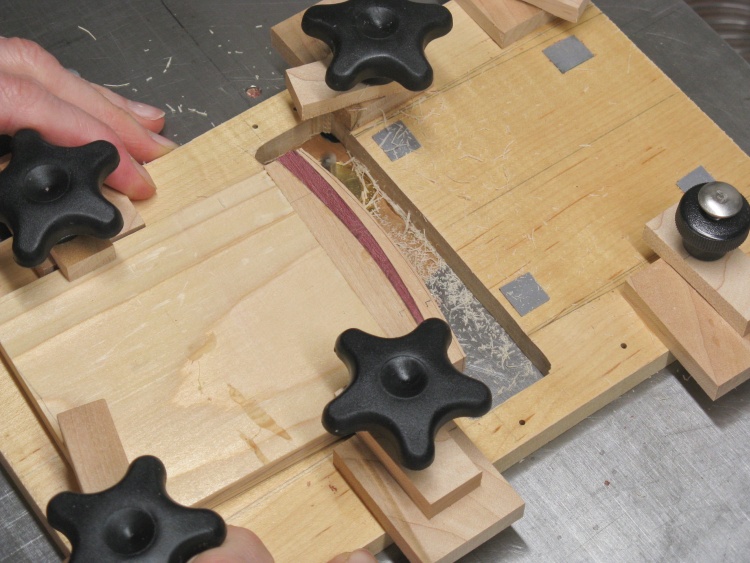
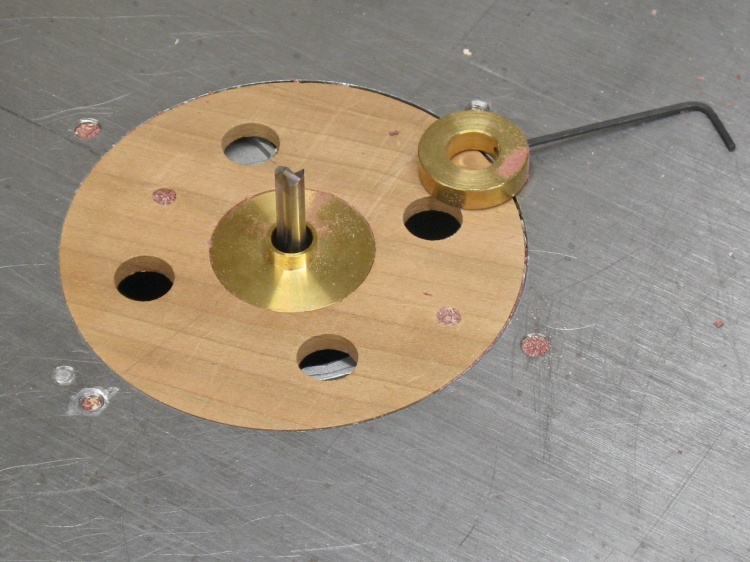
The completed jig
This shot shows the completed jig. The actual pattern is the curved section of the central opening. That pattern edge was coated with cyanoacrylate (super glue) to toughen it up to reduce the wear through multiple uses.
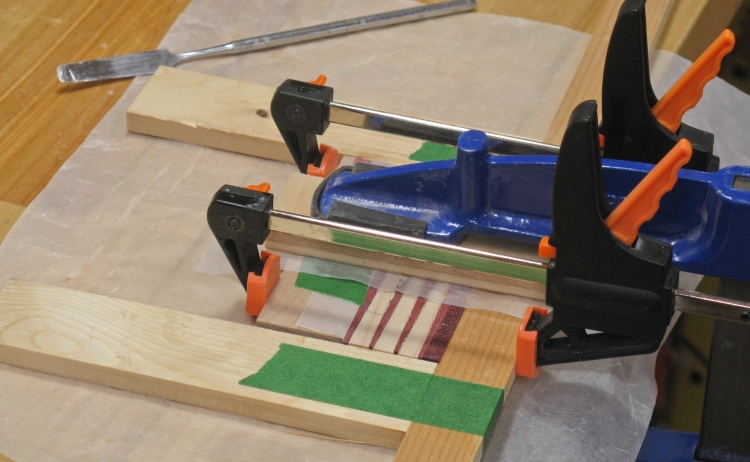
The grey squares are pieces of high-friction tape to help keep the wood in place when it is clamped using the toggles tightened down with the knobs.
The grey squares are pieces of high-friction tape to help keep the wood in place when it is clamped using the toggles tightened down with the knobs.
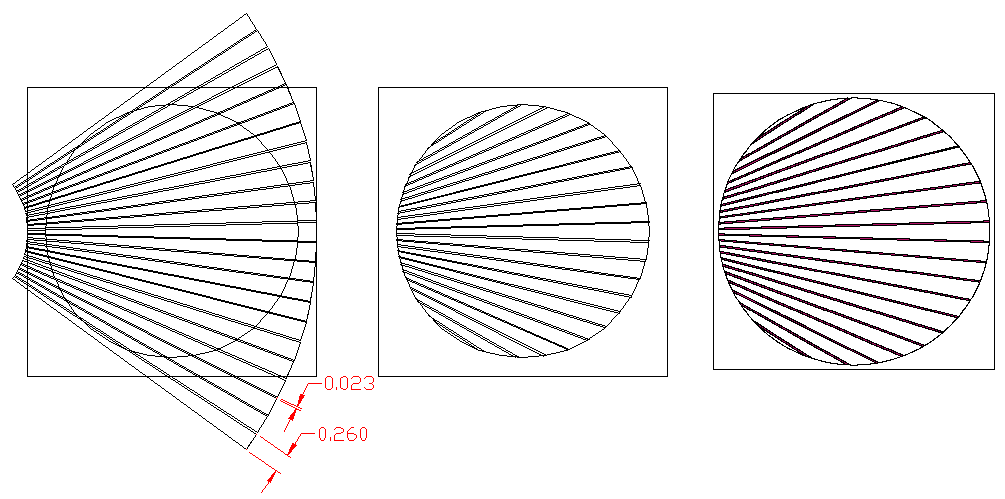
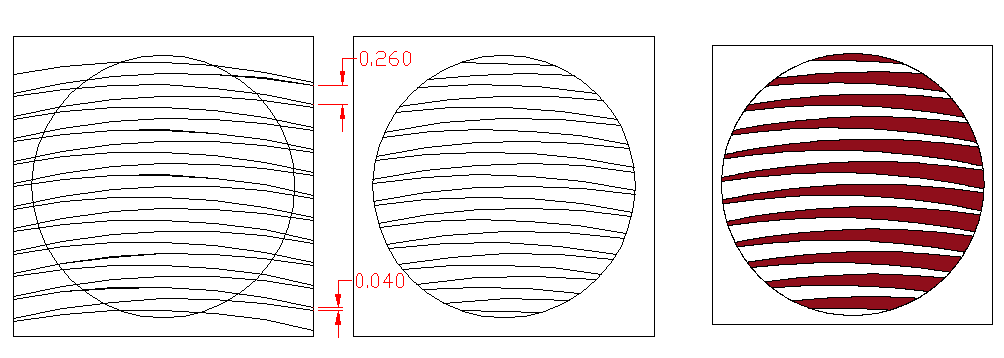
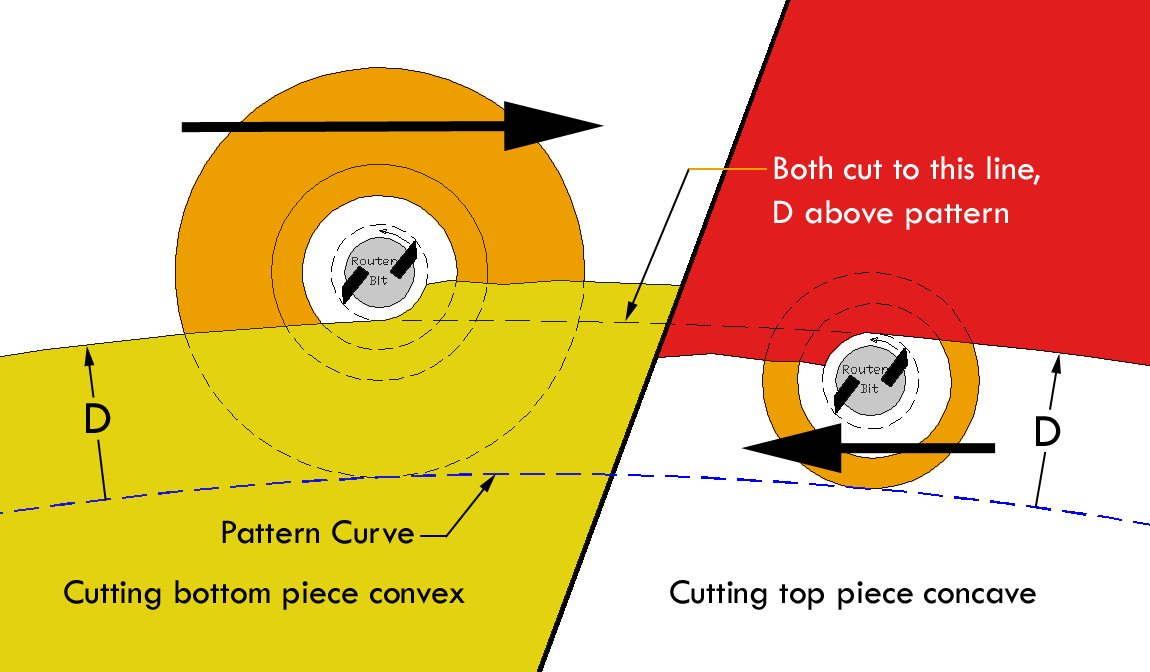
Below is a sketch of how the router cuts the same curve in the two pieces;
• A collar is added which rides against the pattern so the bottom of the router bit is at a distance D from the pattern. This is used to cut the top edge of the yellow bottom piece to the desired curve.
• The un-collared bit is used when cutting the top piece. That moves the bit down so that its top is distance D from the pattern. It then cuts off the bottom edge of the top red piece to the common line, matching the other piece.
The router tracks

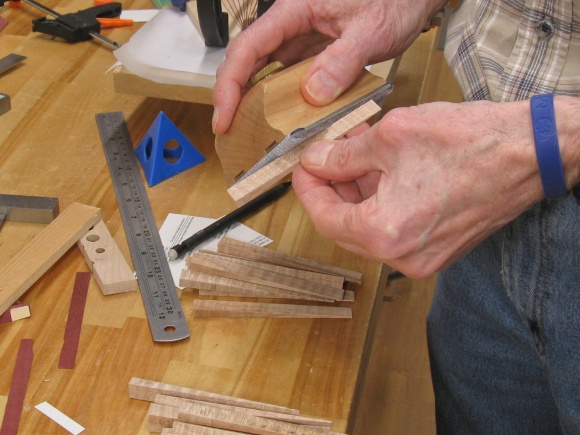
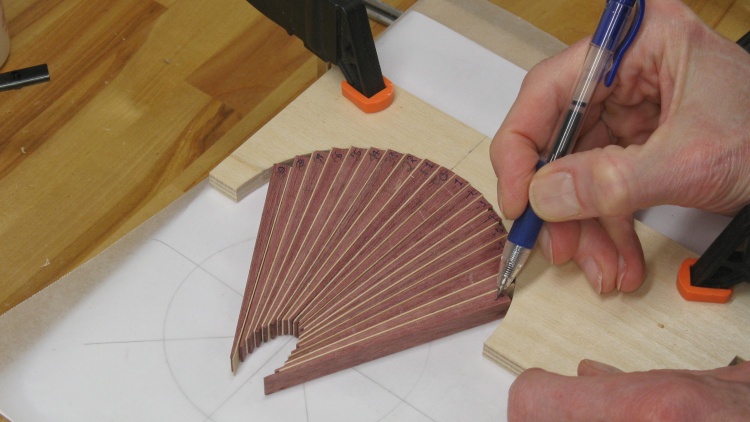
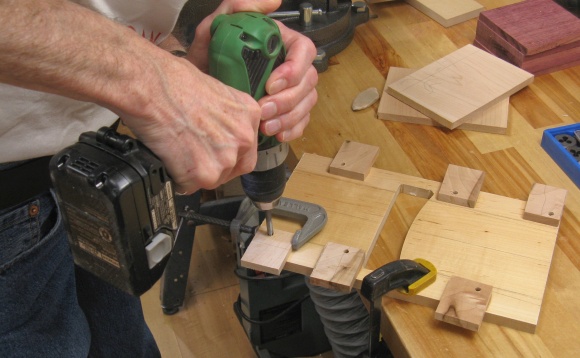
Marking a wedge
The actual wedges were much too small to form individually on the router so each one was cut successively from a larger piece.
In this photo the larger piece is glued to the starting sections and I'm marking the next wedge shape using a cardboard pattern.
In this photo the larger piece is glued to the starting sections and I'm marking the next wedge shape using a cardboard pattern.
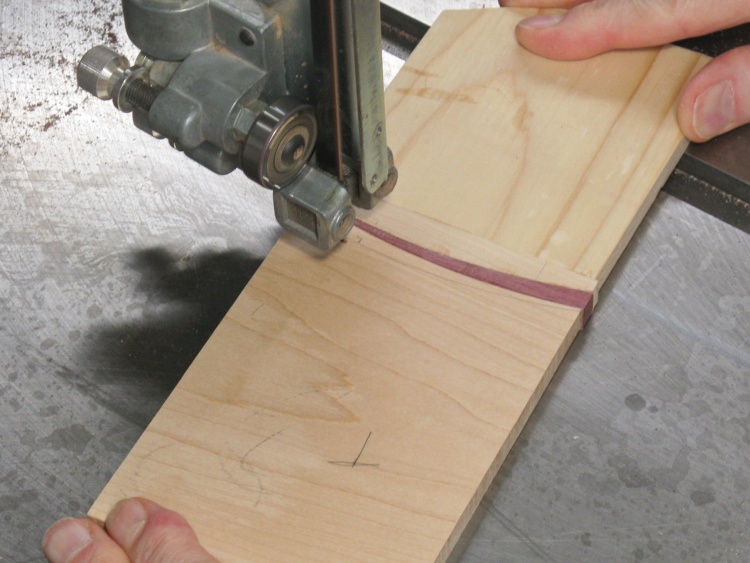
Cutting just outside edge of wedge
The bulk of the larger piece was cut off just outside the line defining the wedge, leaving maybe a millimeter of excess wood to be routed off.
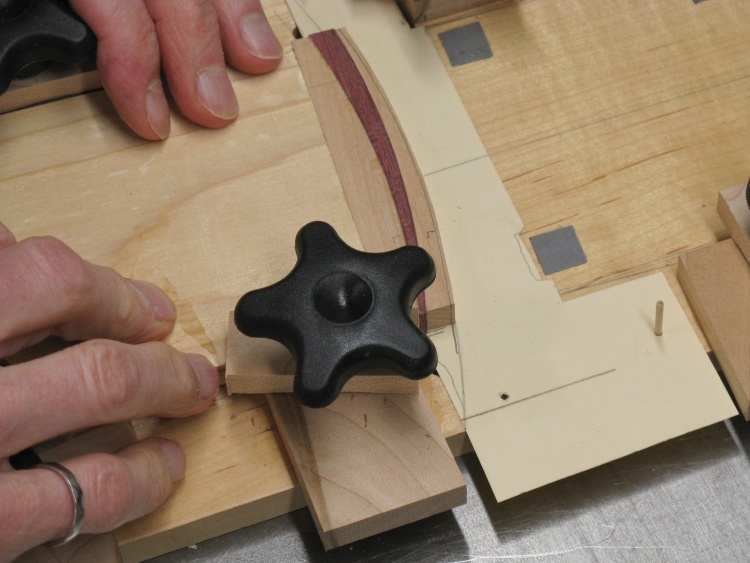
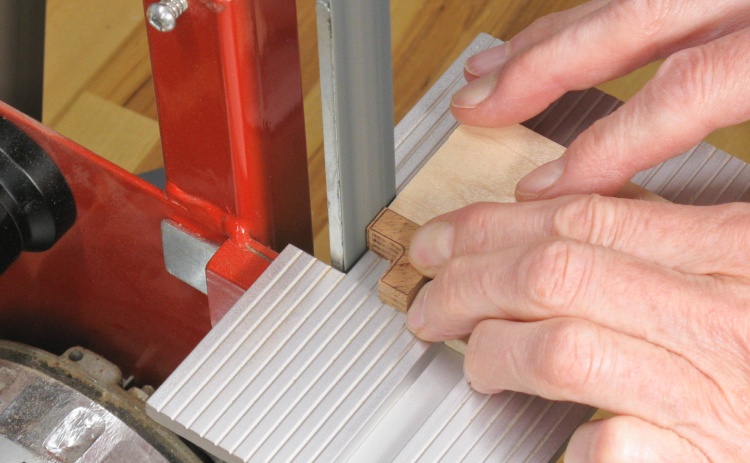
Aligning marked wood with cardboard reference curve
Then it was over to the jig. A file-folder-cardboard pattern with the routing line was put in place, located with toothpick pins. Then the wood was positioned to align the desired cut line on the wood with the pattern line.
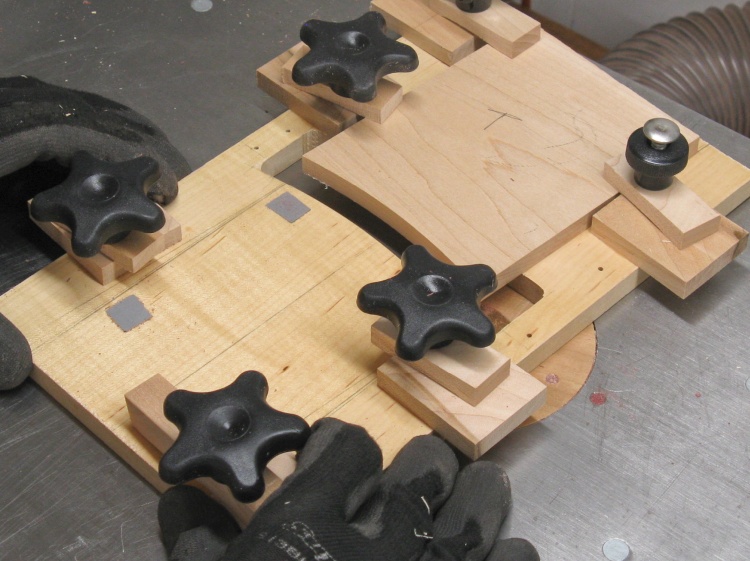
When the alignment looked good the three toggles were placed on the wood to be cut and the knobs tightened down to hold it in place.
When the alignment looked good the three toggles were placed on the wood to be cut and the knobs tightened down to hold it in place.
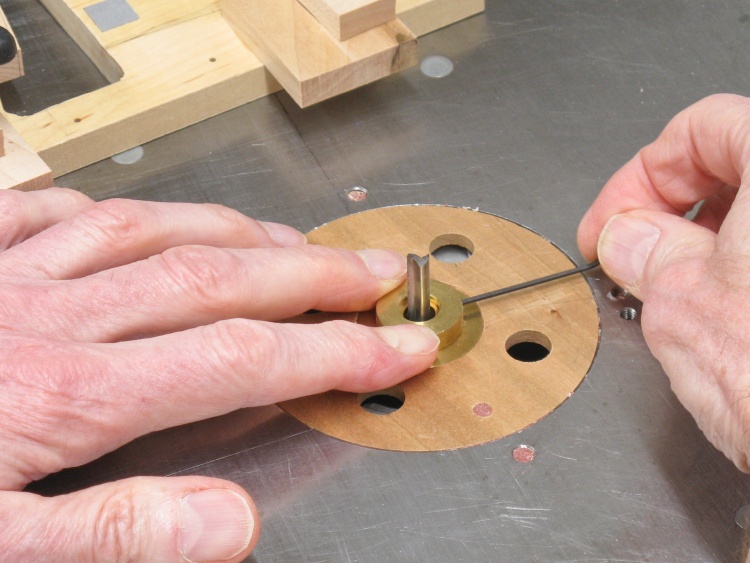
Collar needs to be in place for convex curves
For this convex cut, the collar needs to be on the router bit flange. Here I'm tightening the set screw to hold it in place.
Routing a convex curve
Then the curved edge of the pattern (hidden under the wood) is just held against the router bit collar and the jig is moved by hand to cut the curve.
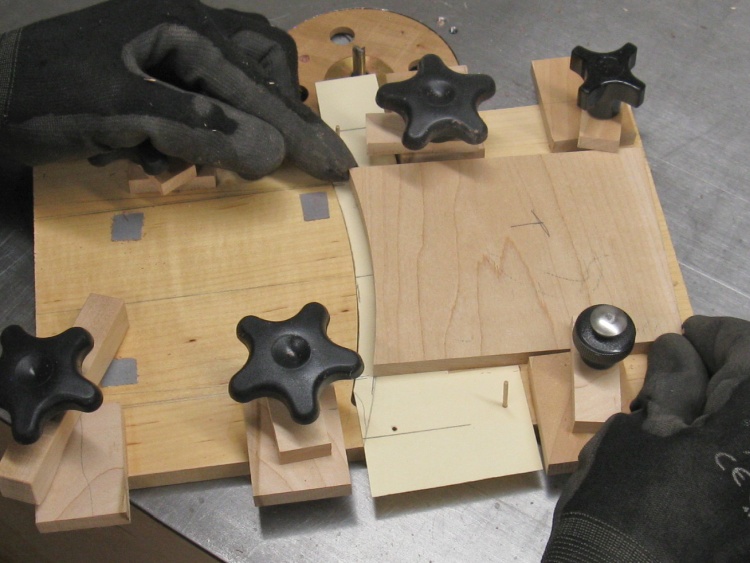
Aligning a concave curve with reference
So that was the convex half of the joint - then I needed to cut the concave half.
The piece that got cut off with the bandsaw went onto the jig, just on the opposite end to that used previously. There's no exact alignment required (the curve just has to be right) but the wood is positioned to make sure all the rough saw-cut edge is routed off, using the cardboard pattern line as a guide again.
As before the toggles hold the piece secure after positioning and the cardboard pattern comes off.
Collar off for cutting concave curves
For this cut, the collar comes off the router.
Routing the concave curve
And once again the jig is hand-guided to route the face of the wood. In this shot the router bit is hidden by one of the knobs.

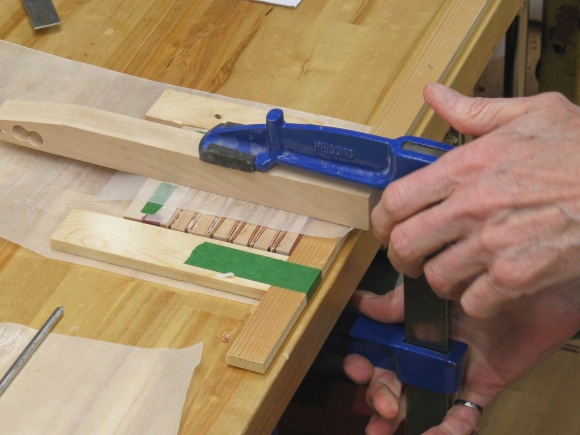
Gluing a joint (way up top there)
Then the two pieces are mated up. In this amateurishly-framed photo, a bead of glue is being applied to the convex end of the growing coaster and it will be mated to the piece of maple on the bench.
You'll notice a second coaster in the photo as well. I actually built two coasters at a time, using the "opposite" woods on them.
You'll notice a second coaster in the photo as well. I actually built two coasters at a time, using the "opposite" woods on them.
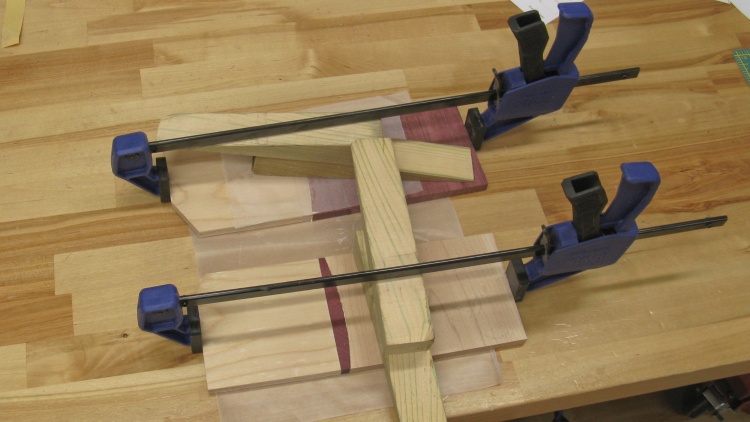
Clamping the glued pieces
And then the joints were clamped until the glue set.
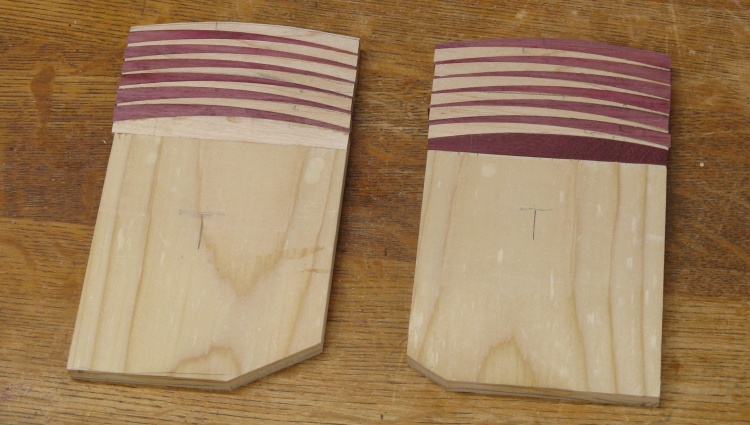
Two half-done coasters
Here I'm about halfway along on both coasters. Now it took about a dozen steps of mark/cut/route/route/glue/dry on each to get here and I was getting a bit tired of it. Plus, they didn't look all that much different from the "A" coaster design.
So instead of trudging ahead for another dozen steps, I thought I'd just combine the two for a single coaster.
So instead of trudging ahead for another dozen steps, I thought I'd just combine the two for a single coaster.
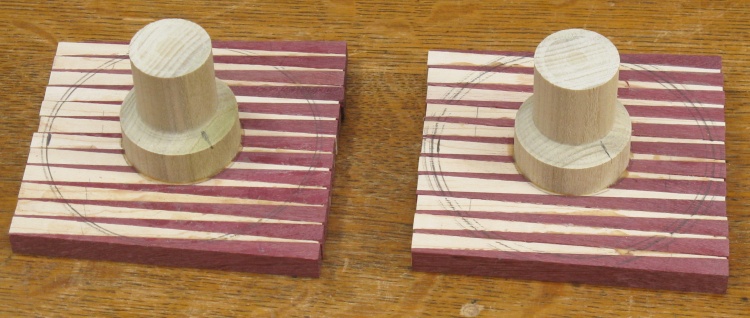
One whole coaster, ready to turn
Here the two haves have been combined and cut circular in preparation for turning.
Turning done
The usual turning process took place, and this was the resulting coaster.
Type E Coasters
From the coasters I had so far made, I liked the look of the original B model the best so decided to use that pin-stripe effect on the next ones. Thus was born the variation-on-a-theme "E" design shown below.
Type E coaster; Like B, but different

Doing a dry assembly of the light version
I made the light version first and here I'm doing the dry assembly of the pieces.
Dark version ready for gluing
And then I did the dark version. Here the pieces are separated into gluing-session groups.

Turning done on the light version
Here is the look of the light version.
Type F Coasters
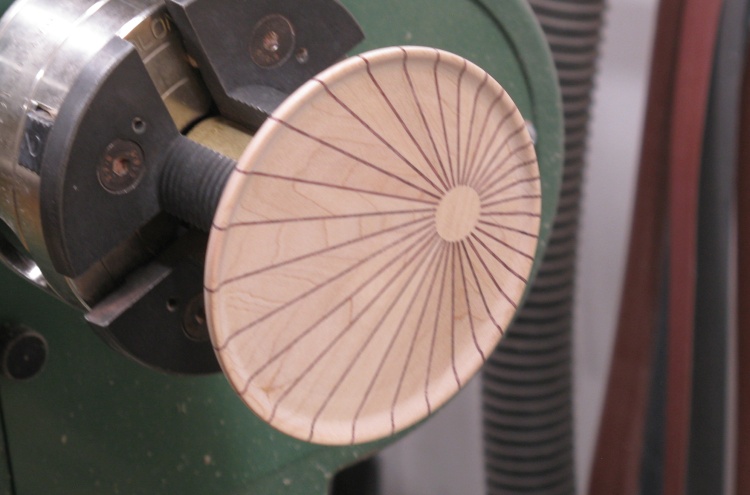
The last of the coaster patterns is the totally-logically-named Type F. I stuck with the pin-stripe motif and this is another radial design, but with the radial-ness cranked up to 11! Well OK, maybe 8, but I always wanted to say that.
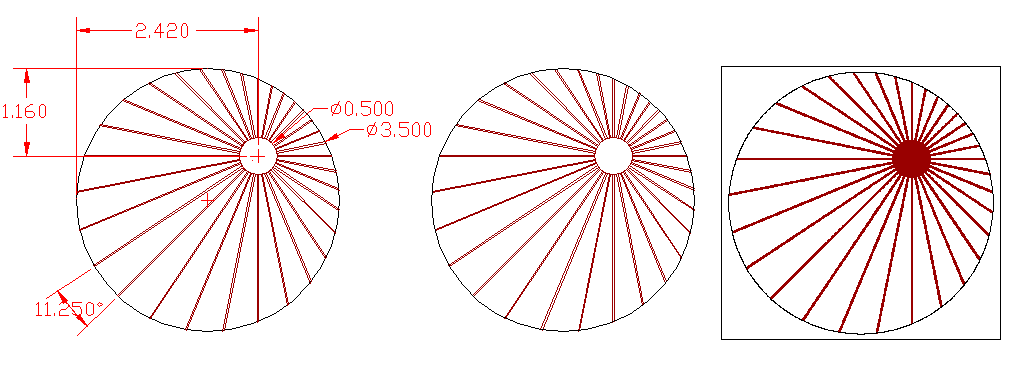
Type F coaster; Falling down an infinite hole........or maybe it's a sun?
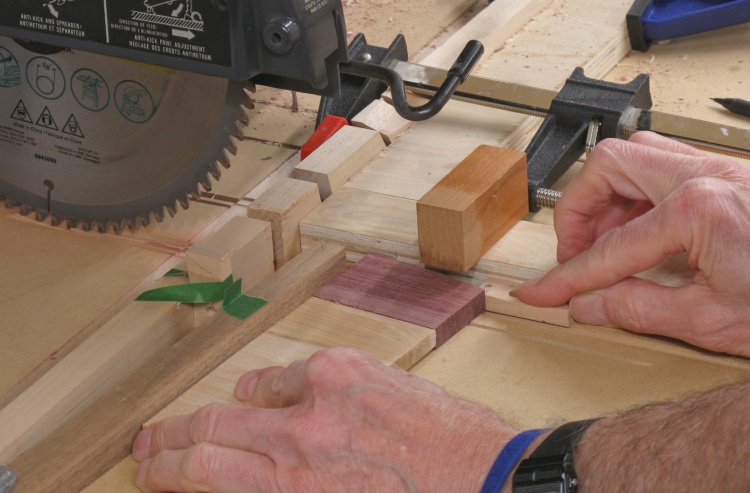
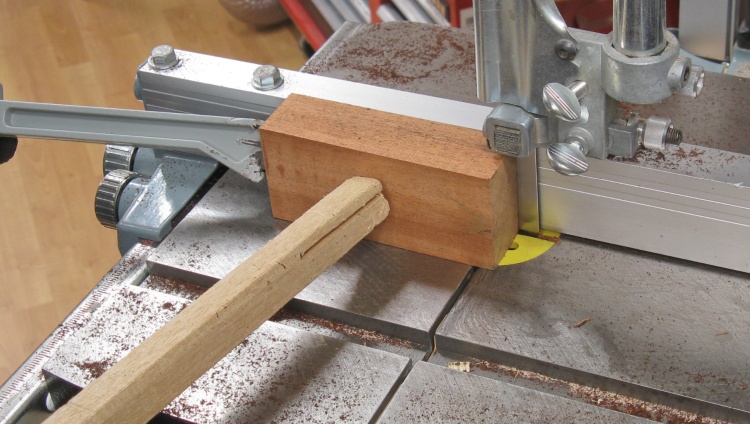
All jigged up to cut purpleheart triangles
The radial arm saw was again used to cut the pieces for the coaster, producing a triangle with an 11.25° angle. I set it up close to what was needed but didn't try to get it exact.
I figured "exact" would need the angle cut within 0.002° so that wasn't going to happen. Instead the angles were cut a tiny bit small and then I made some slightly wider pieces that I could fit in to get close to the correct overall angle.
Due to the small size of the pieces the saw blade would sometimes blow the piece into the teeth which destroyed it. That happened maybe 20% of the time. That half-varnished brown piece was taped in that position to disrupt the airflow off the blade, which reduced the destruction rate a bit.
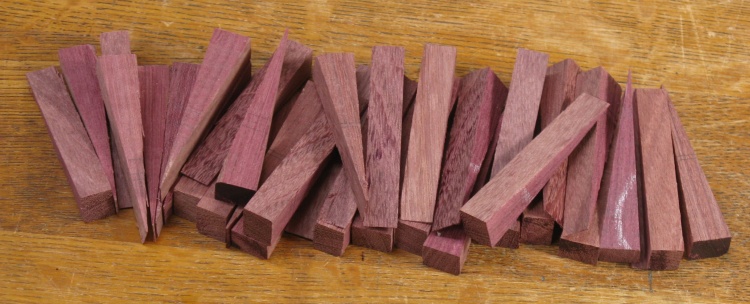
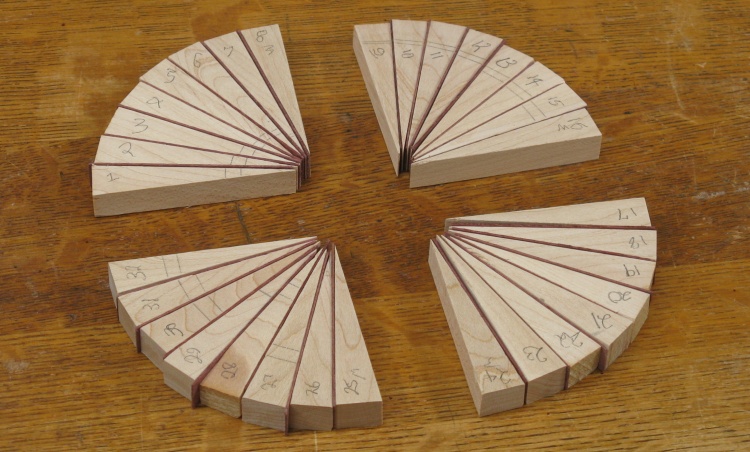
32 and some spares
Eventually I ended up with the required 32 pieces and a few spares.
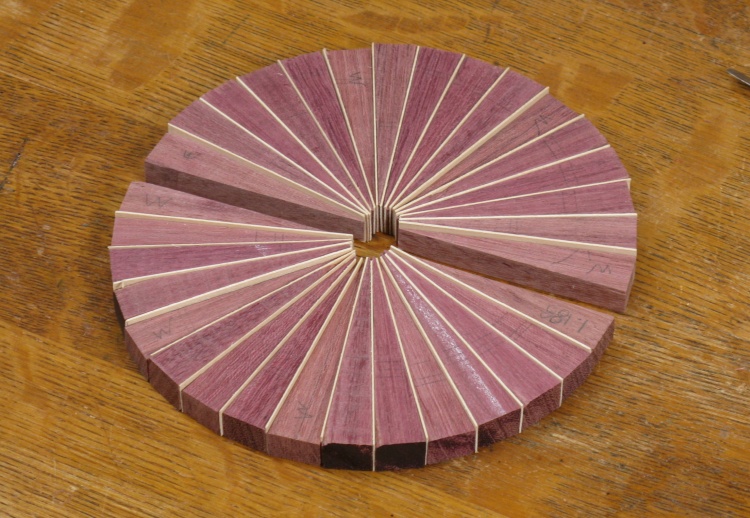
All arranged with maple veneer in place
I did a dry assembly to make sure things were going to come together correctly.
I interspersed the regular pieces with some slightly wider versions (the pieces with a faint "W" visible) to get the overall angle to be slightly wider than needed. That way I could sand it down the exact amount.
I interspersed the regular pieces with some slightly wider versions (the pieces with a faint "W" visible) to get the overall angle to be slightly wider than needed. That way I could sand it down the exact amount.
Gluing a set of four
There were lots of joints in the the full circle so I glued up just four pieces with their associated veneer at a time.
I modified the jig made for the Type Bs to have a slightly larger diameter and then used that for the glue-up.
I modified the jig made for the Type Bs to have a slightly larger diameter and then used that for the glue-up.
Connecting two sets of four
Pairs of four-piece groups were then glued together to make an "8".
Connecting two sets of eight
And then two 8s were glued together to make a 16.
And then the whole shebang
And finally the two half-circles were glued together (with the third type of roughly-made plywood clamping bracket).
And of course, the opposite-species version too
The lighter version, ready for gluing.
Both flavours all together
In this shot both versions have the glue-up done.
The next step is to add plugs to fill the central holes.
The next step is to add plugs to fill the central holes.
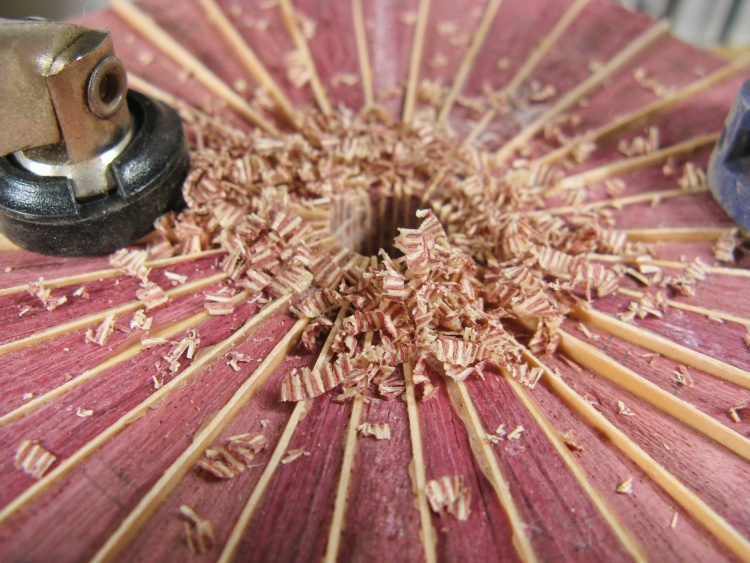
Some interesting shavings after drilling the dark one
I planned to use 1/2" tapered plugs and the first step was to drill a conventional 1/2" hole.
This photo is a close-up of the purpleheart-coaster hole showing some intricately striped shavings.
This photo is a close-up of the purpleheart-coaster hole showing some intricately striped shavings.
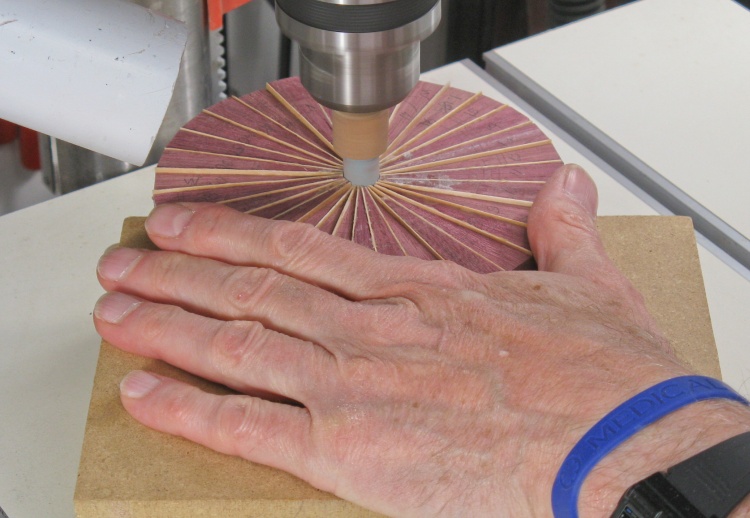
Tapering the hole to match the plug
Following the procedure used for my last project (plug coasters) the hole was tapered to match the plug with the use of an abrasive bit.
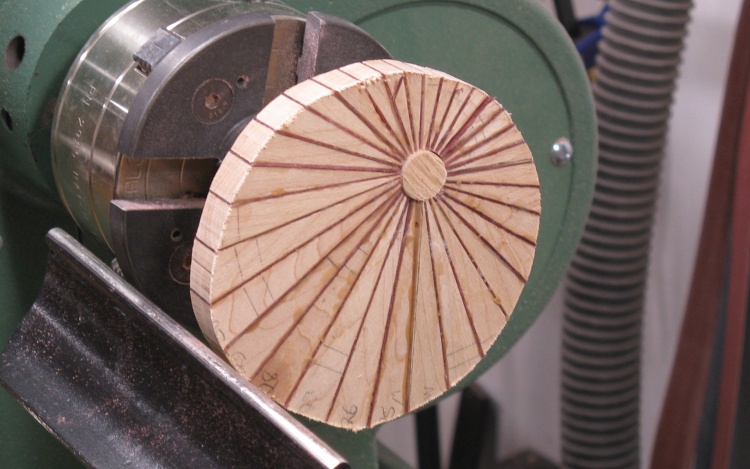
The maple one plugged, cut out and ready to turn
This shows the maple version after plugging and cutting eccentrically (in the geometric sense).
...and turned
A bit of turning, a bit of sanding, and it looks a bit more finished.

A dozen coasters completed
And that was it for the (coaster) woodworking.
At this point there are an even dozen coasters which I'll split into two 6-coaster sets.
At this point there are an even dozen coasters which I'll split into two 6-coaster sets.
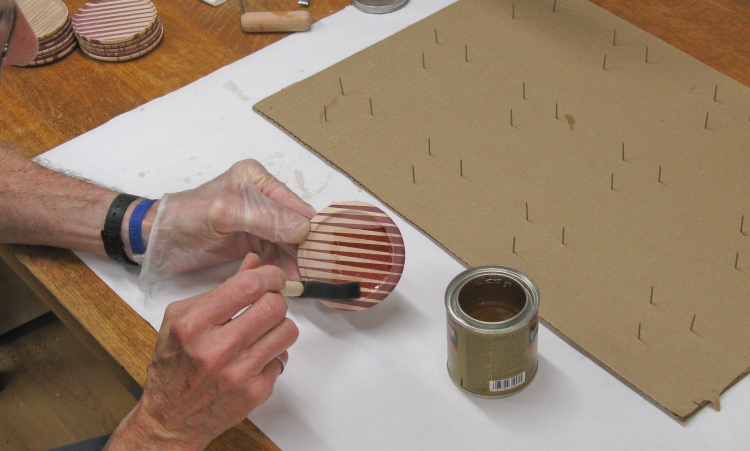
Starting on the varnishing
Time to start the varnishing; Here one of the coasters is getting its first coat with a small foam brush.
In the background is a drying rack that will hold all 12 coasters, constructed from cardboard and a handful of 1" common nails.
In the background is a drying rack that will hold all 12 coasters, constructed from cardboard and a handful of 1" common nails.

The complete set
Holders
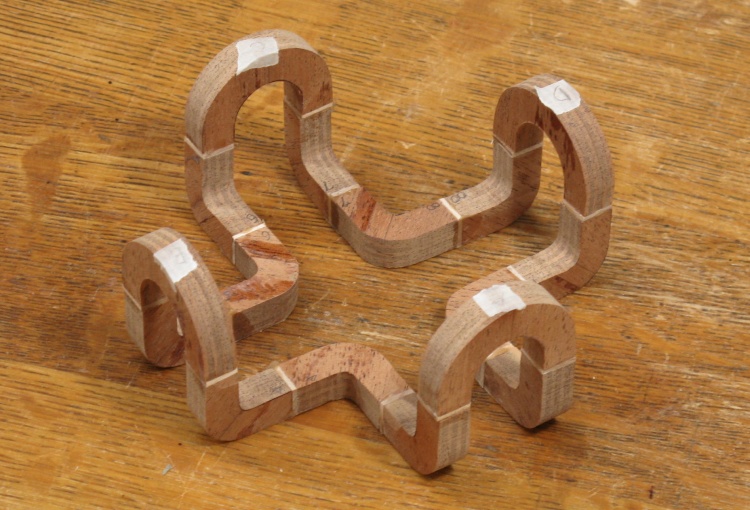
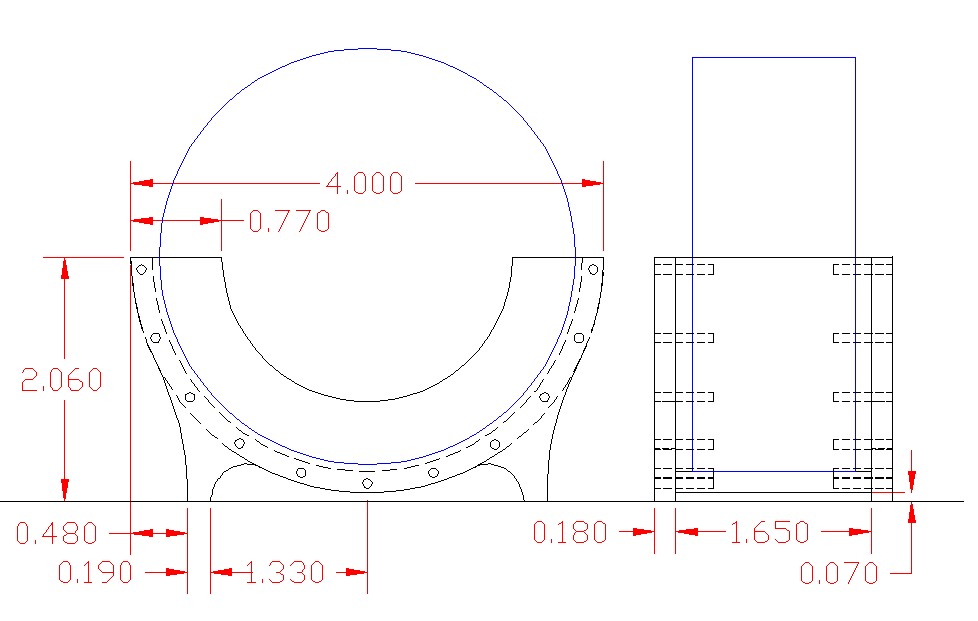
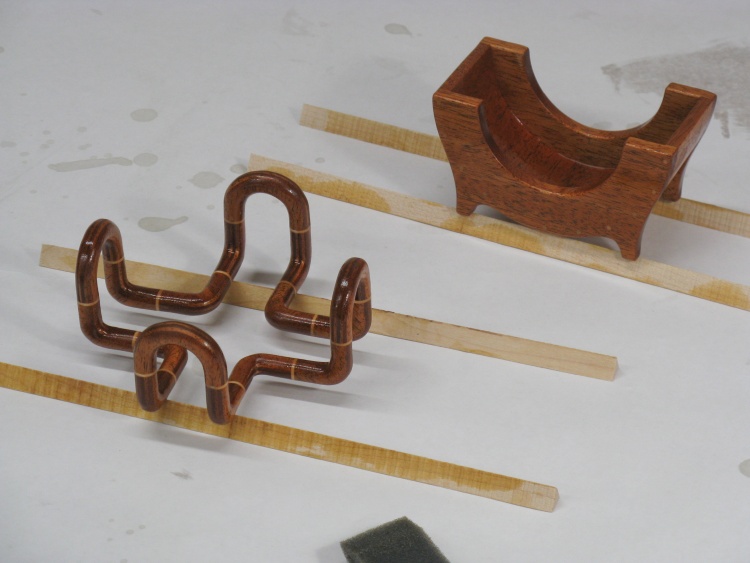
I needed a pair of holders for the coasters, each able to hold a count of six. I'd made a conventional flat holder for the plug coasters so I thought I'd try for some variety. The first one is actually just an unconventional flat holder in that it's made with a pipe-like design.
Now this shape is going to have thin sections in all three dimensions so if solid wood was used, there would be narrow and fragile cross-grain sections in several parts; one drop and it's fragments. Now a more sensible person may just choose a different design, but hey - I'm me, so I looked at ways to be able to make a less-fragile version.
A good first step would be to change to plywood, although there would still be one dimension that had the thin veneers across thin sections. So I added a further refinement by composing it from multiple pieces and arranged the orientation for each plywood corner segment so all sections are equally strong (although I still wouldn't recommend dropping it).
The main problem is what to call it - is it the excellent acronym PLOP for Poly-Lamination Oriented Plywood, or the boring SOPA for Strain Oriented Plywood Assembly. If only I could make the words work out for PIPE. Maybe Poly-Integrated Plywood...Erection? Sometimes the web synonyms aren't that useful.

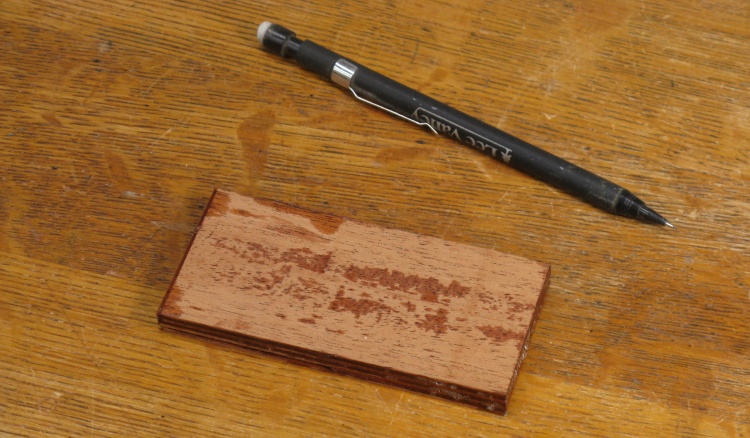
A tubing-inspired holder

A couple chunks of mahogany for the holders
With the coasters having busy designs, it seemed reasonable to make the holders a bit "calmer". The mahogany holder for the plug coasters worked out well so I thought I'd stick with something like that.

A fine holder
I dug out the mahogany pieces seen here which should be lots for a couple holders (left over from the Valet in 2014).
Taking slices off for veneer layers
Of course when you hear the word plywood, the nail-onto-the-studs exterior house sheets generally spring to mind but here we need the shop-made hardwood version.
As we know, plywood is largely composed of plys. Out in the real world, huge knives peel layers off a log to get them but here in Russville it's more of a bandsaw operation. In this shot I'm cutting off a thin layer that will become part of one of the plys.
As we know, plywood is largely composed of plys. Out in the real world, huge knives peel layers off a log to get them but here in Russville it's more of a bandsaw operation. In this shot I'm cutting off a thin layer that will become part of one of the plys.
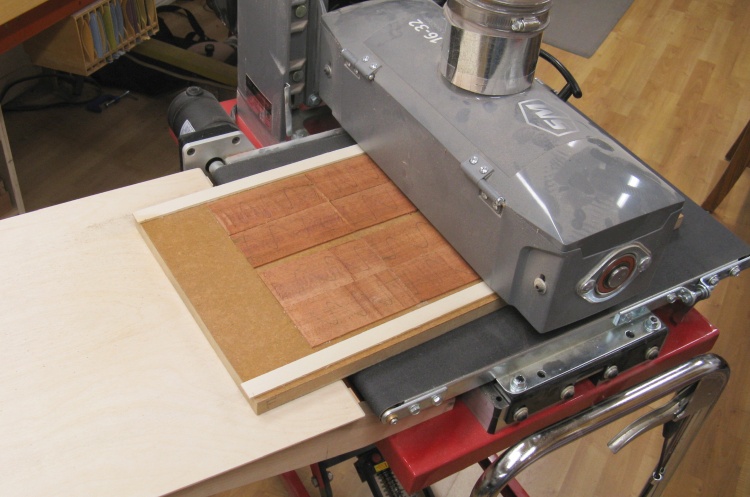
Sanding veneer layers to a consistent thickness
One side of each of the plys is flat and smooth but the sawn faces are rough and the thickness varies as well.
One solution for those issues is to sand them flat and smooth using the drum sander. The plys were purposely cut thick and here they are being sanded down to 0.05" with multiple passes through the drum sander.
One solution for those issues is to sand them flat and smooth using the drum sander. The plys were purposely cut thick and here they are being sanded down to 0.05" with multiple passes through the drum sander.
Bug's-eye view of veneer pieces, 0.05" thick
A buncha nice smooth plys.
Technically these are half-plys since pairs will be glued together edge-to-edge to make a double-sized layer.
Technically these are half-plys since pairs will be glued together edge-to-edge to make a double-sized layer.
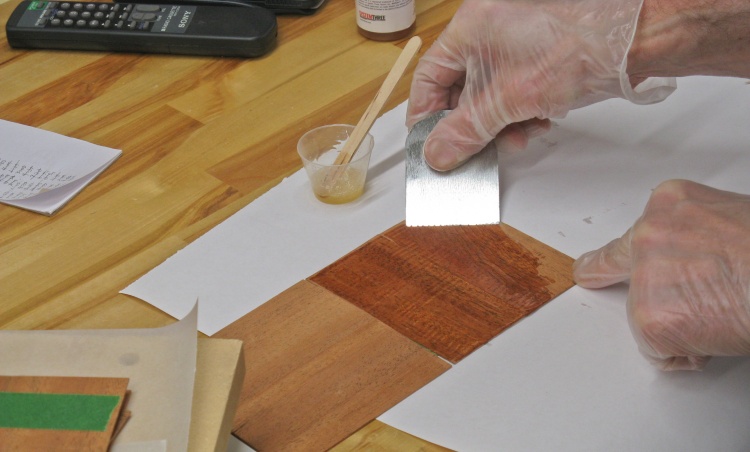
Applying epoxy to start stacking layers
The first step in making the plywood was to glue the edge-to-edge pairs as mentioned above. That's already been done here and this is the next step which consists of stacking plys. I mostly did two at a time as shown here, and then stacked those twosies (and one threesie) to get to seven layers.
Of course the grain direction is alternated in successive layers to get the strong-in-all-directions feature.
I used a thin, slow cure epoxy as the adhesive. The 30 minute open time makes for a lower-stress glue-up. Here the epoxy components have been mixed in the little cup and I'm using a small shop-made spreader to get consistent coverage.
The plywood was only 4.5" square but that was enough for all the pieces I'd need*. Here I've cut patterns in a business card for the two different pieces I'd need and I'm marking the shapes using an ink pen for good contrast.
*...or was it?
*...or was it?

Marking shapes with a pattern
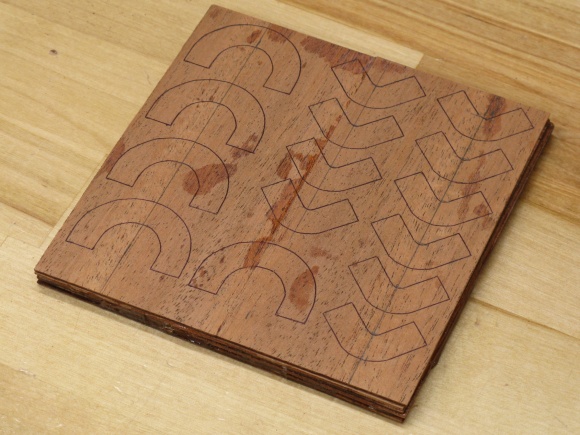
Veneer marked
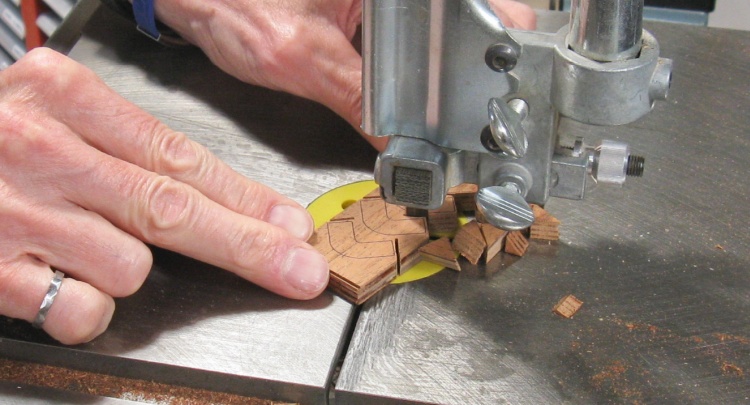
Cutting out the shapes
The pieces were cut out a bit oversized on the bandsaw.
Sanding to the lines
And then the pieces were carefully sanded to the marked lines using a 1" belt sander. That was followed by some hand sanding to get into those inside corners.
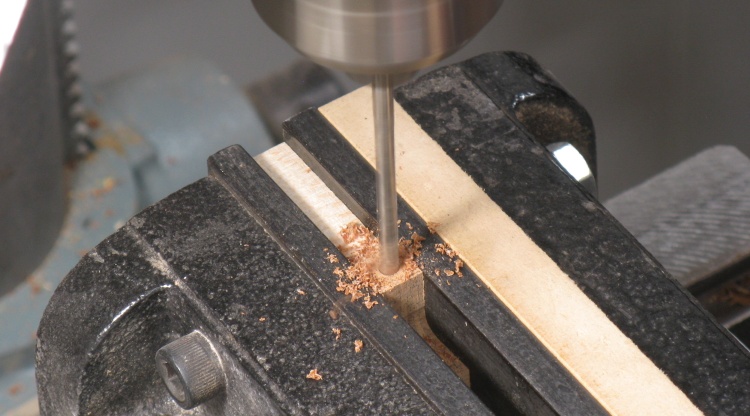
Drilling for connecting pins
Just gluing the pieces end-to-end wouldn't be very strong so the plan was to add a pin between each piece.
To accommodate that the center of each end was drilled with 5/32" hole to accept the pins.
To accommodate that the center of each end was drilled with 5/32" hole to accept the pins.
Adding the maple layer
There was to be a thin slice of maple between each section - mostly for aesthetics - and I finally decided that they should get glued to the end of each piece. I used slightly oversized pieces for easier alignment and then sanded them flush with the mahogany after the glue dried.
And then of course, redrilled the covered-up pin holes.
And then of course, redrilled the covered-up pin holes.
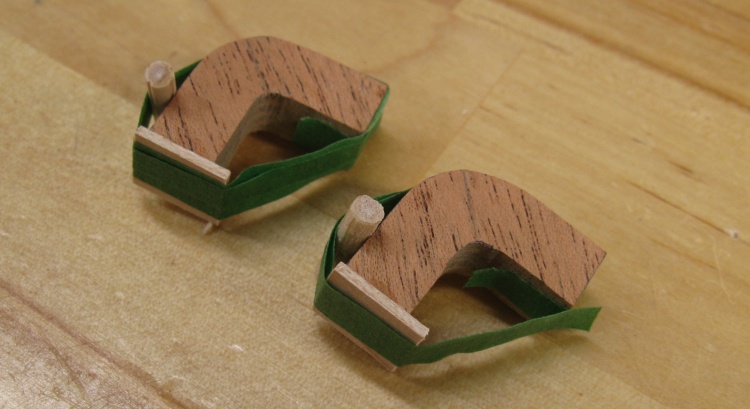
A test fit with...some empty space
I thought I'd do a test fit before gluing and there seemed to be a noticeable shortage of corner pieces. Turns out I miscounted and made only eight (plus an inadequate two spares) when I actually needed twelve. Oops.
A freshly-baked piece of extra plywood
So whatdaya do? Make some more plywood I guess; I sliced up some more mahogany, thicknessed the pieces, mixed up some more epoxy and and glued them up to give another small piece of plywood. Yeesh.
Then of course marked them, cut them out, sanded them, added the maple pieces and drilled the ends.
Then of course marked them, cut them out, sanded them, added the maple pieces and drilled the ends.
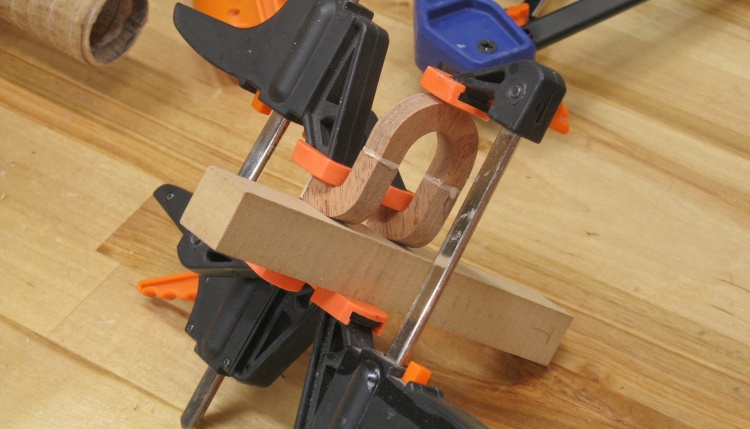
Starting on the gluing
So now with the right number of pieces, they could start going together.
I began by gluing the two "legs" to each of the four "tops" with one of those operations shown here.
I began by gluing the two "legs" to each of the four "tops" with one of those operations shown here.
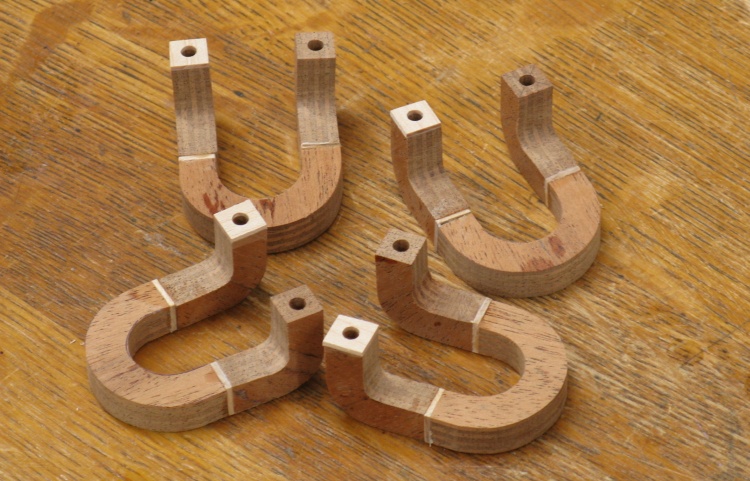
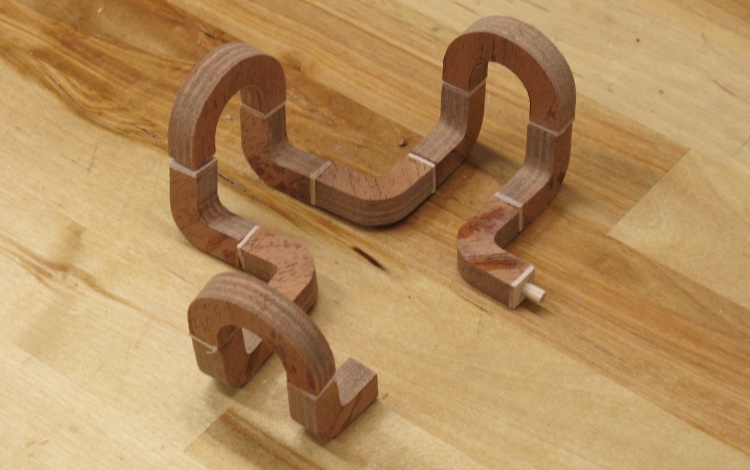
The four vertical corners done
That produced these four subassemblies. The full unit just consists of these with a corner between each one.
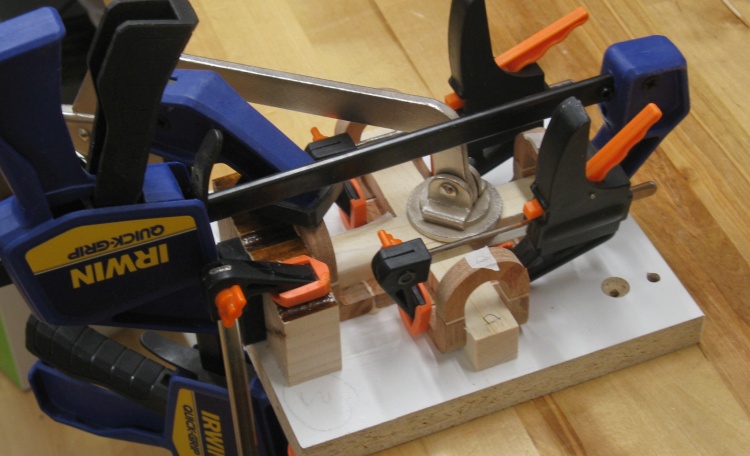
Gluing the middle bits
A cross-shaped jig kept the pieces aligned as they were glued. I fully assembled the holder but glued only one leg at a time.
Fully assembled
And eventually it was complete.
The square cross-section is kind of neat but the plan was for it to be rounded so that was the next step.
The square cross-section is kind of neat but the plan was for it to be rounded so that was the next step.

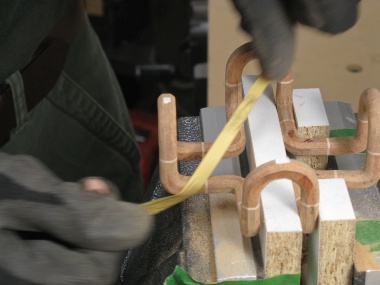
Starting the journey towards a round profile
I started the rounding by marking the corners and then grinding them off at about 45° using a nice blue abrasive bit on the Dremel tool.
Then it was a matter of smoothing the now-octagonal profile into something resembling roundness. That was done using strips of sandpaper, starting at 120 grit and progressing up to 320. Here are a few shots of the process.
Sanding

Sanding

and more sanding

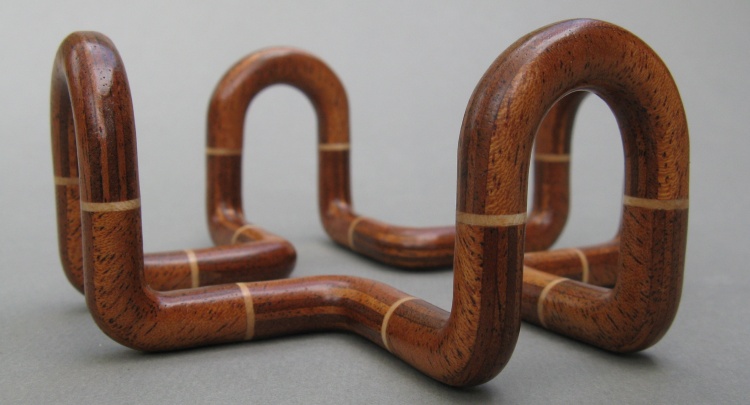
Woodworking done for this one
I was fairly pleased with the end result as seen here.
The holder is also quite rigid and while I avoided an intentional or indeed, accidental drop test, I'm thinking it would likely just bounce.
The holder is also quite rigid and while I avoided an intentional or indeed, accidental drop test, I'm thinking it would likely just bounce.
Complete
A very close-up shot of the completed holder.
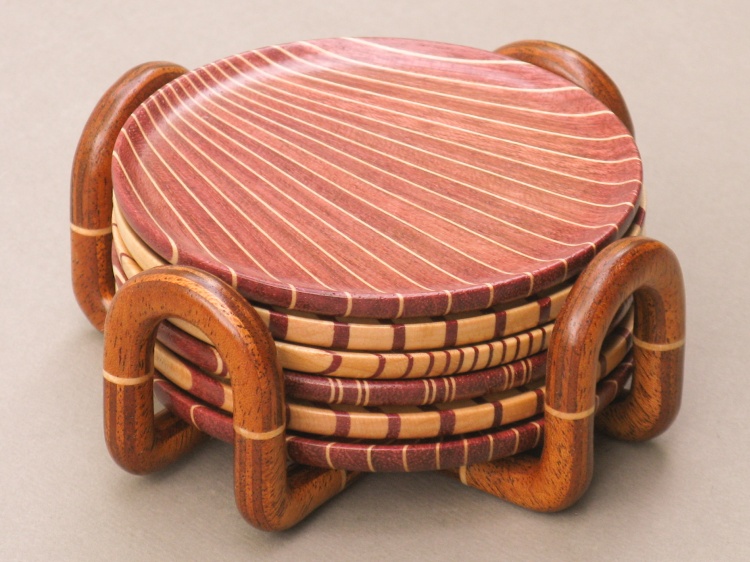
Full of coasters
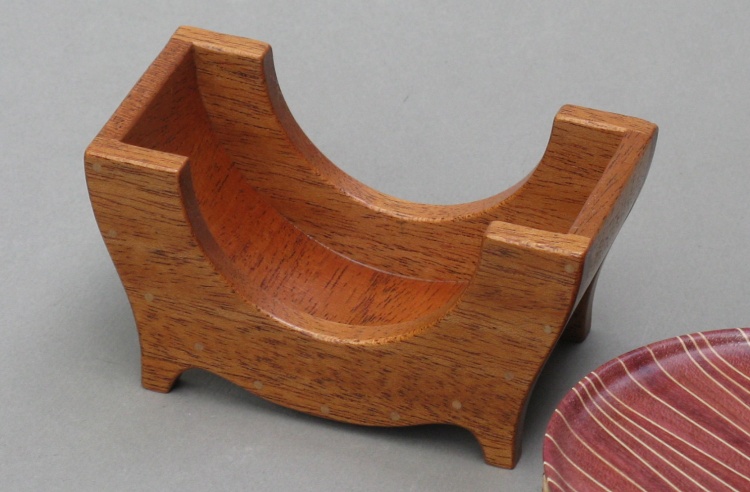
Holder 2
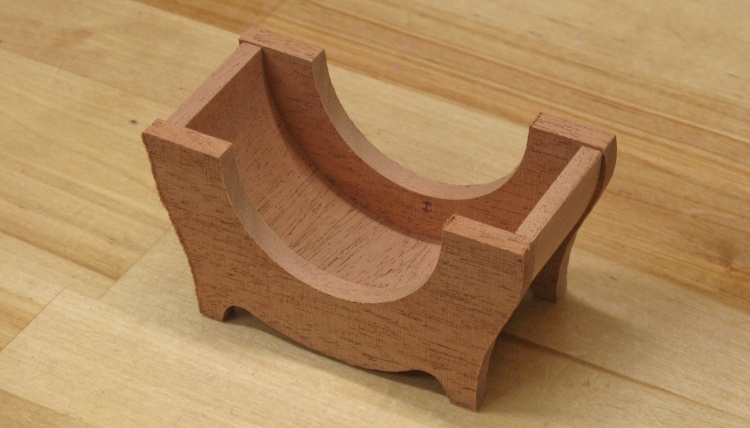
The second holder is a vertical model with a minimalist design, slightly relieved with decorative maple pins.
A vertical holder for some directional variation
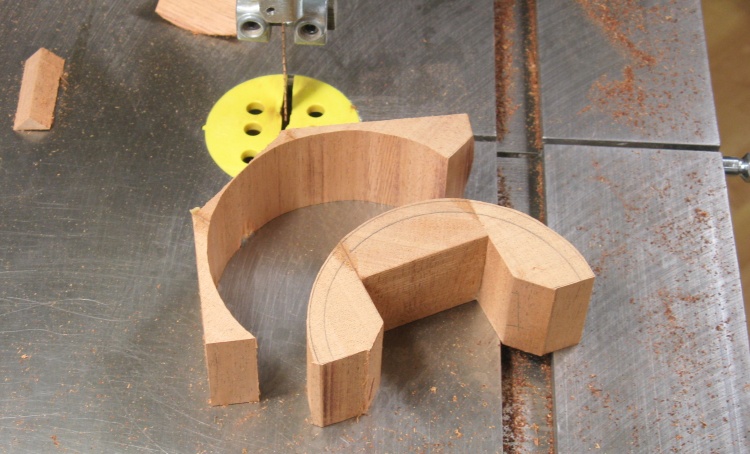
Cutting out the curved bottom
At three main pieces, the holder is pretty simple and I started out by making the circular bottom.
By virtue of some truly inferior planning, I had no mahogany pieces left large enough to make the bottom for this holder, so I made a blank up out of some smaller scraps. I began by gluing together three pieces to synthesize the large-enough blank and in this shot I've just finished cutting the outside contour.
By virtue of some truly inferior planning, I had no mahogany pieces left large enough to make the bottom for this holder, so I made a blank up out of some smaller scraps. I began by gluing together three pieces to synthesize the large-enough blank and in this shot I've just finished cutting the outside contour.
Next was cutting the inside contour and then sanding both faces to a suitable state of smoothness and roundness.
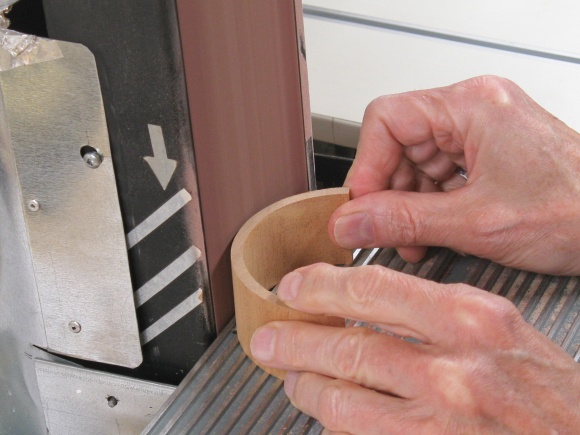
Sanding the outside
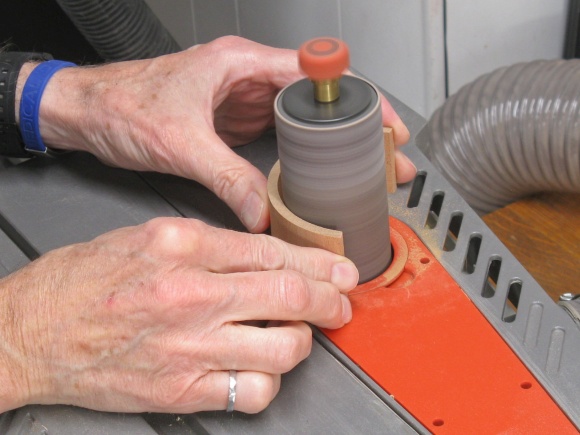
...and the inside
Holder assembled
The two sides were cut to shape out of a properly-thick piece and were simply glued to the round bottom as seen here.
The next steps were to make all the edges flush and then add the decorative pins.
Technically the pins are structural as well as decorative since they extend about a quarter-inch into the bottom but I don't imagine that the glue joint actually needed much strengthening.
The next steps were to make all the edges flush and then add the decorative pins.
Technically the pins are structural as well as decorative since they extend about a quarter-inch into the bottom but I don't imagine that the glue joint actually needed much strengthening.
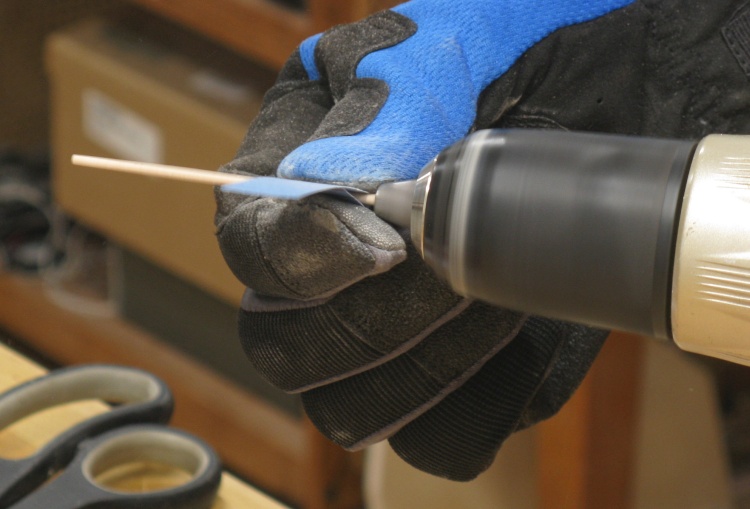
Making a small dowel for pins
I used 5/64"-diameter pins which I made by cutting 5/64"-square rods and sanding them round by spinning them in the drill.
This works surprisingly well for rounding small pins as I had discovered last year when making the cleverly-named "Grid Vessel".
This works surprisingly well for rounding small pins as I had discovered last year when making the cleverly-named "Grid Vessel".
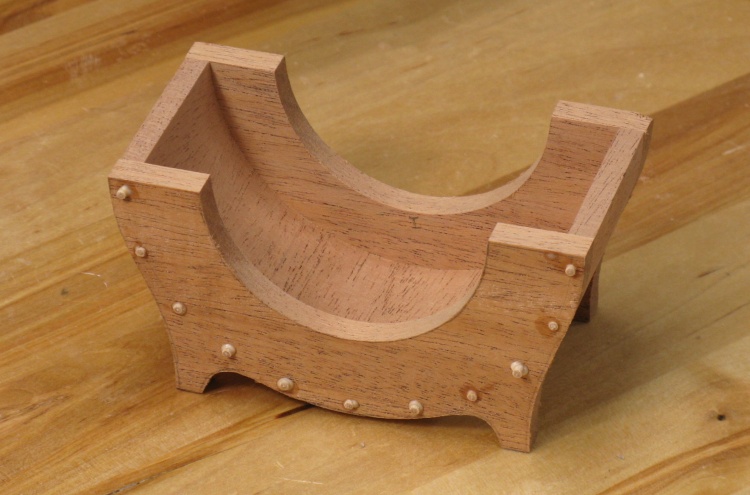
Pins installed in the holder
Through advanced numerical analysis, I determined that 11 pins was the optimum value. I then drilled and filled with the maple pins, leaving a bit of extra length to be cut off later to guarantee flushness.
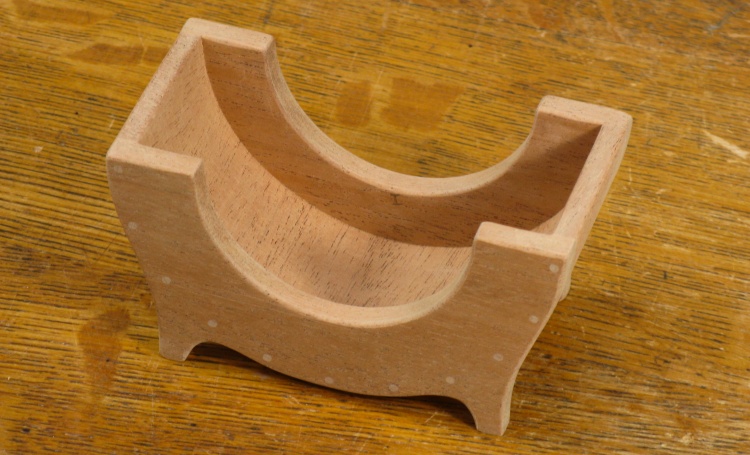
Pins sanded flush
Pins sanded flush and holder ready for some varnish.
The first coat of varnish on the two holders
Both holders received three coats of my usual varnish. Here the first coat has been applied and is still wet.
Complete
The completed holder.
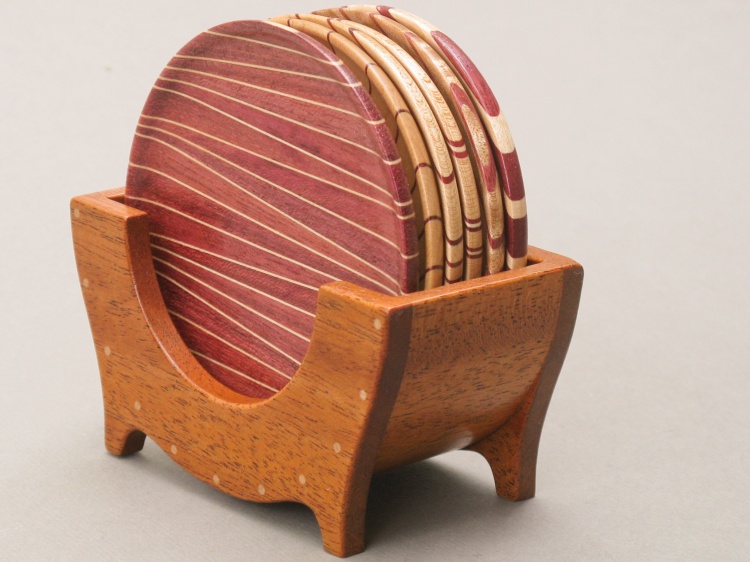
Full of coasters


