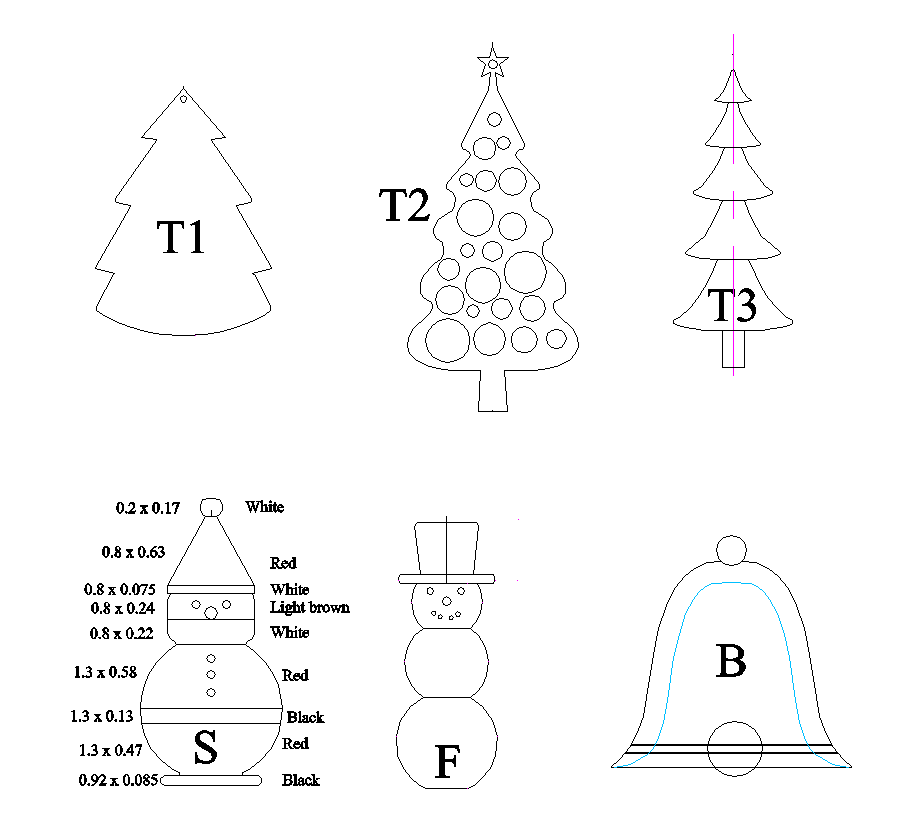
I started on this project by searching for images of wooden Christmas tree ornaments and gathering a group of those that I liked. That group was further whittled down (Ha!) and then drawn up and appropriately scaled, giving me the group shown below. They are all turned pieces except T1 and T2 which are essentially flat. Then I printed out the plans and dove in.
Enough detail to get things going
Contents:
• Tree 1
• Tree 2
• Tree 3
• Frederick the Snowman
• Santa
• Bells
• Spirals
• Packaging
Tree 1
I began with the festively-named Tree 1. The original was just an extremely simple stylized tree with square edges. I started by making one of those but it ended up looking a bit too simple so I tried tapering the edges. That gave the tree a bit of a puffy look which I preferred so that became the new standard.
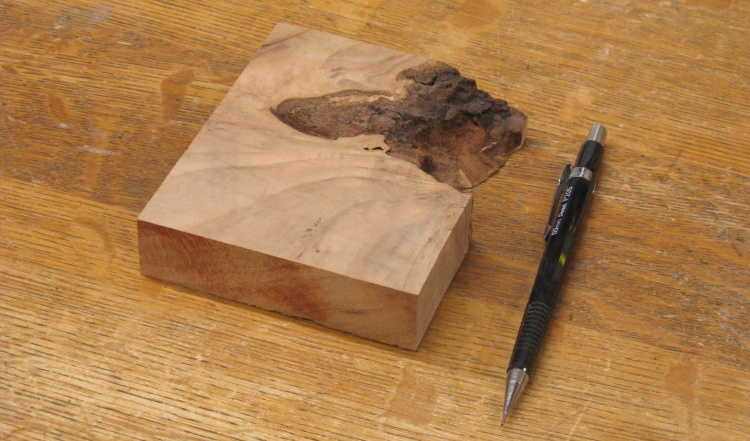
A knotty piece of Cherry
This little chunk of leftover cherry with part of a huge knot wouldn't be useful for anything sizeable but that clear area should be enough to supply a few miniature trees.
The silver lining to the knot's cloud is that it is surrounded by interesting grain patterns.
The silver lining to the knot's cloud is that it is surrounded by interesting grain patterns.
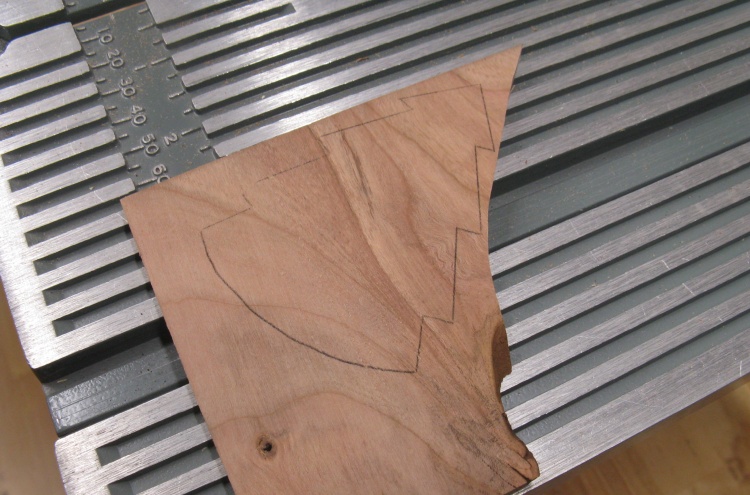
One slice with a tree carbon-copied on
The block was sliced into about 0.2"-thick layers and here a tree shape has been traced on to one of them using my usual carbon-paper technique.
I made a few smaller trees too, which let me squeeze a couple into the oddly-shaped piece of wood.
I made a few smaller trees too, which let me squeeze a couple into the oddly-shaped piece of wood.
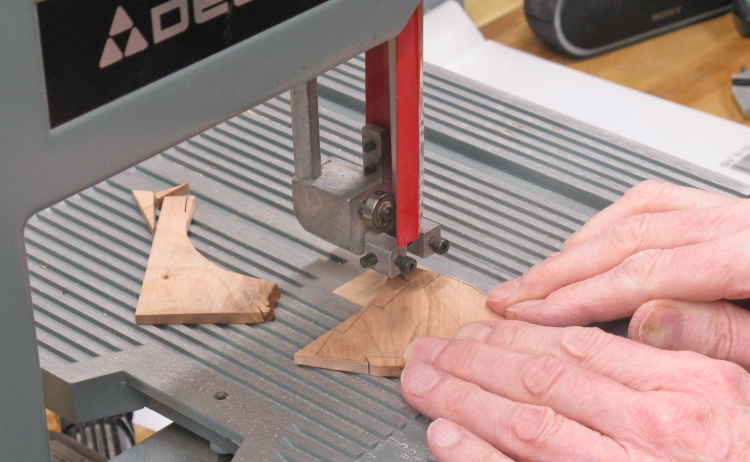
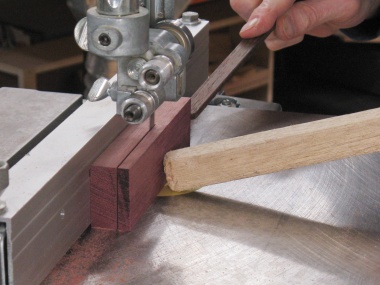
Cutting to the carbon
I used my miniature (8") and ancient (32 years old) band saw to cut out the shapes.

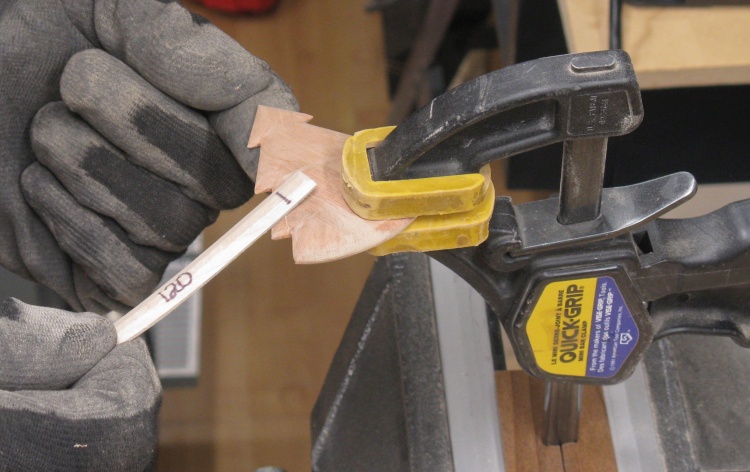
Tapering the edges
The tree in this shot is what the original square-sided version would have looked like.
After deciding that it was a bit too plain, I used my 1" belt sander to taper all the edges.
After deciding that it was a bit too plain, I used my 1" belt sander to taper all the edges.

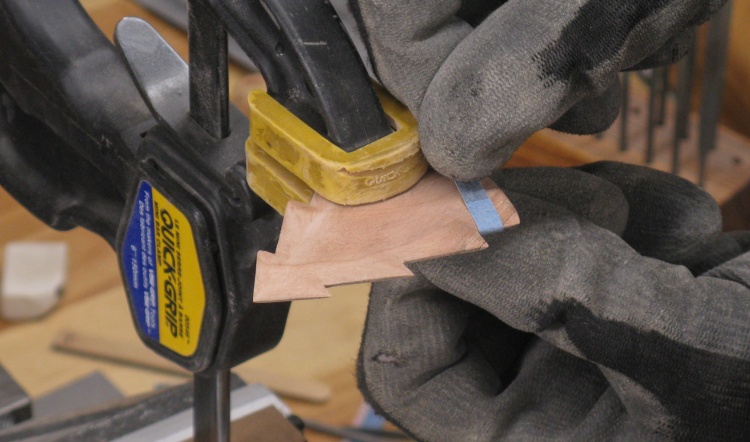
Some finer tapering with an even smaller belt sander
This smaller belt sander (OK, technically a knife sharpener) let me do some more-detailed tapering.
Blending the surfaces
Eventually I needed to hand-sand the tree, mostly using these popsicle-stick-based sanders. That let me blend the tapers and then move to finer grits to remove sanding marks.
Some final edge rounding
Finally I rounded the edges with strips of 320 grit paper.
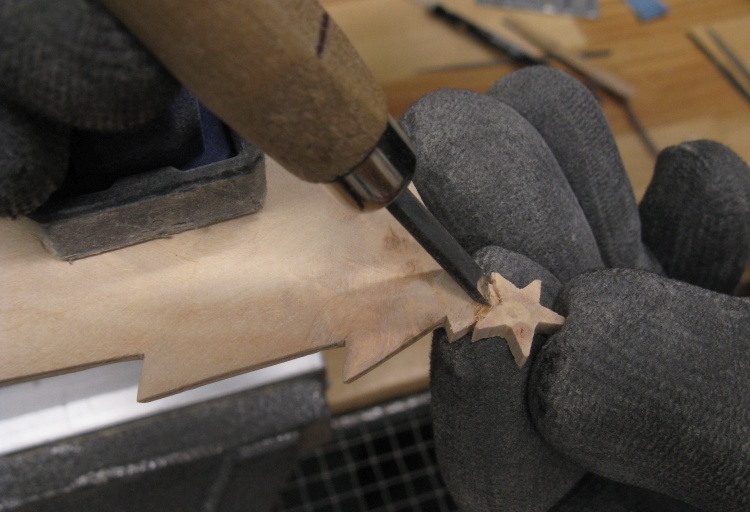
A few had top stars
I also made some trees from a small block of Box Elder burl and there was a bit more room so I added a star to the top. That needed a bit of carving to define it as can be seen here.
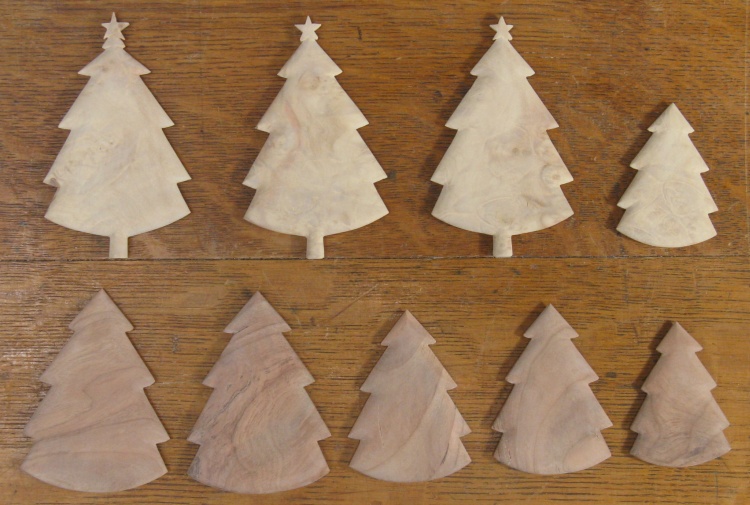
The first batch, pre-finishing
This was the original selection I had done, pre-finishing.
I decided I needed a couple more so after this photo I made a pair from some little Roasted Curly Maple scraps I managed to find.
I decided I needed a couple more so after this photo I made a pair from some little Roasted Curly Maple scraps I managed to find.
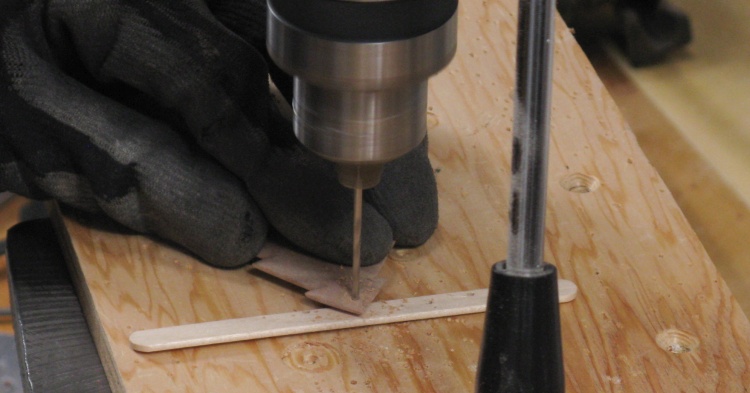
Drilling the hanging holes
These trees would get loops of string to hang them so that needed a stringing hole, for which I used a 5/64" drill.
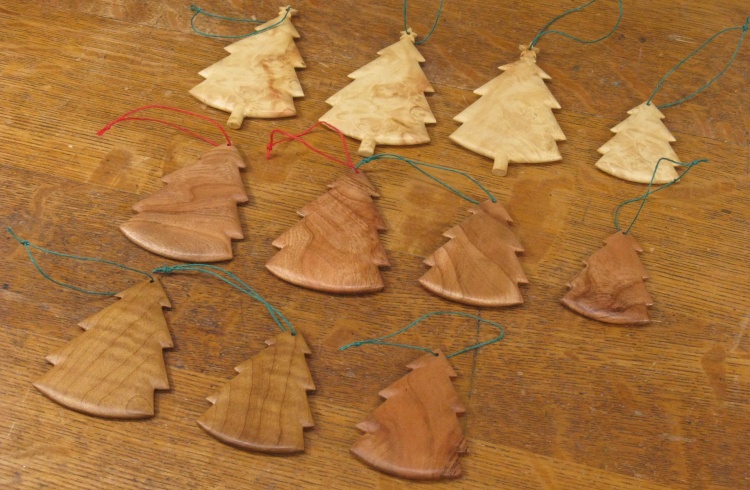
Finished and strung
This shot shows all the trees, finished and strung with coloured 0.5 mm hemp cord. They all received two coats of polyurethane varnish.
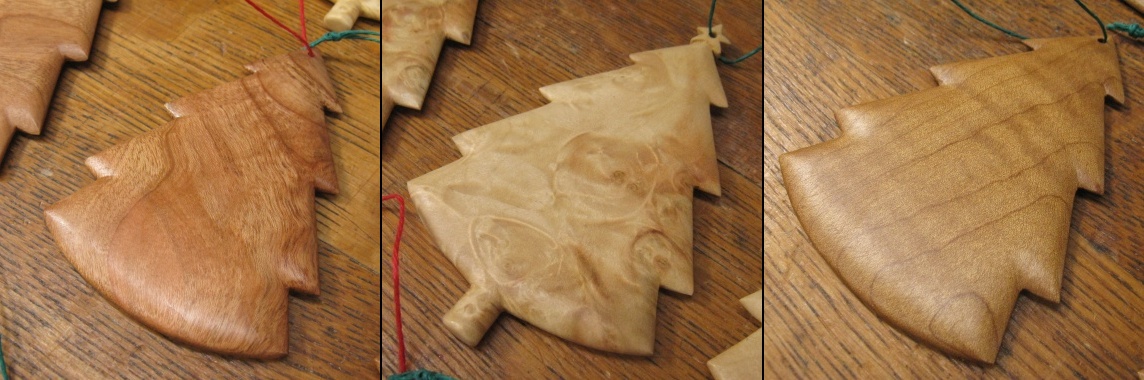
Pudgy little trees in Cherry, Box Elder burl and Roasted Curly Maple
Tree 2
The time had come to switch tree types. The second variety was named - logically I believe - Tree 2. Tree 2 shares little with Tree 1 except a certain general flatness. In fact they are even flatter and thinner, the novelty to this style being in the plethora of holes.
The closely-spaced holes in the design results in very thin sections of wood between the holes which would likely be susceptible to breakage so I made the trees from a thin 3-layer plywood. That provides grain in both directions throughout, improving strength of any thin sections.
The closely-spaced holes in the design results in very thin sections of wood between the holes which would likely be susceptible to breakage so I made the trees from a thin 3-layer plywood. That provides grain in both directions throughout, improving strength of any thin sections.
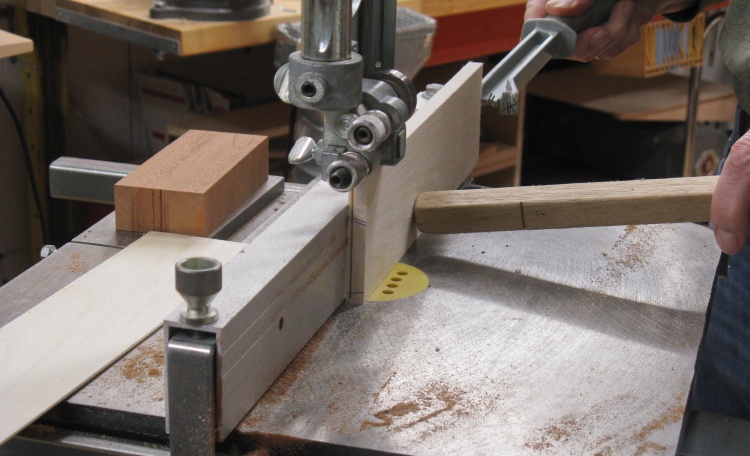
Slicing up some Aspen
Step one was to make some plywood blanks from which to cut the trees.
I originally made the blanks from Aspen (being sawn) and Mahogany (in the background) and later made Maple and Roasted Curly Maple versions for a few more trees.
I started by cutting some thin sections from which to make the plys.
I originally made the blanks from Aspen (being sawn) and Mahogany (in the background) and later made Maple and Roasted Curly Maple versions for a few more trees.
I started by cutting some thin sections from which to make the plys.
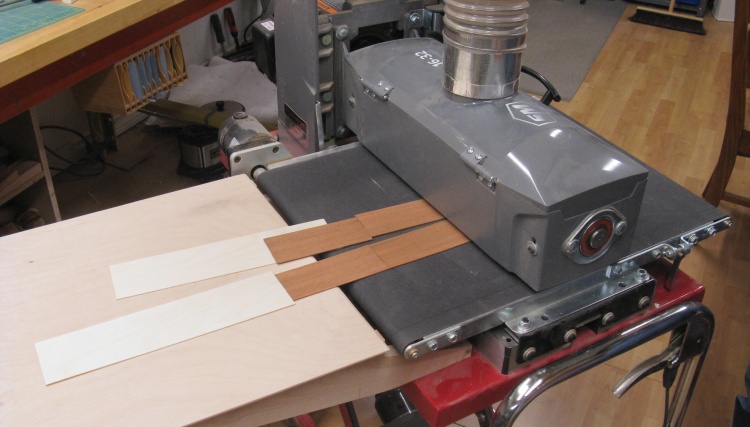
Sanding plys
From the band saw, the pieces proceeded to the drum sander which through numerous passes removed saw marks and thinned the wood to a consistent thickness of about 0.035".
Each blank would have three layers of wood with the grain of the center layer at right angles to the outside layers.
Each blank would have three layers of wood with the grain of the center layer at right angles to the outside layers.
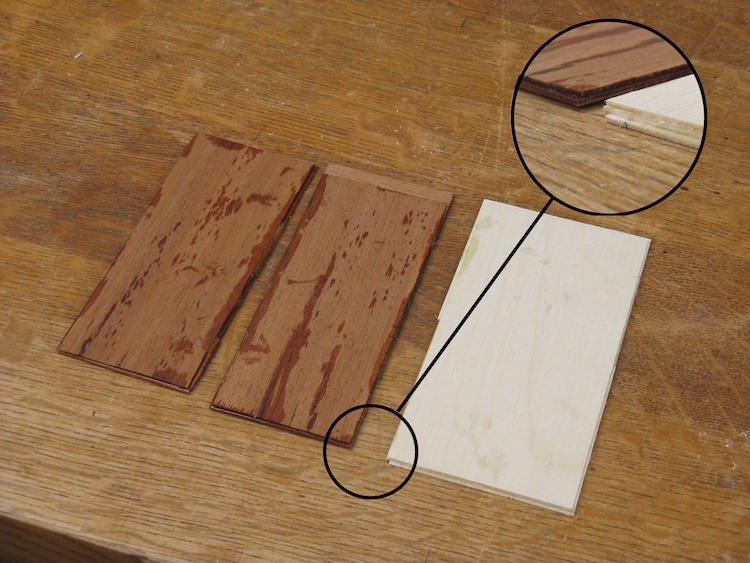
Plys glued up
The inner layers were rotated 90° and trimmed to fit into the finished size and then the three layers were epoxied together and clamped between flat surfaces while the glue dried. That resulted in these three blanks, each just big enough for two trees.
The ancient piece of Mahogany I used had some cracks through which the epoxy leaked but that will sand off.
The ancient piece of Mahogany I used had some cracks through which the epoxy leaked but that will sand off.
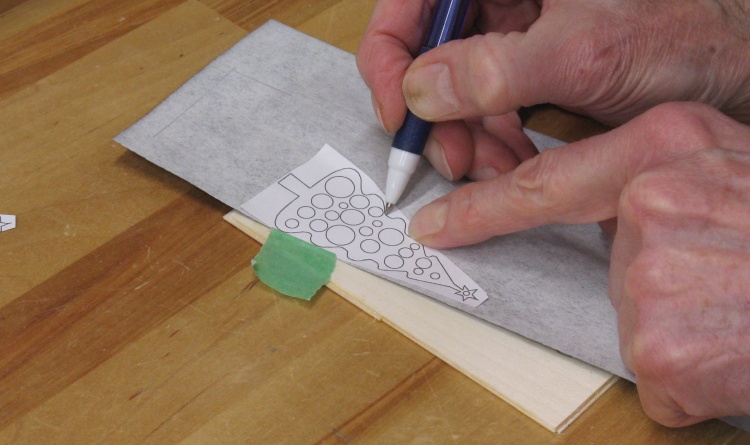
Tracing on a tree shape
The outline of the tree was traced on using carbon paper and my Official Tracing Pen. The OTP is out of ink so it can trace over a pattern without messing it up. That makes the pattern easier to reuse though I do need to remember which parts of the pattern have already been traced.
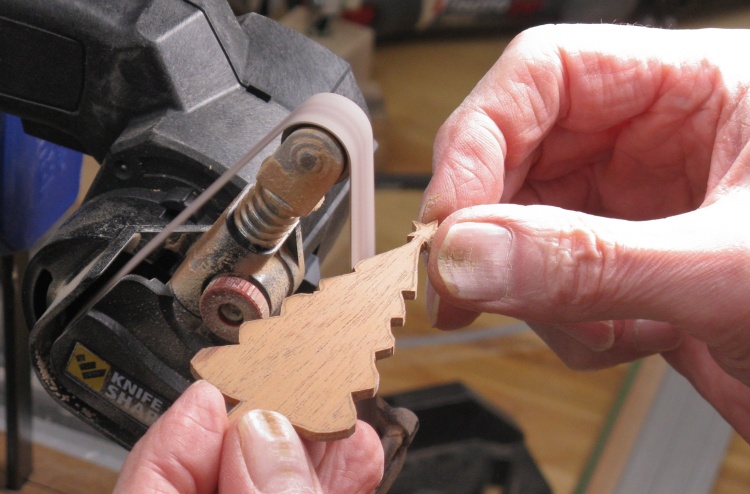
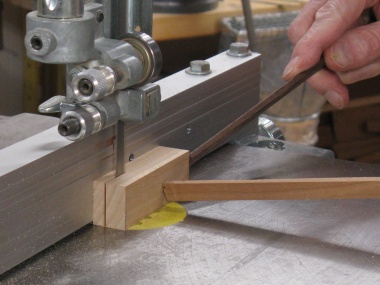
Shaping the outside
After being cut roughly to the outline using the small band saw, the edges were sanded closer to the outline with the mini belt sander.
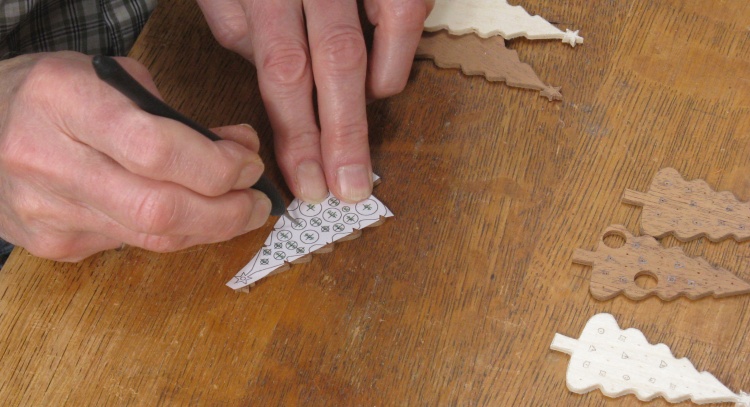
Marking hole locations
Once the outlines were done, I marked the hole positions using an awl. As can be seen from the trees on the right, I pencilled on shapes around the holes to indicate the first few drill sizes.
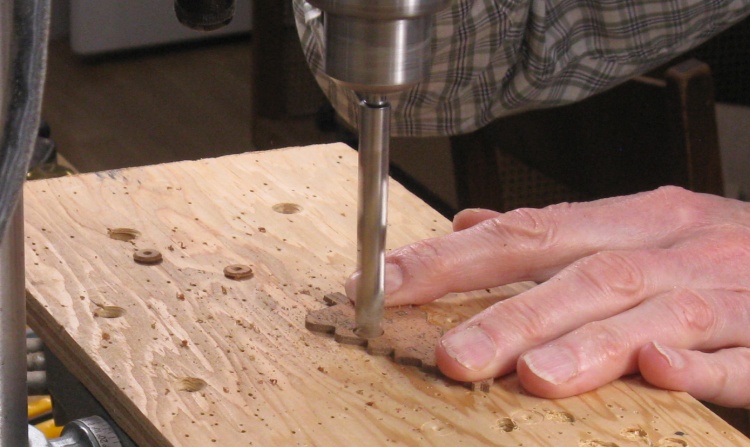
Drilling from the top side
Normally drilling a hole through wood will result in some tear-out on the bottom side. It helps to have the wood clamped tightly to a sacrificial piece under it, but the necessary tightness can be difficult to achieve.
So to consistently achieve clean holes on both sides, I drilled only partway through from the top and then flipped the tree over and drilled from the bottom side.
So to consistently achieve clean holes on both sides, I drilled only partway through from the top and then flipped the tree over and drilled from the bottom side.
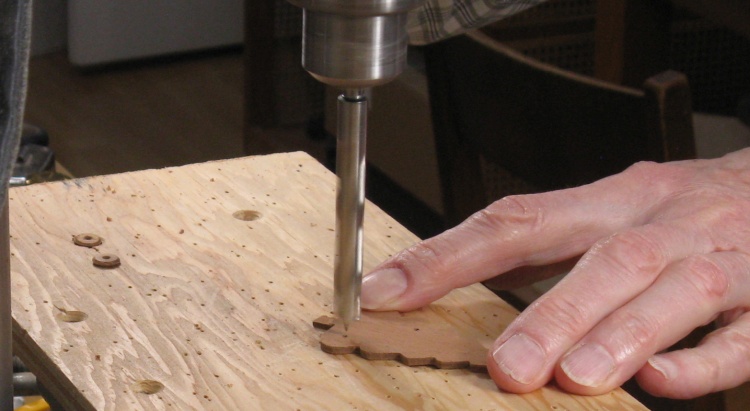
...and the backside
I used brad-point bits which make clean entry holes. They also have a center peak which if one drills to a strategic depth will pierce the bottom without cutting the outside diameter. This tiny peak hole can be used to locate the center for perfect alignment when drilling from the other side.
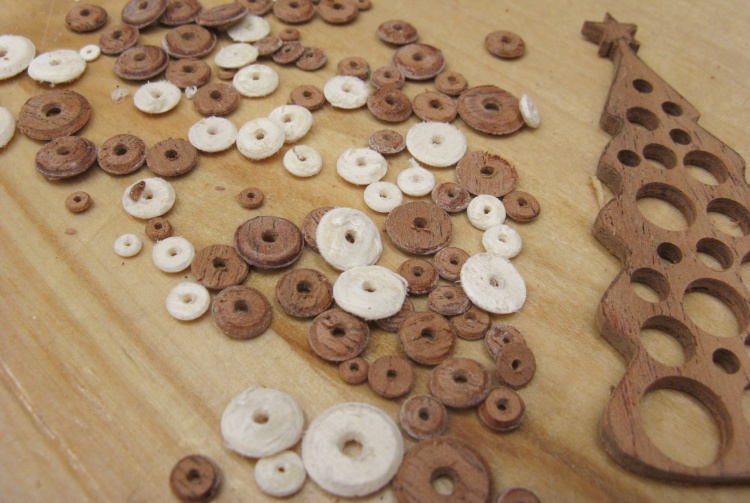
A pile of "holes" left over
Brad-point bits leave a contoured bottom since the edges and the center go deeper than the rest of the bit bottom. That resulted in a donut-shaped core being cut from each size of hole which I collected here for my own amusement.
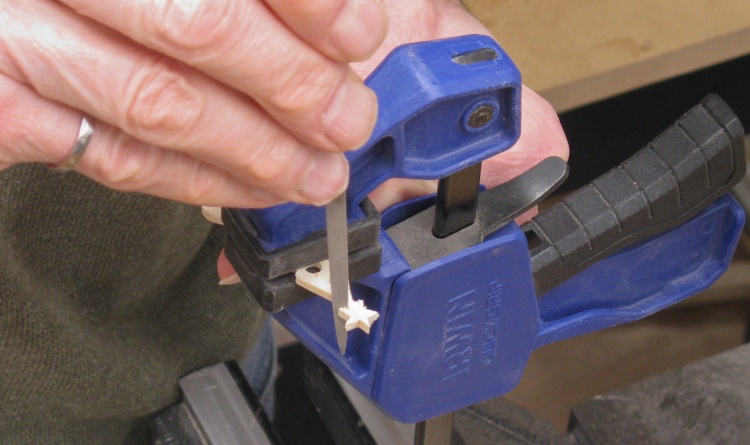
Shaping the top star
Finally I got around to cleaning up the top stars which had been roughly cut out with the band saw. That took some sanding jigs and fine needle files like this one.
Pile 'o trees ready for varnishing
I had saved the "1s" until the "2s" were done and then varnished them at the same time.
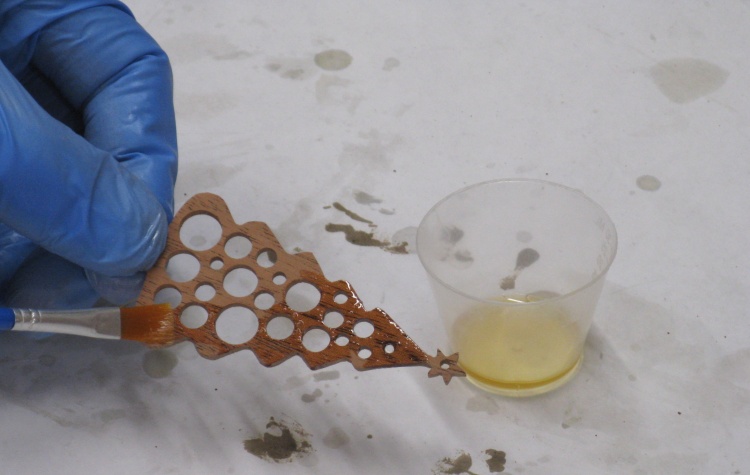
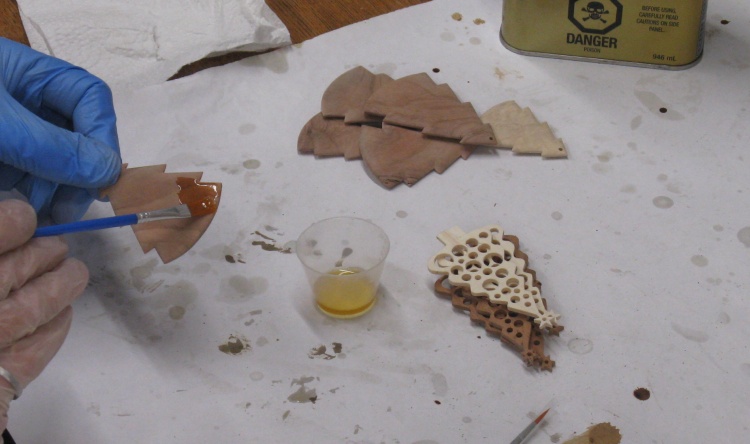
Lotsa holes to do in these
The 2s were a bit involved to varnish since the insides of each hole needed to be coated. I used two different sizes of brushes to help with that.
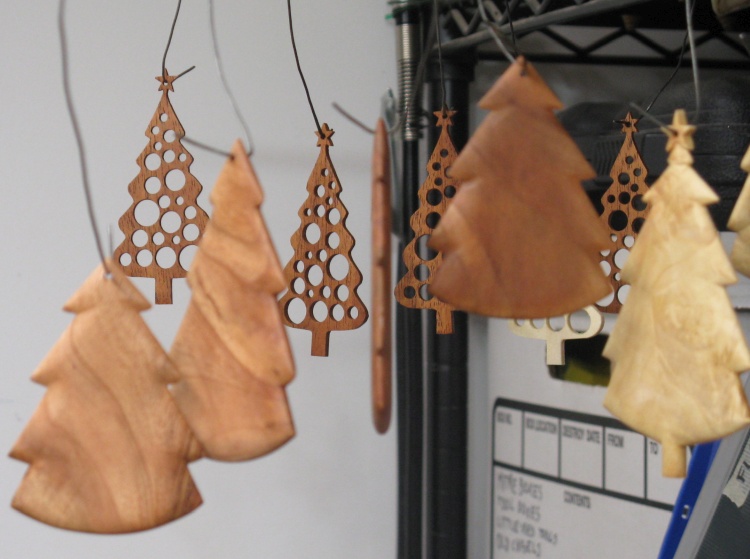
The artsy drying rack shot
The newly-varnished trees were hung out to dry, literally. Once dry they were roughened up with fine steel wood and given another coat.

The flat forest of finished trees
Then for both types the string holes were drilled and strings were strung.
The species in this photo include:
- Aspen (the 2 lightest)
- Maple (the remaining 2 lighter trees)
- Mahogany (the 4 reddish trees) and
- Roasted Curly Maple (4 lighter brown).
The species in this photo include:
- Aspen (the 2 lightest)
- Maple (the remaining 2 lighter trees)
- Mahogany (the 4 reddish trees) and
- Roasted Curly Maple (4 lighter brown).
Tree 3
That was enough flat stuff. The revolutionary Tree 3 was, well, revolved. These are similar in design to the miniature tree decorations I made from tree branches, minus the stand-up base and bark bits. They were turned on the lathe, mostly from small branches but a few from larger pieces of wood. They include a wide variety of (not necessarily known) wood species.
A piece of Aspen about 2 pencils long
I thought an almost-white tree might look interesting so I pulled out my whitest wood - Aspen.
Unfortunately the piece was under an inch thick so I needed to laminate two thicknesses together but fortunately the seam ended up being fairly subtle.
Unfortunately the piece was under an inch thick so I needed to laminate two thicknesses together but fortunately the seam ended up being fairly subtle.
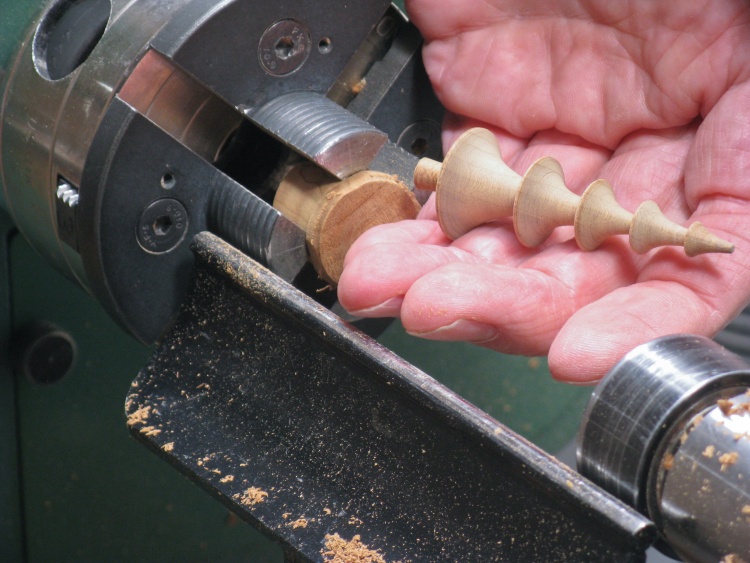
Glued from 2 pieces & turned
This is the resulting tree ornament before being pulled off the lathe.
Aspen is pretty soft which accounts for the fuzzy white grass under the tree (which will be cut off). Fortunately the wood can be sanded satisfyingly smooth.
Aspen is pretty soft which accounts for the fuzzy white grass under the tree (which will be cut off). Fortunately the wood can be sanded satisfyingly smooth.
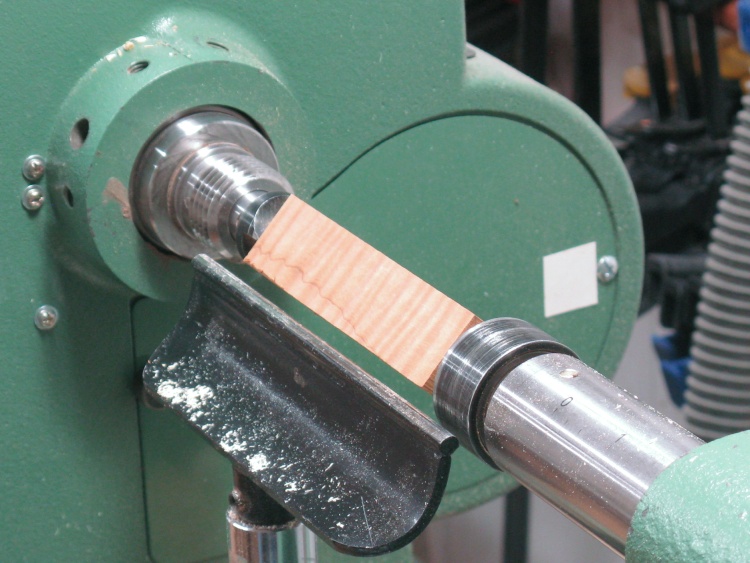
A Figured Maple blank
Next up was a piece of Figured Maple and here the blank is on the lathe ready to go.
That Aspen tree description above didn't have much detail so I've overcompensated with a 20-photo grouping of this guy being turned;
That Aspen tree description above didn't have much detail so I've overcompensated with a 20-photo grouping of this guy being turned;
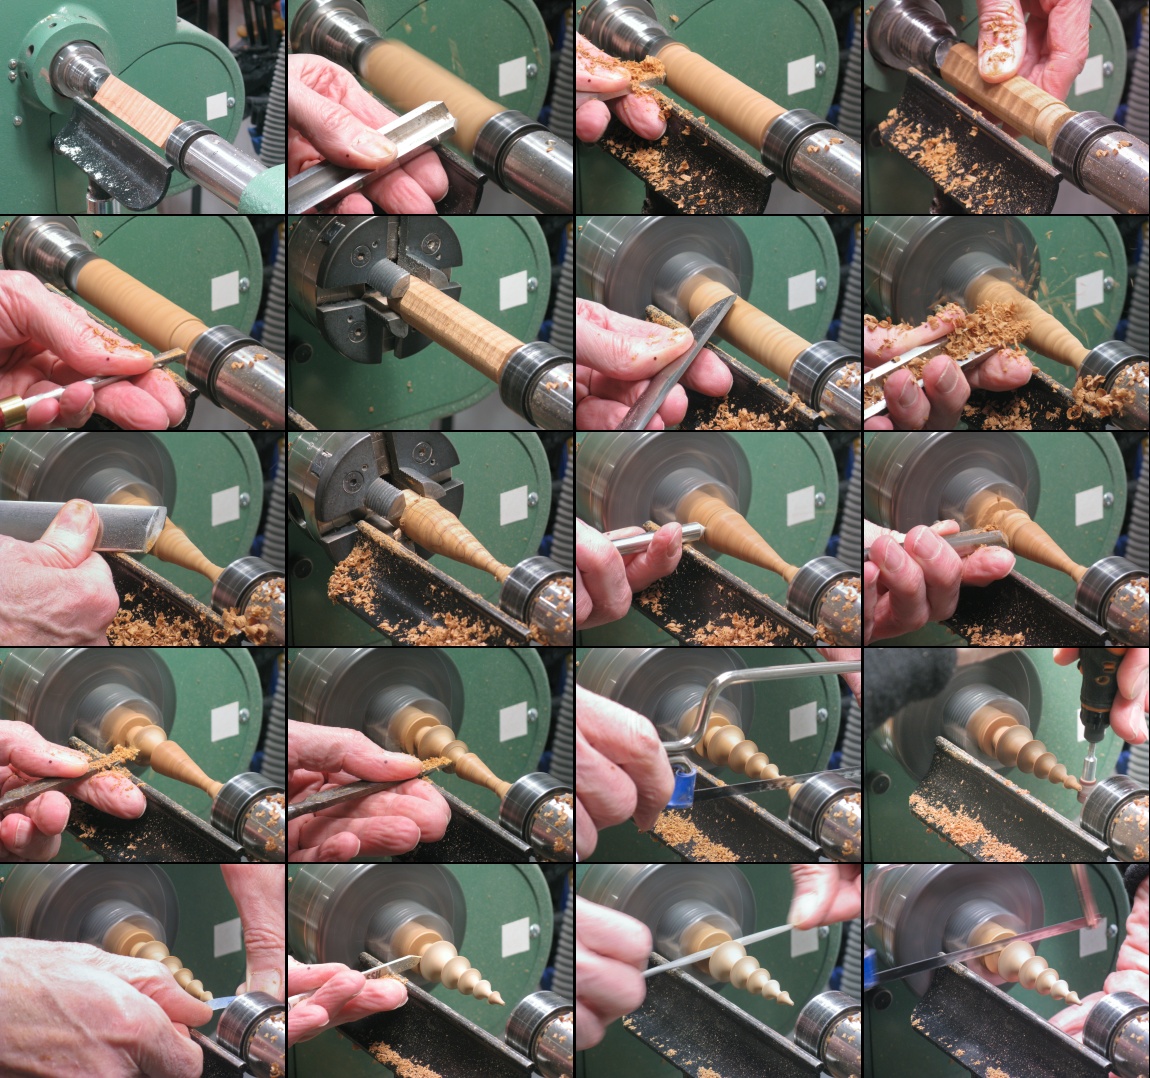
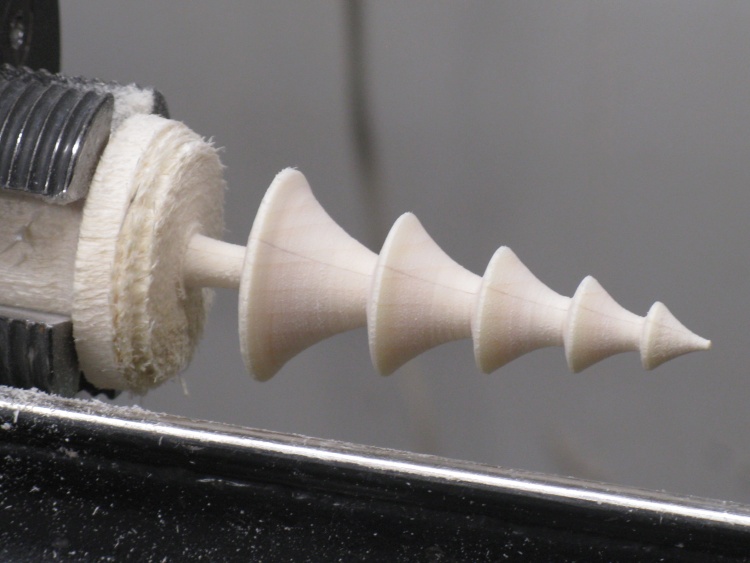
That maple blank turning into a tree
The finished tree
And there's the completed tree.
For such a nice figured wood, I have to say that the tree looks rather bland. Fortunately that perked up a bit after it was varnished.
For such a nice figured wood, I have to say that the tree looks rather bland. Fortunately that perked up a bit after it was varnished.
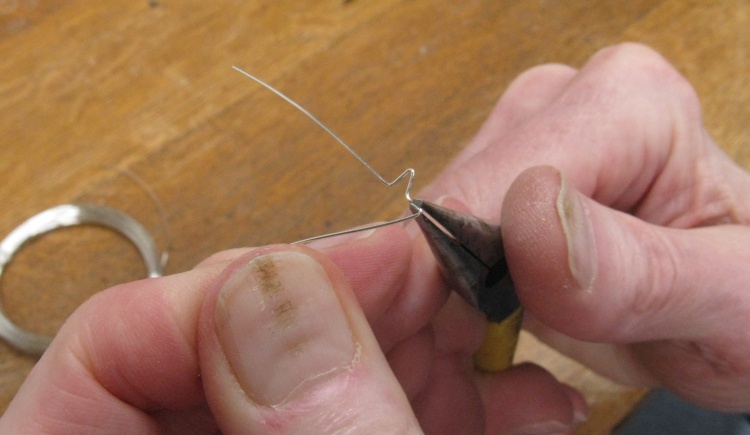
Bending up a little wire star
All the ornaments need some way to hold them to the tree. The flat trees received integral string loops but all the turned ornaments got some sort of metal loop compatible with a standard wire ornament hanger. In the case of these trees I decided to make little wire stars instead of a plain loop.
I took a number of tries to find the right wire (a couple of trips to - egads - Michael's) and then figure out how to bend it consistently enough to form a not-painful-to-look-at star shape. A bunch of practise and modifying an old pair of pliers helped with the process and in this shot I'm bending a peak.
I took a number of tries to find the right wire (a couple of trips to - egads - Michael's) and then figure out how to bend it consistently enough to form a not-painful-to-look-at star shape. A bunch of practise and modifying an old pair of pliers helped with the process and in this shot I'm bending a peak.
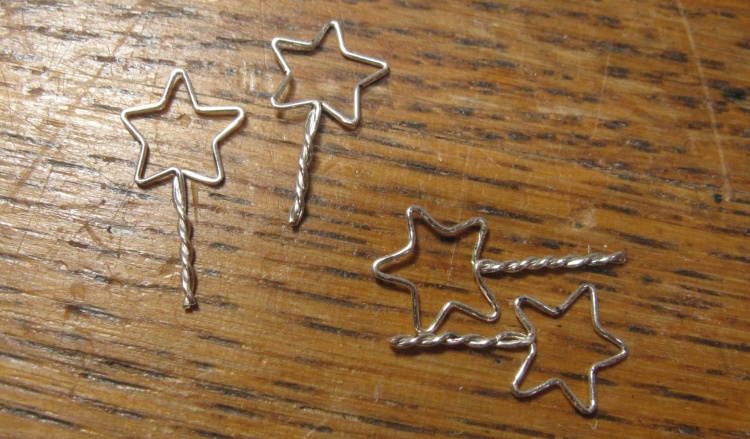
A few stars ready to go
Here are a few of the completed stars which size-wise are about 8 mm peak-to-peak.
I ended up using 0.5mm stainless steel "memory wire". Wire that "remembers" how you bend it? Amazing!
I ended up using 0.5mm stainless steel "memory wire". Wire that "remembers" how you bend it? Amazing!
Stars glued into tree tops
Then after varnishing I carefully drilled 0.04" holes in the very tippy-top of each tree and epoxied in a star.
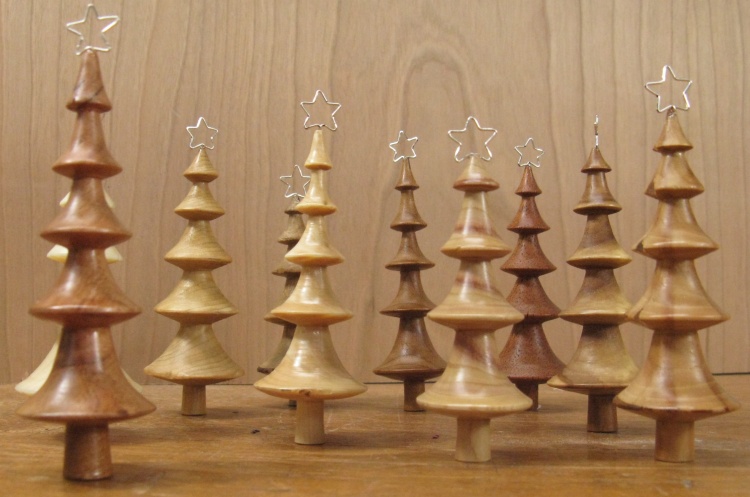
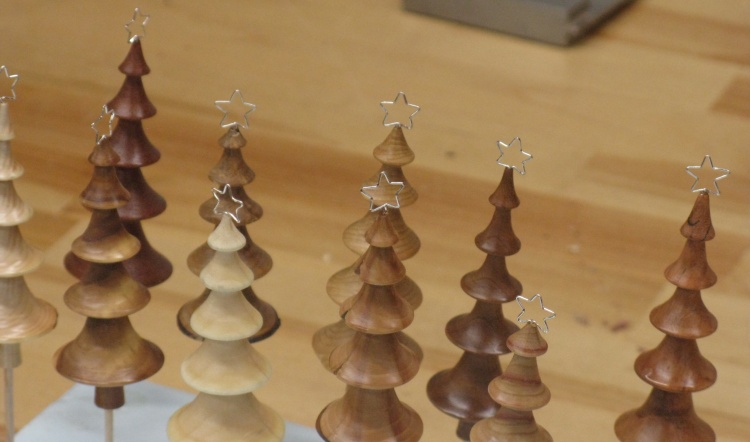
The family of turned and varnished trees
That's all the trees in a variety of woods. They are about 3" tall including star.
I didn't keep close track of which wood was which for these trees, but the species include Aspen, Cherry, Cedar, Figured Maple, Mahogany, Roasted Curly Maple and four generic branches.
I didn't keep close track of which wood was which for these trees, but the species include Aspen, Cherry, Cedar, Figured Maple, Mahogany, Roasted Curly Maple and four generic branches.
Frederick the Snowman
Next up was Frederick the snowman - Frosty's little-known sibling. Ancient lore (or at least the 1950 song) held that Frosty had a button nose whereas Frederick has the more traditional carrot, plus he doesn't smoke a corncob pipe. They both sport the traditional 3-section snowman build of abdomen, thorax and head but for fragility purposes lack any branch arms. The various incarnations of Fred were mostly made from different woods with a darker contrasting wood for the top hat (or the ball cap in the case of the one rebellious teenager).
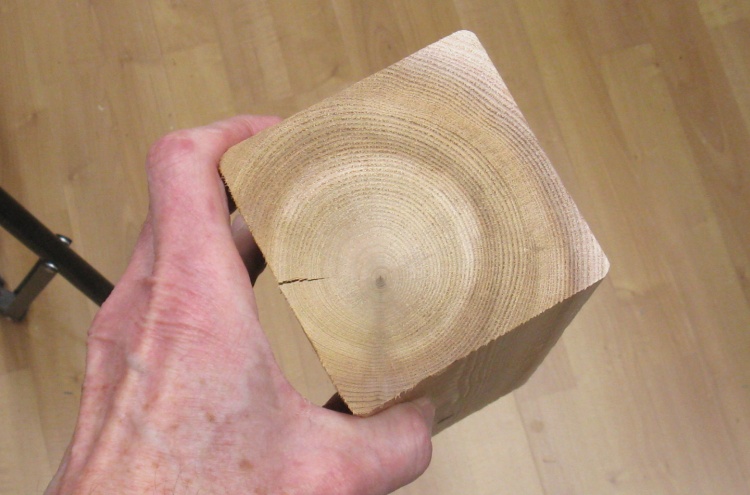
Cedar post from the tree center
I started with a cedar snowman since I had a piece of cedar fence post with the tree core in it. That would let me turn a nice concentric-grain snowman that I hoped might have an interesting look.
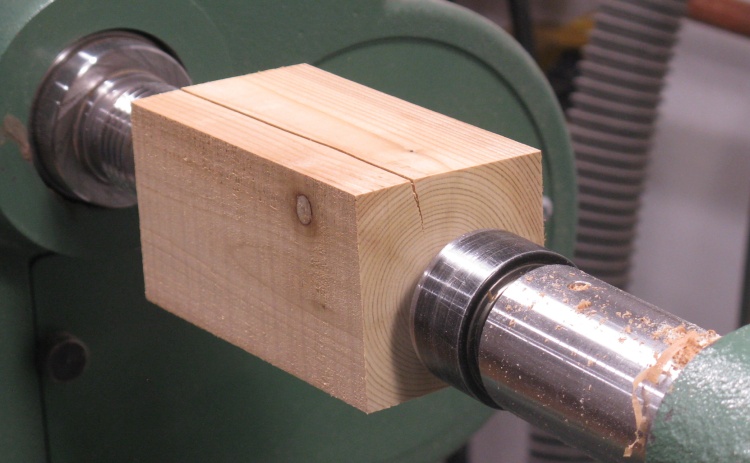
Centered and mounted on the lathe
The post was trimmed a bit smaller and then mounted to the lathe with the core centered.
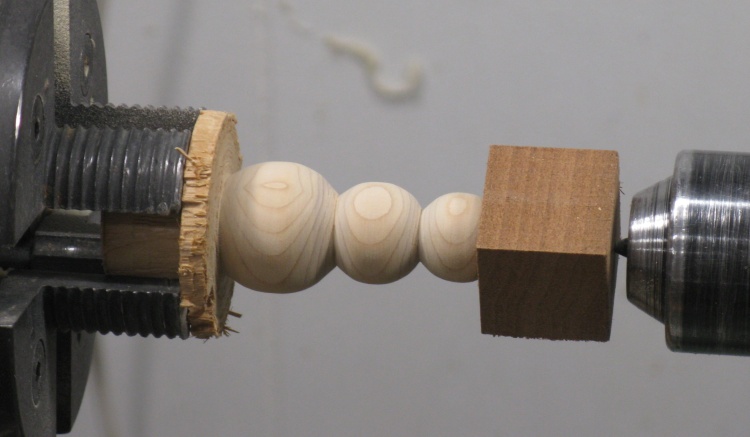
Body turned and hat wood glued on
Cedar is pretty soft and Frederick is pretty simple so it didn't take long to do the body. When that was done, I cut a cubic inch or so of Thermally Modified Poplar and glued that on for a hat.
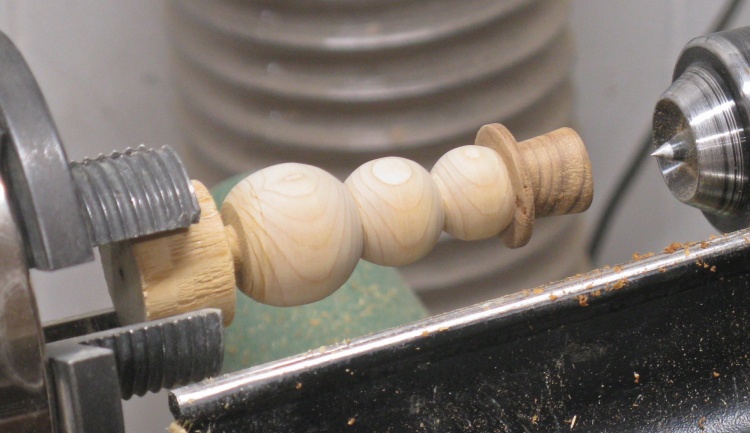
Top hat turned too
Once the glue was dry, a bit more turning finished off the top hat.
Also visible in this shot is a thinned bottom area to make it easier to cut the figure off the lathe which was accomplished using a miniature hand saw.
Also visible in this shot is a thinned bottom area to make it easier to cut the figure off the lathe which was accomplished using a miniature hand saw.
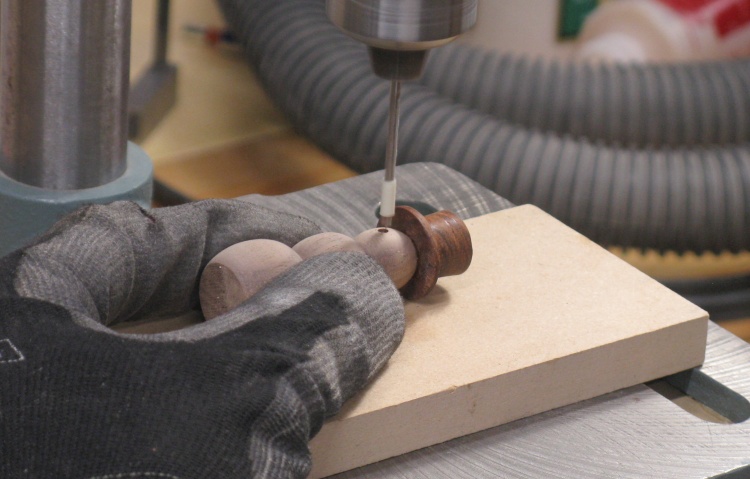
Drilling nose mounting hole
All the Fredericks were equipped with carrot noses (substituted by Aromatic Cedar in this wooden version of the world) and they were inset for a clean fit. Here I'm drilling a 3/32" nose-mounting hole.
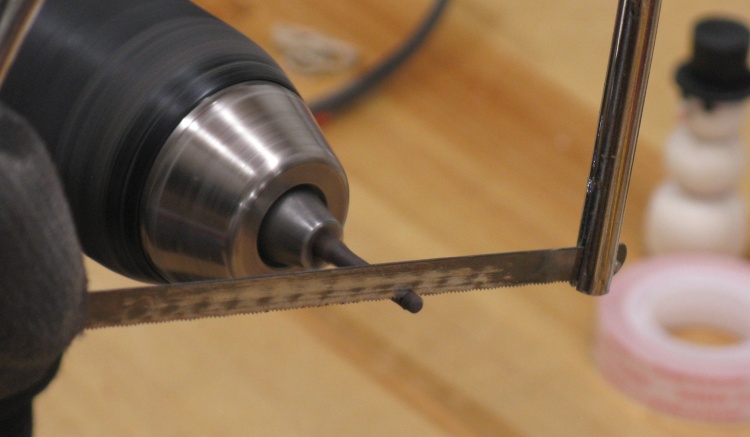
Cutting off a piece of coal for eye
The traditional chunk-of-coal eyes were inset as well. In this shot I'm cutting an eye off a 7/64"-diameter African Blackwood dowel which is standing in for the fossil fuel.
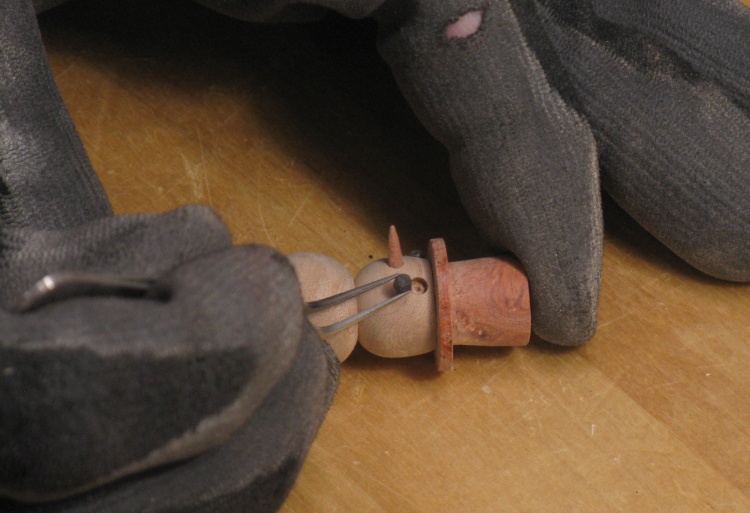
Delicate eye installation operation
Glue and tweezers helped with facial feature installation.
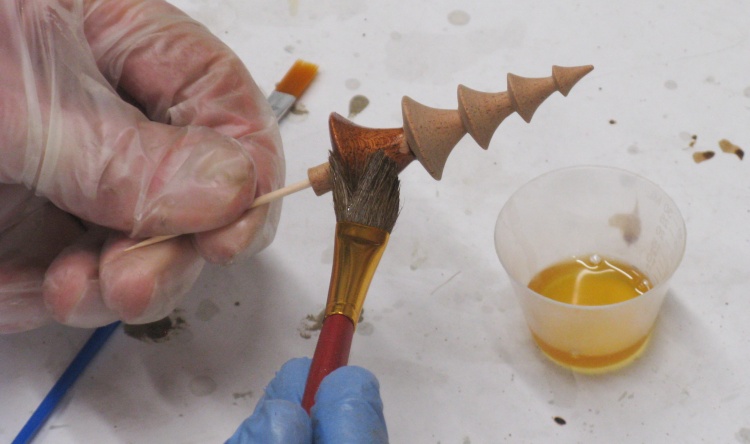
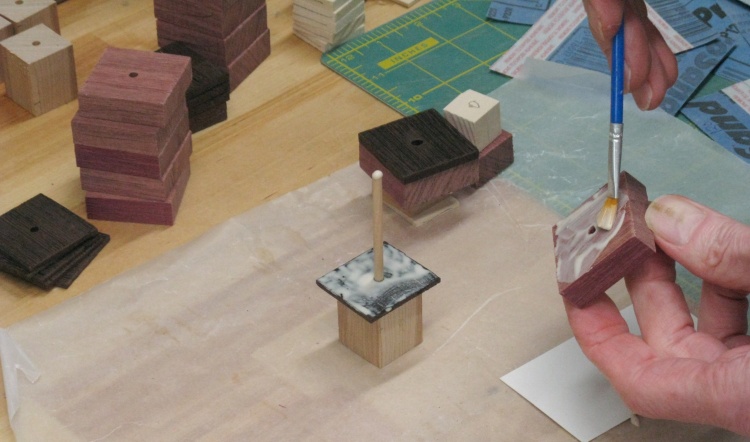
Back to the trees with a can of varnish
The #3 trees had also been waiting around "in the raw" and after the snowmen were done, I gave them all coats to wear. Coats of varnish, that is. Here the first tree gets the first brush of varnish.
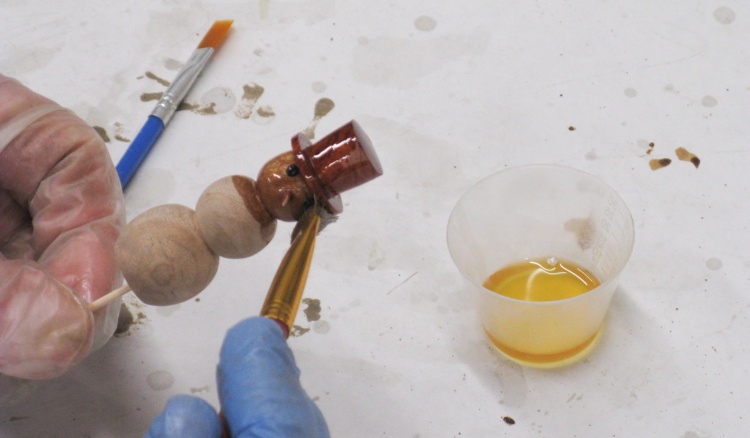
Frederick gets a coat as well
...and the same thing for the snowmen.
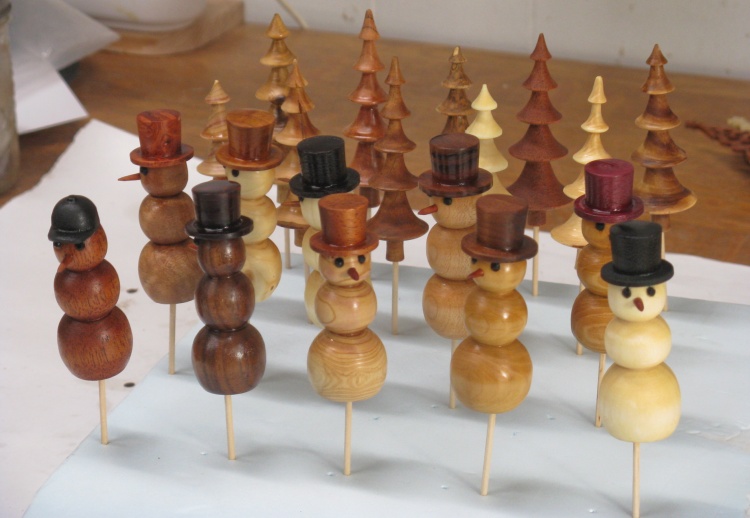
Can't see the forest for the...uh...snowmen?
For easier handling, both trees and snowmen were mounted on toothpicks via small holes in the bottom (5/64" diameter for those who must know).
Here the toothpicks are mounted in a block of styrofoam while the varnish on the figures dries.
Here the toothpicks are mounted in a block of styrofoam while the varnish on the figures dries.
The figures were varnished with two coats of Minwax Fast-Dry polyurethane. After that, small metal screw-in eyes were installed in the hats for hanging. They are assembled below for a family portrait.
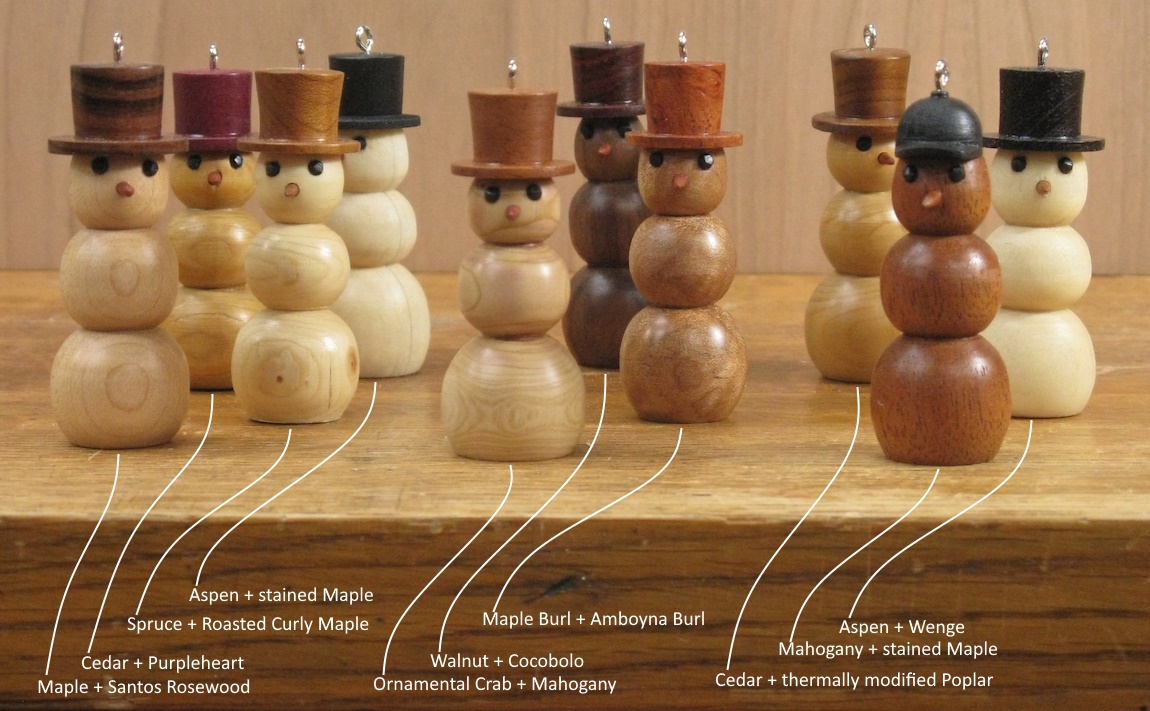
The whole fam damily
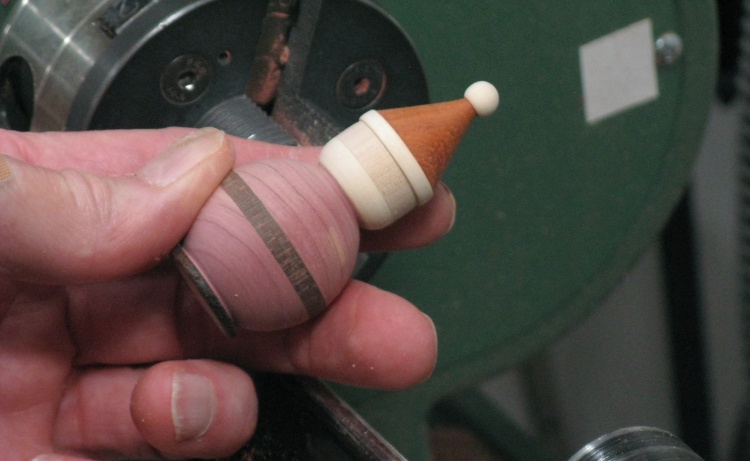
Santa
No Christmas ornament selection would be complete without the patron saint of children and symbol of aggressive holiday marketing: Santa Claus. Each almost-clone is composed of 9 layers of wood, producing a rather stylized and axially symmetric version of old Saint Nick.
The Santa figure uses appropriately-coloured woods to build him up: feet, Santa pants, belt, Santa jacket, beard, face, Santa hat; fur, body and pompom. I began by chopping up appropriately-thick pieces for each layer.
The Santa figure uses appropriately-coloured woods to build him up: feet, Santa pants, belt, Santa jacket, beard, face, Santa hat; fur, body and pompom. I began by chopping up appropriately-thick pieces for each layer.
Chopping some Purpleheart
Chopping some Cherry
Chopping some Maple
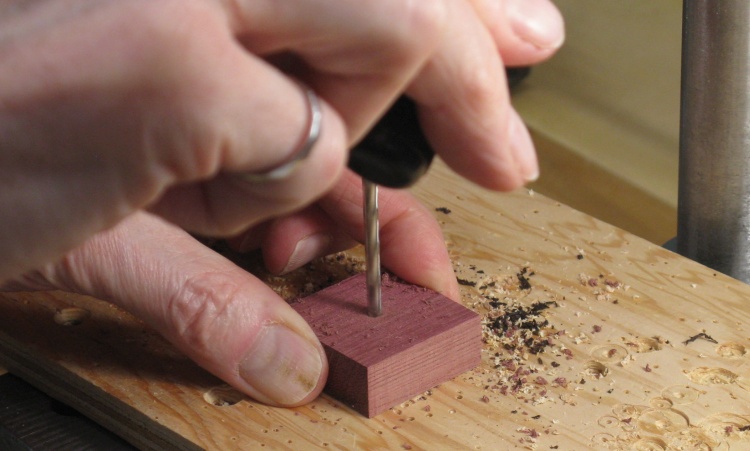
Drilling a center-post hole
The layers of wood will need to be glued together and clamped for tight seams. I've found that clamping glued wood together without constraint is a recipe for frustration. Two layers are usually not too bad and I've managed to do three but 9? Not gonna happen.
I decided to constrain things with a center dowel to keep everything together and here I'm drilling a hole in some Santa-pants-to-be for the alignment dowel.
I decided to constrain things with a center dowel to keep everything together and here I'm drilling a hole in some Santa-pants-to-be for the alignment dowel.
Stacking up a Santa
The bottom-most piece of wood will just be used to hold the figure in the lathe (and bring the stack count to a nice even 10). In this shot the black "foot" wood is on the stack and I'm slathering glue on the pants.
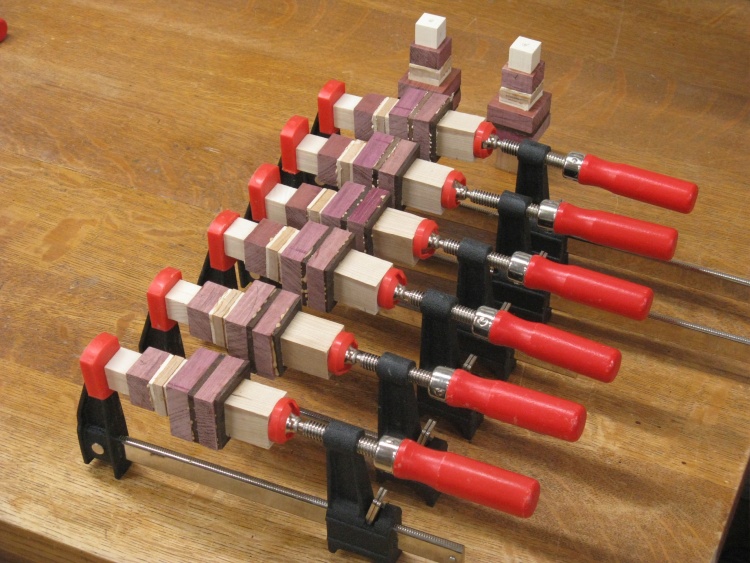
A small phalanx of Santas drying
A couple complete stack-ups look on while another six dry in the (very) secure embrace of screw clamps.
The wood used for these Santas include:
Feet - Wenge
Santa pants - Purpleheart
Belt - Wenge
Santa jacket - Purpleheart
Beard - Manitoba Maple
Face - Cherry
Santa hat fur trim - Manitoba Maple
Santa hat body - Purpleheart
Santa hat pompom - Manitoba Maple
The wood used for these Santas include:
Feet - Wenge
Santa pants - Purpleheart
Belt - Wenge
Santa jacket - Purpleheart
Beard - Manitoba Maple
Face - Cherry
Santa hat fur trim - Manitoba Maple
Santa hat body - Purpleheart
Santa hat pompom - Manitoba Maple
Very chippy wood gave a high failure rate
The first couple of Santas worked out all right but the rest of the group had "issues". I used Purpleheart and Wenge for the red and black bits and both are very hard and chippy woods. The grain direction and hardness made it difficult to cleanly turn the Santas and in this shot is visible chipped-out portions which would be appalling to Christmas-card illustrators, innocent children and of course, Mrs. Clause.
After a few failures I decided that I needed to start over.
After a few failures I decided that I needed to start over.
Starting over with new woods
So then I chose some new woods (Padauk seen here for the red) and got sawing.

The new collection of Santa components
Eventually I had a pile of woods ready for drilling/stacking/gluing & turning.
In addition to the more-forgiving woods, where practical I oriented the grain parallel to Santa's spine (another dowel in this incarnation). Those two measures made the turning much more successful.
In addition to the more-forgiving woods, where practical I oriented the grain parallel to Santa's spine (another dowel in this incarnation). Those two measures made the turning much more successful.
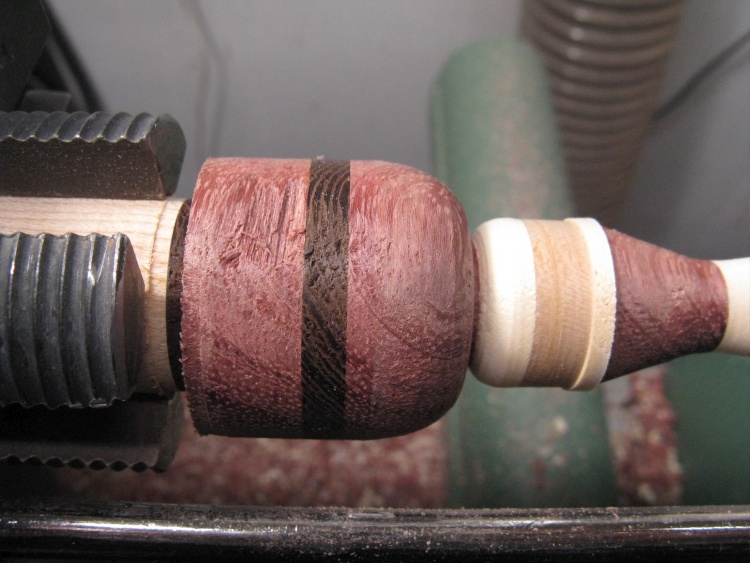
This guy turned out fine
This was the first new Santa and he worked out just fine.
I included two new woods for the reds - Padauk and Aromatic Cedar - but accidentally ended up mixing them on some Santas. This guy had a cedar torso and a Padauk hat that are hugely different colours. Fortunately after varnishing most of the difference disappeared - Whew!
I included two new woods for the reds - Padauk and Aromatic Cedar - but accidentally ended up mixing them on some Santas. This guy had a cedar torso and a Padauk hat that are hugely different colours. Fortunately after varnishing most of the difference disappeared - Whew!
After some practise it took a bit over 20 minutes to turn a Santa. Here's an eight-times speed version of one being turned.
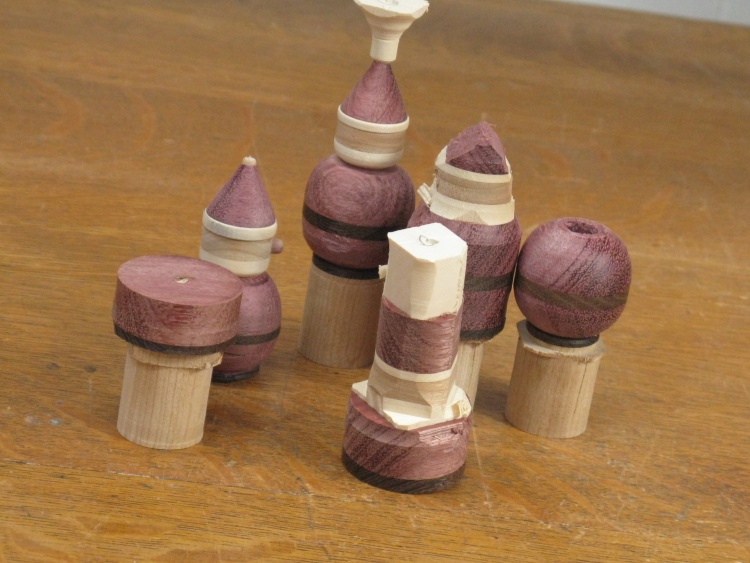
The horrific carnage of the Santa morgue
After turning all the new-wood Santas I thought I might as well return and do the originals and see how many good ones I could get from them. Here's the "boneyard" of unsuccessful turnings.
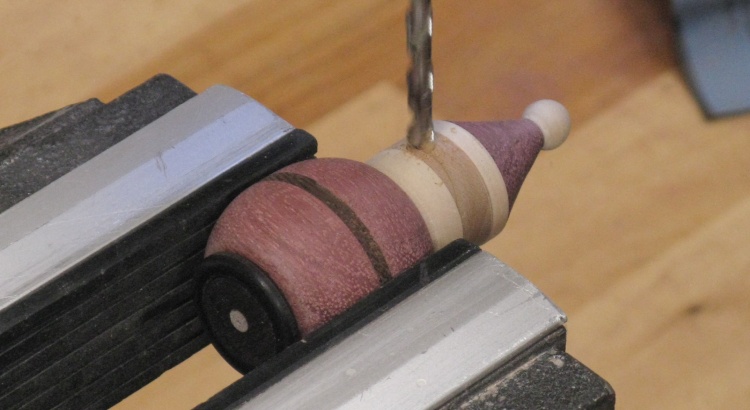
Drilling for a nose
Like Frederick the snowman, the noses of the Santas were inset and this photo shows one of them getting drilled.
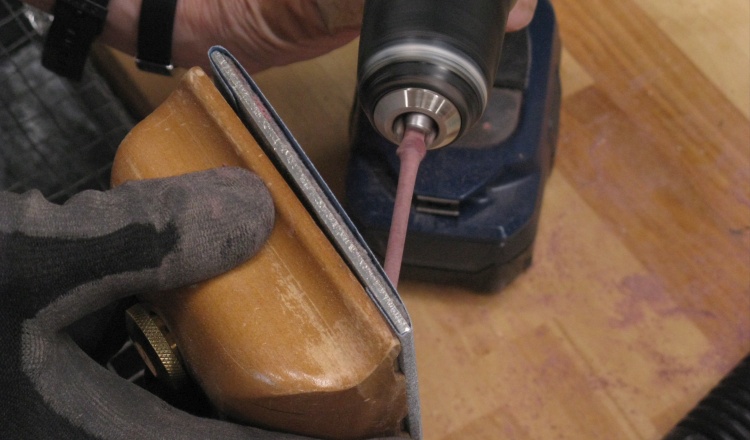
Rounding a nose dowel
The noses were made from purpleheart and started with a square rod sanded into a dowel using a cordless drill and sandpaper. In this shot the end is being rounded to proper Santa-nose shape.
Adding eyes and buttons
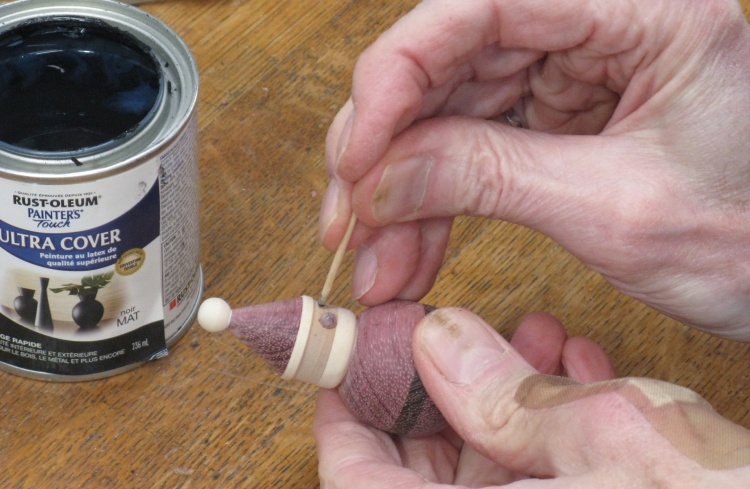
It took a while to find a good method to add eyes and buttons but I eventually settled on using paint.
Rather than use a brush, the paint was applied with the flattened end of a round toothpick; Just a bit of paint on the toothpick was picked up and then lightly contacted onto the Santa. That gave a nice well-defined and round dot.
Rather than use a brush, the paint was applied with the flattened end of a round toothpick; Just a bit of paint on the toothpick was picked up and then lightly contacted onto the Santa. That gave a nice well-defined and round dot.
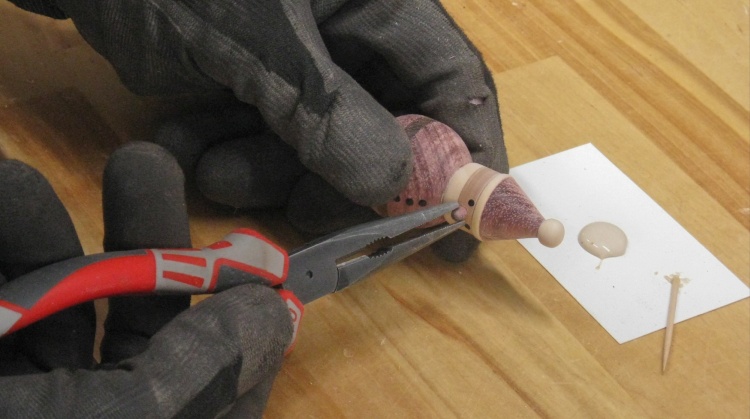
Gluing in the schnoz
Once all the eyes and buttons were added and dried, the noses were glued into place.
Waiting around for the varnishing guy to arrive
That pretty much did it for the Santas. They did receive (barely readable) engraved initials on the bottom and a hole for a varnishing stand toothpick (yes, round toothpicks are a vital part of a woodworker's supplies).
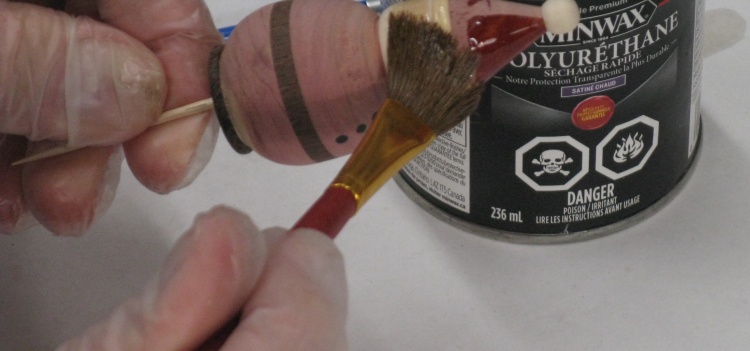
Varnishing guy's not so great with camera framing
Here a be-toothpicked Santa is getting his first varnish coat with a relatively huge brush.
As with the other ornaments they received two coats of Minwax Fast-Dry Poly.
As with the other ornaments they received two coats of Minwax Fast-Dry Poly.
Once the varnishing was done, the Santas were equipped with loops for hanging. A small hole was drilled in the pompom and a tiny metal eye was threaded in.
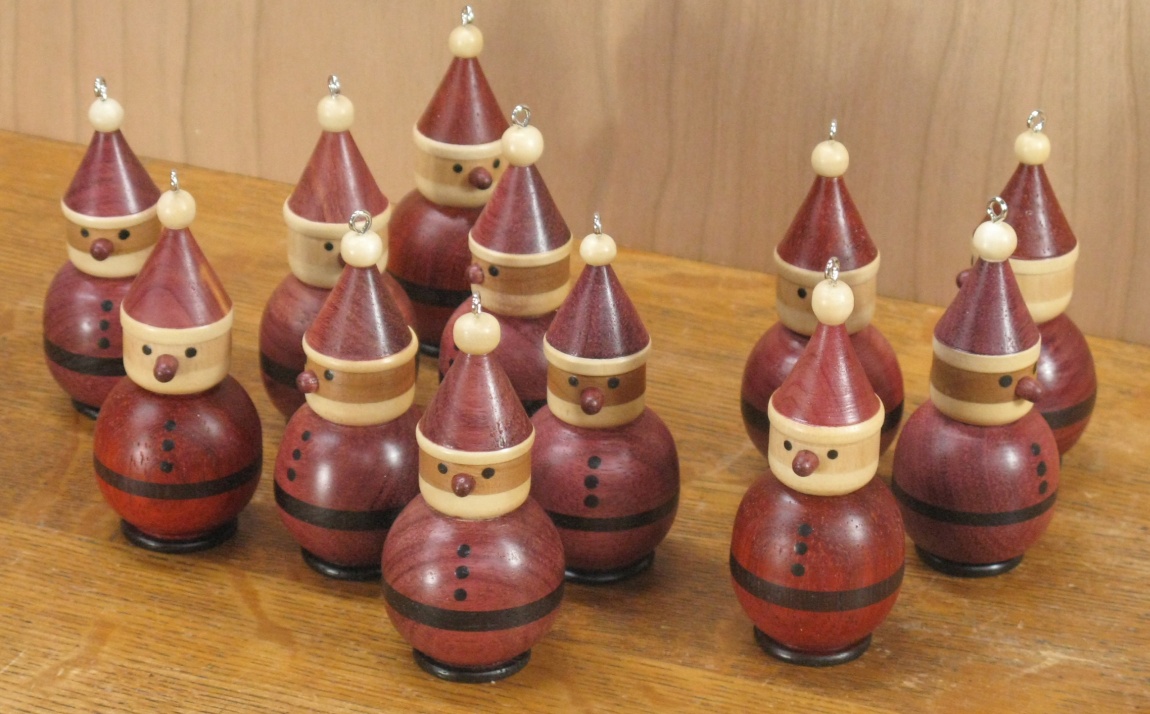
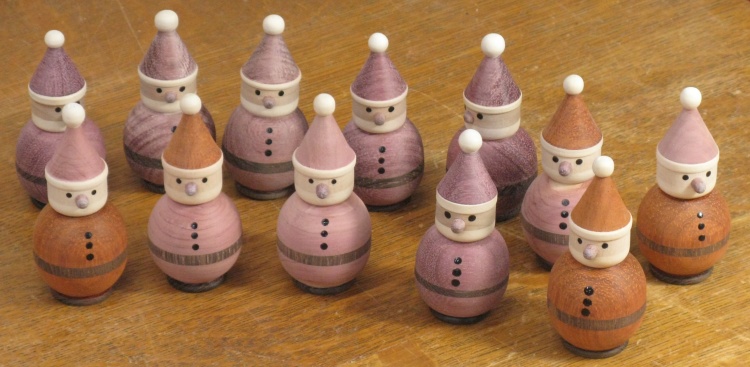
Everyone looking shiny
Wood colours
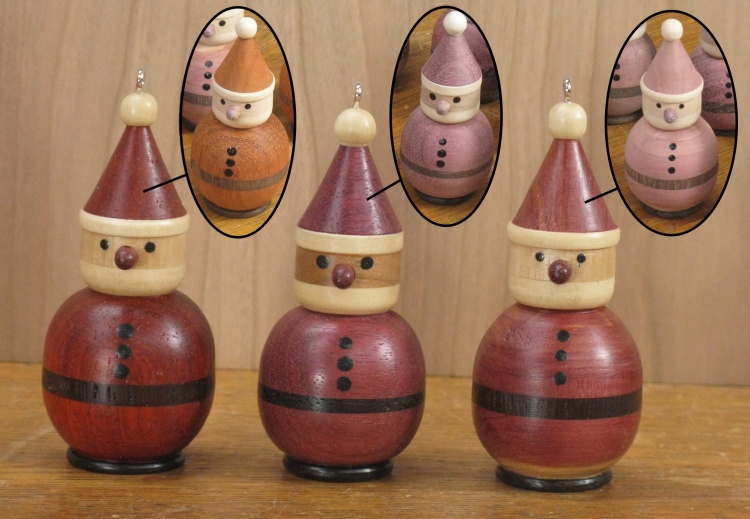
As previously mentioned, I had been concerned about the colour variation in the red parts. However after the varnish was applied, the three very different woods took on a similar dark red hue.
From left to right these three Santas have red parts made from Padauk, Purpleheart and Aromatic Cedar with before-varnishing images beside them.
From left to right these three Santas have red parts made from Padauk, Purpleheart and Aromatic Cedar with before-varnishing images beside them.
Bells
And what would Christmas be without the bells joyously ringing out the season? Um...realistic maybe? But let's not permit reality to get in the way of a good imagined Christmas season. So for that we need some idealized bells with functional yet ineffective clappers. Let's all sing along - "clunk clack, clunk clack, Christmas bells are knocking..." (it is wood after all).
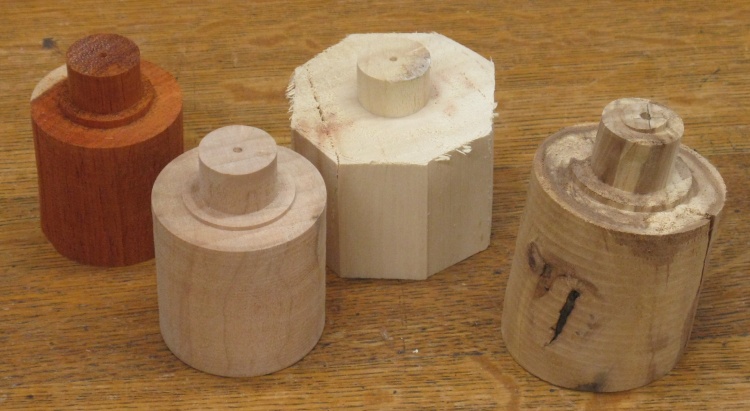
The bell bodies are all made from single pieces of wood (except the redwood version which didn't quite have enough length and had to be laminated) and all turned on the lathe.
The bell bodies are all made from single pieces of wood (except the redwood version which didn't quite have enough length and had to be laminated) and all turned on the lathe.
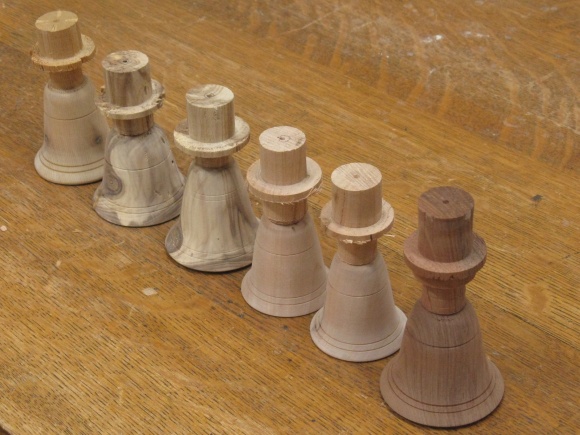
A diverse variety of bell blanks
After making a first bell as a test (which joined the rejected Santas due to some turning issues), I made a couple which worked out fine.
Unfortunately the turning process ended up involving five different lathe setups so that was lots of busywork for each bell. To minimize the reconfiguration time I decided to make additional bells in batches so I could do all the bells sequentially on each lathe configuration.
Then I picked out some woods and cut these four blanks to start. The woods from left to right are an Ornamental Crab branch, Figured Maple, Manitoba Maple and Padauk.
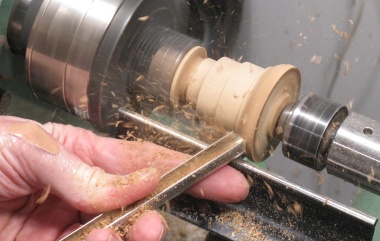
Rounding the end for use in a 4-jaw chuck
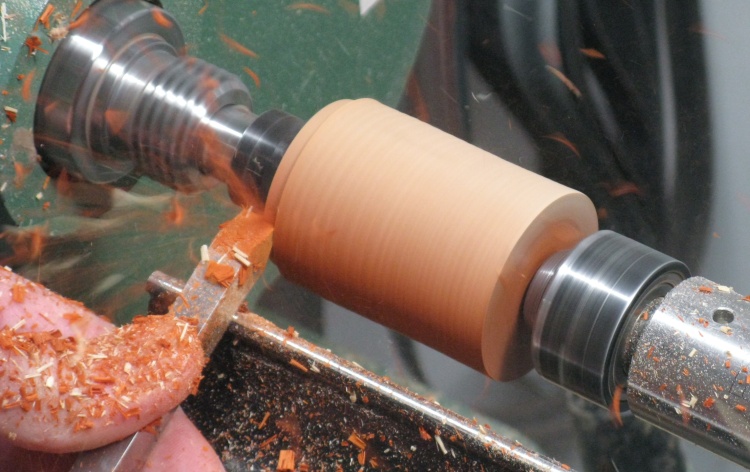
Step 1 used the spur center on the lathe which let me get at the end of the blank and round it off to form a tennon with a diameter suitable for a 4-jaw chuck.
In this photo I'm doing the Padauk blank which produces lots of fine orange-ish shavings.
In this photo I'm doing the Padauk blank which produces lots of fine orange-ish shavings.
The four blanks through the round-the-end process
That's the four blanks all ready for the second lathe setup.
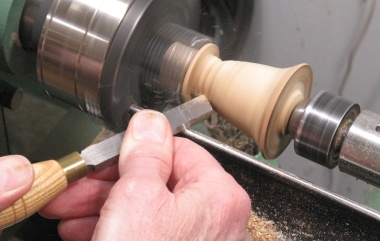
The second configuration used the 4-jaw chuck to hold the newly-turned tennon. This is when the outside is shaped except for the very top. Shaping the top at this stage would leave only a very small diameter of wood which might not be strong enough to handle the hollowing process.

Cutting a reference diameter slot
Removing excess wood between slots
Final shaping
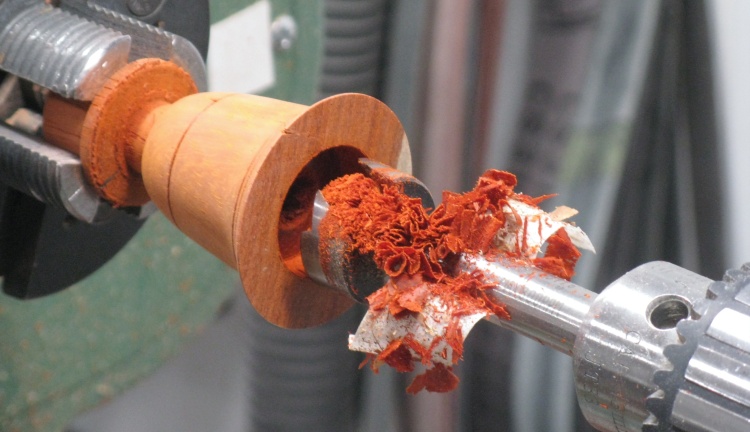
Drilling to remove the bulk of the interior
Next was the start of the hollowing, using drill bits to remove the center and some of the bulk wood. This Padauk blank produced lots of brightly-coloured crinkly shavings on the Forstner bit.
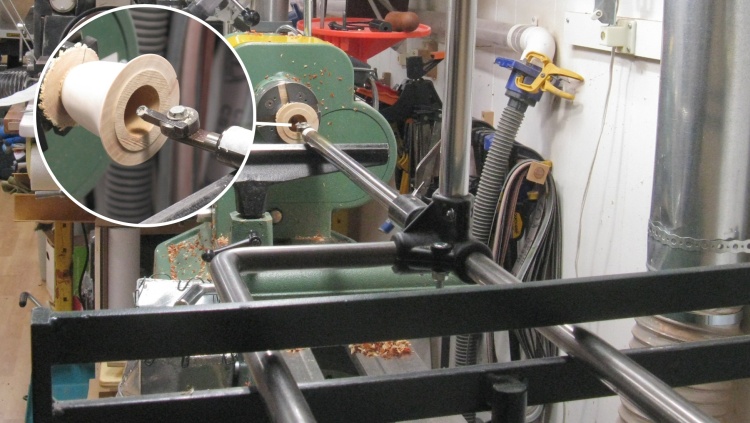
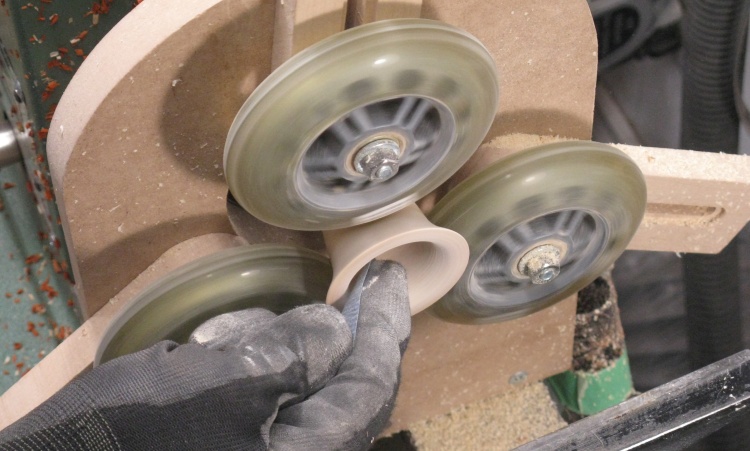
A shot down the captured hollowing jig
The remainder of the hollowing followed. I used my captured hollowing jig as usual which has the tiny carbide cutter at the end.
At the time of this photo I hadn't yet set up the three-wheel steady-rest to stabilize the bell during the hollowing but it can be seen in the next photo.
At the time of this photo I hadn't yet set up the three-wheel steady-rest to stabilize the bell during the hollowing but it can be seen in the next photo.
Sanding the inside after hollowing
After the inside hollowing was complete, it was sanded to remove tool marks.
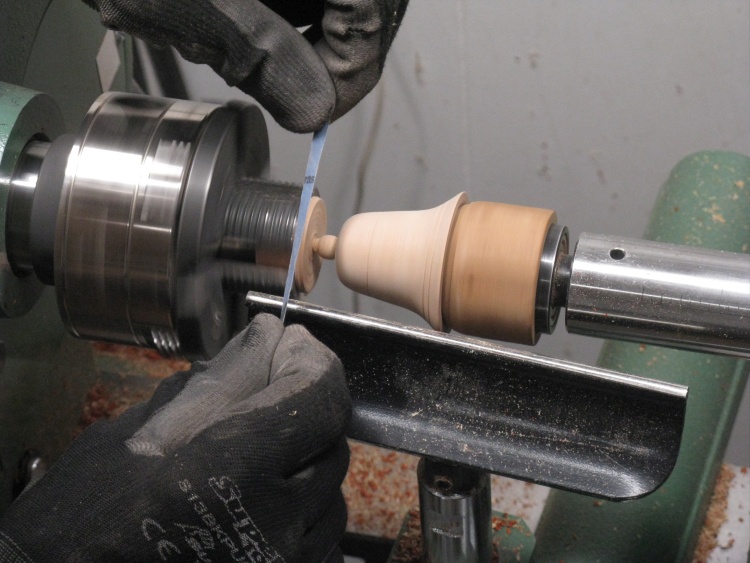
Top section now shaped
The steady-rest came off, the tailstock with a wooden adapter was moved in and the shaping of the top of the bell was completed.
Here I'm getting ready to sand the top before cutting it off the wood in the chuck.
Here I'm getting ready to sand the top before cutting it off the wood in the chuck.
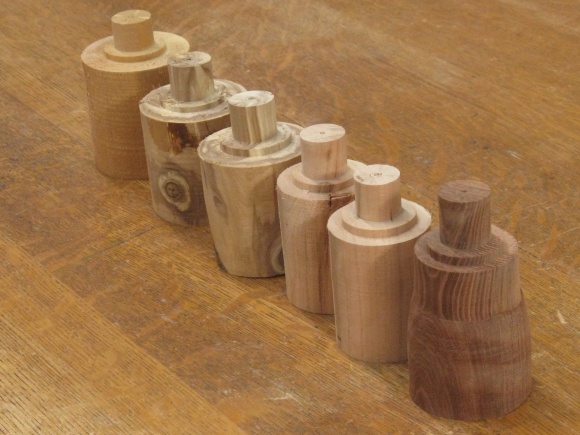
Batch #2; blanks for clappers and bells
Once that batch was done, I selected another group and repeated the process. On the left are little blanks that I cut for the clappers at the same time.
Woods include the two-storey Redwood, a couple more Ornamental Crabs, a pair of smaller Cherrys and a Cedar.
Woods include the two-storey Redwood, a couple more Ornamental Crabs, a pair of smaller Cherrys and a Cedar.
Tennons turned
Outsides shaped
Insides drilled
Insides shaped
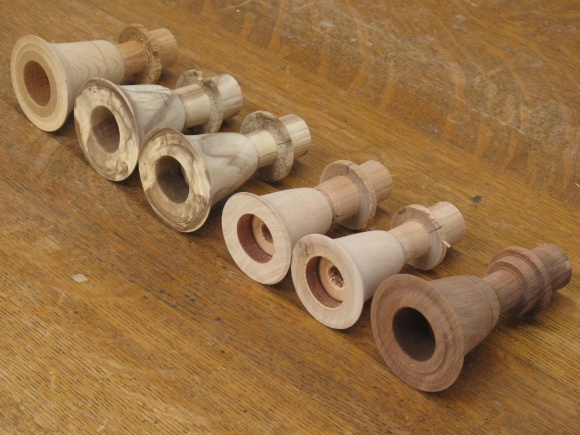
Main bell bodies done
All six of the bells were turned successfully (well, except for the Redwood flying apart at the glue joint - but I executed a successful repair and carried on).
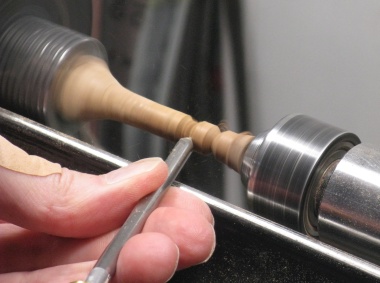
So far all the bells are mute so the next task was to make clappers for them. The clappers are pretty simple ball-on-a-rod shapes, made from the same wood as each bell. Below shows an Ornamental Crab version being turned.
Wormy blank for clapper
Shaping the ball
Sanding the ball

A completed clapper
That blank had a bunch of worm tunnels throughout but it worked out OK with only some small holes in the ball.
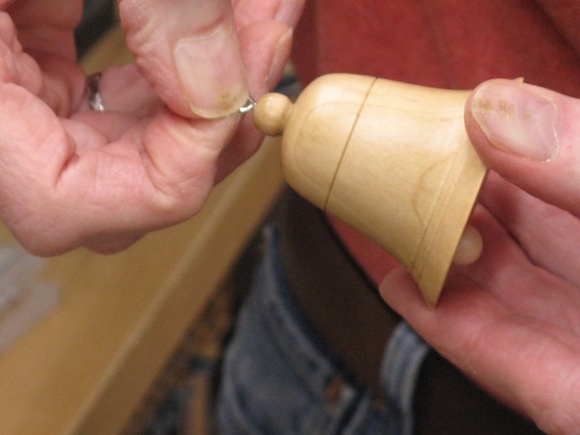
Clapper attachment
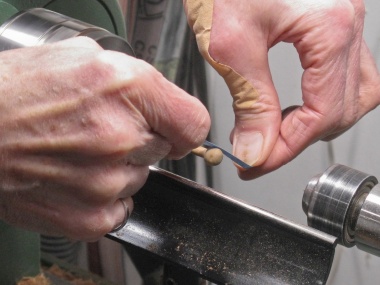
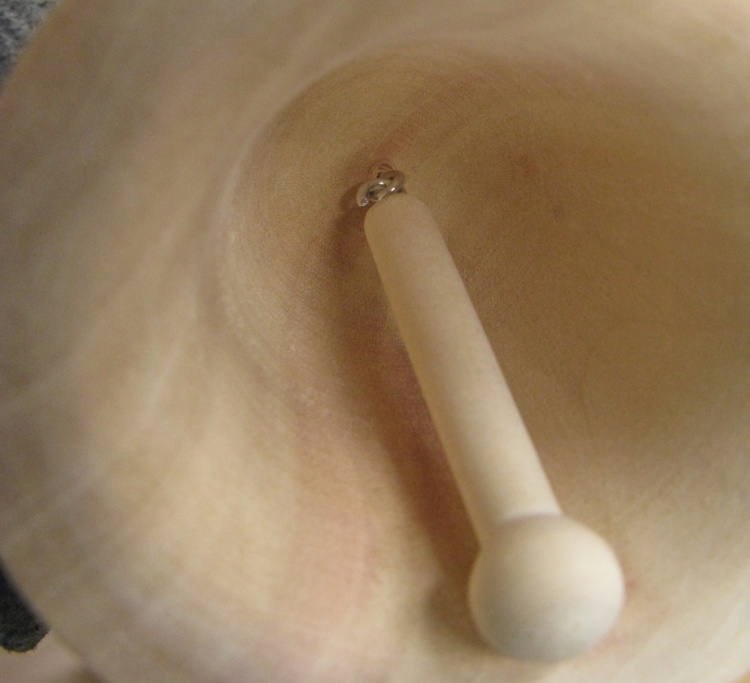
The inside of the bell received a tiny screw eye while the top end of the clapper got a tiny hook (just a screw eye bent slightly open). The hook engaged the eye to support the clapper as can be seen inside this Manitoba Maple bell. That allows the clapper to swing free pealing out a glorious ringing muted clunk.

Foamy jig to keep things organized during finishing
Each of the clappers was associated with a specific bell so I knocked together this organization-and-drying setup to keep things matched during finishing operations.

The first coat of varnish on all the pieces
In this photo the first coat of varnish is on all the pieces.
I had left the clapper metalwork in place during finishing but the bells still needed their hanging hooks installed. Once the last coat of varnish was dry I drilled pilot holes and screwed in the metal eyes.
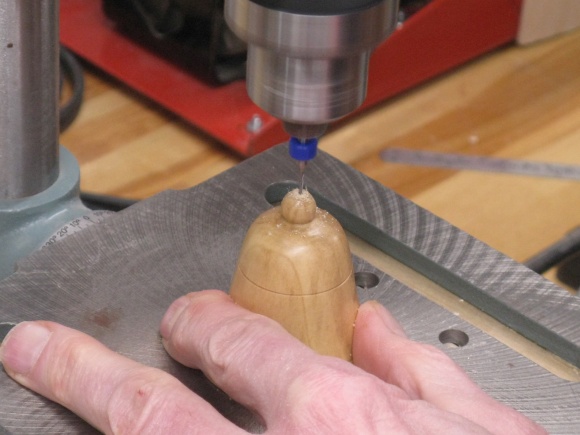
Drilling the top
Screwing in the small metal eye
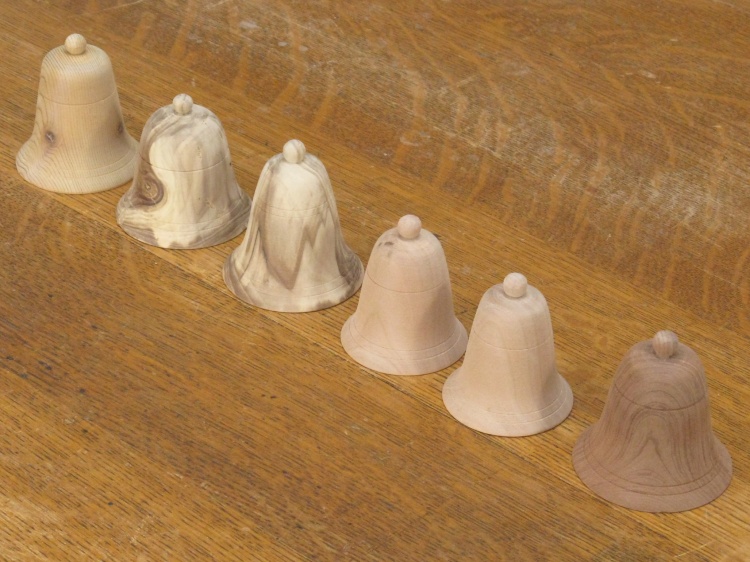
That was it for the bells. They don't really sit flat since the clappers extend out the bottom so they were all hung with thread for the group shot.
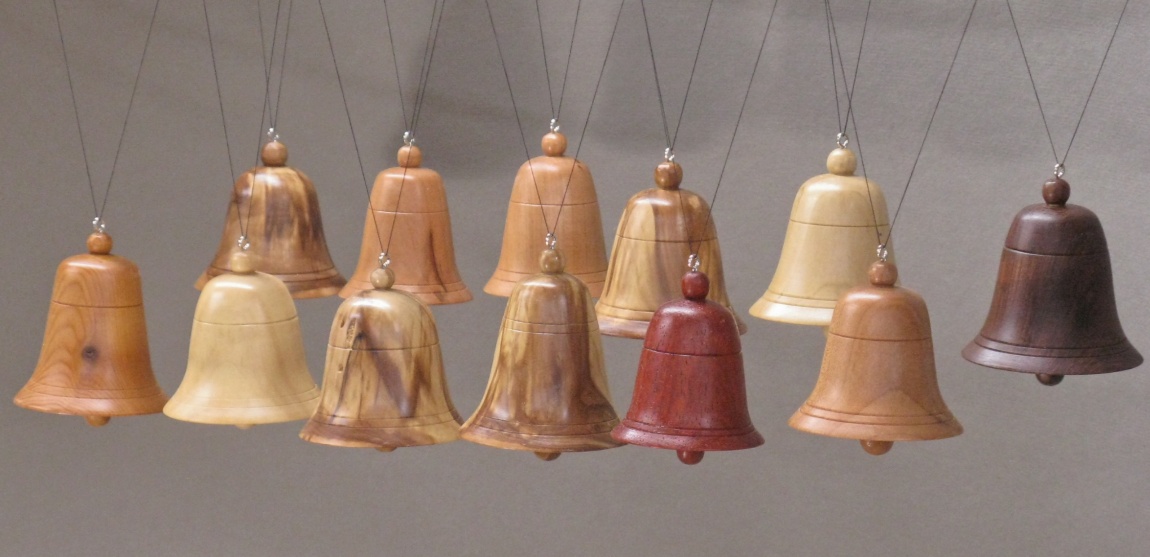
Ready to ring
Summary
I thought I'd better draw the line at the six varieties of ornaments or this web page would never be finished. This photo shows a sample of each of those six types.
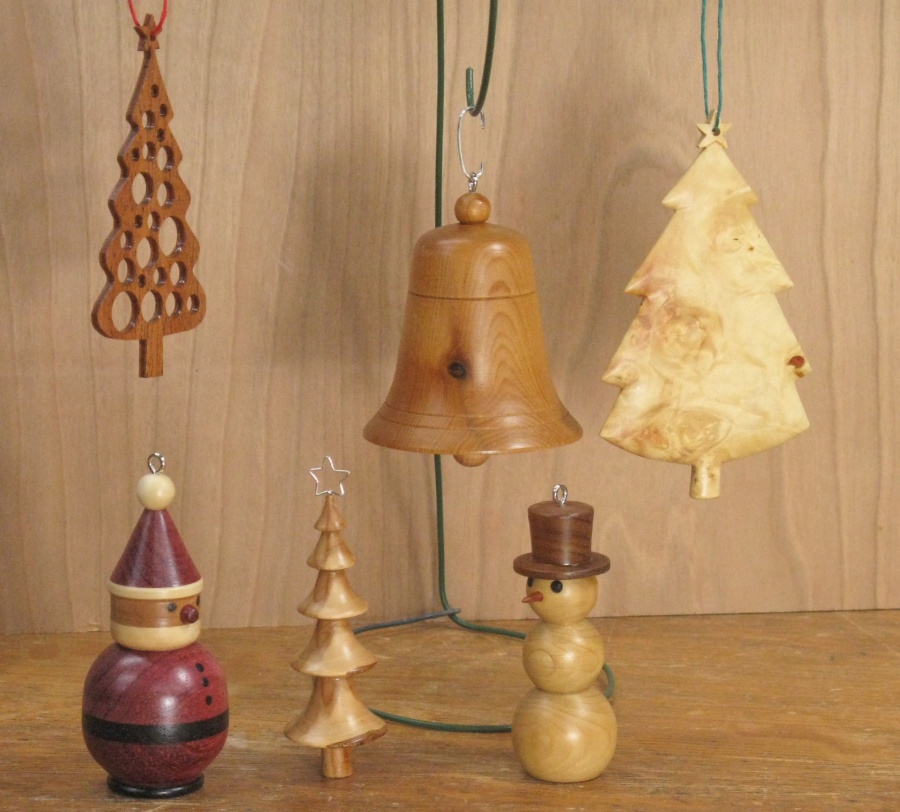
The full selection
Spirals
I had finished off the half-dozen different ornament types above and thought that I'd better draw the line there so it didn't become the Forever Project. That being said, I thought there was still some more "exploring of the space" to do and since I had no pressing woodworking projects, I just sort of carried on. In the event, the exploration didn't turn up anything else that intrigued me so it kind of ended with this ornament but at least it was interesting to make.
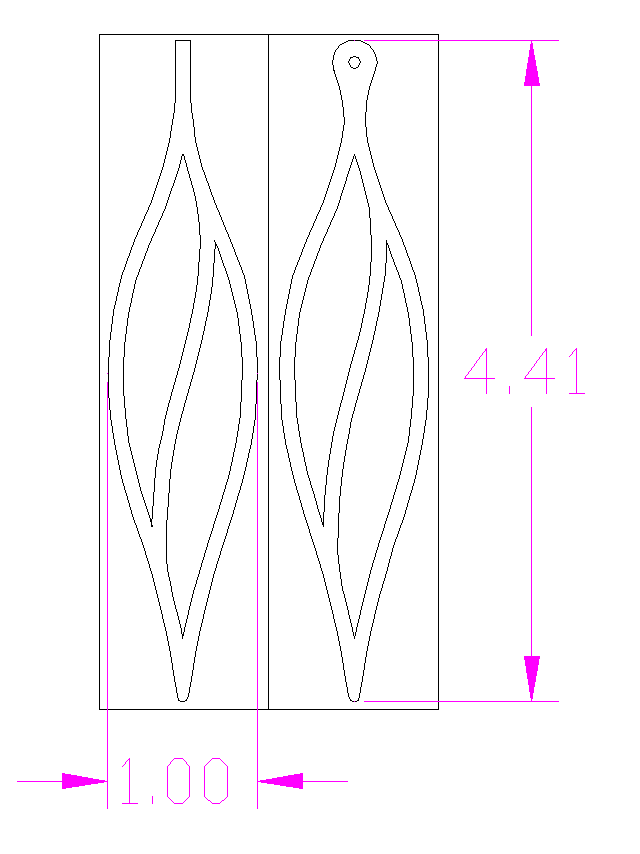
Pretty simple in concept
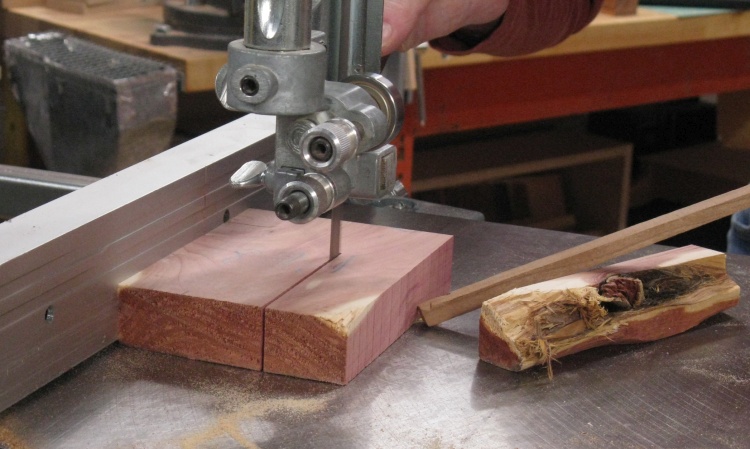
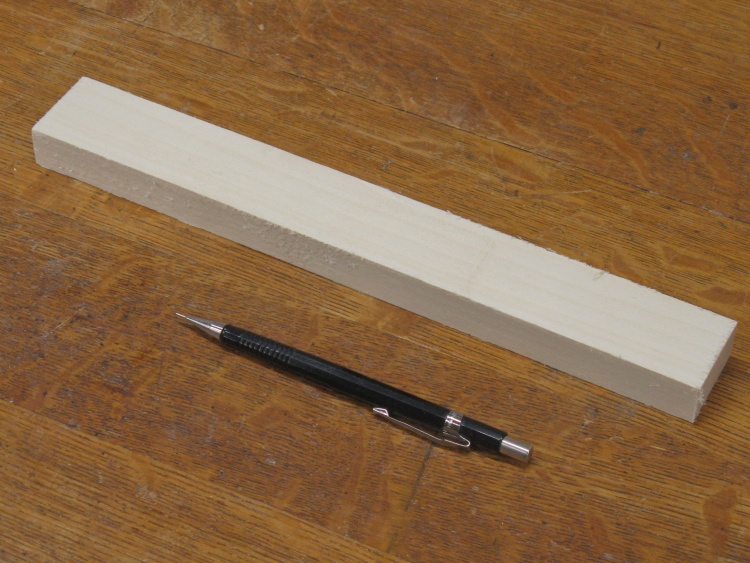
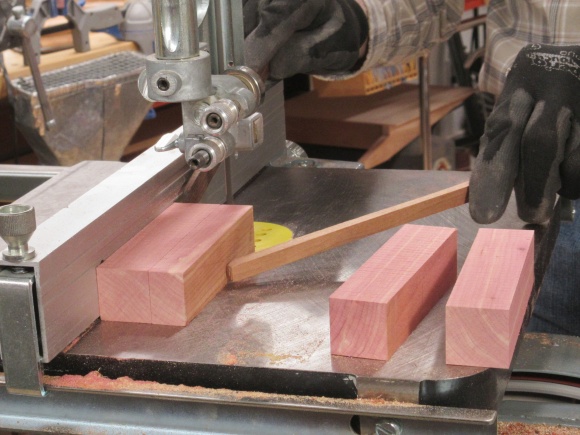
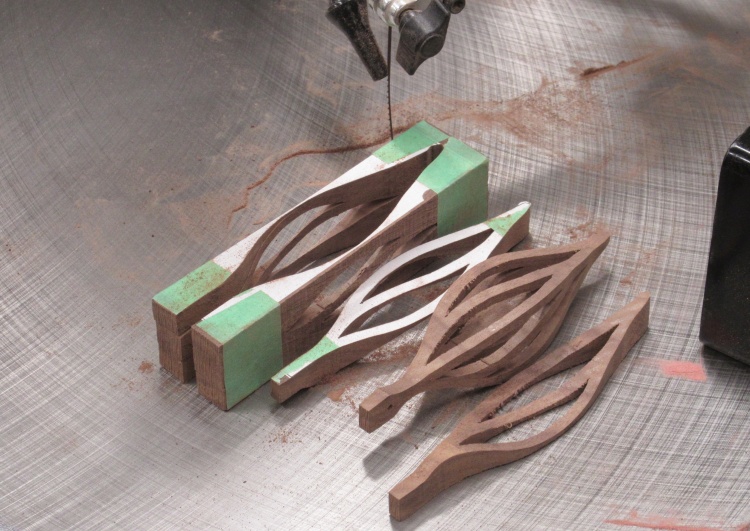
Some Aromatic Cedar getting sized
The ornaments start with blanks that are just over an inch square and around 5 inches long.
I thought Aromatic Cedar would be a good candidate so here I'm starting to cut up a couple blanks on the band saw.
I thought Aromatic Cedar would be a good candidate so here I'm starting to cut up a couple blanks on the band saw.

A few blanks ready to get the pattern traced on
I used my standard trace-it-on-from-a-pattern technique and in this shot I've got a Yellow Cedar blank taped to the bottom of the pattern sheet while the Mahogany and Aromatic Cedar blanks wait their turn.
The pattern on a Figured Maple blank
Here the pattern can be seen on two sides of a Figured Maple blank.
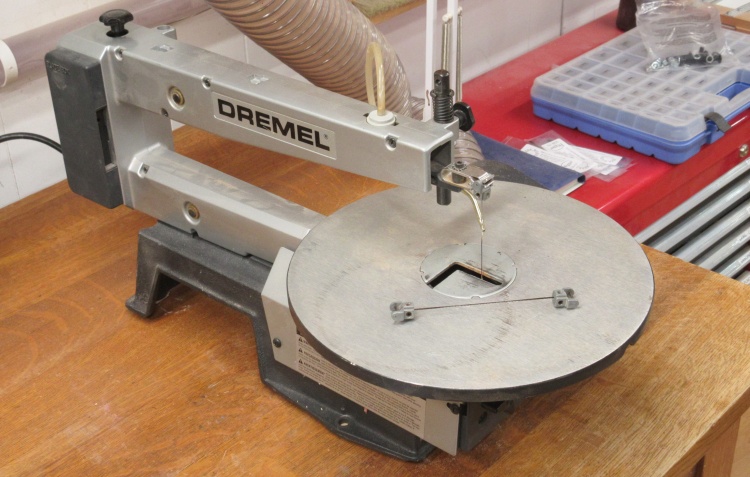
The ancient scroll saw
This is my ancient Dremel-brand scroll saw. It's actually the first woodworking power tool I bought, circa 1992.
It didn't take long to discover how appallingly ineffective scroll saws are at actually cutting wood. Their strengths are 1) a removable blade so you can put it through the wood and cut out a hole and 2) cutting curves in thin wood. I had hoped to use it as a general saw but that's like using a watering can to water your entire lawn. You can do it but it takes a painfully long time.
Anyway I shortly thereafter bought a band saw which was what I had really needed.
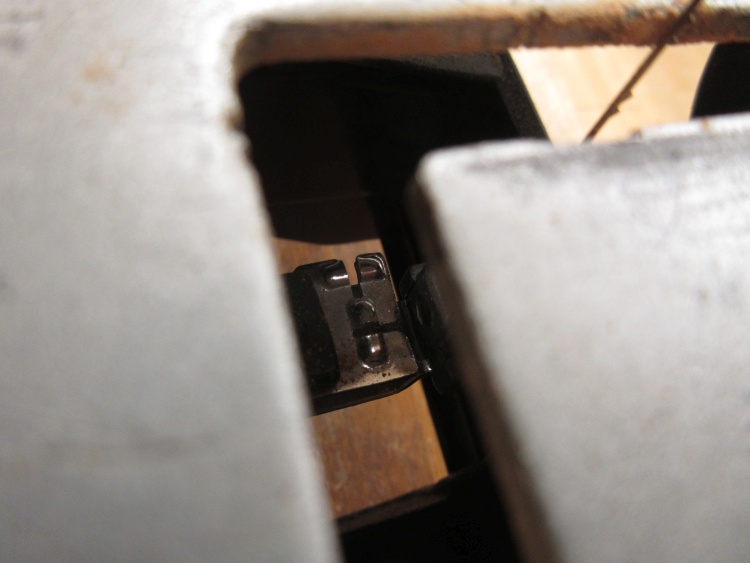
Just hook that obscured clip over the bracket under the table
The #1 strength I listed - being able to feed the blade through a hole - is substantially complicated in the crappy design of this saw since you need to remove the blade from one of the big adapter ends with a tiny Allen wrench to feed it through the wood.
And when the adapter is reconnected you need to hook it into a tab under the table of the saw, only visible through the slot (assuming your piece of wood is small enough to see around). This process can get less annoying with practise but it never becomes easy.
And when the adapter is reconnected you need to hook it into a tab under the table of the saw, only visible through the slot (assuming your piece of wood is small enough to see around). This process can get less annoying with practise but it never becomes easy.
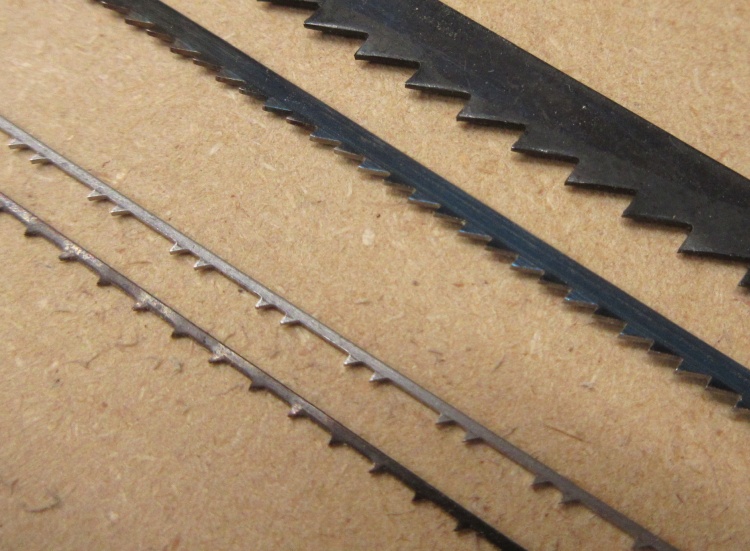
Good and bad blades
Over the years I'd occasionally need the scroll saw and say "it can't be as bad as I remember". Wrong - it was. Then I may or may not use it and would put it away for a few more years.
It turns out that part of the problem was blades. The conventional scroll saw blades I had (like the two on the right) were appallingly ineffective. Some research led me to improved models termed PGT for Precision Ground Tooth. There are two varieties of those on the left side of the photo and they are way more effective than conventional blades, particularly for the thick wood I was working on.
It turns out that part of the problem was blades. The conventional scroll saw blades I had (like the two on the right) were appallingly ineffective. Some research led me to improved models termed PGT for Precision Ground Tooth. There are two varieties of those on the left side of the photo and they are way more effective than conventional blades, particularly for the thick wood I was working on.
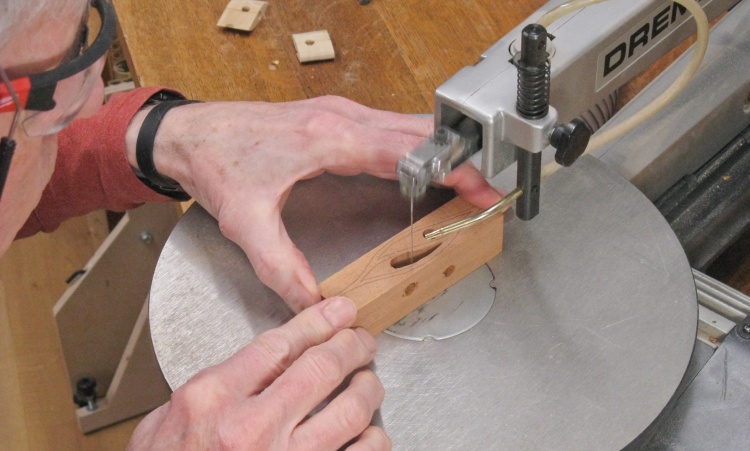
The first cutout on a mahogany blank
So after getting some decent blades (Olsen PGT 9RG Double-Reverse) I started trying out the hole cutting. Here I'm on the first hole of the Mahogany blank.
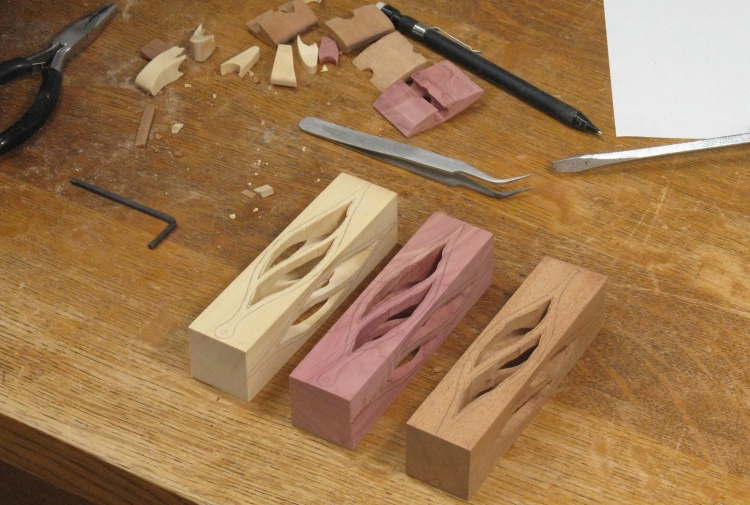
Three hollowed blanks - none of them worked out
I wasn't too satisfied with the cuts since they differed on the top and bottom (which was partially due to imperfect saw setup and/or technique). I kept trying but didn't improve much over these three blanks.
Some parts are way too thin
This shows the Aromatic Cedar version after being fully cut out. It has much-too-thin sections, earning it a first-class flight direct to the garbage can.
I almost abandoned the Good Ship Ornament at this point but I did manage on a fourth attempt to cut out a reasonably decent version from the Figured Maple blank. That showed there was hope. Since I've always disliked the Dremel scroll saw, I decided just out of spite to replace it with a decent model and see if it was the tool or myself that was the problem. I also researched the best scroll saw blades and bought a selection of Pegas Modified Geometry PGT blades and then started chopping up some new blanks:
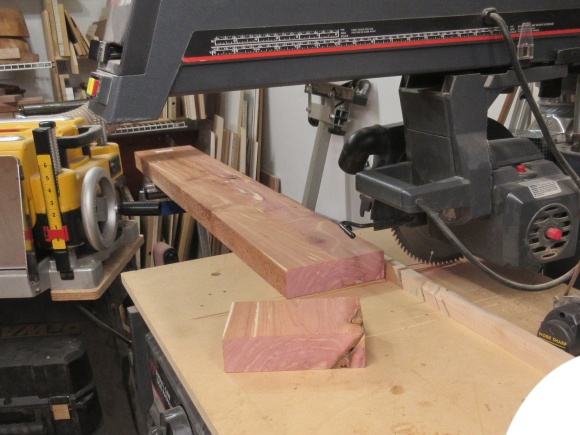
A new piece of Cedar for a new start
Chopping into blanks
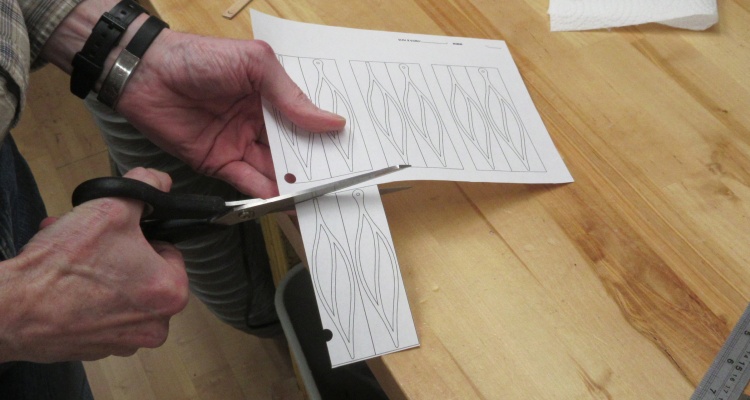
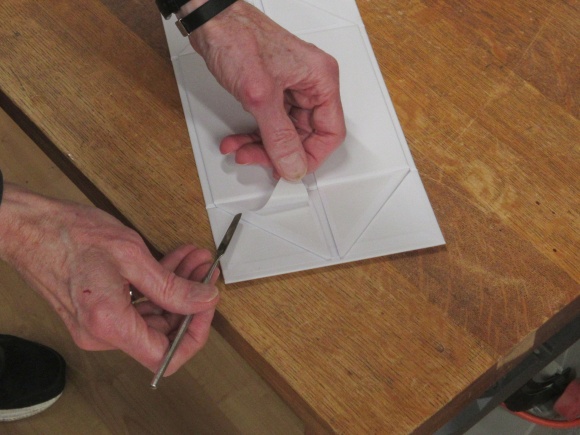
Cutting out a paper pattern
I also abandoned my laborious and inaccurate trace-the-pattern-on-with-carbon-paper technique by replacing it with glued-on paper patterns. In this photo I'm cutting out a set of patterns.
That technique turned out to work quite well.
That technique turned out to work quite well.
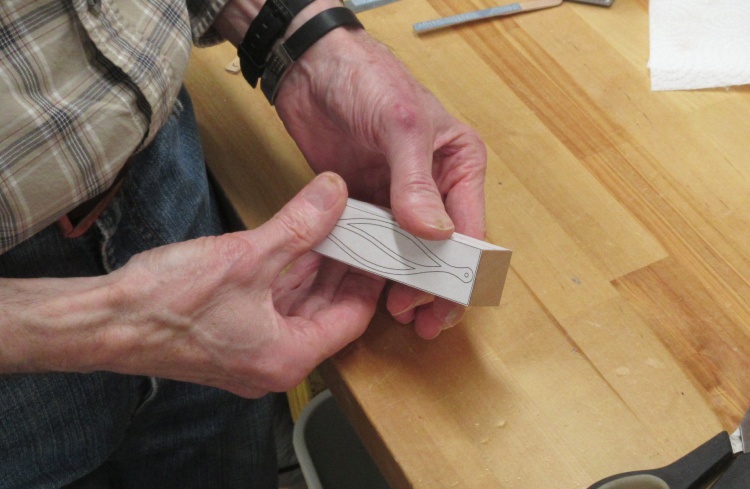
Gluing on the pattern instead of tracing
I just used a regular glue stick to adhere the patterns to two sides of the blank, making sure they were exactly square to the corners.
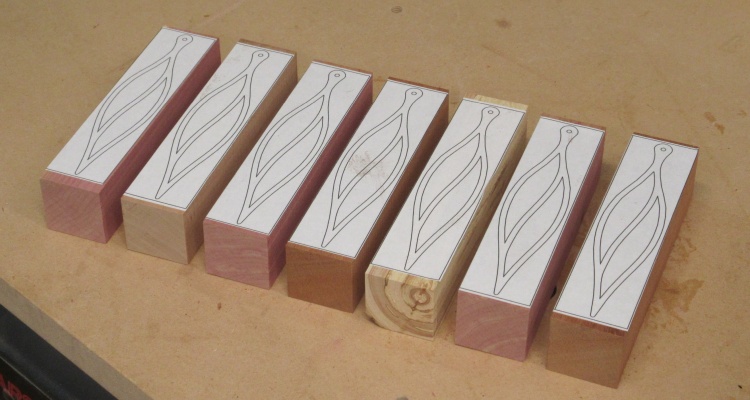
A buncha blanks patterned up
Eventually I had a number of blanks ready to go. These included Aromatic Cedar, Cherry, Mahogany and Ornamental Crab.
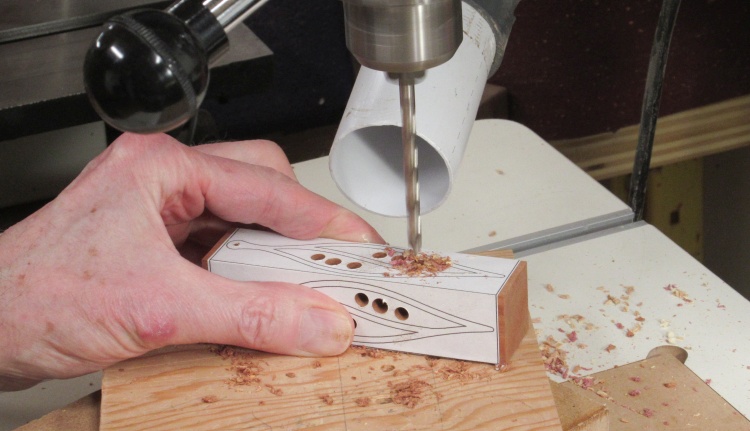
Drilling some preliminary wood-removal holes
I needed holes through which to insert the blades to cut out the openings. Given the size of the blade, these could have been quite small holes but instead I drilled the largest practical - and three of them - to remove some wood to make the sawing a bit easier.
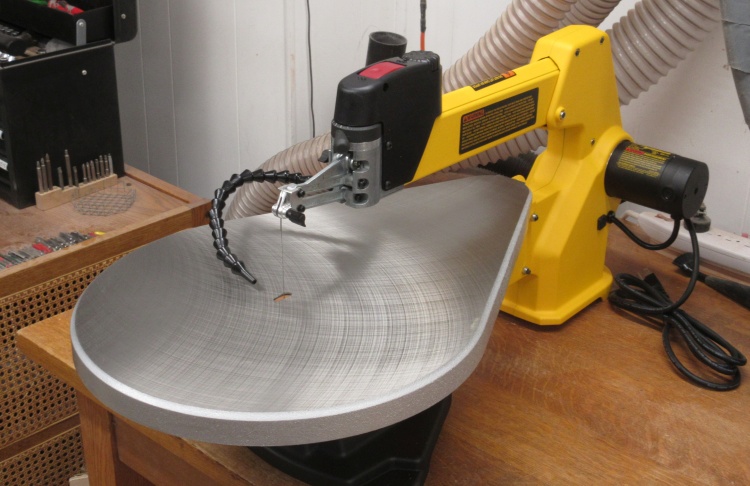
A shiny new saw
This is the shiny new saw - a Dewalt DW788 20" variable speed scroll saw. It was larger than what I really need (and heavier than what I can really lift) but it was supposed to be the best non-professional model and has good blade handling.
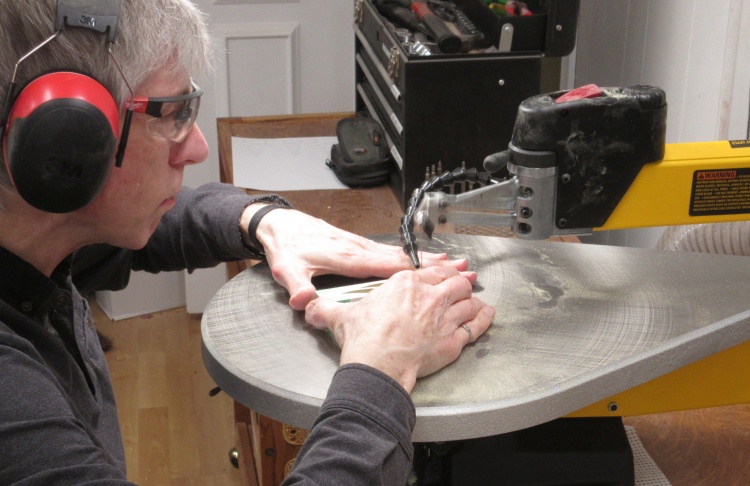
Getting to work
With the saw on a table, I started in on the blanks. The saw itself is actually very quiet but the blade cutting through the wood is surprisingly loud - hence the hearing protection.
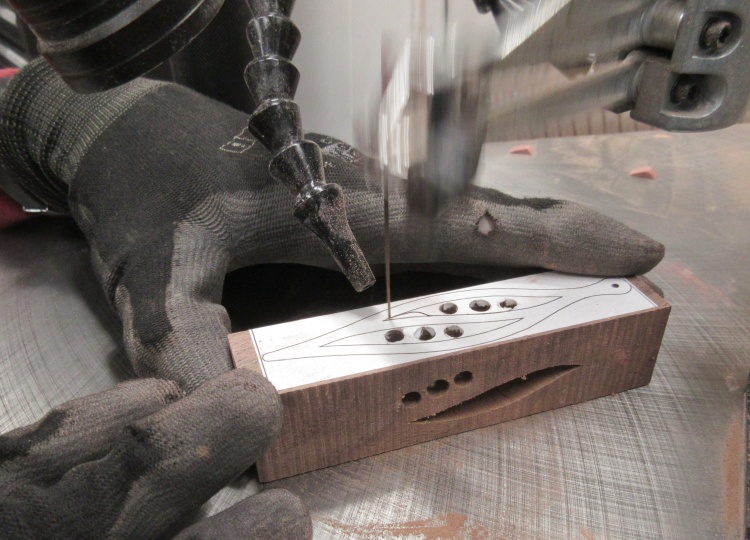
Cut in progress
That flexible black segmented hose blows dust off the wood to keep the pattern clear. This works really well when the hose end is correctly positioned.
In this shot I'm cutting out a triangle at the end of a hole in a Walnut blank so I can flip the wood around and saw in the opposite direction.
A close look reveals that the pattern has somewhat fatter arms than the originals three or 4 photos back. This was done for a couple reasons:
1. To make the arms a bit more robust, and
2. To move the line over half a blade-width so I can cut in the middle of the line rather than outside in hopes of better accuracy (not sure that actually panned out).
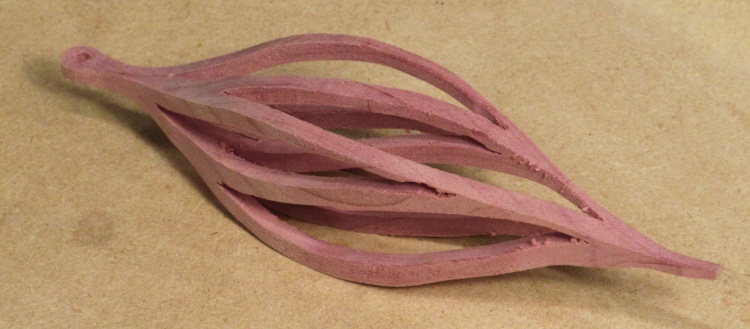
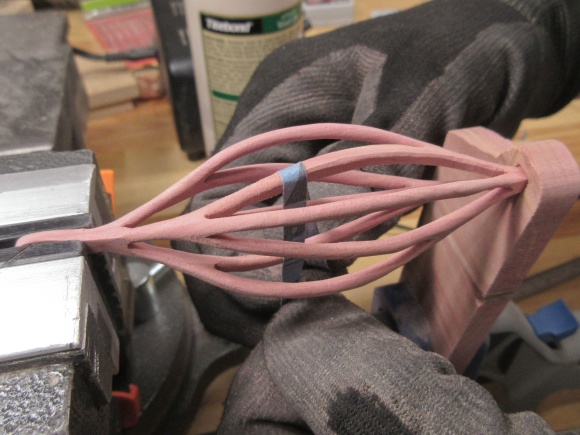
The result after removing the shell
Then after cutting out the four holes and four outlines, the center hatches out as a rough-cut (well, when I do it anyway) version of the ornament.
There's even all sorts of neat-looking pieces left over which, after a few seconds of admiration, make excellent garbage can stuffers.
There's even all sorts of neat-looking pieces left over which, after a few seconds of admiration, make excellent garbage can stuffers.
And then the ornament "just" needs to be made presentable. The scroll saw leaves a surprisingly smooth surface but tiny wobbles in the blade path needed to be smoothed out and thin slots need to be touched up.
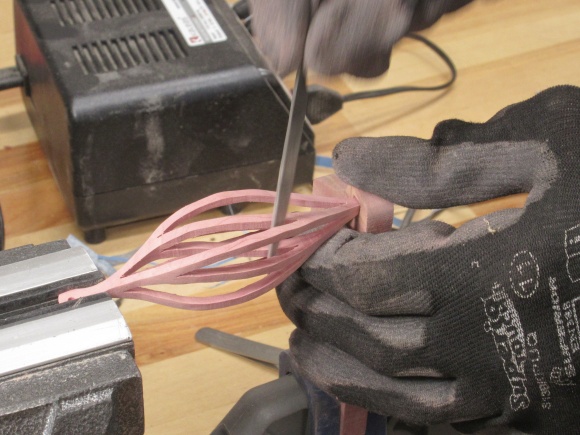
A sharp file for the narrow slot ends
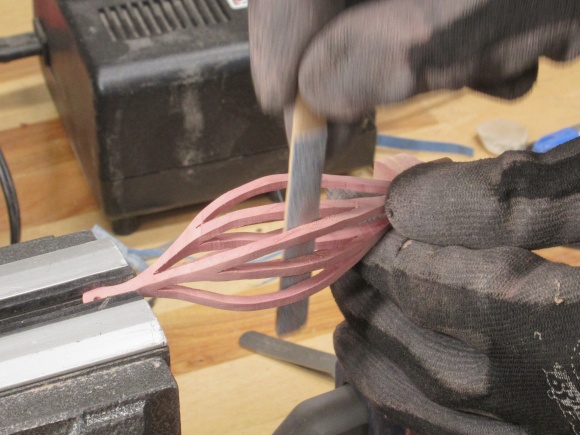
Sandpaper to smooth the profile
I also decided that the ornaments would look better with round profiles so I chamfered the corners and sanded them round using strips of 120 and then 220-grit sandpaper.
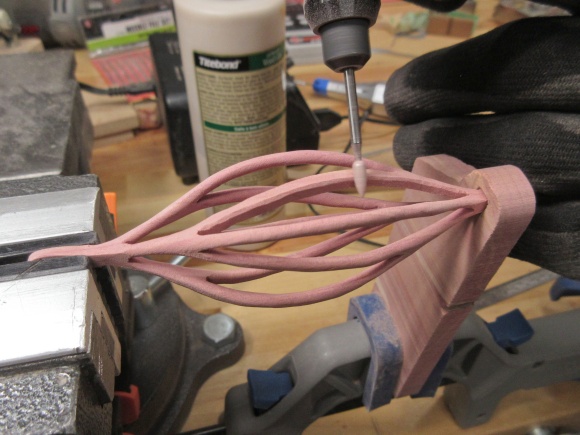
Dremeling chamfers into the corners
Sandpaper strips to finish rounding

The complete set with a coat of finish (plus a bonus tree)
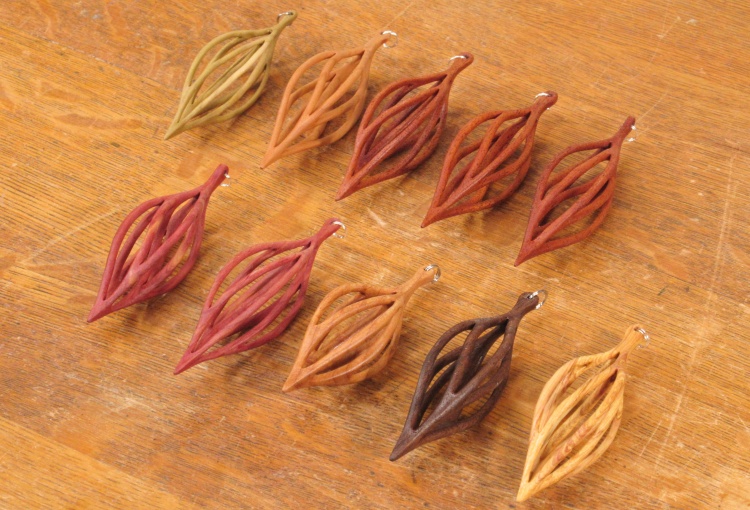
I ended up with the 10 ornaments shown here after their first coat of Deft Danish Oil finish (and an extra little tree that need finishing at the same time).
Caption
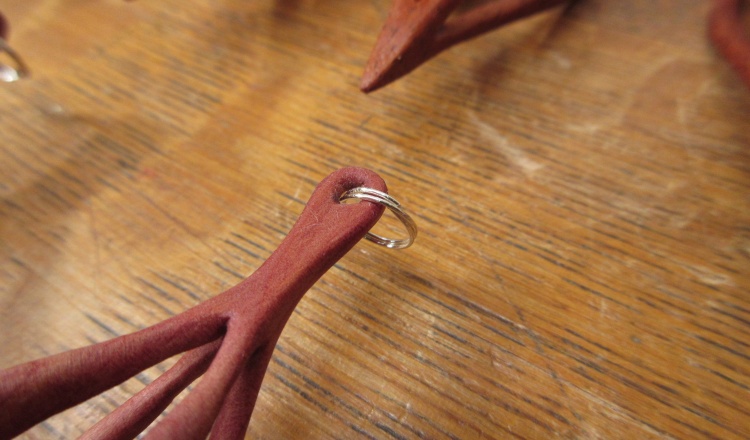
For easier hanging, I fashioned wire loops that went through the top holes of the ornaments.
Caption
Here is the full complement of 10 spiral ornaments. Left to right, top and bottom rows are:
- Birch, Cherry, 3 Mahogany
- 2 Aromatic Cedar, Figured Maple, Walnut & Ornamental Crab.
- Birch, Cherry, 3 Mahogany
- 2 Aromatic Cedar, Figured Maple, Walnut & Ornamental Crab.
Packaging
I wanted to be able to give away sets consisting of one each of the seven different ornaments so I needed some way to package and protect them. Of course, I also didn't want the packaging to take more time to make than the actual ornaments - an all-too-plausible scenario. My solution was to order gift boxes of the closest appropriate size and then just make foam inserts to separate the ornaments. I would have been happier if they had ended up looking a bit more polished but viewed through a purely functional lens, they seem to do the job.
I was able to find some only-slightly-too-large gift boxes from a Quebec vendor and ordered a pack of 10, which was just the number I needed. They arrived flat-packed so the first order was folding them into proper box shapes.

A box in planar configuration
Removing adhesive-patch liner
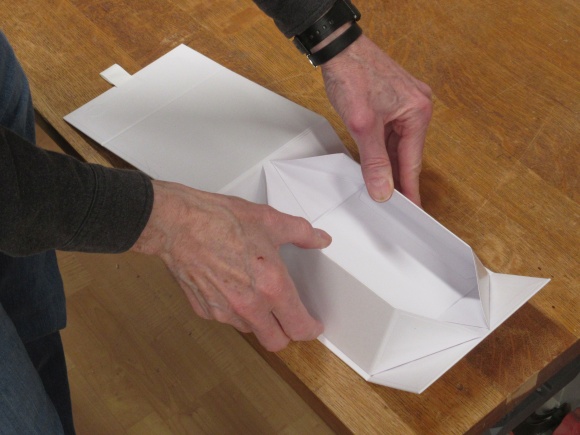
Folding the sides up
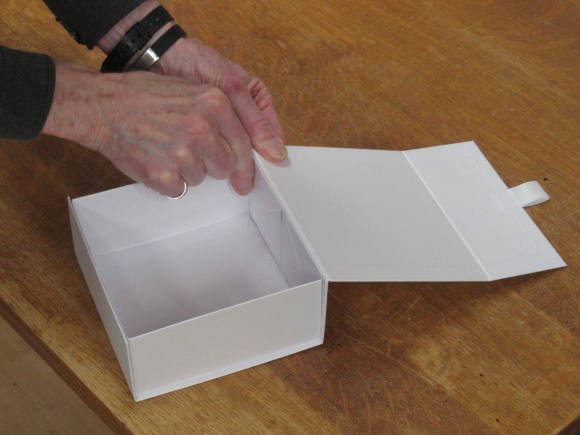
...and Voilà: Box!

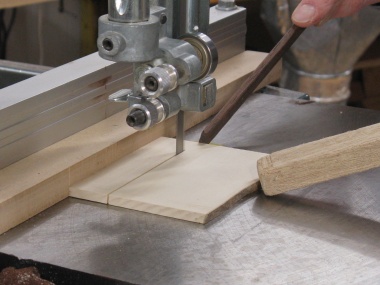
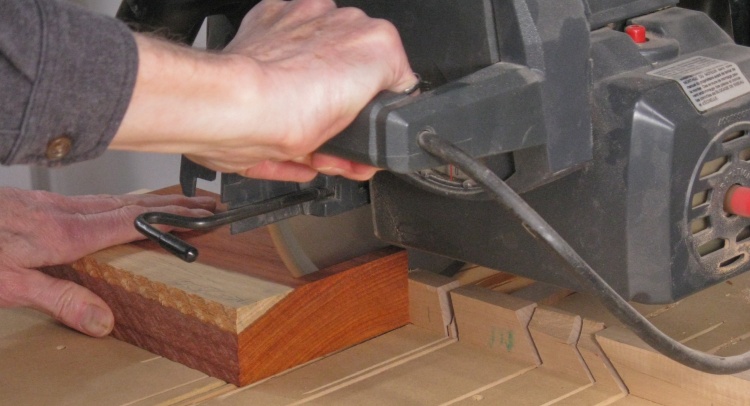
Slicing foam on the band saw
The ornaments would get packed lying on their sides so the box had much more height than most of them needed. To use up some of that excess space, a 1" layer of foam was used over most of the bottom. Then foam walls - also 1" in height - were used to create separate compartments.
The walls were sliced from foam slabs using the band saw as seen in this photo.
The walls were sliced from foam slabs using the band saw as seen in this photo.
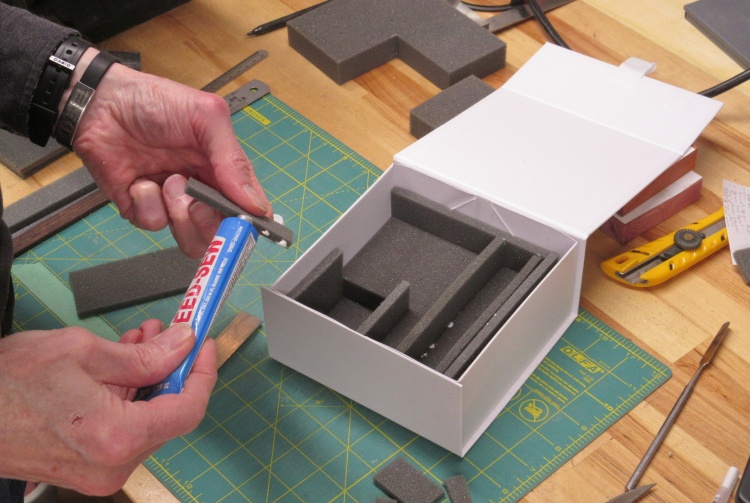
Fabric cement to hold walls in place
The walls were glued to the floor piece (and each other) using fabric cement.
A deeper section in one corner provided the taller compartment needed for a bell ornament.
A deeper section in one corner provided the taller compartment needed for a bell ornament.
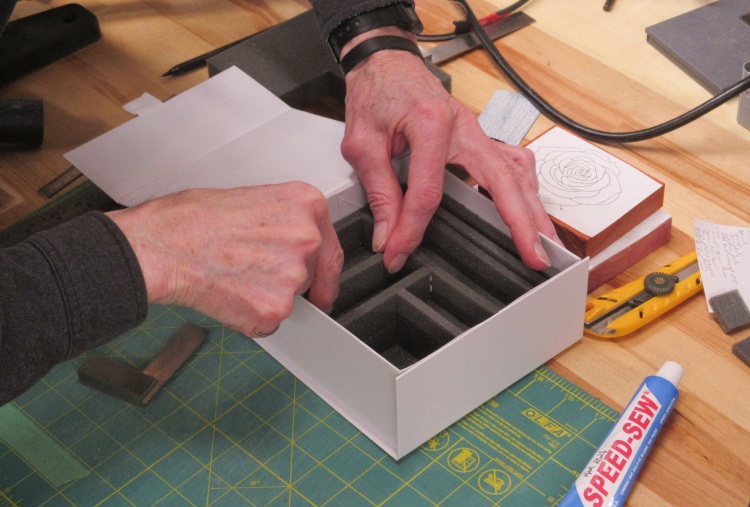
Adding the last wall for this box
Once glue was applied, the walls were just set in place, positioned by eye.
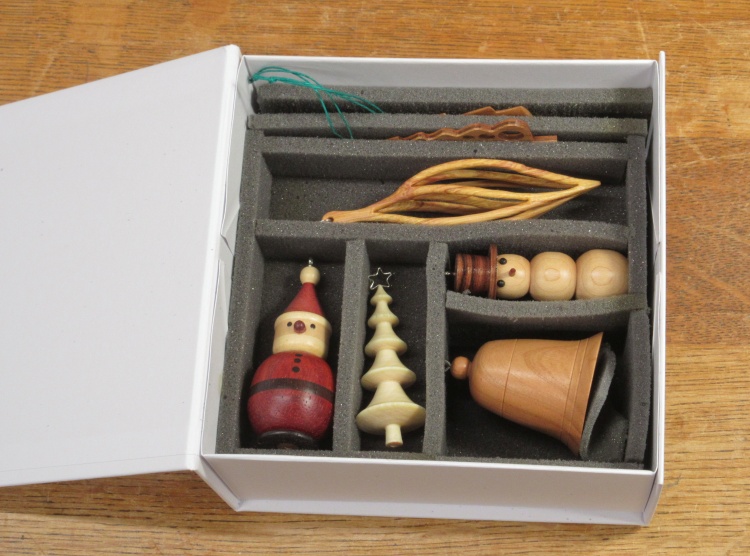
More functional than elegant
Once the glue was dry, the box was loaded up.
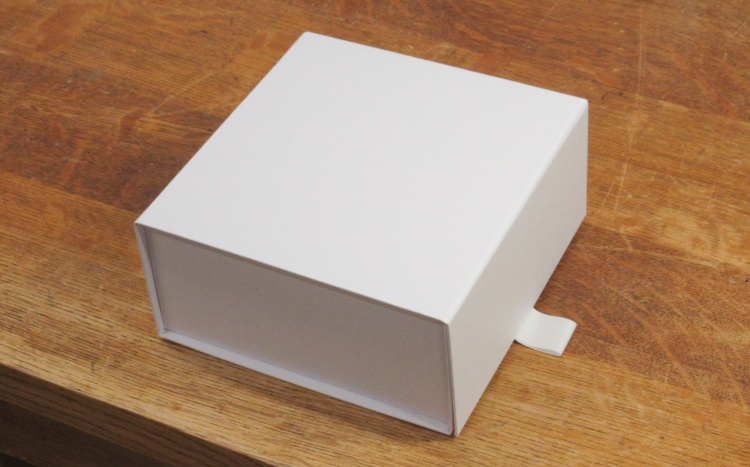
Storage box
The box includes a flap with a magnetic closure and a ribbon to use as a pull-tab for opening.


