I had been planning to make some more sets of turned Christmas trees again this year, although I had envisioned a more getting-into-the-spirit date of maybe early December; snow on the ground, carols playing in the stores, too damned cold to go outside, etc. Fortunately they look just as Christmasy for being made in a July heatwave, plus it gave me an excuse to be in the cool basement.
I didn't bother to try to stick with using the "ideal" wood (that being a nice piney-smelling Spruce branch) but that was OK since there are lots of wood types with more-interesting looking grain out there. I must confess I didn't closely track or even identify all the particular species used - although of course they are all local.
I didn't bother to try to stick with using the "ideal" wood (that being a nice piney-smelling Spruce branch) but that was OK since there are lots of wood types with more-interesting looking grain out there. I must confess I didn't closely track or even identify all the particular species used - although of course they are all local.

The plan: Make some more like these
Contents:
• Tree Turning
• Quickie Mini-Project: Soap Bottle Base
• Bases
• Packaging
• Square Trees
Tree Turning

Branches awaiting reincarnation into decorative trees
I started with branches left over from the end-grain vessel I had recently made, plus some stored branches, plus later some new dead branches gathered from "the bushes" as we called them in elementary school.

Chopped into tree-length pieces
The first step was to cut suitable lengths.
Ideally these pieces would be:
- a straight section of the branch,
- with a round cross-section
- no twig stubs in the bark sections
- with well-adhering bark and
- no major cracks.
Ideally these pieces would be:
- a straight section of the branch,
- with a round cross-section
- no twig stubs in the bark sections
- with well-adhering bark and
- no major cracks.

Rounding a branch end
The tree-length pieces were turned on the lathe using a spur center so a shaft could be formed in one end.

Ends turned so they can be held in a chuck
The shaft would allow the use of a chuck to hold the piece from a single end, allowing the other end to be free so the top of the tree could be shaped.
The branch in the back has a masking tape wrapping to keep the loose bark from flying off when turned. Unfortunately the branches from that particular tree (in-law's yard pruning) turned out to be too soft to successfully turn anyway.
The branch in the back has a masking tape wrapping to keep the loose bark from flying off when turned. Unfortunately the branches from that particular tree (in-law's yard pruning) turned out to be too soft to successfully turn anyway.

The turning composite
This rather long composite photo shows a piece of Scots Pine being formed step by step.

The resulting Scotts Pine tree
The tree is cut off the shaft at the narrow section seen in the last image of the composite and then the bottom is sanded smooth.
The result is the tree shown here - one of the "large" ones at around 4" high.
The result is the tree shown here - one of the "large" ones at around 4" high.

An in-process tree with bark loss on lower branch
This was a not-uncommon problem where less-than-secure bark flies off the piece, often at the thin "lower branch" location.

Some salvaged pieces of bark
I usually had little success finding the small pieces of bark that flew off the thin sections so if the bark adhesion looked iffy I would try to cleanly cut some spare bark off the branch before turning. That's the source of these pieces.

Gluing bark back onto a tree
I almost never had a full circle of bark to glue on so the circumference was pieced together from a number of segments. Some or all the segments would be glued on (often linked with masking tape for easier handling) and then would usually be wrapped with stretch-film to apply pressure while the glue dried. That's what's happening in this shot (which astute readers will notice is not actually the same tree as on the lathe above).

Bark glued on to lower branch
Then when the glue is dry the excess width of the bark needs to be made flush with the surrounding wood.
If I was in a daring mood, this could be done by re-cutting with a chisel. However this risks having the new bark fly off like the original, so mostly I took the safer route and just sanded it flush using a sanding drum on a Dremel.
If I was in a daring mood, this could be done by re-cutting with a chisel. However this risks having the new bark fly off like the original, so mostly I took the safer route and just sanded it flush using a sanding drum on a Dremel.
Quickie Mini-Project: Soap Bottle Base
OK, so in the middle of making trees I needed to do a little mini-project much too insignificant to rate its own web page. It was just an hour or so of turning a slightly sloped base for a liquid soap dispenser bottle.
This is like the toothpaste tube where when it is essentially empty you can get another week's worth of brushing by squeezing it really hard. In the case of liquid hand soap, when you get to the bottom of a pump bottle there's often another week's worth of hand washing there, made accessible by tilting the bottle to make sure the pickup hose is at the bottom. Well, who wants to do that every time? But if a guy had a tilted base, it could be turned to make sure the pickup hose was at the lowest point and the penny-pinching urges would be satisfied with an elegant, matches-the-other-bathroom-woodwork manner.
So this was a pretty simple matter of turning a base contoured to hold the plastic soap dispenser bottle, cutting it at a slight angle and applying some finish. I used Cherry to match the bathroom woodwork and these shots show the essential construction steps.
Crudely-cut Cherry blank on lathe

Turned to match soap dispenser bottle

Cutting the base off at 2.5° angle

The resulting base

The first of three coats of varnish

3" base slopes 1/8" across width

The finished base
The base received some rubber feet and that was pretty much it.

Turned so pickup hose is at lowest point

The base in operation
So that was pretty much it. I'll have to see if I remember to use the base the next time the bottle is almost empty. Anyway, where were we? Oh yah - turning more trees:

An interesting branch got an epoxy fill in a dire crack
It seemed to me that the more interesting-looking branches tended to be ones in the poorest shape. Many of the aging processes must also add some colour.
That was the case with this branch that looked to have a nice dark core but also a substantial crack. Turning branches with cracks is usually unsuccessful (pieces fly off) so on this one I filled the crack with epoxy to keep things together while turning.
That was the case with this branch that looked to have a nice dark core but also a substantial crack. Turning branches with cracks is usually unsuccessful (pieces fly off) so on this one I filled the crack with epoxy to keep things together while turning.

Interesting enough to be worth the trouble
And sure enough it made a rather handsome tree. The glued crack can be seen on the left side.

Nicely-coloured wood in this branch
This was a piece cut from a fairly old tree. It wasn't very round or solid but it had a nicely coloured and figured core so I thought it was worth checking out.

...but a bit too rotten for turning
Well judging by the colour of the top section, it probably would have made a nice-looking tree. Unfortunately it was a bit too rotten to spin at 1000 RPM without part of the bottom section flying off in what turned out to be an unrepairable fashion.
Ya win some, ya lose some.
Ya win some, ya lose some.
Now here's a few shots of before-and-after branches and the resulting trees:


The completed group
Eventually I decided I had enough trees.
While it isn't obvious from this shot, the three rows represent the "large", "medium" and "small" sizes of trees, aligned to make sure there was an appropriate number (14 as it turns out) of each size.
While it isn't obvious from this shot, the three rows represent the "large", "medium" and "small" sizes of trees, aligned to make sure there was an appropriate number (14 as it turns out) of each size.

An unfortunately large number of rejects
And rejects. There were rejects. Problems due to cracks, brittle wood, rotten wood, unrepairable missing bark patches and the odd turning error.
It wasn't pretty from a statistical viewpoint; 31% of the trees I turned ended up in Reject Forest.
It wasn't pretty from a statistical viewpoint; 31% of the trees I turned ended up in Reject Forest.

Signing off on the trees
That was it for the tree woodworking.
Before applying the finish I initialed and dated all the tree bases.
Before applying the finish I initialed and dated all the tree bases.

Starting the finishing
Then it was on to the finishing.
Once again I used two coats of Danish oil and here I'm applying the first coat with a small foam brush to one tree while it soaks into the wood on the four trees in the background.
Once again I used two coats of Danish oil and here I'm applying the first coat with a small foam brush to one tree while it soaks into the wood on the four trees in the background.

Each coat wiped off after some soak-in time
After the oil sits on the wood for 30 minutes or so, the excess is wiped off with a cloth and the piece is left to dry.

All the trees with the first coat of finish
My usual practise was to coat the trees in groups of six or so. That took around 40 minutes which was close to my limit of tolerance of doing finishing and wearing sweaty disposable gloves.
The second coat went slightly faster as the finish went on a bit better.
The second coat went slightly faster as the finish went on a bit better.

Finishing done
Everyone wearing two coats.

A mid-group shot
A close-up shot.

Drone's-eye view
The range in diameters is more obvious from the top.

Mug shots of all the successful trees
All the trees, obsessively arranged tallest to shortest.
Making Some Bases
I thought I'd make a few small bases on which to place the sets of trees. I'd actually made one or two of these last year (somehow completely unphotographed) and I used the same Cedar-end-grain approach.

Slicing up a cedar 4x4
I used a standard cedar 4x4 post as the source of wood. The bases needed to be 4 to 5 inches in diameter so a single slice wouldn't be large enough and they'd need to be made up by combining 3 or 4.
Here the post is producing slices of about 1/4" thickness.
Here the post is producing slices of about 1/4" thickness.

Gluing slices together
About half the bases were made by combining four slices. After flattening the sides, pairs were glued together and then the pairs were combined as seen here.
I also made three-slice assemblies where the slices were cut to 120° before being fitted together. Due to the difficulty of clamping the odd angles, they were instead held together with masking tape while the glue dried.
I also made three-slice assemblies where the slices were cut to 120° before being fitted together. Due to the difficulty of clamping the odd angles, they were instead held together with masking tape while the glue dried.

Sanding the bases flat
I assigned the task of sanding the bases flat to the drum sander, running then through until all the saw marks were removed.

Using a circle jig to sand the edge of a round base
A few bases were cut circular and the edges were sanded with a circle-sanding jig on the belt sander.

Rounding edges
The outlines of most of the bases followed the Cedar grain. This particular one is a 4-lobed shape.
All the bases had the edges rounded and after some coarse sanding by hand or with sanders, the final rounding was done using sandpaper strips as seen here.
All the bases had the edges rounded and after some coarse sanding by hand or with sanders, the final rounding was done using sandpaper strips as seen here.

Enough bases for 64.28% of tree sets
I eventually figured I had enough bases. This is the whole group with all the sanding done.
The Cedar post I started with had a simple curving end grain pattern. For some more-interesting bases, I also picked up another post that incorporated the core of the tree and made a few bases from that.
The Cedar post I started with had a simple curving end grain pattern. For some more-interesting bases, I also picked up another post that incorporated the core of the tree and made a few bases from that.

The first coat of varnish soaking in
The bases received three coats of polyurethane varnish. Here the first of the three is starting to dry.

The complete set
Bases done.
Later That Year...
After all the leaves were gone and snow had come to stay and the December page was displayed on the calendar, I decided the time was ripe to see if people wanted some extra Christmas clutter. But how does one handle/transport/present an awkward little set of wooden trees? I eventually settled on folding up some custom paper bags as something that would fill the need and not be too precious to toss away.
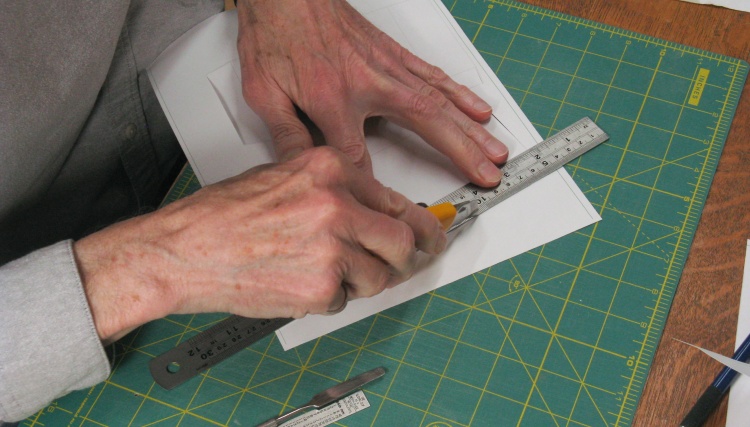
Cutting out a bag from printed-on pattern
The bag has 5 sides plus gluing tabs and I cunningly arranged those to fit on a standard 8-1/2 x 11 sheet. The pattern was printed in light grey (barely visible in the photo) and the bags were cut and folded to those lines.
Question from post-photo me: Why not use some Christmas-themed paper?
Answer: Ummm...it's...snow! Yeah - that's the ticket - it's snow themed!
Question from post-photo me: Why not use some Christmas-themed paper?
Answer: Ummm...it's...snow! Yeah - that's the ticket - it's snow themed!
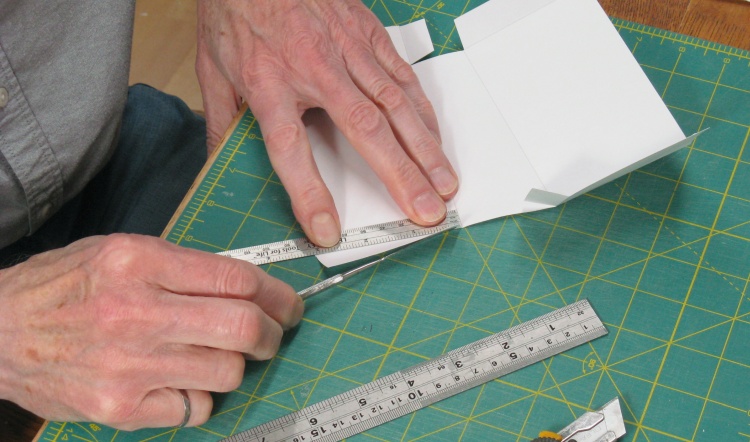
Folding at all the corners
A metal ruler and miniature spatula were used to help get straight folds.

Forming a handle
The handle strips had been made by folding the 11" side of a sheet into three layers and gluing them closed. In this shot I'm folding them to form the two legs.
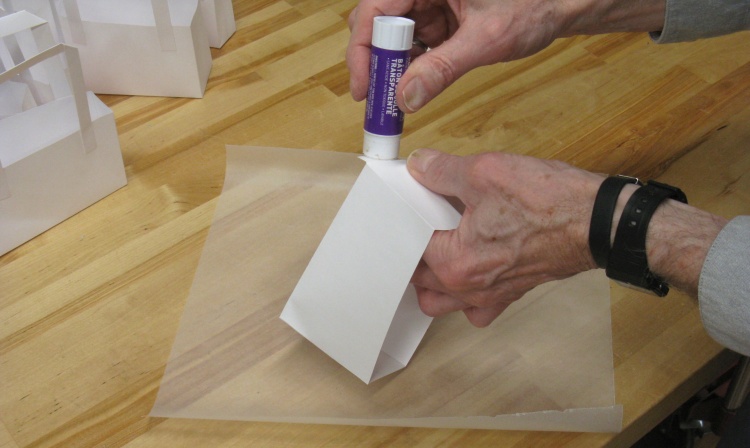
Gluing up a bag
The bags were glued together with a standard glue stick.
I will say that I'm not sure why I even have a glue stick - they are hardly useful for woodworking - and neither do I recall where it came from. But it turned out to be handy so I can hardly complain.
I will say that I'm not sure why I even have a glue stick - they are hardly useful for woodworking - and neither do I recall where it came from. But it turned out to be handy so I can hardly complain.
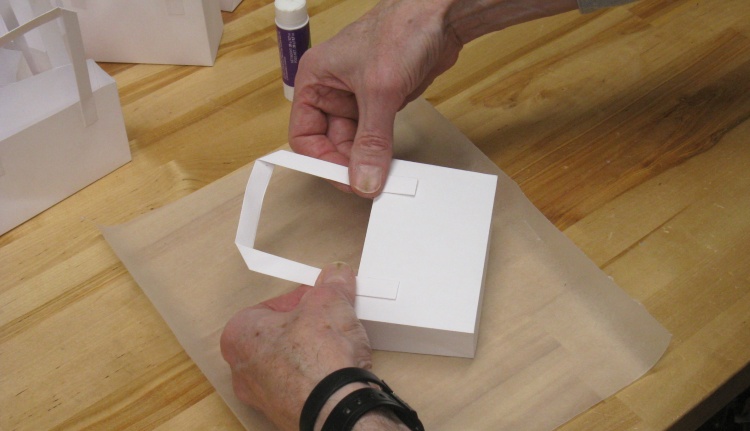
...and sticking on a handle
The handles were just glued on to the outside.
Question from post-photo me: Why didn't I put the handles on the inside?
Answer: Ummm...not sure. Maybe next time?
Question from post-photo me: Why didn't I put the handles on the inside?
Answer: Ummm...not sure. Maybe next time?
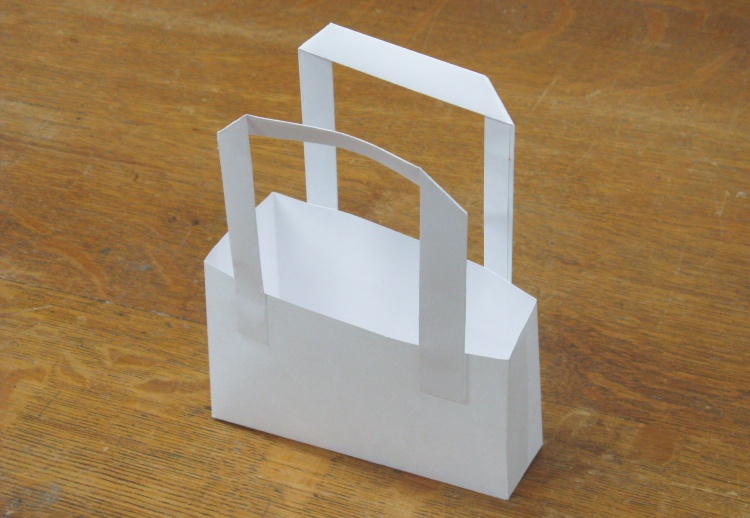
A completed bag
That's one of the completed snowy-white bags.
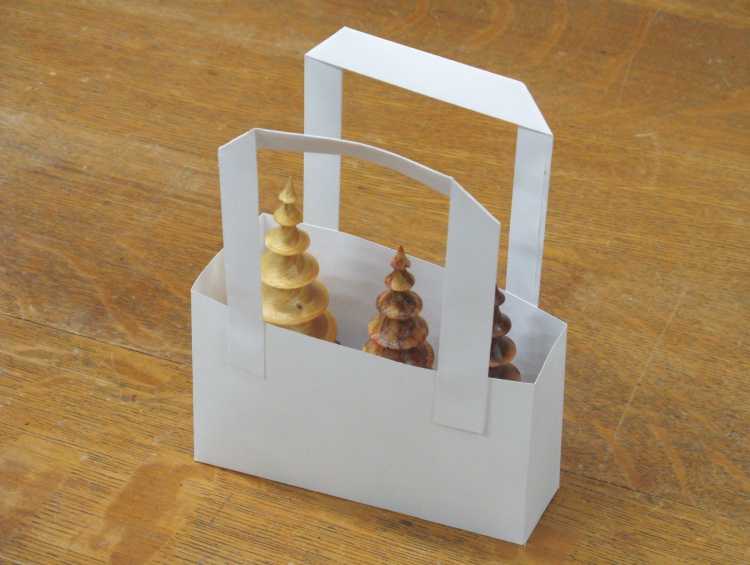
One bag full
It nicely holds one set of trees.
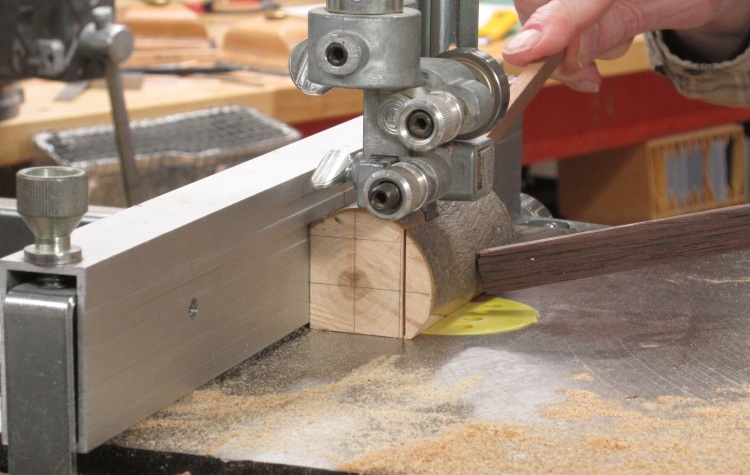
Some Square Trees
After making a few more turned tree sets in early 2026, I started wondering what a square version of the trees would look like. I had recently bought a new scroll saw (which would be the best tool to make these) so this seemed like a good match and I started with an Aromatic Cedar blank to see how it would turn out. When the tree was done, I thought it looked pretty good so I went ahead and made another couple trees for a set of three.
The square trees are rather more labour-intensive than the round ones. A lathed tree may take 45 minutes to an hour while a square tree is probably closer to 3 or 4 hours. Most of that is sanding to smooth out imperfections (yes, hard to believe) in the cutting.
The square trees are rather more labour-intensive than the round ones. A lathed tree may take 45 minutes to an hour while a square tree is probably closer to 3 or 4 hours. Most of that is sanding to smooth out imperfections (yes, hard to believe) in the cutting.
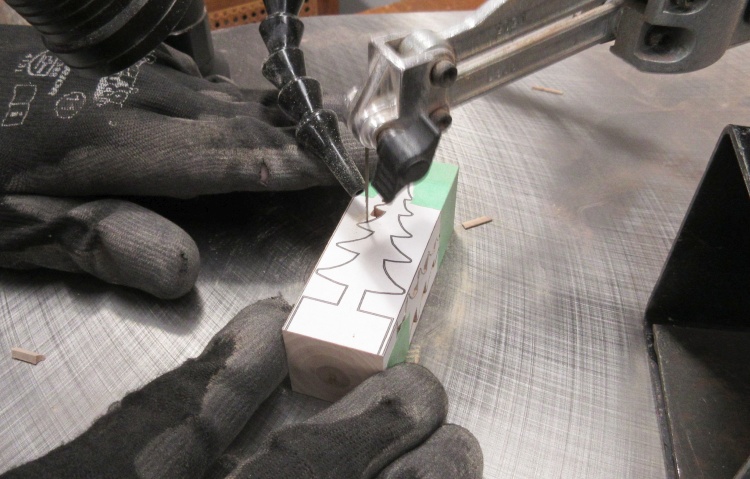
A piece of Cedar patterned up
The thickest wood I thought it was practical to cut on the scroll saw was about 1.4" which should produce a tree close to the "large" turned tree size.
I started with a nice soft wood - Aromatic Cedar - and glued the pattern to two adjacent sides. Here it is ready to drive forward whenever the saw hears the "Gentlemen, start your engines".
I started with a nice soft wood - Aromatic Cedar - and glued the pattern to two adjacent sides. Here it is ready to drive forward whenever the saw hears the "Gentlemen, start your engines".
The good bit cut out
Engines have been started, run and shut off several times. After the four cuts, the inner tree is revealed.
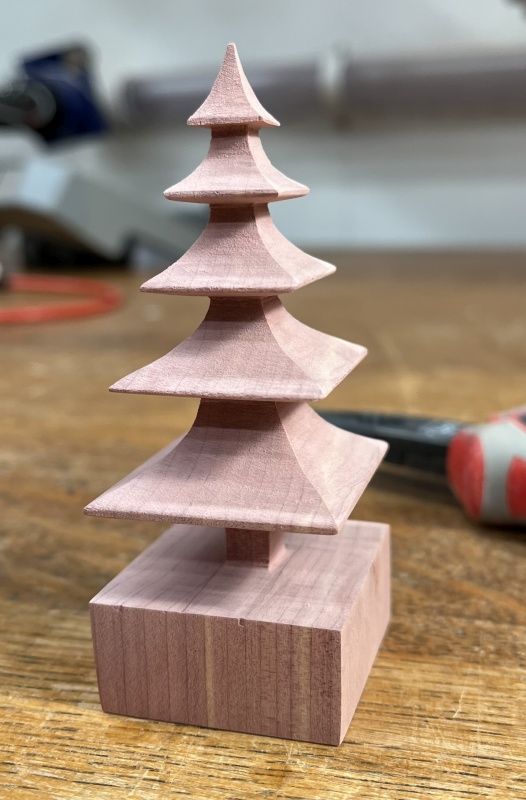
It's...5 stacked pagodas? Or a tree.
After sanding the tree, I decided it looked pretty decent.
Now if I was a cat owner (which I'm not and never will be) I'd say awww...this tree is going to be lonely and I better get it some company and damn the vet bills. Well fortunately we're talking about funky little square wooden trees so I think I'm safe from vet bills although I imagine I'm going to have to do a bunch more sanding. That's not my favourite activity but I think you will agree that it still beats cleaning up cat vomit/hair balls/dead mice/litter box on an hour-for-hour basis.
Now if I was a cat owner (which I'm not and never will be) I'd say awww...this tree is going to be lonely and I better get it some company and damn the vet bills. Well fortunately we're talking about funky little square wooden trees so I think I'm safe from vet bills although I imagine I'm going to have to do a bunch more sanding. That's not my favourite activity but I think you will agree that it still beats cleaning up cat vomit/hair balls/dead mice/litter box on an hour-for-hour basis.
Cutting up an unknown-species branch
Keeping with the cat-owner theme, I made two smaller trees because they were even cuter.
Step one was to chose a couple other woods with one of them shown here being cut into the "medium" tree blank. It's a piece of a stored branch from - if I recall correctly - my Mother-in-law's yard, species unknown. My past self was a bit lackadaisical about labelling, it would seem.
Step one was to chose a couple other woods with one of them shown here being cut into the "medium" tree blank. It's a piece of a stored branch from - if I recall correctly - my Mother-in-law's yard, species unknown. My past self was a bit lackadaisical about labelling, it would seem.
A couple more blanks ready to go
Here are the two blanks, all patterned up. The left-side blank is Lacewood while the one on the right is the Mom-In-Law's Rando Branch of the previous photo.
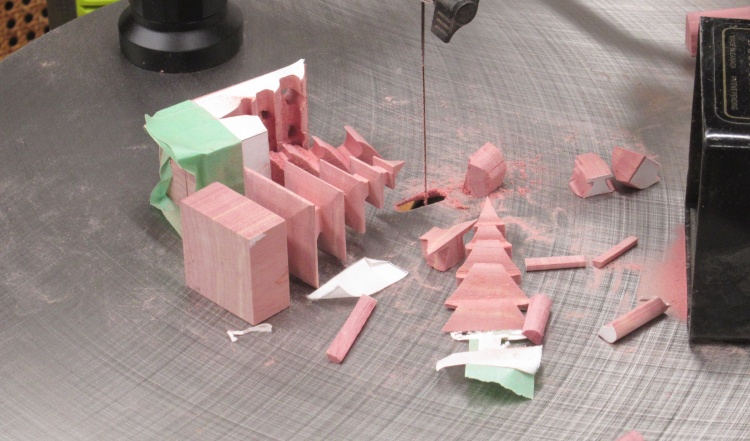
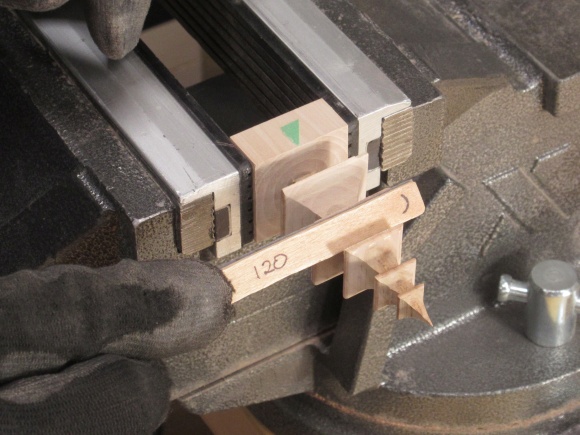
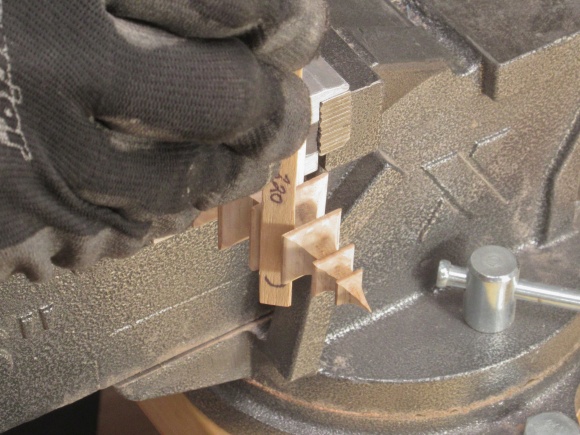
The medium-sized blank being cut out
The fabrication process was to simply cut along the outline from two orthogonal sides.
When this shot was taken, one side has already been cut and the resulting pieces held together with green masking tape.
I'm doing the first cut on this new side, trying to saw directly on the line since the "toolbox of remedies" for inaccuracy pretty much just has sandpaper in it.
When this shot was taken, one side has already been cut and the resulting pieces held together with green masking tape.
I'm doing the first cut on this new side, trying to saw directly on the line since the "toolbox of remedies" for inaccuracy pretty much just has sandpaper in it.
Once the trees were cut out, it was a matter of sanding things until they looked good. For example the base gets four cuts, each from the edge to the trunk of the tree. Any differences in position of the cuts will show up as different levels on the base and it will all need to be sanded down to the lowest level to achieve an even surface. The branches are less sensitive to minor cut differences so it is mostly a matter smoothing out any inconsistent cuts and correcting the profile. I started with 120 grit for good material removal and then finished up with 220 and lastly 320 grit sandpaper on my usual popsicle-stick sanding jigs.
Starting to sand the "branches" smooth
Some 220-grit sanding

Starting with the varnishing
I decided to use varnish on these trees and here I'm starting to coat the first one.

This set also got an Aspen display base
I decided I'd also make a base for the tree set and thought a light colour showed them off the best. I had a wide-enough piece of Aspen which let me make a nice no-joints base of almost white. Here it has also received a coat of varnish.
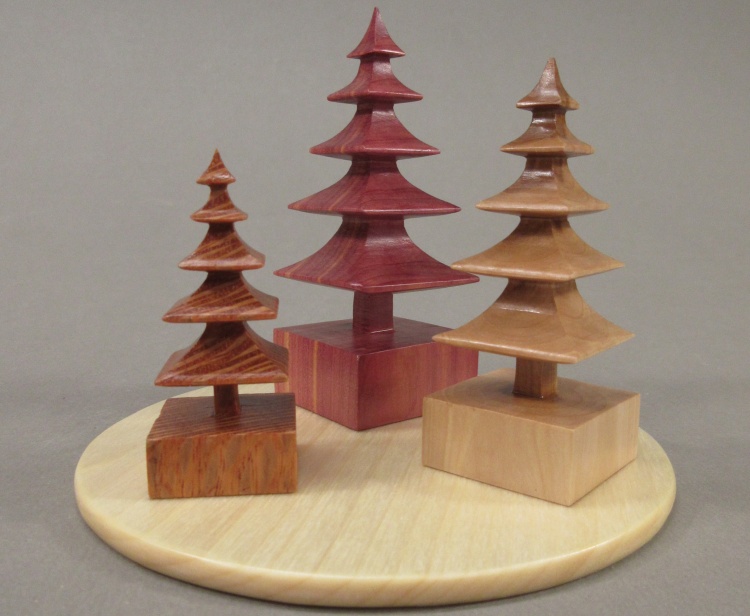
The completed set
All the items received three coats of the Minwax Fast-Dry Polyurethane and the full set is shown here.


