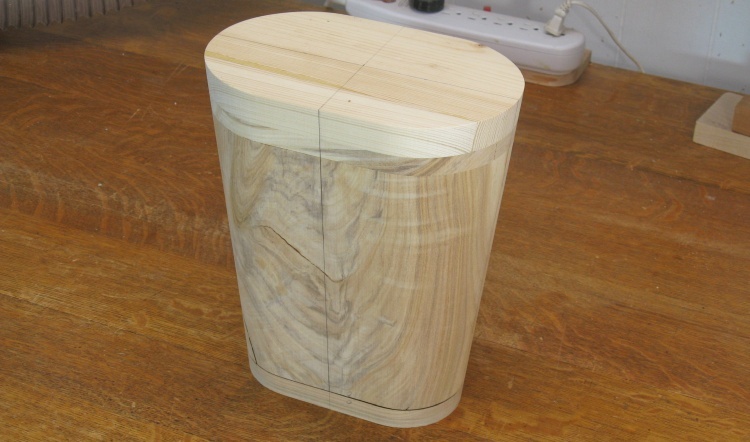
Most wooden wastebaskets (and yes, they seem to exist) are either 4-sided or round, both of which would be easier to make than an oblong version. However, the thinner oval profile takes up less room which in this application was useful.
I've used shop-made plywood a number of times although the plys are usually 0.08 to 0.1" thick. In this case the layers would be veneer which was only 0.022" thick. My plan was to use five layers, building up to about 1/8" overall thickness. Fortunately the one roll of veneer I had was enough to do the whole wastebasket. I was reasonably sure the walls would be strong enough since comparable-thickness Baltic Birch plywood is nice and rigid.
Most wood wastebaskets have a square bottom but I wanted the inside and outside corners at the bottom to be rounded. I thought the best way to do that was to make a shaped base for the wastebasket first and then add veneer to form the walls.
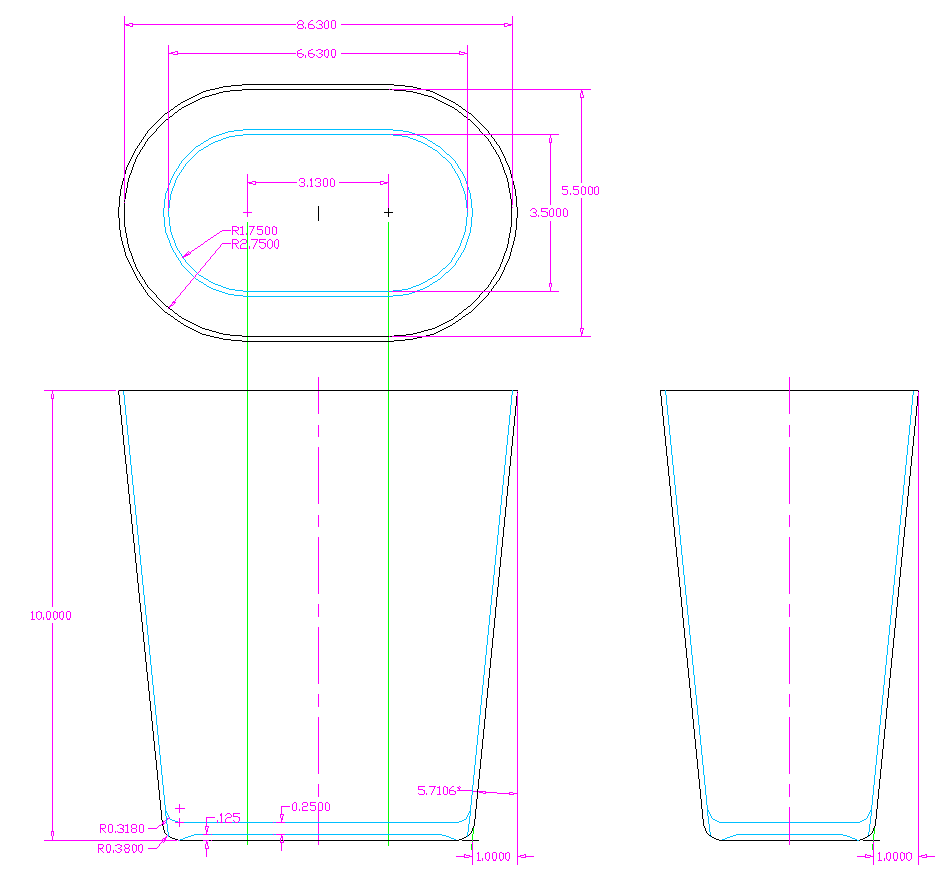
The plan
Wastebasket Form
With the oval cross-section and tapered sides, there wasn't much chance of making the wastebasket without a form to build it on. I fortunately had a log in the shed which would be large enough for a 10"-tall wastebasket form. As an alternative I could have laminated smaller pieces of wood to make something large enough but using a single piece eliminated that step (and as a bonus, freed up shelf space in the shed). Using rigid insulating foam was also a possibility but a wood form was less likely to be damaged by clamping, taping, etc.
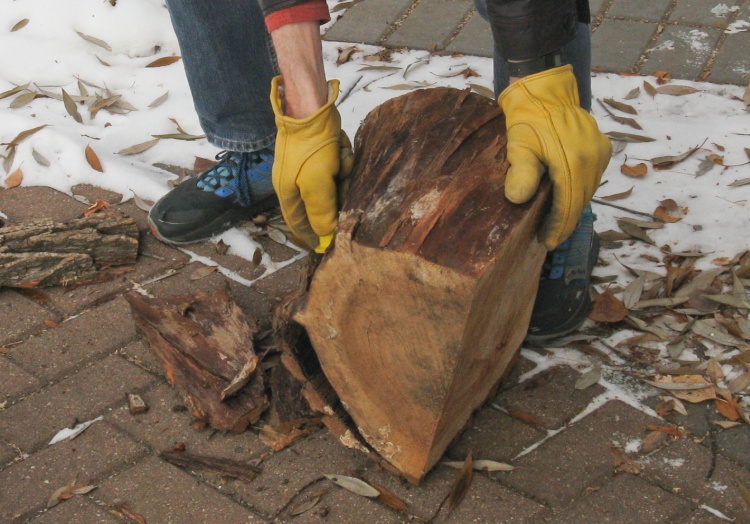
De-barking a spruce log
The Spruce "log" was really only half a log, the other half of which had been turned into a largish bowl way back in, well, last year*.
The log still had the bark in place so I grabbed a de-barking tool (AKA trowel) and used it out on the back path to avoid messing up the shop.
*It seemed like a pretty long time back, maybe because it was actually 20 projects ago. Apparently being retired leaves you a bit more time for hobbies...
The log still had the bark in place so I grabbed a de-barking tool (AKA trowel) and used it out on the back path to avoid messing up the shop.
*It seemed like a pretty long time back, maybe because it was actually 20 projects ago. Apparently being retired leaves you a bit more time for hobbies...
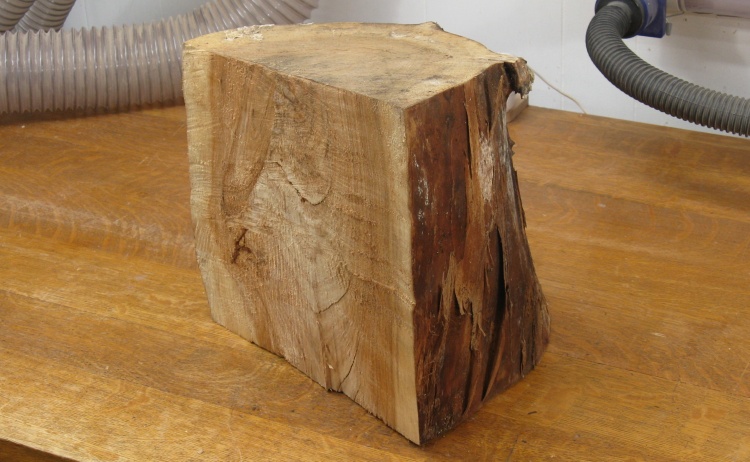
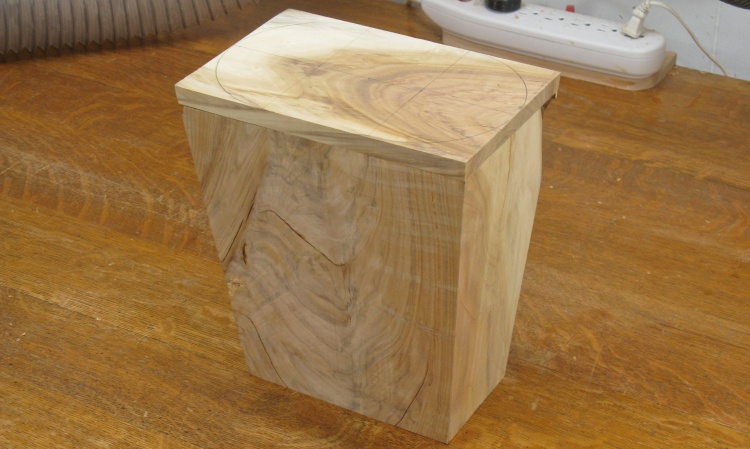
A log with a wastebasket shape hidden inside
The wood was decently solid. It had the odd crack but that wasn't going to be a big problem in making a solid form.
The strategy for the form was to:
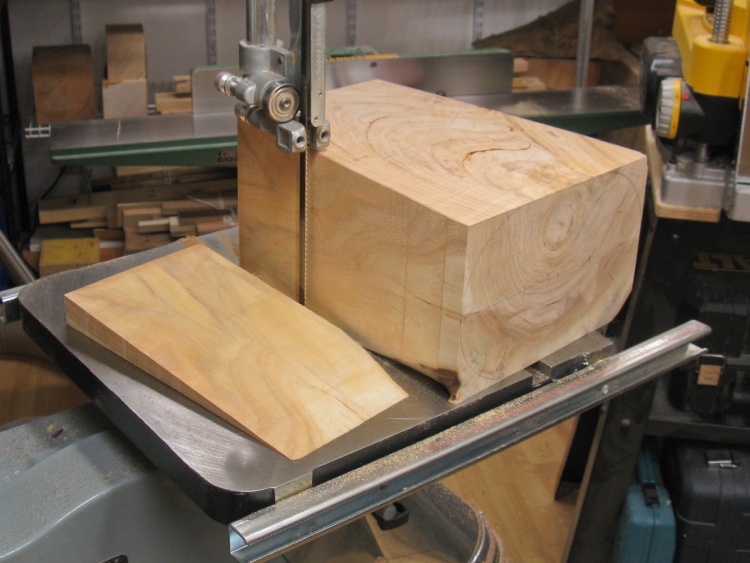
1. Cut a rectangular block out of the log;
2. Add the side tapers and finally;
3. Round it off.
These three shots show Step 1 of that sequence:
1. Cut a rectangular block out of the log;
2. Add the side tapers and finally;
3. Round it off.
These three shots show Step 1 of that sequence:
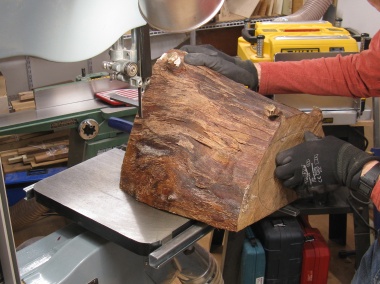
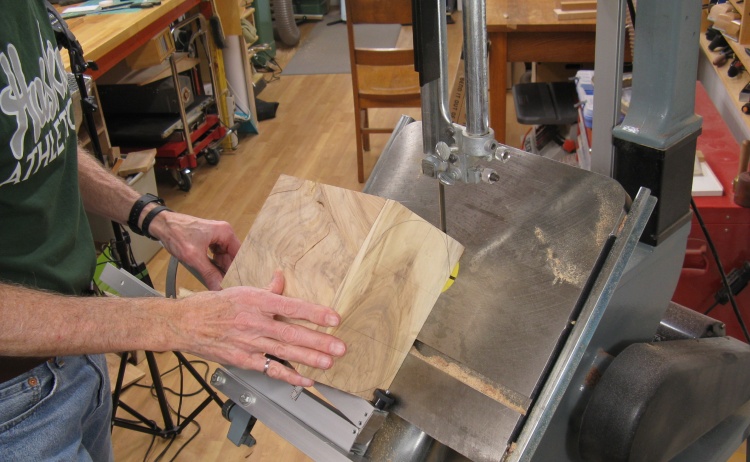
Starting the squaring process
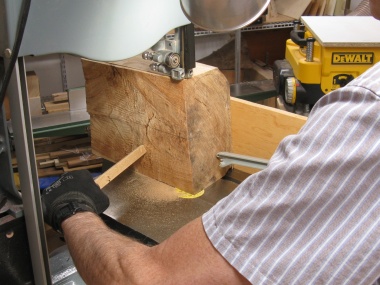
Bandsawing down to size
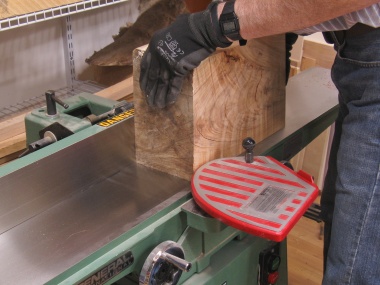
Jointing to flatten a side

Drawing on the top-to-bottom taper
The four sides needed to have a consistent slope where the 10" tall sides tapered down by one inch at the bottom. In this shot I'm marking the slope for one of the sides.
One side tapered
The sides had the slopes cut into them using the bandsaw. I just guided the cuts by hand and then smoothed the resulting face.
To clean up the cut edges, I employed the jointer on the narrow sides (jointing to a marked line) and the planer on the wide sides (planing the side with the wood propped up at the appropriate angle);
To clean up the cut edges, I employed the jointer on the narrow sides (jointing to a marked line) and the planer on the wide sides (planing the side with the wood propped up at the appropriate angle);
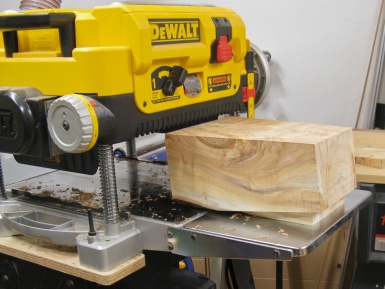
My slightly iffy planing setup
An extra bit on the top for extra height
After the slopes were cut, I found that the form was a bit narrower than what I had planned (overenthusiastic side smoothing, perhaps?) so I added a piece to the top to extend the wider end.
Chopping off the corners
Then it was time to get it rounded. I started by using the bandsaw to cut appropriately-sloped 45° angles from the corners.
With all the sides being sloped and a taper to achieve, finding the correct cut angle was a bit tricky. I suppose I could have used a truckload of geometry but instead I just iteratively trial-and-errored it to converge on the proper angle setup. Once that was configured, the cuts were pretty simple to make.
I'm wearing a Huskies shirt in this shot. Now technically there are something like 15 different Huskies teams but this was the weekend of the Vanier Cup so here we're talking men's football. They were in London Ontario and lost a close one to some other useless university.
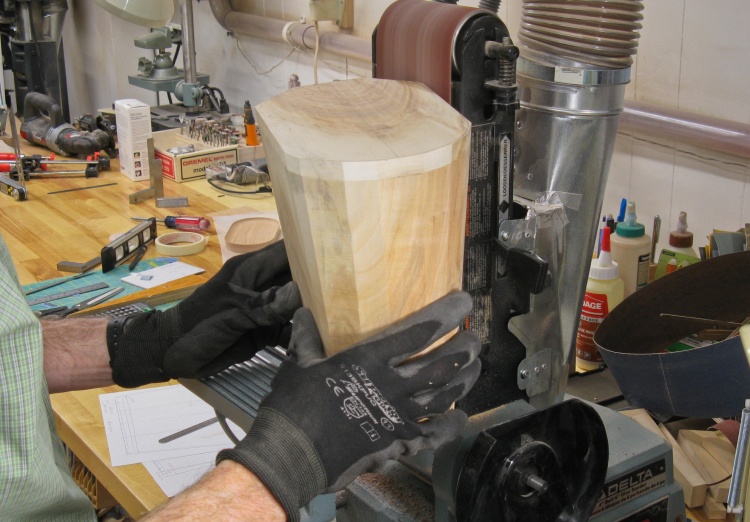
Starting to sand the corners off
And then it was just a matter of sanding the octagonal-y oval to have rounded sides.
I set up the belt sander table with the correct 5.7° angle so the sides would get sanded at the appropriate slope. Spruce is a relatively soft wood so this process didn't take too long with an 80 grit belt.
I set up the belt sander table with the correct 5.7° angle so the sides would get sanded at the appropriate slope. Spruce is a relatively soft wood so this process didn't take too long with an 80 grit belt.
At this point the form was set aside until the base was completed. This was to ensure that everything fit together correctly with the actual pieces rather than measurements.
Wastebasket Base
I had originally thought to use solid cherry for the base which would let me give it inside and outside radiuses. However it occurred to me that it should probably be plywood as well to prevent seasonal expansion from cracking the veneer walls. I wanted the visible grain oriented the long way and for minimal warpage the plywood should have a symmetrical top-to-bottom structure. I didn't quite achieve perfect symmetry but at least the grain orientation is what I wanted.
I started with a "live edge" cherry plank. That's a very trendy thing if you are going to make a table or fireplace mantle but it's just a sign of low-quality lumber if you actually want a flat plank. Fortunately I had more than enough for the small base.
I started with a "live edge" cherry plank. That's a very trendy thing if you are going to make a table or fireplace mantle but it's just a sign of low-quality lumber if you actually want a flat plank. Fortunately I had more than enough for the small base.
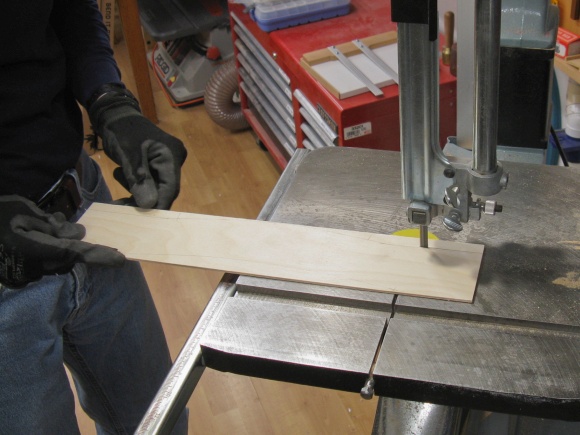
Chopping up a cherry plank
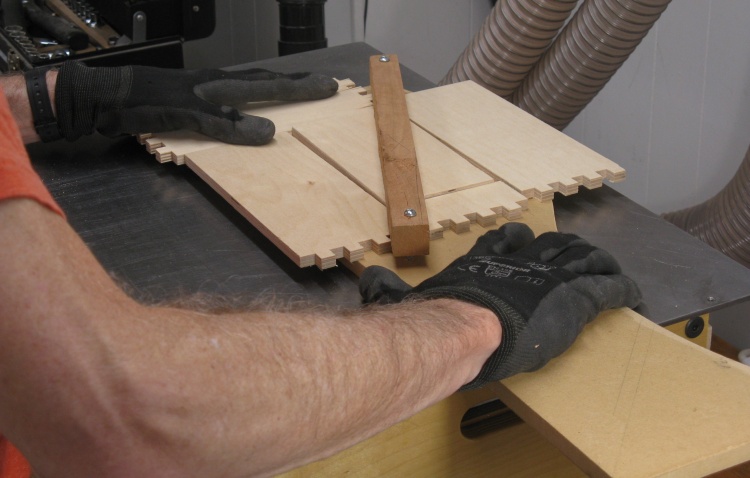
Cutting some plies for the base
First three base plies being clamped
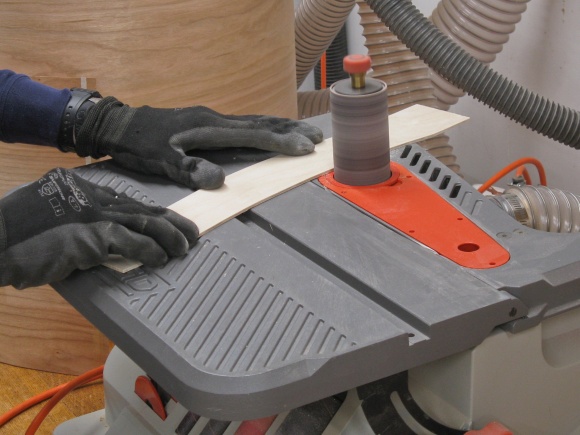
After cutting and thicknessing a few plies to 0.07", I laminated the center three layers. Here they are clamped between flat platens while the epoxy sets.
Base top, plywood center and bottom
This is what the base stack-up looks like;
- A thickish top layer from which to form the inner radiuses,
- A core layer with the previously-shown three 0.07" layers, here with veneer added top and bottom,
- A thinner bottom layer to form the foot of the base.
The plan was to route out top and bottom layers and then add them to the center stack.
The plys
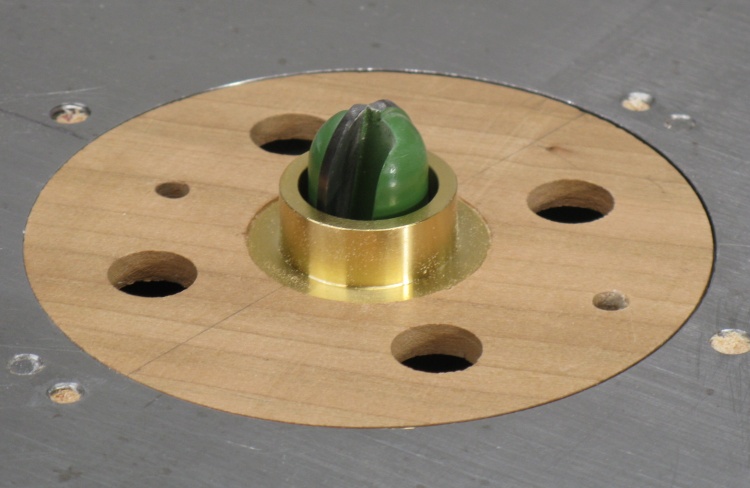
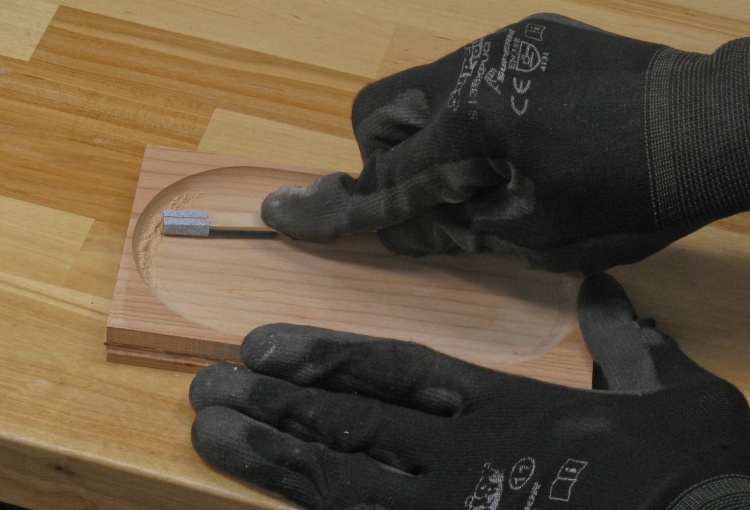
The top and bottom layers needed to be routed to provide rounded sections and for that to be consistent I was going to need a pattern - just an appropriately sized oval. I grabbed an oddly-shaped scrap of 1/2" MDF to use for that which in an earlier life was a curved cutting-board insert pattern.
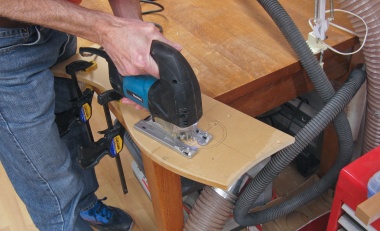
Cutting out an oval pattern
Sanding the inside
...and finally hand sanding
Bottom piece (not visible) secured to the pattern with flanking scraps and hold-down
I started with the foot piece; the blank for that was laid over the oval pattern hole and held in place laterally with taped-on scraps of plywood and vertically with the diagonal brown board.
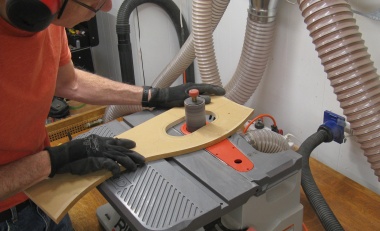
3/4" router bit with pattern-following collar on router table
I used this 3/4" "core box" bit to form a radius in the foot piece. It will cut all the way through the wood until there's just a ring left around the outside.
The pattern contacts the brass collar which puts the bit a specific distance from the edge of the pattern. The pattern size was made with this distance in mind to achieve the desired cut.
The pattern contacts the brass collar which puts the bit a specific distance from the edge of the pattern. The pattern size was made with this distance in mind to achieve the desired cut.
Routing the bottom piece
In this shot I'm routing the bottom piece. After each "orbit" of the pattern, I increased the bit height slightly until the wood was cut completely through.
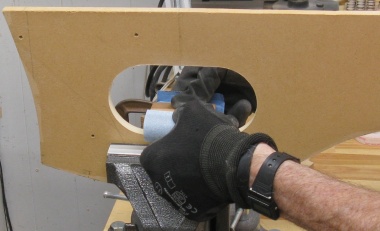
Routed bottom piece visible from backside of pattern
This shows the routed bottom piece through the backside of the MDF pattern.
Chopping off first failed attempt at top shaping
I used the same procedure for the top of the base (after altering the MDF pattern for the larger oval it needed). Unfortunately after gluing that to the center plies, I decided that it was a bit too...imperfect; The grain of the veneer didn't line up with the edge pieces and there was some tear-out on the edge. Nothing for it except to try, try again.
In this shot I'm cutting off the original try. I'll sand off the veneer layer as well and glue on a slightly thicker top piece. Then instead of routing all the way through, I'll route the edge round and the center flat, leaving about 0.03" thickness in the center area. That took another little jig to accomplish but it worked out fine and I was happy with the result.
In this shot I'm cutting off the original try. I'll sand off the veneer layer as well and glue on a slightly thicker top piece. Then instead of routing all the way through, I'll route the edge round and the center flat, leaving about 0.03" thickness in the center area. That took another little jig to accomplish but it worked out fine and I was happy with the result.
Sanding successful second try at top routing
This shows the base after redoing the top. I'm sanding out some router-bit marks to blend the radiused corner with the flat bottom.
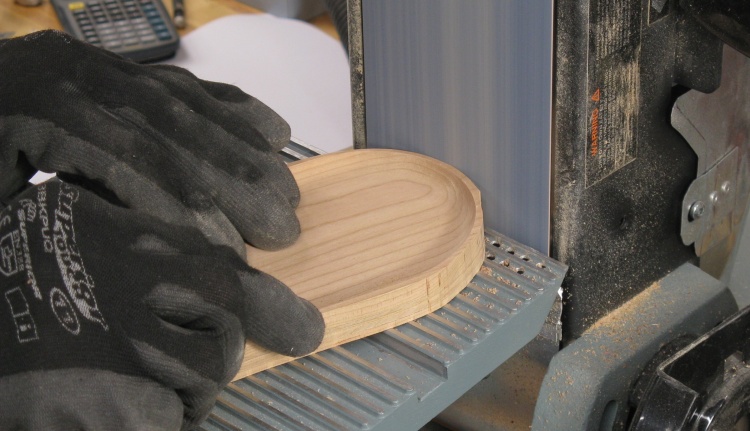
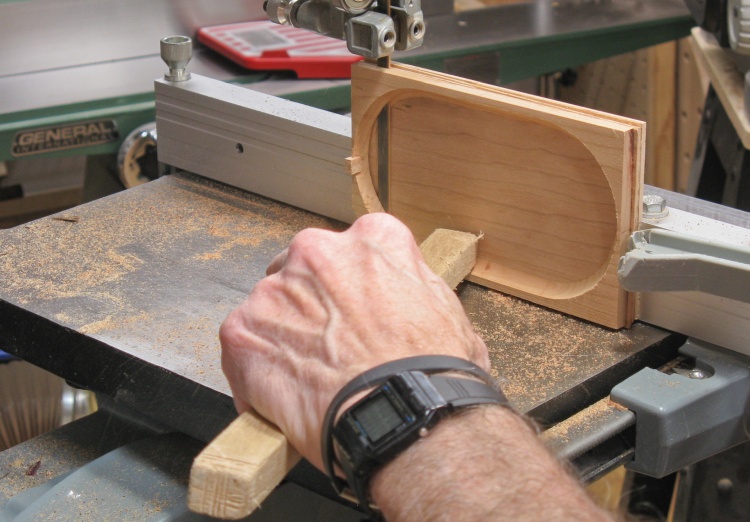
Shaping the base to an oval
The last step for the base was to get it from rectangular to oval. I cut off most of the excess wood with the bandsaw and then sanded it until the edges were almost sharp.
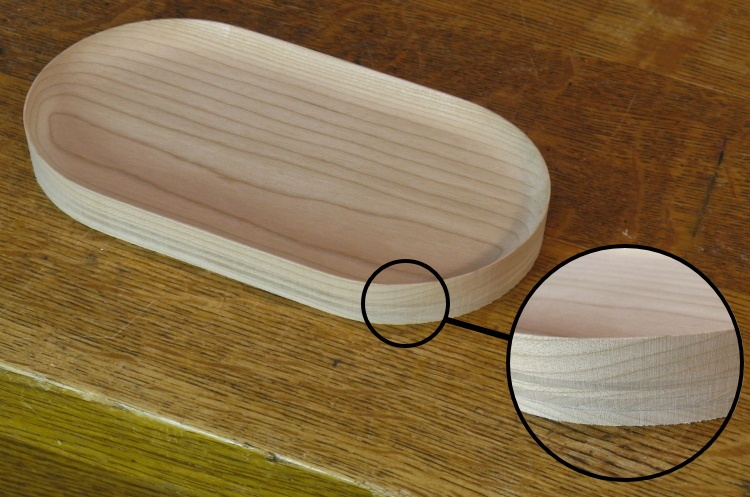
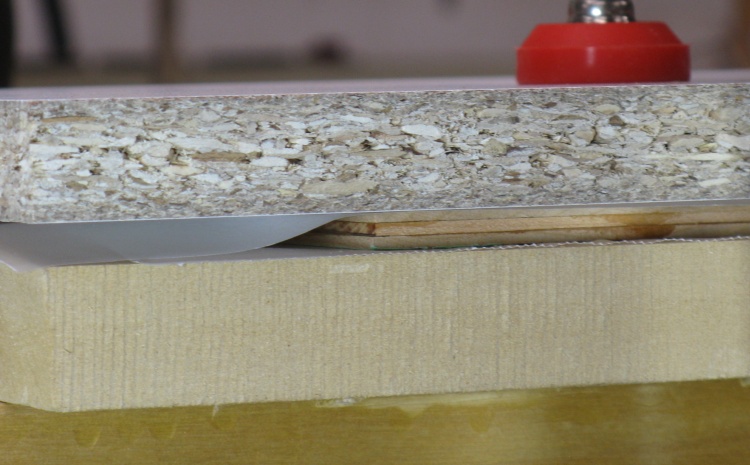
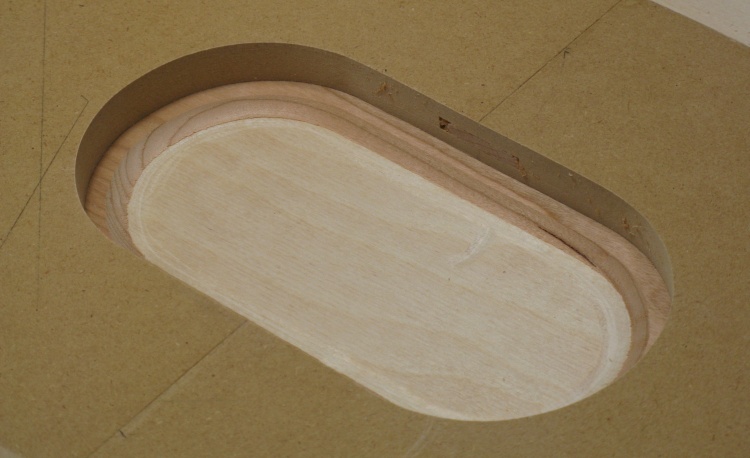
Base completed
This shot shows the finished base. I sanded as close as I dared to the edges, but left a flat top of maybe 0.02" so the edge wouldn't be too fragile. The magnified shot shows (with not really enough contrast) the six layers that comprise the base.
The base currently has a straight outside edge so the veneer will adhere to it but after all the veneer layers are in place it will be rounded off.
The base currently has a straight outside edge so the veneer will adhere to it but after all the veneer layers are in place it will be rounded off.
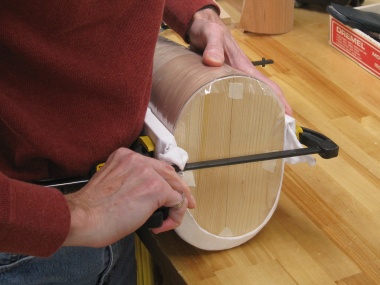
Checking base fit on rounded form
This shot shows me fitting the completed base onto the bottom of the form. The form has been shaped along the bottom edge so it clears the rounded inside of the base.
Unfortunately the base ended up a tiny bit larger than I had expected so it was a bit wider than the bottom of the form. I wanted it flush so Something Needed To Be Done.
After a bit of hemming, I tried some hawing and that seemed to do the trick; I decided to cut off 3/4" from the bottom of the form which given the slope of the sides would make it about 0.075" wider on each side. Then I could sand it down a bit to make it flush with the base.
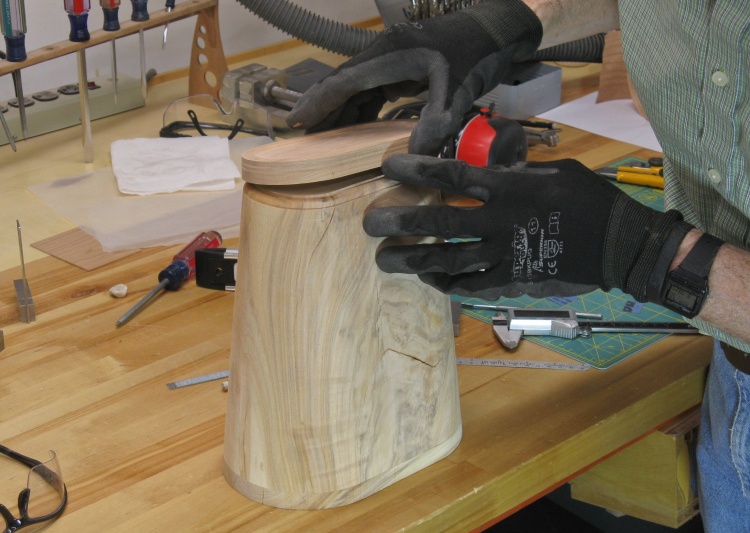
Completed form with a bit more on the top
Of course after cutting 3/4" off the bottom, the form was shorter and I needed to add another 3/4" piece to the top to maintain the height. It was glued on and then trimmed and sanded flush with the rest of the body.
This shows (finally) the completed form on the base and sitting in the proper wastebasket orientation.
This shows (finally) the completed form on the base and sitting in the proper wastebasket orientation.
Building the Body
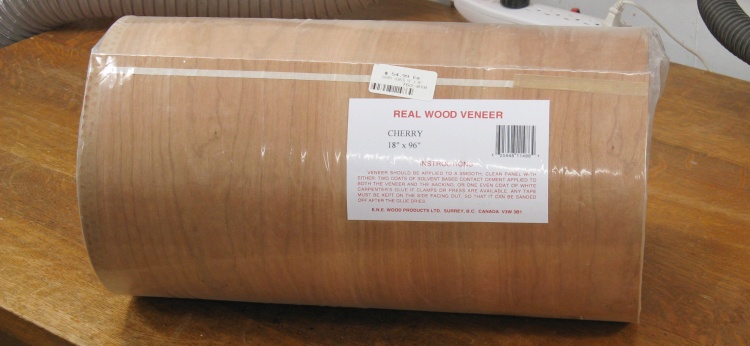
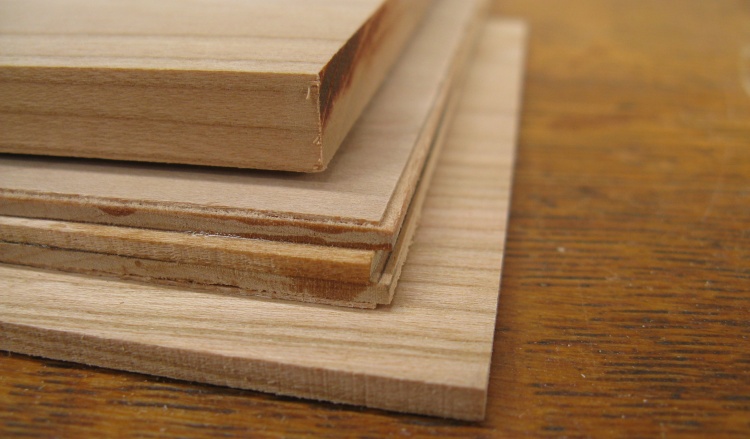
A spare roll of cherry veneer
This is the roll of veneer that I planned to use for the wastebasket. I had purchased it for a drawer set some time ago but then managed to later find pre-veneered plywood and used that instead.
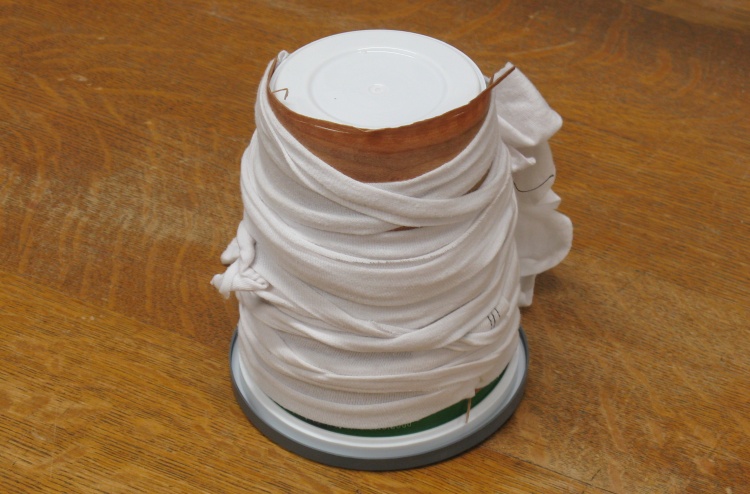
Veneer-bending test
I didn't think it was too practical to bend, trim to size and glue the veneer all in one step, so I thought I'd try the bending stage separately. The normal prep technique to wood bending is to steam it but I figured soaking should work just as well on the thin material I was using.
This is a test of the bending technique. I've cut a small piece of the veneer, soaked it in warm water and then bent it around a plastic container. It is held in place with a (perhaps overgenerous) wrap of stretchy material.
This is a test of the bending technique. I've cut a small piece of the veneer, soaked it in warm water and then bent it around a plastic container. It is held in place with a (perhaps overgenerous) wrap of stretchy material.
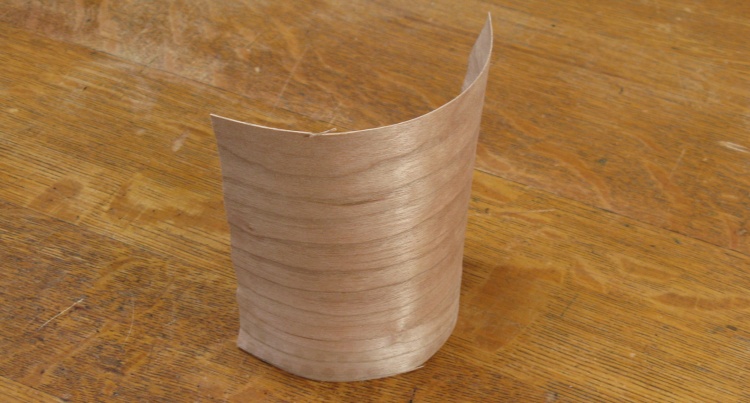
Yup, it's bent alright
Once the wood was dry, it seemed to retain the round-and-tapered shape similar to what the wastebasket ends look like. So that technique looks like it will work fine.
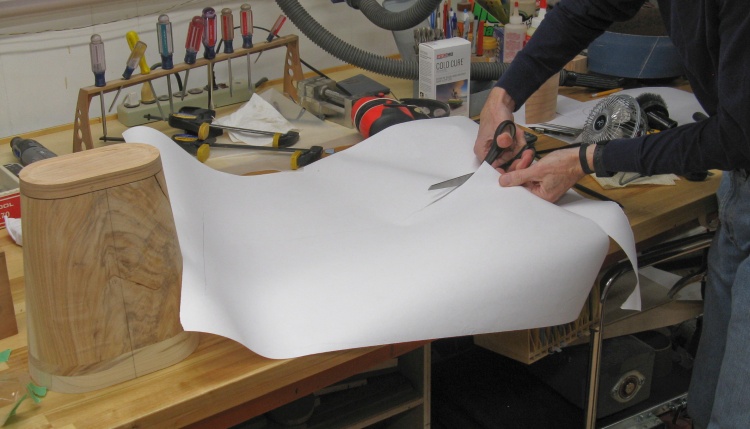
Cutting up a paper pattern for the veneer shape
To make it easier to cut a piece of veneer that accurately wraps around the form, I first wrapped the form in paper, marked the edges and then cut out the pattern.
I actually made two patterns; the larger one shown here that wraps around the whole form and will be used for the horizontal-grain layers, and a second smaller one that covers half of the form and will be used for the vertical-grain layers.
I actually made two patterns; the larger one shown here that wraps around the whole form and will be used for the horizontal-grain layers, and a second smaller one that covers half of the form and will be used for the vertical-grain layers.
To make it easier to cut the veneer consistently, I decided to make a cutting pattern for the top and bottom of the smaller vertical-grain pattern. I used a scrap of 1/8" plywood and made curves on either side that corresponded to the top and bottom curves of the pattern.
Making a curve cutting template
Smoothing off the curve
Cutting veneer with template and utility knife
In this photo I'm using the template to make a curved cut corresponding to the bottom profile of the vertical-grain pattern.
The paper pattern is rolled up on the right to keep it out of the way while I make the cut.
The paper pattern is rolled up on the right to keep it out of the way while I make the cut.
Soaking a piece of veneer (with Canadian weights)
A suitably-sized pan was recruited from the kitchen and filled with hot tap water. I soaked the veneer in it for around 20 minutes, weighted down with a couple of hard pucks.
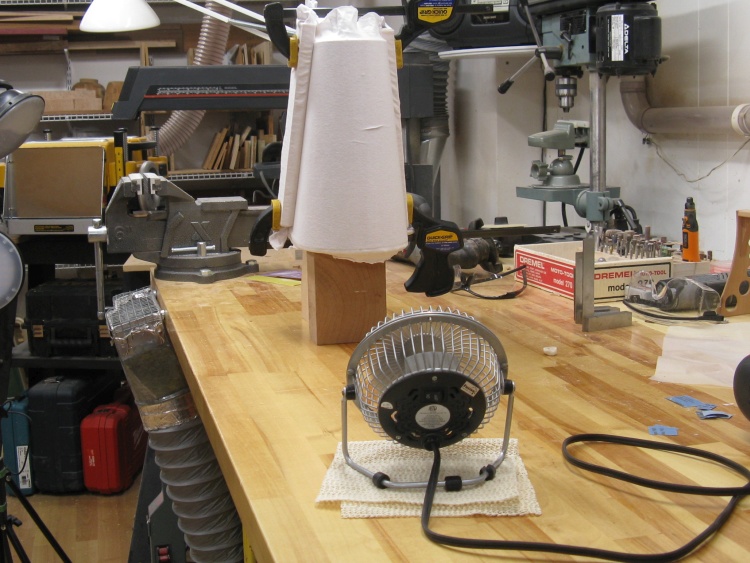
Fan-drying the veneer via cloth
The veneer got wrapped around the form (with a layer of plastic between) and held in place with a stretchy cloth tightly strung between two short boards. Then a fan was aimed at it to help the veneer to dry through the cloth.
This was one of the vertical-grain pieces which wrapped only half-way around the form.
This was one of the vertical-grain pieces which wrapped only half-way around the form.
Drying a horizontal-grain piece
I bent the horizontal-grain veneer in a similar soak-and-strap fashion, except with a bit different strapping technique.
Haphazardly piled in the background of this shot are another horizontal and a couple vertical-grain pieces of already-bent veneer.
Haphazardly piled in the background of this shot are another horizontal and a couple vertical-grain pieces of already-bent veneer.

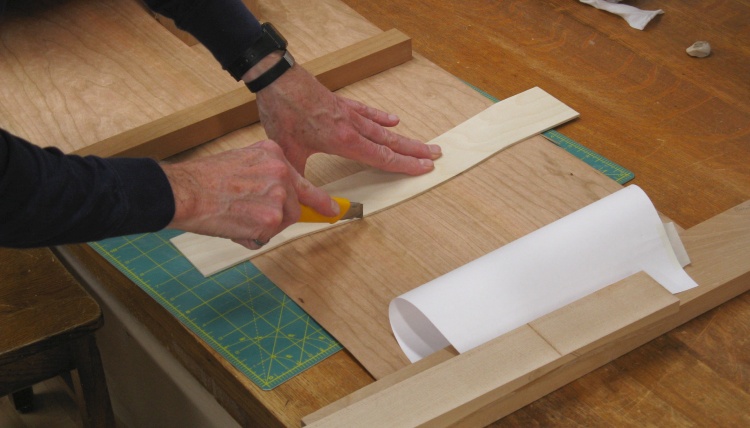
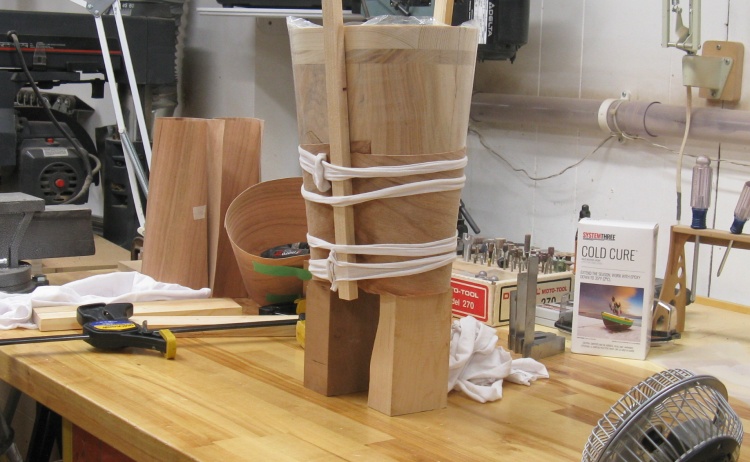
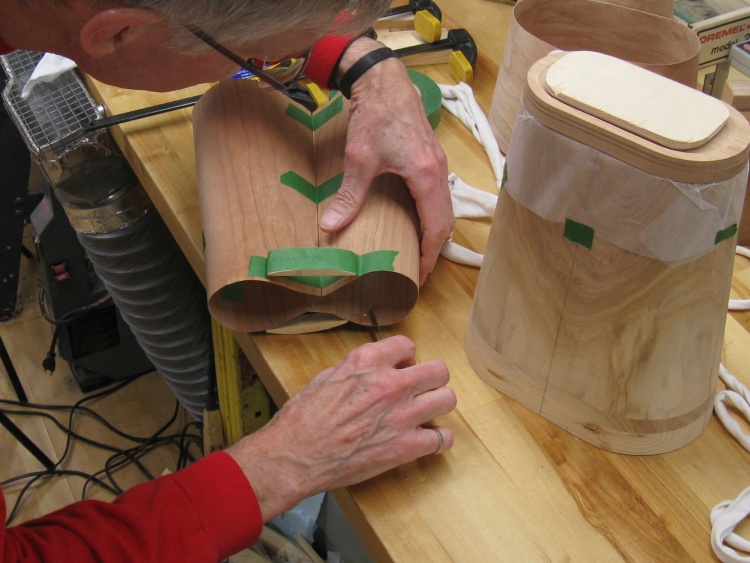
Trimming vertical-grain pieces to fit together
The inside layer of veneer consisted of two of the vertical-grain pieces. These two pieces were wrapped around the form with the ends overlapping. Then I cut through the both layers where they overlapped so the edges were aligned correctly.
That lighter-coloured rectangle on the veneer was where the paper label sat when the veneer was rolled up. It protected the cherry from the light which darkened the rest of the wood. Of course the lighter area will eventually be covered by another layer of veneer so it isn't a problem here.
That lighter-coloured rectangle on the veneer was where the paper label sat when the veneer was rolled up. It protected the cherry from the light which darkened the rest of the wood. Of course the lighter area will eventually be covered by another layer of veneer so it isn't a problem here.
The inner veneer layer taped together
After trimming, those two pieces were taped together to form the complete inside layer.
I wanted the inside layer to tightly wrap the base so before adding any other layers, it would be glued to the base.
I wanted the inside layer to tightly wrap the base so before adding any other layers, it would be glued to the base.
Applying epoxy to bottom of veneer
I added waxed paper to the form to prevent any glue leakage from bonding the veneer to the form. Then I added epoxy just around the bottom of the inside layer where it would contact the base.
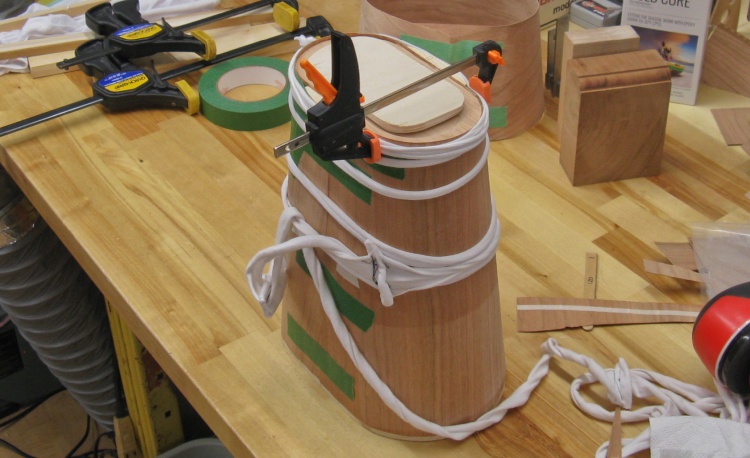
Veneer glued to the wastebasket base
The glued layer was slid down over the form and base and then wrapped and clamped to apply pressure while the adhesive set.
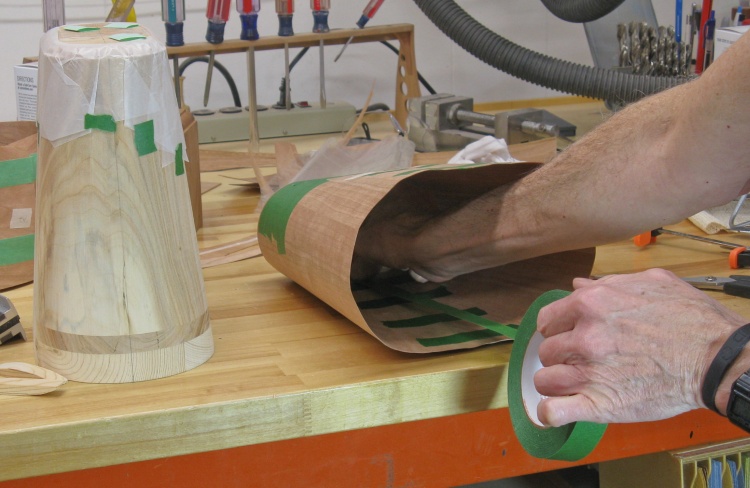
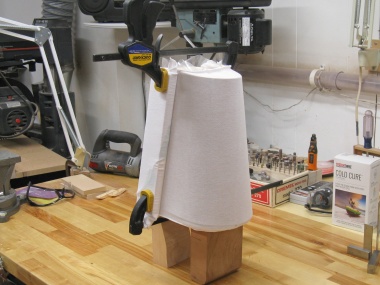
Adding tape to the inside for next step
The next stage was to add the second layer of veneer but I needed to remove the masking tape on the outside before that could happen.
So first I added masking tape on the inside as shown here to keep the veneer pieces together.
So first I added masking tape on the inside as shown here to keep the veneer pieces together.
Inner veneer layer with no outside tape
This shows the first (inside) layer cleaned of tape.

Taping up 2nd (horizontal-grain) layer
So in preparation for the next layer which was to be horizontal-grained, I wrapped the two veneer pieces on, trimmed the ends as before and taped any gaps or cracks.

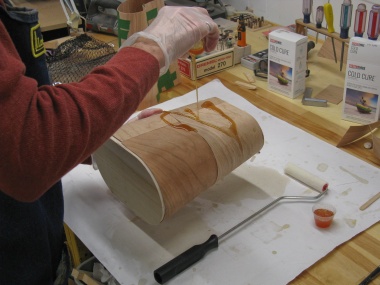
Mixing up epoxy
My plan was to use epoxy to bond the layers together. I used a slow-setting type that gave me plenty of time to work. Here I'm mixing up around 25 ml.
This was then spread over the outside surface of the first layer of veneer using a small roller and the second layer was slid down over top.
This was then spread over the outside surface of the first layer of veneer using a small roller and the second layer was slid down over top.

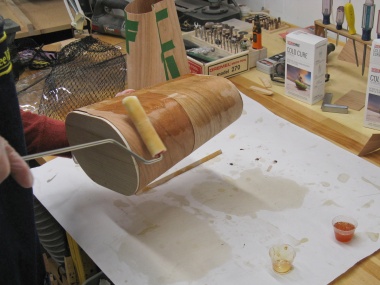
Adding breather mesh after 2nd layer glued on
The next step was to prep it for the vacuum press. Here the "breathing mesh" is being spread over the veneer layers. The mesh provides a path for air to be removed via the vacuum pump.
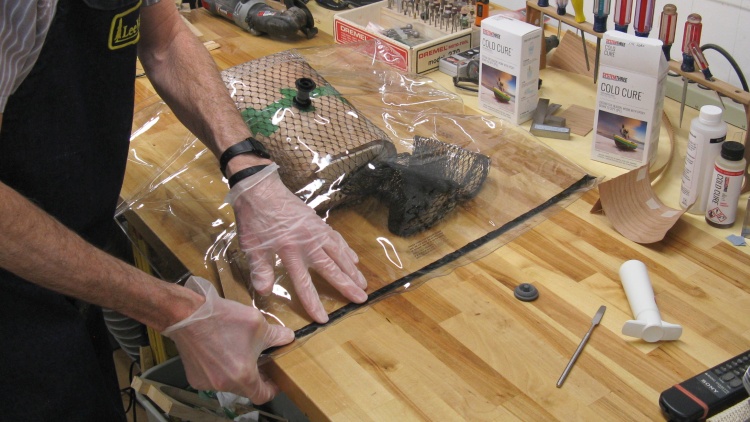
Pressing together the big black seal on the vacuum bag
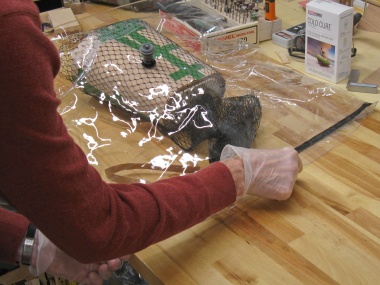
The vacuum press is composed of a thick vinyl bag with a valve to remove air and an opening that can be sealed against air ingress. I was able to borrow this one from a buddy (Thanks Gary!).
In this photo, the form & veneer are in the bag and I'm sealing the opening by pressing closed the sticky black sealing strip.
In this photo, the form & veneer are in the bag and I'm sealing the opening by pressing closed the sticky black sealing strip.
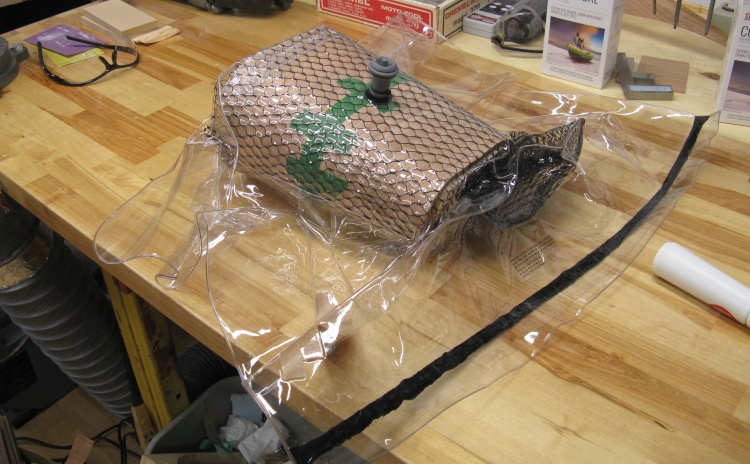
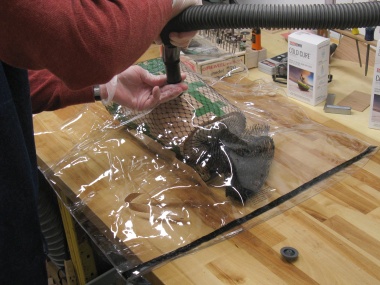
Bag pumped down
The bulk of the air was removed using the central vac and then a vacuum pump was attached to the valve on top and the last of the air was pumped out.
The pump (white tube on the right) gets enough air out so there is about 13 PSI pressure on the item in the bag, providing an even pressure all around it.
The pump (white tube on the right) gets enough air out so there is about 13 PSI pressure on the item in the bag, providing an even pressure all around it.
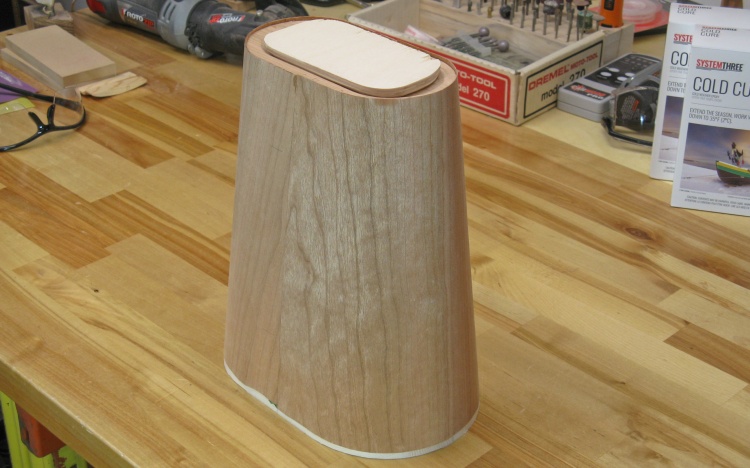
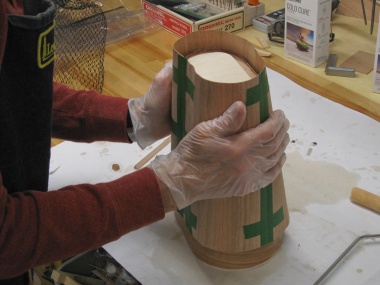
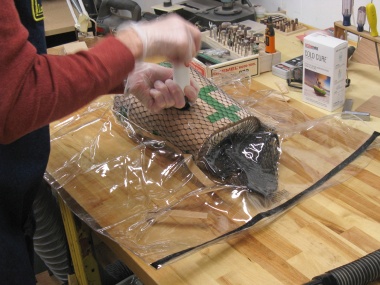
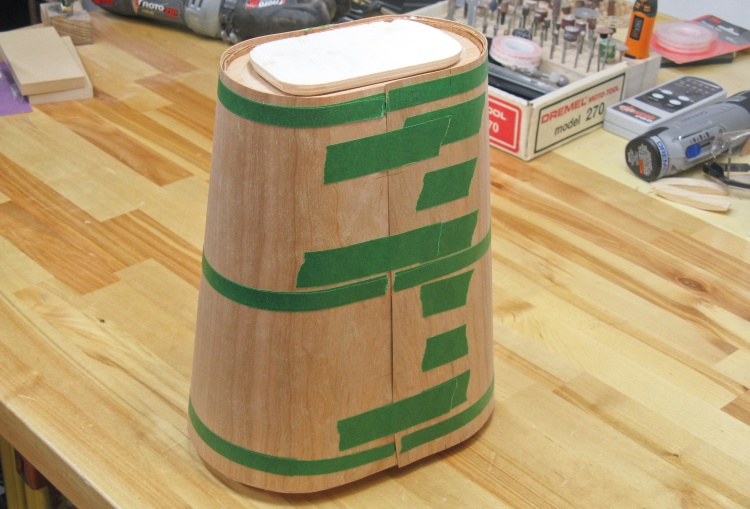
First two layers out of vacuum press
After a day or so I removed the items from the vacuum press bag, extracted the form and pulled the masking tape off the veneer. The first glue-up is done!
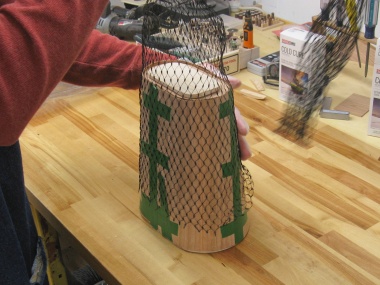
Now for another three...
Now for another three...
This Big Photo Array shows the next veneer layer being put into place. It's another vertical-grain layer composed of two side-by-side pieces.
Bending wet veneer around form
Clamping on stretched cloth
Drying in the breeze of a fan

Wrapping two pieces in place

Inserting a metal backing for cutting
Cutting wood for butt joint
Measuring out epoxy hardener
Pouring epoxy on existing veneer
Spreading epoxy around
Installing the new veneer layer
Putting on the breather mesh
Sealing the vacuum bag
Using shop-vac to remove air
Creating a good vacuum with hand pump

Press evacuated and "pressing"
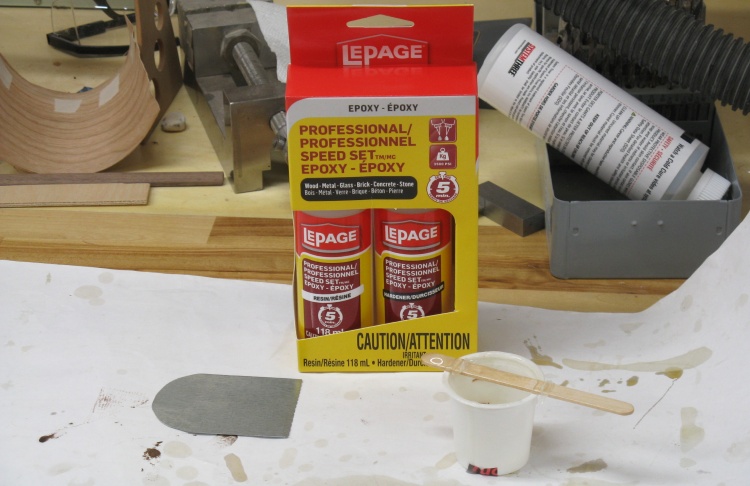
5-minute epoxy for those in a hurry
The epoxy used for the first two gluings has a very slow curing time so there was lots of time to work. Unfortunately the vacuum bag wasn't holding vacuum very well after its first perfect performance. My diagnostic steps suggested seal and/or valve leaks but I was hesitant to start changing things on a borrowed item. So instead I decided to use a faster-curing epoxy. Almost all hardware-store epoxys are the "5 minute" version and that's what I bought.
That meant I would have 5 minutes to mix the epoxy, spread it evenly on the form, add the new veneer layer, add the breather mesh, put it all in the bag, seal the open end, remove the excess air and pump it down to create a vacuum. Of course I'd need to maintain the vacuum for only 1/2 hour or so which was achievable with periodic pump-down sessions.
That was the technique I used for the last two veneer layers. I got everything ready and rehearsed the operations before starting and it still took closer to 6 minutes before the bag was pumped down. Fortunately that seemed to be close enough.
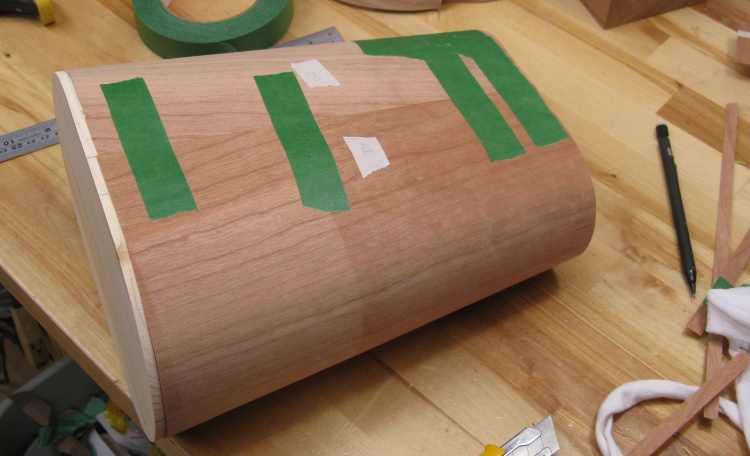
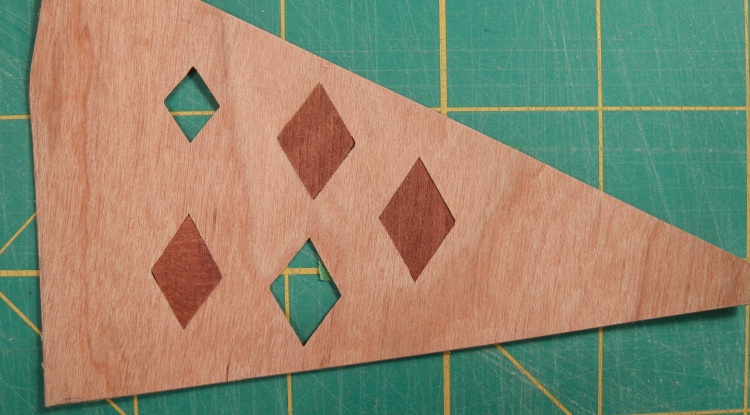
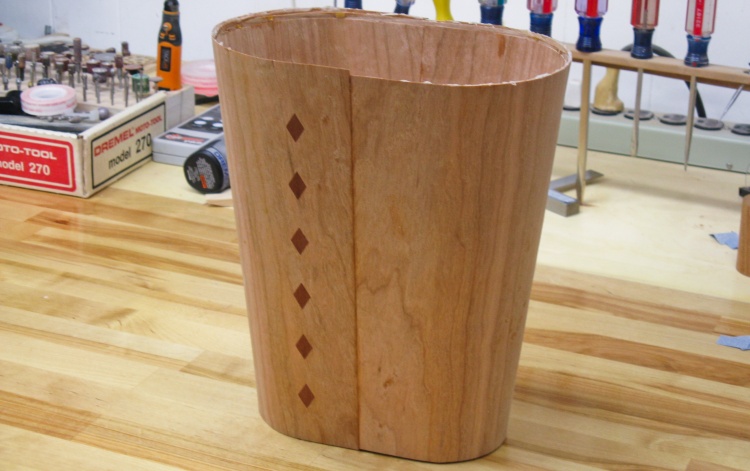
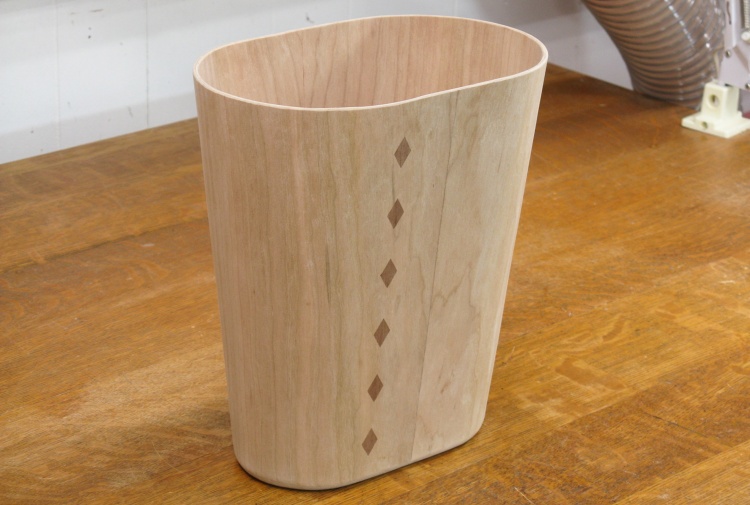
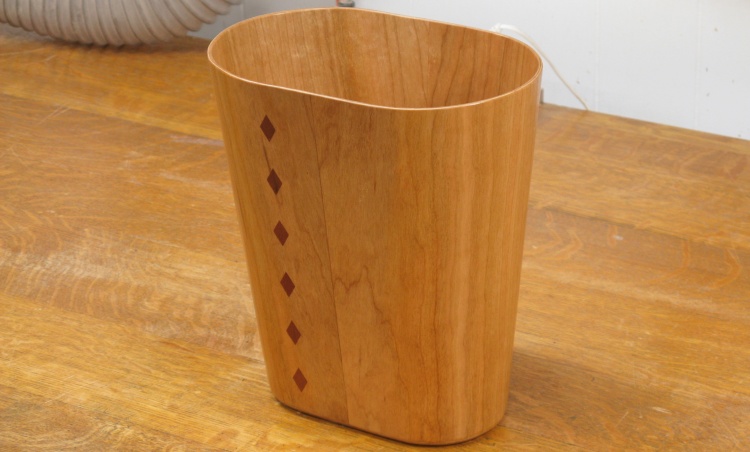
Some Decoration
I worried that the plain cherry sides of the wastebasket might be a bit boring so I thought I'd add some decoration to one of the sides. I had in mind a vertical array of contrasting diamonds.
Trying out some test inlays
I hadn't really done marquetry before so I thought I'd better try out a few test diamonds to make sure they looked fine. They didn't, particularly. I tried a few techniques of cutting the opening and the filler but I didn't think they were accurate enough.
This shot shows me cutting another diamond in a test scrap of cherry veneer. The already-inlaid diamonds look OK in this shot but unfortunately eyes are better than low-resolution snapshots and gaps are visible due to imperfect fit.
This shot shows me cutting another diamond in a test scrap of cherry veneer. The already-inlaid diamonds look OK in this shot but unfortunately eyes are better than low-resolution snapshots and gaps are visible due to imperfect fit.
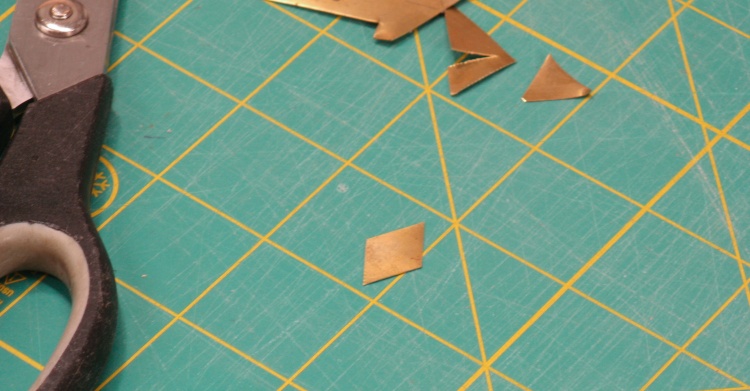
A small brass pattern was called for
After reading up a bit more on marquetry I noticed one article talking about using a pattern so I thought I'd give that a try. A few minutes of work produced a diamond pattern from 0.007" brass as shown here.
Rightmost diamond is decent
The pattern was used both to cut the hole and then to cut out the insert. That produced the rightmost diamond on my little cherry pizza-slice here and which I thought looked like a pretty good fit.
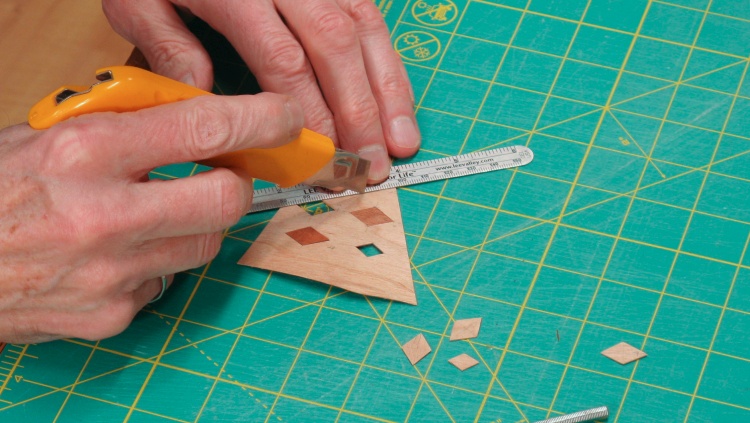
Cutting a hole in the cherry veneer
So then on to the real thing!
I started by using the pattern to cut out six diamonds from the back of the final veneer layer.
I started by using the pattern to cut out six diamonds from the back of the final veneer layer.
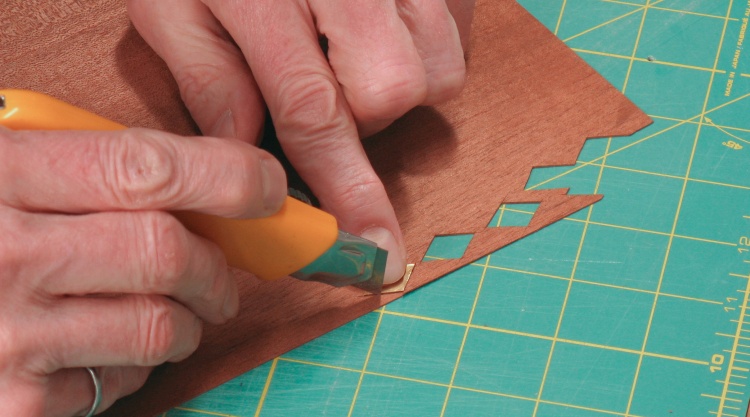
Cutting a diamond out of something reddish
I pulled out my Big Pizza Box of Veneer and found a nice dark reddish-brown veneer of the correct thickness and proceeded to cut diamonds out of that one too. I don't know what the wood species is, except I'm guessing that it grew some place much warmer than here.
Tips:
- Keep knife vertical
- Use many light cuts
- Cut in direction to prevent splitting
Tips:
- Keep knife vertical
- Use many light cuts
- Cut in direction to prevent splitting
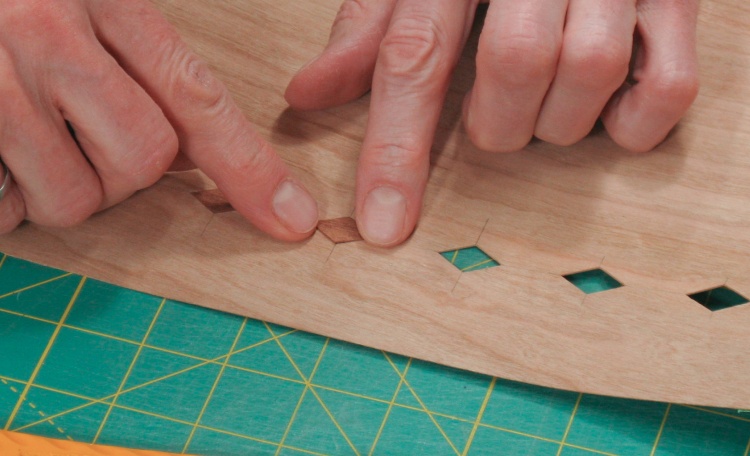
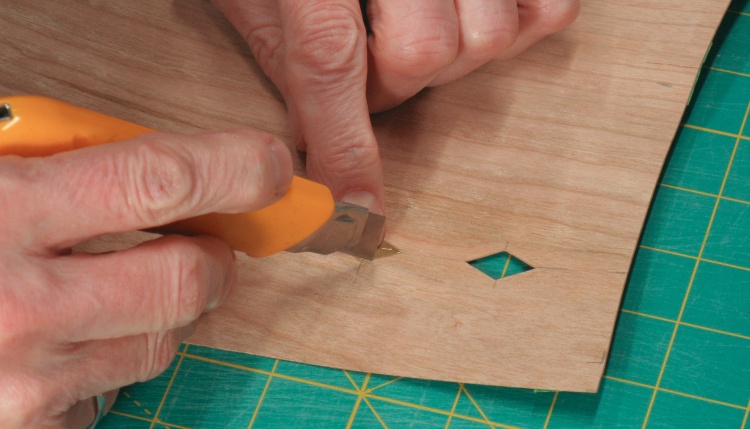
Fitting in the diamond
The mystery-species diamonds were fitted into the cherry holes. Most went in well but a couple needed a bit of edge sanding.
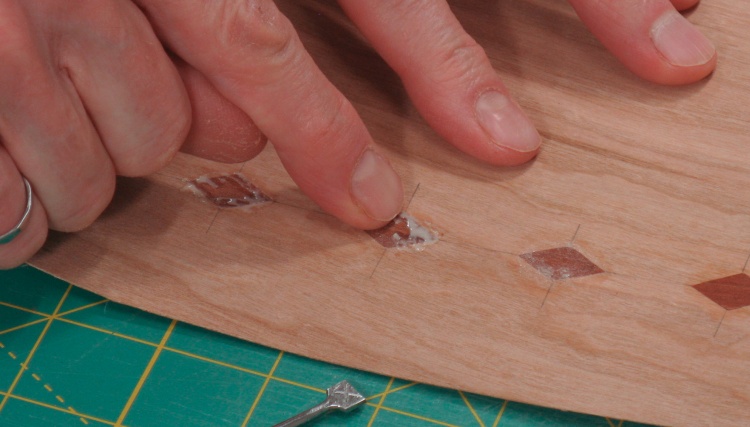
Shmearing on some glue
I used a bit of wood glue to fill any seams, rubbing it in before scraping the excess off. This should help hold the pieces in place as the veneer is bent back around the form. I added tape to the front side to help secure them as well.
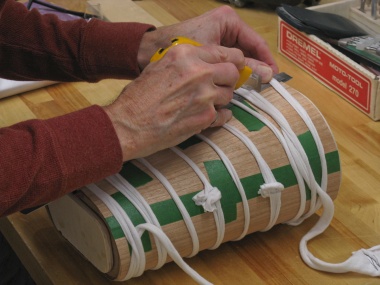
Last layer ready for gluing
This shows the final veneer layer prior to gluing. Six patches of tape on the right cover the inset diamonds. The three thinner strips of tape strengthen the veneer to prevent splitting when it is tightly pressed over the form.
Note that the center seam currently overlaps. I'll glue everything except the area around that seam since the vacuum press tends to squeeze the veneer ends closer. Then later I'll trim and glue that seam so it lines up nicely.
Note that the center seam currently overlaps. I'll glue everything except the area around that seam since the vacuum press tends to squeeze the veneer ends closer. Then later I'll trim and glue that seam so it lines up nicely.
Gluing seam
Here most of the veneer has been glued and the seam has been trimmed. In this feebly-composed shot I'm using a thin piece of brass to insert epoxy under the edges to glue them down.
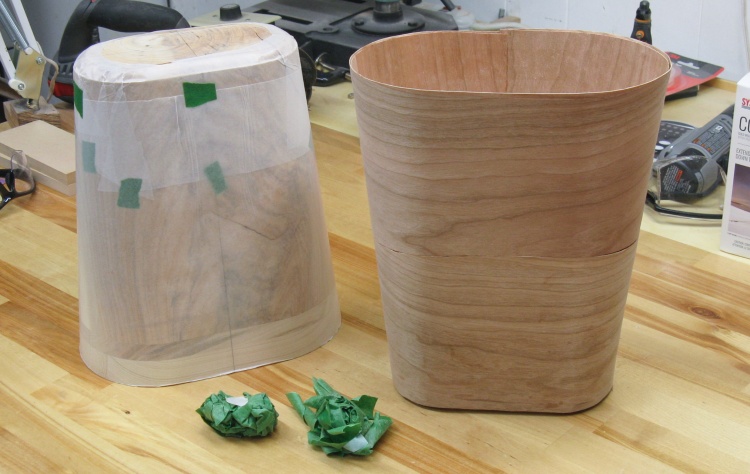
Veneer work done!
That completed the veneer laminating. I'd made the layers extra-tall so the edges ended up extending below the base and about half an inch taller than needed as well so those needed to be trimmed.
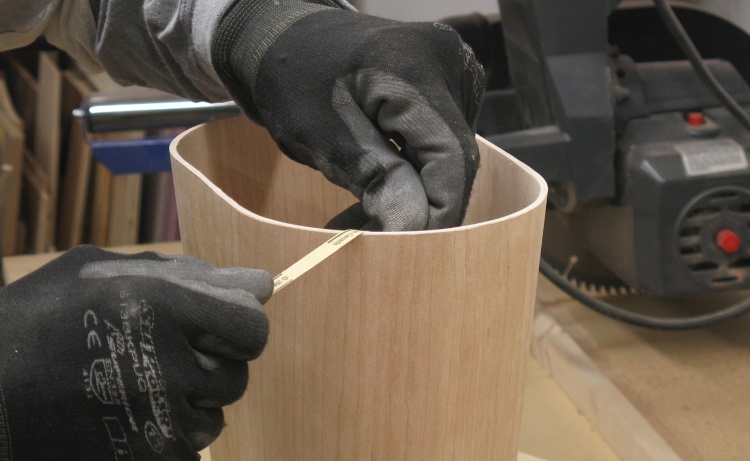
Then the obligatory hand sanding
But first there some hand sanding to do. I worked on the inside as seen here and then sanded the outside to 320 grit as well.

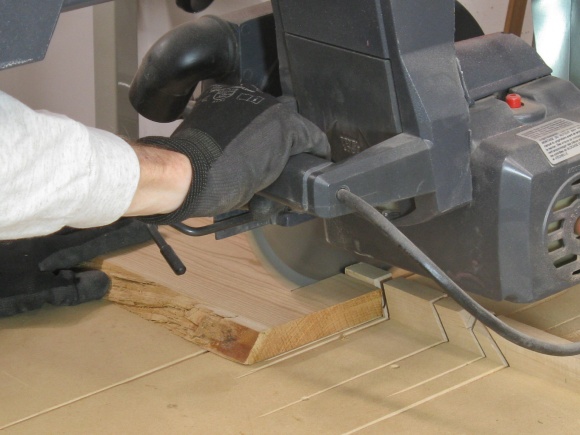
Removing the extra veneer from the bottom
The excess veneer on both the bottom and top were removed with the belt sander.
Cleaning up the top edge after belt sanding
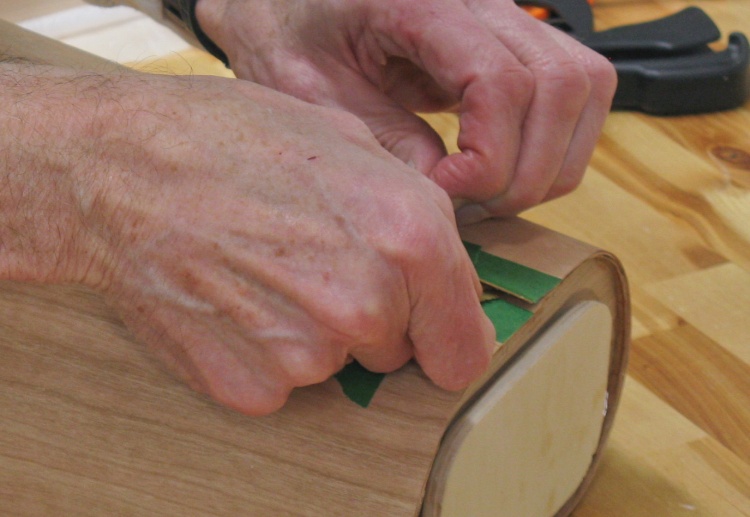
The top edge was sanded down to a marked line and then the edge was cleaned up and rounded off by hand with sandpaper strips.
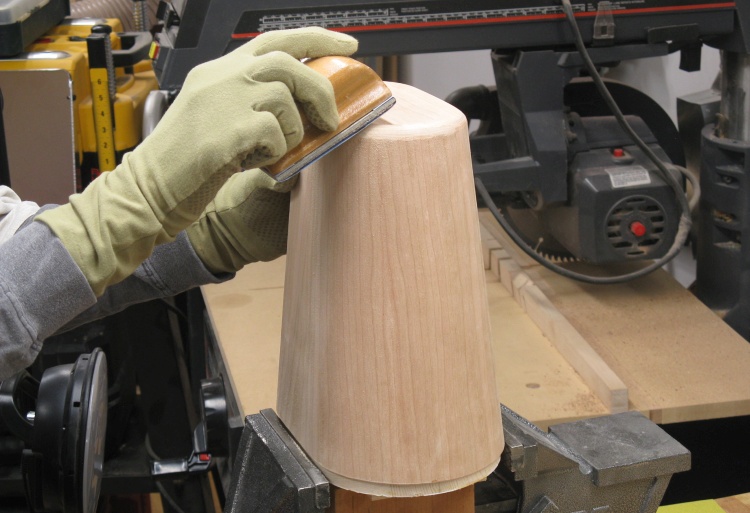
Rounding off the bottom corner
Down at the bottom, the profile of the veneer was rounded and blended with the base using a sanding block.
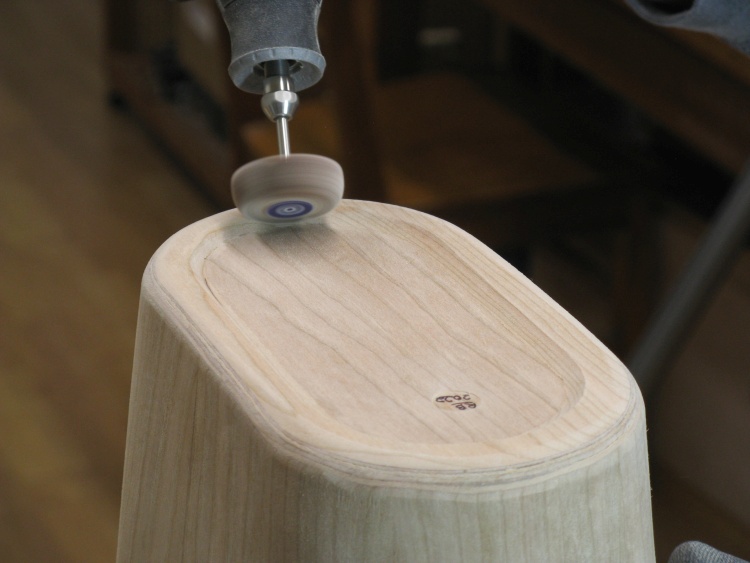
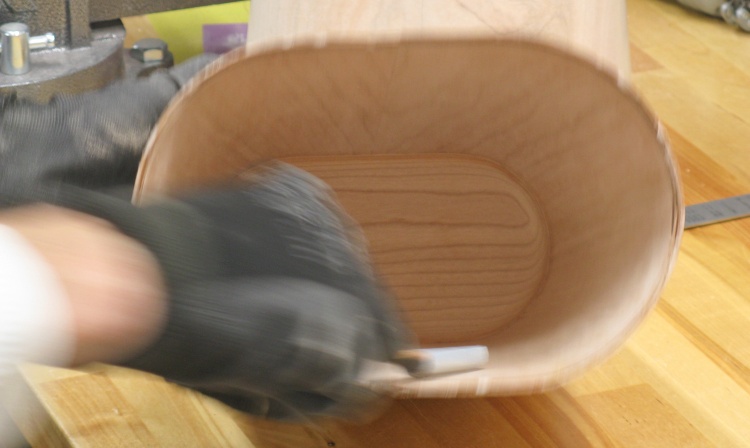
Rounding the inside of the foot
The inside of the oval foot still had a sharp inside edge from the routing many photos ago. That was rounded off with a Dremel-mounted flap wheel and smoothed with hand sanding.
The initial circle has already been added to the bottom by the time of this shot.
The initial circle has already been added to the bottom by the time of this shot.
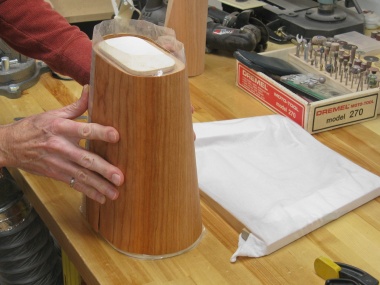
Woodworking done
That completed the woodworking.
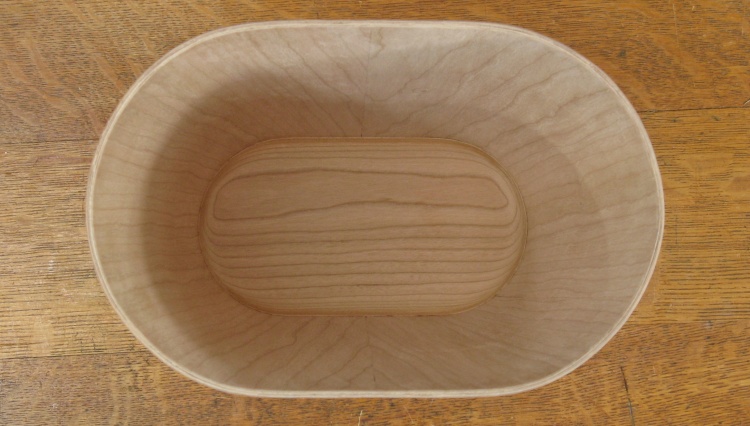
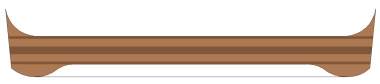
A view inside
The view inside.

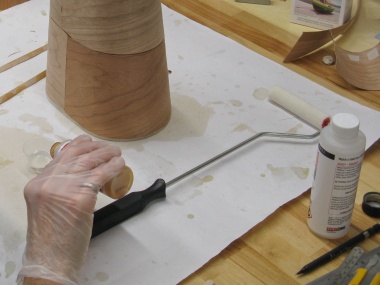
Some off-screen varnishing
Next up: finishing. In this tragically-composed shot you can't see me brushing on the first coat of varnish
The first coat of varnish
In this shot the first coat of varnish on the wastebasket is drying.
I went on to add another three coats of varnish with the usual #0000 steel wool sanding between coats.
I went on to add another three coats of varnish with the usual #0000 steel wool sanding between coats.
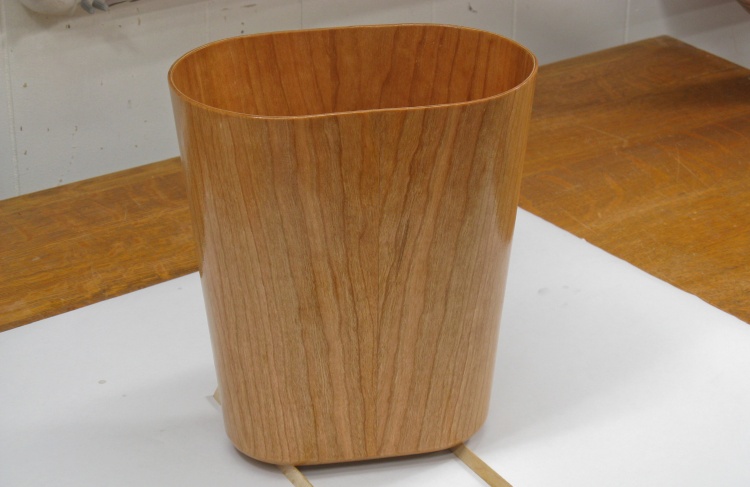
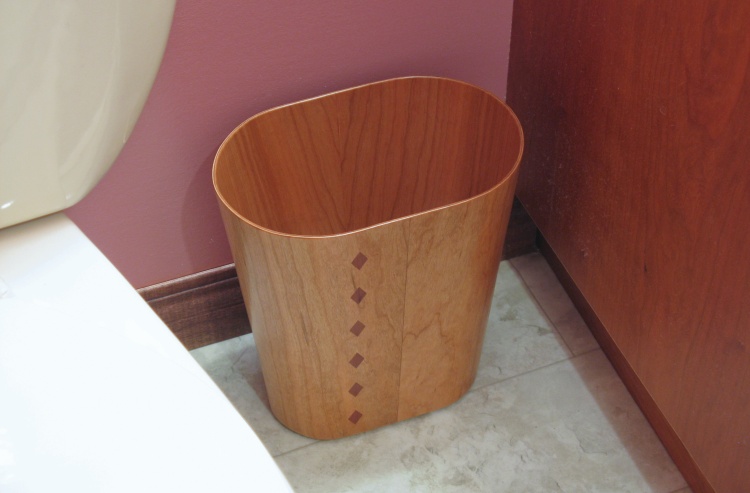
Done
Complete
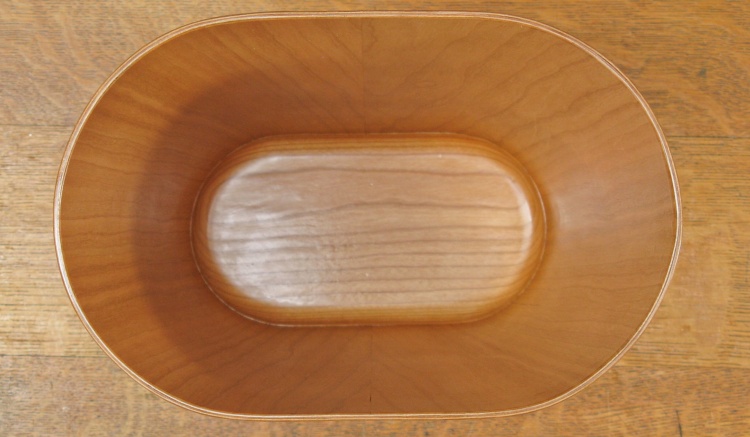
The inside again, varnished
The inside view, yet again.
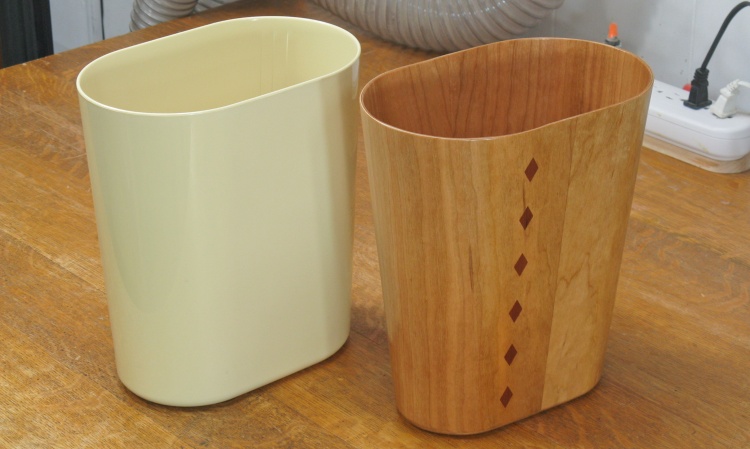
Alongside the old Rubbermaid 7612
This shows the new wastebasket alongside the one it replaces. It looks like the new one ended up with a bit more side taper than the original but we'll call that "artistic license" since it sounds better than "sloppy measurement".
On duty


